Herunterladen Inhalt Inhalt Diese Seite drucken

Telcoma T600 Gebrauchs- Und Programmierungsanweisungen

Steuerzentrale für 1-2 motoren mit 230v

Werbung

Verfügbare Sprachen
  • DE

Verfügbare Sprachen

  • DEUTSCH, seite 55
T600
mod.
CENTRALE COMANDO PER 1-2 MOTORI 230V
I
Istruzioni d'uso e di programmazione
CENTRALE DE COMMANDE POUR 1-2 MOTEURS 230V
F
Notice d'emploi et de programmation
CENTRAL DE MANDO PARA 1 O 2 MOTORES DE 230 V
E
Instrucciones de uso y programación
ELECTRONIC CONTROL UNIT FOR 1 or 2 230V-MOTORS
GB
Programming and user instructions
STEUERZENTRALE FÜR 1-2 MOTOREN MIT 230V
D
Gebrauchs- und Programmierungsanweisungen
BESTURINGSKAST VOOR 1-2 230V MOTOREN
NL
Gebruiksaanwijzing en programmeerinstructies
ZVL601
V. 02.2017

Werbung

Inhaltsverzeichnis
loading

Inhaltszusammenfassung für Telcoma T600

  • Seite 1 ZVL601 V. 02.2017 T600 mod. CENTRALE COMANDO PER 1-2 MOTORI 230V Istruzioni d’uso e di programmazione CENTRALE DE COMMANDE POUR 1-2 MOTEURS 230V Notice d'emploi et de programmation CENTRAL DE MANDO PARA 1 O 2 MOTORES DE 230 V Instrucciones de uso y programación...
  • Seite 2 Fig. A 22 21 9 10 P1 (P/P) P2 (PED) Art. XXXOC2 Spia STOP* Art. TAST 3F...
  • Seite 3 Fig. B (mm)
  • Seite 4 6 7 8 9 10 11 12 13 14 15 Ingressi comando e sicurezze F6,3A (230V) (24V) Collegamenti M2 Encoder Collegamenti M1 Uscite 230V US1* Alimentazione ac ANT. 28 29 30 31 32 33 34 35 36 37 Encoder T600 mod.
  • Seite 5 1 2 3 4 5 6 7 Collegamenti M2 (P/P) (PED) Uscite 230V US1* Alimentazione ac Collegamenti M1 E.S. ANT. 28 29 30 31 32 33 34 35 36 37 ANT. Con. 230V max.100W Con. 230V max.100W T600 mod.
  • Seite 6 8,2K 8,2K n.c. n.c. n.c. n.c. n.c. n.c. n.o. n.o. n.o. n.o. n.o. n.o. (n.a.) (n.a.) (n.a.) (n.a.) (n.a.) (n.a.) 8,2K 8,2K Fig. E Couple of photocells (VEDO 180) n.c. n.c. n.c. n.c. n.c. n.c. n.c. n.c. Fig. F...
  • Seite 7 12. connettore per ricevente OC2 28. trasformatore esterno di alimentazione 13. connettore per tastiera TAST 3F 29. scheda centrale T600 14. terminali per reset procedure in corso 30. PRG-Link (optional) 15. tasto per PROGRAMMAZIONE e STOP 31. ricevente OC2 (optional) 16.
  • Seite 8 Mors. n. Funzione / Dispositivo V/I max Note 1 (L) 230V ingresso alimentazione 230/6A Collegare alla linea 230V. 2 (N) Ingresso abilitato in chiusura. Collegare bordi sensibili 8,2K 3,15 (com) Ingresso per bordi sensibili oppure un contatto N.C. con resistenza 8,2K in serie (fig. E). 8K2/NC intervento in CHIUSURA Se non utilizzato (morsetto libero), portare in ON il dip 1...
  • Seite 9 Mors. n. Funzione / Dispositivo V/I max Note 20 (CON.) M1 è il motore che parte per primo in apertura e in 21 (CON.) ritardato in chiusura. 22 (AP) Uscita motore M1 230/4A Questa è l’anta con l’eventuale ettroserratura. Morsetti dedicati al collegamento del condensatore, 23 (CH) per la capacità...
  • Seite 10 DIP-SWITCH ESCLUSIONE SICUREZZE Utilizzare questi dip-switch (particolare 7 di fig. L) per escludere gli ingressi di sicurezza non collegati. Il dip-switch in ON (Escluso) equivale ad un ponte tra il Comune (mors. 3-15) e uno di questi 7 ingressi. Funzione OFF-ON Modo Descrizione...
  • Seite 11 Funzione Off - On Modo Descrizione J1=Ingresso OROLOGIO; chiude il cancello quando il contatto viene J1 = OROLOGIO aperto e apre quando il contatto viene chiuso. J2=ingresso per la terza fotocellula (FT3); interviene solo in apertura e J2 = FT3 fa chiudere.
  • Seite 12 PROGRAMMAZIONE TEMPI DI MANOVRA E DI PAUSA Questa programmazione rileva e memorizza tutti i tempi necessari ai motori per completare ogni singola manovra di apertura e chiusura, compreso il tempo di richiusura automatica. Durante la fase di apprendimento si azionerà più volte il pulsante P/P (part. 17 di fig.A), in alternativa si potranno usare eventuali comandi P/P (morsetto 14 di fig.
  • Seite 13 Quando l’anta con M1 ha completato la chiusura, premere P/P si arresta il motore, e parte automaticamente in apertura. Premere nuovamente P/P quando M1 raggiunge l’angolo di sfasamento desiderato, il motore si arresta per un attimo e poi riparte in apertura. Dopo questo punto è...
  • Seite 14 PROGRAMMAZIONE DI DUE ANTE BATTENTI, CON ENCODER E SENZA FINECORSA ELETTRICI In questo caso la centrale rileva in AUTOMATICO tutti i riferimenti di fine-manovra, la programmazione diventa più precisa e veloce grazie ai sensori encoder. Anche gli sfasamenti tra le due ante e il rallentamento sono inseriti in automatico, per modificarli basta dare i nuovi riferimenti durante la programmazione EVOLUTA dopo il punto 3e.
  • Seite 15 Programmazione STANDARD Dopo aver trovato la battuta di chiusura M1 riapre in automatico. Quando l’anta con M1 trova la battuta di apertura parte l’altro motore M2. Quando l’anta con M2 ha completato l’apertura (è arrivata sul fermo meccanico) parte la memorizzazione del tempo di pausa (se non viene utilizzata la richiusura automatica si può...
  • Seite 16 Premere nuovamente P/P quando M2 raggiunge l’angolo di sfasamento desiderato, il motore si arresta per un attimo e poi riparte in chiusura. Dopo questo punto possiamo inserire, manualmente con il P/P, il punto di inizio RALLENTAMENTO (DIP 9 in ON) il motore si ferma per un attimo e poi riparte.
  • Seite 17 Quando l’anta con ha completato la chiusura, premere P/P si arresta il motore, e parte automaticamente in apertura. Dopo questo punto è possibile inserire, manualmente con il P/P, il punto di inizio RALLENTAMENTO (DIP 9 in ON). Il motore si ferma per un attimo e poi riparte.
  • Seite 18: Dati Tecnici

    PRG LINK è l’innovativa interfaccia Wi-Fi che rivoluziona la programmazione, il controllo e la diagnostica delle centraline di ultima generazione Telcoma. Con PRG LINK e la sua applicazione dedicata, l’operatore può sfruttare un potente network Wi-Fi integrato che permette di operare sulla scheda senza un accesso diretto ai dip-switch.
  • Seite 19 12. connecteur pour récepteur OC2 28. transformateur d'alimentation extérieur 13. connecteur pour clavier TAST 3F 29. carte centrale T600 14. broches pour reset procédés en cours 30. PRG-Link (en option) 15. bouton de PROGRAMMATION et STOP 31. récepteur OC2 (en option) 16.
  • Seite 20 Borne. n. Fonction / Dispositif V/I max Note 1 (L) 230V Entrée alimentation 230/6A Brancher au réseau 230V. 2 (N) Entrée validée en fermeture. Brancher les barres palpeuses Entrée pour barres palpeuses 3,15 (com) sensibles 8,2K ou un contact N.F. avec résistance 8,2K en sensibles 8K2/NC série (fig.
  • Seite 21 Borne. n. Fonction / Dispositif V/I max Note 20 (CON.) M1 est le moteur monté sur le vantail qui démarre en 21 (CON.) premier en ouverture et qui se referme en retard. 22 (AP) Sortie moteur M1 230/4A C'est le vantail qui reçoit l'éventuelle serrure 23 (CH) électrique.
  • Seite 22 DIP-SWITCH POUR INVALIDATION DES SÉCURITÉS Utiliser ces dip-switch (détail 7 de la fig. L) pour invalider les entrées de sécurité déconnectées. Le dip-switch sur ON (invalidé) est comme avoir un pont entre le commun (borne 3-15) et une de ces 7 entrées. Fonction OFF-ON Mode...
  • Seite 23 Fonction Off - On Mode Description J1= entrée HORLOGE; il ferme le portail quand le contact s'ouvre et l'ouvre J1 = HORLOGE quand le contact se ferme. J2= entrée pour la troisième cellule photoélectrique (FT3); il intervient seulement en ouverture et déclenche la J2 = FT3 fermeture.
  • Seite 24 PROGRAMMATION DES TEMPS DE MANŒUVRE ET PAUSE Cette programmation relève et mémorise tous les temps nécessaires aux moteurs pour exécuter les manœuvres d'ouverture et de fermeture, y compris le temps de refermeture automatique. L'apprentissage s'effectue soit au moyen du bouton P/P (dét. 17 de la fig. A) ou, en alternative, des éventuelles commandes P/P (borne 14 de la fig.
  • Seite 25 Quand le vantail avec M1 a complété la fermeture, appuyer sur le bouton P/P, le moteur s'arrête et démarre automatiquement en ouverture. Appuyer de nouveau sur le bouton P/P quand le vantail avec M1 atteint l'angle de décalage souhaité. Le moteur s'arrête un instant et redémarre en ouverture. À...
  • Seite 26 PROGRAMMATION DE DEUX BATTANTS, AVEC ENCODEURS ET SANS FINS DE COURSE ÉLECTRIQUES Dans ce cas de figure, la centrale relève en AUTOMATIQUE toutes les valeurs de fin de manœuvre et la programmation devient ainsi plus rapide et plus précise, grâce aux capteurs encodeur. Les décalages entre les deux vantaux et le ralentissement sont entrés eux aussi automatiquement.
  • Seite 27 Programmation STANDARD Dès que le vantail trouve la butée en fermeture, M1 rouvre automatiquement. Quand le vantail avec M1 trouve la butée en ouverture, l'autre moteur, M2, démarre. Quand le vantail avec le moteur M2 a complété l'ouverture (quand il est arrivé à la butée mécanique), la mémorisation du temps de pause se déclenche (si l'on n'utilise pas la refermeture automatique, on peut passer directement au point (6a).
  • Seite 28 Dès que le temps de pause souhaité s'est écoulé, appuyer sur le bouton P/P; le vantail avec le moteur M2 démarre en fermeture. Appuyer de nouveau sur le bouton P/P quand le vantail avec le moteur M2 atteint l'angle de décalage souhaité, le moteur s'arrête un instant avant de redémarrer en fermeture.
  • Seite 29: Réglage De La Sensibilité

    Quand le vantail a complété la fermeture, appuyer sur le bouton P/P, le moteur s'arrête un instant avant de redémarrer automatiquement en ouverture. À partir de ce moment, il est possible d'entrer manuellement, au moyen du bouton P/P, le point de déclenchement du RALENTISSEMENT (DIP 9 sur ON).
  • Seite 30: Données Techniques

    PRG LINK est l'innovante interface Wi-Fi qui révolutionne la programmation, le contrôle et le diagnostic des centrales Telcoma de la dernière génération. Grâce au PRG LINK et à son application dédiée, l'opérateur peut bénéficier d'un puissant réseau Wi-Fi intégré qui permet d'intervenir sur la carte sans avoir à...
  • Seite 31 12. conector para receptor OC2 28. transformador exterior de alimentación 13. conector para teclado TAST 3F 29. tarjeta central T600 14. terminales para restablecer los procedimientos en curso 30. PRG-Link (opcional) 15. botón de PROGRAMACIÓN y STOP 31. receptor OC2 (opcional) 16.
  • Seite 32 Mors. n. Función / Dispositivo V/I max Notas 1 (L) 230V entrada alimentación 230/6A Conectar a la línea 230 V 2 (N) Entrada habilitada en cierre. Conectar los bordes sensibles 3,15 (com) Entrada para bordes sensibles 8,2 K o un contacto NC con resistencia 8,2 K en serie (Fig. E). 8K2/NC intervención en CIERRE Si no se utiliza (borne libre), poner en ON el dip-switch 1...
  • Seite 33 Mors. n. Función / Dispositivo V/I max Notas 20 (CON.) 21 (CON.) M1 es el motor que arranca primero en apertura y en 22 (AP) Salida motor M1 230/4A retardo en cierre. Esta es la puerta con la electrocerradura. 23 (CH) 24 (Com) 25 (-) Para la conexión central-motor utilizar un cable...
  • Seite 34 DIP-SWITCH DE DESACTIVACIÓN DE LAS SEGURIDADES Utilizar estos dip-switch (detalle 7 de la Fig. L) para desactivar las entradas de seguridad no conectadas. El dip-switch en ON (desactivado) equivale a un puente entre el común (borne 6) y una de estas 7 entradas. Funzione OFF-ON Modo...
  • Seite 35 Función Off - On Modo Descripción J1=Entrada RELOJ; cierra la cancela cuando el contacto se abre y abre J1 = RELOJ la cancela cuando el contacto se cierra. J2=Entrada para la tercera fotocélula (FT3); interviene solo en apertura J2 = FT3 y hace cerrar la cancela.
  • Seite 36 PROGRAMACIÓN DE LOS TIEMPOS DE MANIOBRA Y DE PAUSA Esta programación detecta y memoriza todos los tiempos que los motores necesitan para completar cada una de las maniobras de apertura y cierre, incluso el tiempo de cierre automático. Durante la fase de aprendizaje se accionará varias veces el botón P/P (detalle17 de la Fig. A), en alternativa se podrán usar los mandos P/P (borne 14 de la Fig.
  • Seite 37 Cuando la puerta con M1 ha completado el cierre, pulsar P/P, el motor se detiene e inicia automáticamente la apertura. Pulsar otra vez P/P cuando M1 alcanza el ángulo de desfase deseado, el motor se detiene durante un instante y luego vuelve a arrancar en apertura. Después de este punto es obligatorio ingresar manualmente con el P/P el punto de inicio de la RALENTIZACIÓN, si el DIP-SWITCH 9 está...
  • Seite 38 PROGRAMACIÓN DE DOS PUERTAS BATIENTES, CON CODIFICADOR Y SIN FINALES DE CARRERA ELÉCTRICOS En este caso la central detecta en AUTOMÁTICO todas las referencias de final de maniobra, la programación se hace más precisa y rápida gracias a los sensores del codificador.También los desfases entre las dos puertas y la ralentización se activan en automático.
  • Seite 39 Programación ESTÁNDAR Después de haber llegado al tope de cierre, M1 se vuelve a abrir en automático. Cuando la puerta con M1 llega al tope de apertura, el otro motor M2 arranca. Cuando la puerta con M2 ha completado la apertura (ha llegado al tope mecánico), inicia la memorización del tiempo de pausa (si no se utiliza el cierre automático se puede pasar directamente al punto (6a).
  • Seite 40 Transcurrido el tiempo de pausa deseado, pulsar el botón P/P y el motor M2 inicia el cierre. Pulsar otra vez P/P cuando M2 alcanza el ángulo de desfase deseado, el motor se detiene durante un instante y luego vuelve a arrancar en cierre. Después de este punto podemos activar el punto de inicio RALENTIZACIÓN (DIP-SWITCH 9 en ON) manualmente con el P/P.
  • Seite 41: Regulación De La Sensibilidad

    Cuando la puerta ha completado el cierre, pulsar P/P, el motor se detiene e inicia automáticamente la apertura. Después de este punto podemos activar el punto de inicio RALENTIZACIÓN (DIP-SWITCH 9 en ON) manualmente con el P/P. El motor se detiene durante un instante y luego vuelve a arrancar.
  • Seite 42: Datos Técnicos

    PRG-LINK es la innovadora interfaz Wi-Fi que revoluciona la programación, el control y el diagnóstico de las centralitas de última generación de Telcoma. Con PRG-LINK y su aplicación dedicada, el operador puede aprovechar de una potente red Wi-Fi integrada que permite trabajar en la ficha sin un acceso directo al dip-switch.
  • Seite 43 27. external transformer primary connection (230V) 11. receiver aerial input binding post OC2 28. external power supply transformer 12. receiver connector OC2 29. T600 electronic circuit 13. keypad TAST 3F connector 30. PRG-Link (optional) 14. active procedure reset terminals 31. OC2 receiver (optional) 15.
  • Seite 44 Term. n. Function / Device V/I max Notes 1 (L) 230V power supply input 230/6A Connect to the 230V power supply. 2 (N) Input for closing direction enabled. Connect 8,2K safety 3,15 (com) Safety edge input edges or an N.C. contact with 8,2K resistance in series (fig. 8K2/NC Cuts in during CLOSING E).
  • Seite 45 Term. n. Function / Device V/I max Notes 20 (CON.) Motor M1 moves first in the opening direction and is 21 (CON.) delayed during closing. 22 (AP) Output motor M1 230/4A An eventual electric lock should be fitted to this gate 23 (CH) leaf.
  • Seite 46: Dip-Switch Setting

    I GB SAFETY DEVICE EXCLUSION DIP-SWITCHES Use these dip-switches (part. 7 fig. L) to excluded inputs of unused safety devices. A dip-switch set to ON (Excluded) is the same as bridging the Common (binding post 6) and any one of these 7 inputs. Function OFF-ON Modo...
  • Seite 47 Function Off - On Mode Descrption J1=TIMER input; closes the gate when the contact is opened and J1 = TIMER opens it when the contact is closed. J2=third photocell input (FT3); intervenes only during opening and J2 = FT3 forces closing. Use N.C. contacts. J1 = FCA M1 Stops only motor M1 using electric travel limits.
  • Seite 48 I GB PROGRAMMING THE TRAVEL DISTANCE AND PAUSE TIMES Programming detects and memorises all the work times necessary for the motor to complete each individual opening and closing manoeuvre, including the automatic reclosing times. During the learning stage you'll either press the P/P several times (part. 17, fig. A) or you can use a P/P command at (binding post 14, fig.
  • Seite 49 Once M1 has reached the completely closed position, press P/P, the motor will stop and begin to open automatically. Press P/P again when M1 has reached the desired gate delay angle, the motor will stop for a second and then begin to open again. At this point you must manually insert the DECELERATION start point using P/P if DIP 9 is set to ON.
  • Seite 50 I GB PROGRAMMING TWO SWING-TO GATES, WITH ENCODER CONTROL AND WITHOUT ELECTRICAL TRAVEL LIMITS In this case the ECU will automatically detect all the travel limit information. Programming is more precise and quicker thanks to the encoder sensors. The gate delay between the two gate leaves and deceleration points and times will be inserted automatically.
  • Seite 51 STANDARD programming After having found the M1 closing travel limit it will open automatically. When the gate with M1 finds the opening travel limit, the other motor M2 will begin to move. When the gate with M2 has opened completely (reaching the mechanical stop), pause time memorisation will start (if automatic reclosing is not being used you may move directly to point (6a).
  • Seite 52 I GB Press P/P again when M2 has reached the desired gate delay angle, the motor will stop for a second and then begin to close. After this point we can manually insert the deceleration start points using P/P (DIP 9 set to ON) the motor will stop for a second then start again. Otherwise wait until the gate reaches the travel limit.
  • Seite 53: Sensitivity Adjustment

    When the gate has completely closed, press P/P, the motor will stop and begin to open automatically. At this point you may manually insert the DECELERATION start point using P/P if DIP 9 is set to ON. The motor will stop for a second and then begin to move again.
  • Seite 54: Technical Data

    MODIFYING AND CONTROLLING SETTINGS USING PRG-Link (optional) The PRG LINK system is a WI-FI interface dedicated to programming, control and diagnostics of the latest generation Telcoma ECU's. Using PRG LINK and its dedicated software application, the operator takes advantage of a powerful Wi-Fi network that allows him to intervene on the ECU without having to directly access the dip-switches.
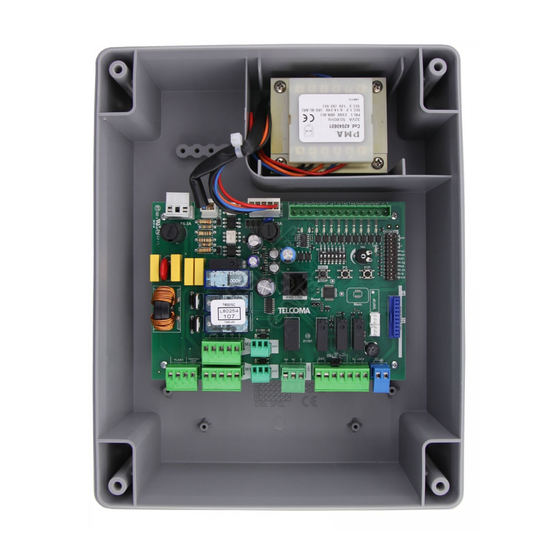
  • Seite 55: Funktionen Und Beschreibung Der Teile

    27. Stecker für Primärverbindung (230V) externer 11. Klemmleiste Eingang Empfängerantenne OC2 Transformator 12. Anschlussstecker für Empfänger OC2 28. externer Transformator Stromzufuhr 13. Tastaturanschlussstecker TAST 3F 29. Zentralplatine T600 14. Anschlussklemmen für laufende Reset-Verfahren 30. PRG-Link-(optional) 15. PROGRAMMIER- und STOPPTASTE 31. OC2-Empfänger (optional) 16. Taste P3 32.
  • Seite 56 Klemme n. Funktion / Vorrichtung V/I max Anmerkungen 1 (L) 230V Stromzufuhr Eingang 230/6A Mit der 230V Leitung verbinden. 2 (N) Eingang aktiviert beim Schließen. 8,2K-Schaltleisten oder 3,15 (com) Eingang für Schaltleisten einen NC-Kontakt mit 8,2K-Widerstand in Reihe anschließen 8K2/NC Eingreifen bei SCHLIESSEN (Abb.
  • Seite 57 Klemme n. Funktion / Vorrichtung V/I max Anmerkungen 20 (CON.) M1 ist der Motor, der bei der Öffnung als Erster und 21 (CON.) beim Schließen in Verzögerung startet. 22 (AP) Ausgang Motor M1 230/4A Dies ist der Torflügel mit dem eventuell vorhandenen 23 (CH) Elektroschloss.
  • Seite 58: Dip-Switch Für Ausschluss Von Sicherheiten

    DIP-SWITCH FÜR AUSSCHLUSS VON SICHERHEITEN Diese DIP-Schalter verwenden (Detail 7 der Abb. L), um die nicht angeschlossen Sicherheitseingänge auszuschließen. DIP-Schalter auf ON (Ausgeschlossen) entspricht einer Brücke zwischen dem Gemeinschaftseingang (Klemml. 6) und einem dieser 7 Eingänge. Funktion OFF-ON Modo Beschreibung Mit installierter Schließ-Sicherheitsleiste Schließt den Eingang der Sicherheitsleiste beim Schließen aus.
  • Seite 59 Funktion Off - On Modo Beschreibung J1 = Eingang UHR; schließ das Tort, wenn der Kontakt geöffnet wird J1 = UHR und öffnet, wenn der Kontakt geschlossen wird. J2 = Eingang für die dritte Lichtschranke (FT3); greift nur während der J2 = FT3 Öffnung ein und bewirkt Schließen.
  • Seite 60: Programmierung Der Manöverzeiten Und Der Pausen

    PROGRAMMIERUNG DER MANÖVERZEITEN UND DER PAUSEN Dieses Programm erkennt und speichert die Zeiten, in denen die Motoren jedes einzelne Manöver des Öffnens und Schließens, einschließlich des automatischen Wiederverschließens, ausführen können. Während der Einlernphase wird mehrmals die Taste P/P verwendet (Detail 17 von Abb. A) Als Alternative können eventuelle P/P- Befehle eingesetzt werden (Klemme 14 von Abb.
  • Seite 61 Nachdem der Torflügel mit M1 den Schließvorgang beendet hat, P/P drücken, der Motor stoppt und startet dann automatisch mit der Öffnungsphase. Nochmals P/P drücken, wenn M1 den gewünschten Winkel der Phasenverschiebung erreicht, stoppt der Motor für einen Moment und startet dann wieder in Öffnung.
  • Seite 62 PROGRAMMIERUNG FÜR ZWEI TORFLÜGEL, MIT ENCODER UND OHNE ELEKTRISCHE ENDSCHALTER In diesem Fall erhebt AUTOMATISCH die Steuereinheit alle Referenzdaten der Manöverbeendigung, die Programmierung wird präziser und schneller dank der Encodersensoren. Auch der Phasenversatz zwischen den beiden Torflügeln und die Verlangsamung werden automatisch eingegeben, um sie zu ändern genügt es, die neuen Referenzen während der ERWEITERTEN Programmierung nach Punkt 3e einzugeben.
  • Seite 63 STANDARD-Programmierung Nach er den Schließanschlag erreicht hat, öffnet M1 automatisch. Wenn das Tor mit M1 den Öffnungsanschlag findet, startet der andere Motor M2. Wenn der Torflügel mit M2 die Öffnung abgeschlossen hat (am mechanischen Anschlag angekommen ist), beginnt die Speicherung der Pausenzeit (wenn automatisches Wiederschließen nicht verwendet wird, kann man direkt zu Punkt (6a) übergehen.
  • Seite 64 Wenn der Torflügel mit M2 den Endanschlag findet, startet der andere Motor M1. Nach diesem Punkt kann manuell mit dem P/P der Startpunkt der VERLANGSAMUNG eingegeben werden, wenn der DIP 9 auf ON gesetzt ist. Der Motor stoppt für einen Moment und startet dann wieder. Ansonsten warten, bis der Torflügel den Endanschlag erreicht.
  • Seite 65: Änderung Der Pausenzeitspanne

    Nachdem der Torflügel den Schließvorgang beendet hat, P/P drücken, der Motor stoppt und startet dann automatisch mit der Öffnungsphase. Nach diesem Punkt kann manuell mit dem P/P der Startpunkt der VERLANGSAMUNG eingegeben werden (DIP 9 in ON). Der Motor stoppt für einen Moment und startet dann wieder.
  • Seite 66: Veränderung Und Kontrolle Der Parameter Mit Prg-Link (Optional)

    VERÄNDERUNG UND KONTROLLE DER PARAMETER MIT PRG-LINK (optional) PRG-LINK ist eine innovative WiFi-Schnittstelle, durch die Programmierung, Überwachung und Diagnostik der Steuergeräte der neuesten Generation von Telcoma revolutioniert werden. Mit PRG-LINK und seiner speziellen Applikation kann der Bediener ein leistungsfähiges WiFi-Netzwerk nutzen, durch das er direkt und ohne direkten Zugriff auf die DIP-Schalter an der Leiterplatte arbeiten kann.
  • Seite 67 12. stekkerverbinding voor ontvanger Oc2 28. externe voedingstransformator 13. stekkerverbinding voor toetsenbord TAST 3F 29. besturingskaart besturingskast T600 14. aansluitklemmen voor reset procedures bezig 30. PRG-Link (optioneel) 15. drukknop voor PROGRAMMEREN en STOP 31. ontvanger OC2 (optioneel) 16.
  • Seite 68 Klem n. Functie / Inrichting V/I max Opm. 1 (L) 230V Voedingsingang 230/6A Aansluiten op de 230V lijn 2 (N) Ingang geactiveerd voor sluiten. Contactlijsten 8,2K of N.C. 3,15 (com) Ingang voor contactlijsten contact met weerstand 8,2K seriegeschakeld aansluiten (afb. 8K2/NC Inschakeling tijdens SLUITEN E).
  • Seite 69 Klem n. Functie / Inrichting V/I max Opm. 20 (CON.) M1 is de motor die het eerste start om te openen en 21 (CON.) die later start om te sluiten. 22 (AP) Uitgang motor M1 230/4A Op deze poortvleugel moet een eventueel elektrisch 23 (CH) slot gemonteerd worden.
  • Seite 70 I NL DIP-SWITCHES VOOR UITSCHAKELING VEILIGHEIDSVOORZIENINGEN Gebruik deze dip-switches (detail 7 van afb. L) om de veiligheidsingangen die niet aangesloten zijn uit te sluiten. Wanneer de dip-switch op ON staat (uitgesloten) fungeert deze als brug tussen het gemeenschappelijke contact (klem 6) en één van deze 7 ingangen.
  • Seite 71 Functie Off - On Modus Beschrijving J1=KLOK ingang; zorgt ervoor dat de poort sluit als het contact J1 = KLOK geopend wordt en dat de poort opent als het contact gesloten wordt. J2=ingang voor de derde fotocel (FT3); schakelt alleen in tijdens het J2 = FT3 openen en zorgt ervoor dat de poort sluit.
  • Seite 72 I NL PROGRAMMERING VAN DE WERK- EN PAUZETIJDEN PROGRAMMERING VAN DE WERK- EN PAUZETIJDEN Deze programmering registreert en slaat alle tijden op die de motoren nodig hebben om elke afzonderlijke openings- en sluitbeweging te voltooien inclusief de tijd van de automatische hersluiting. Gedurende de leerfase moet u de P/P-knop (det.
  • Seite 73 Als de poortvleugel met M1 volledig gesloten is, drukt u op P/P, dan zal de motor stoppen en automatisch beginnen te openen. Druk nogmaals op P/P als M1 de gewenste vertragingshoek van de poort heeft bereikt, dan zal de motor even stoppen en daarna weer beginnen te openen. Daarna moet u met P/P het startpunt van het AFREMMEN met de hand instellen als DIP 9 op ON gezet is.
  • Seite 74 I NL PROGRAMMERING VAN TWEEVLEUGELIGE DRAAIPOORTEN, MET ENCODERBESTURING EN ZONDER ELEKTRISCHE EINDSCHAKELAARS In dit geval neemt de besturingskast AUTOMATISCH alle gegevens van het einde van de beweging waar. Het programmeren is nauwkeuriger en sneller dankzij de encodersensoren. Ook de vertraging tussen de twee poortvleugels en het afremmen wordt automatisch ingesteld.
  • Seite 75 STANDAARD programmering Nadat de sluitaanslag is bereikt zal M1 automatisch weer openen. Als de poortvleugel met M1 de openingsaanslag heeft bereikt, start de andere motor M2. Wanneer de poortvleugel met M2 volledig geopend is (de poortvleugel heeft de mechanische stop bereikt) start het opslaan van de pauzetijd in het geheugen (als de automatische hersluiting niet gebruikt wordt, kan direct overgegaan worden naar punt (6a).
  • Seite 76 I NL Druk nogmaals op P/P als M2 de gewenste vertragingshoek van de poort heeft bereikt, dan zal de motor even stoppen en daarna weer beginnen te sluiten. Daarna moet u met P/P het startpunt van het AFREMMEN met de hand instellen als DIP 9 op ON gezet is.
  • Seite 77 Als de poortvleugel volledig gesloten is, drukt u op P/P, dan zal de motor stoppen en automatisch beginnen te openen. Daarna moet u met P/P het startpunt van het AFREMMEN met de hand instellen als DIP 9 op ON gezet is. De motor stopt even en zal daarna weer beginnen te bewegen.
  • Seite 78: Technische Gegevens

    I NL WIJZIGING EN CONTROLE VAN DE PARAMETERS MET PRG-Link (optioneel) PRG LINK is de innovatieve Wi-Fi interface die de programmering, de controle en de diagnose van de Telcoma besturingen van de laatste generatie radicaal verandert. Met PRG LINK en de bijbehorende applicatie kan de gebruiker gebruik maken van een krachtig geïntegreerd draadloos netwerk waarmee er aan de kaart gewerkt kan worden ook zonder directe toegang tot de dip-switches.
  • Seite 79 MACCHINE E NON FUNZIONANTE IN MODO INDIPENDENTE: Nome dell'apparato Centralina elettronica per 1 o 2 motori 230 Vac Tipo di apparato Centralina elettronica Modello PRG230M2 - T600 Marchio Cardin Elettronica Anno di prima fabbricazione 2016 è conforme alle disposizioni delle seguenti direttive comunitarie: - Direttiva 2014/30/EU (Compatibilità...
  • Seite 80 Telcoma Via del Lavoro, 73 z.i. Cimavilla Riello Elettronica Group 31013 Codognè - (TV) Italy - Tel. ++39 0438-451099...

Inhaltsverzeichnis