ASROCK Z77 Extreme6/TB4 Handbuch
Inhaltsverzeichnis
Copyright Notice:
No part of this installation guide may be reproduced, transcribed, transmitted, or trans-
lated in any language, in any form or by any means, except duplication of documentation
by the purchaser for backup purpose, without written consent of ASRock Inc.
Products and corporate names appearing in this guide may or may not be registered
trademarks or copyrights of their respective companies, and are used only for identifica-
tion or explanation and to the owners' benefit, without intent to infringe.
Disclaimer:
Specifications and information contained in this guide are furnished for informational use
only and subject to change without notice, and should not be constructed as a commit-
ment by ASRock. ASRock assumes no responsibility for any errors or omissions that may
appear in this guide.
With respect to the contents of this guide, ASRock does not provide warranty of any kind,
either expressed or implied, including but not limited to the implied warranties or condi-
tions of merchantability or fitness for a particular purpose. In no event shall ASRock, its
directors, officers, employees, or agents be liable for any indirect, special, incidental, or
consequential damages (including damages for loss of profits, loss of business, loss of
data, interruption of business and the like), even if ASRock has been advised of the pos-
sibility of such damages arising from any defect or error in the guide or product.
This device complies with Part 15 of the FCC Rules. Operation is subject to the following
two conditions:
(1) this device may not cause harmful interference, and
(2) this device must accept any interference received, including interference that
may cause undesired operation.
CALIFORNIA, USA ONLY
The Lithium battery adopted on this motherboard contains Perchlorate, a toxic substance
controlled in Perchlorate Best Management Practices (BMP) regulations passed by the
California Legislature. When you discard the Lithium battery in California, USA, please
follow the related regulations in advance.
"Perchlorate Material-special handling may apply, see
www.dtsc.ca.gov/hazardouswaste/perchlorate"
The terms HDMI™ and HDMI High-Definition Multimedia Interface, and the HDMI logo
are trademarks or registered trademarks of HDMI Licensing LLC in the United States and
other countries.
1
Inhaltsverzeichnis

Verwandte Anleitungen für ASROCK Z77 Extreme6/TB4


Inhaltszusammenfassung für ASROCK Z77 Extreme6/TB4
- Seite 1 ASRock. ASRock assumes no responsibility for any errors or omissions that may appear in this guide. With respect to the contents of this guide, ASRock does not provide warranty of any kind, either expressed or implied, including but not limited to the implied warranties or condi- tions of merchantability or fitness for a particular purpose.
-
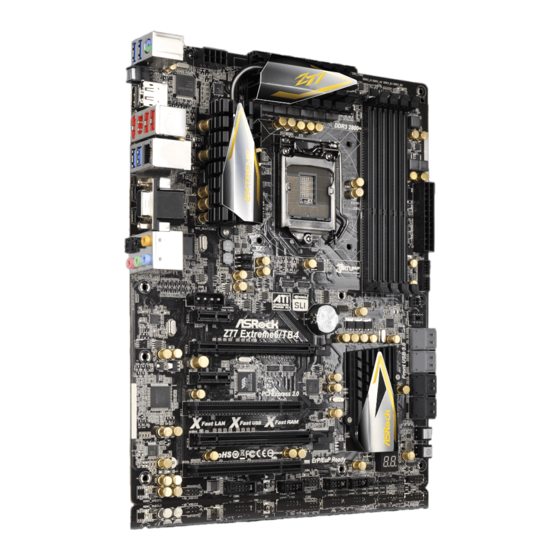
Seite 2: Motherboard-Layout
PCI Express 3.0 x16 Slot (PCIE2, Black) Dr. Debug PCI Express 2.0 x1 Slot (PCIE1, Black) System Panel Header (PANEL1, Black) SLI / XFIRE Power Connector Clear CMOS Jumper (CLRCMOS1) Chassis Fan Connector (CHA_FAN2) Chassis Speaker Header (SPEAKER1, Black) ASRock Z77 Extreme6/TB4 Motherboard... - Seite 3 ** There are two LED next to the LAN port. Please refer to the table below for the LAN port LED indications. LAN Port LED Indications ACT/LINK SPEED Activity/Link LED SPEED LED Status Description Status Description No Link 10Mbps connection Blinking Data Activity Orange 100Mbps connection Link Green 1Gbps connection LAN Port ASRock Z77 Extreme6/TB4 Motherboard...
- Seite 4 “ok”. Choose “2CH”, “4CH”, “6CH”, or “8CH” and then you are allowed to select “Realtek HDA Primary output” to use Rear Speaker, Central/Bass, and Front Speaker, or select “Realtek HDA Audio 2nd output” to use front panel audio. **** eSATA3 connector supports SATA Gen3 in cable 1M. ASRock Z77 Extreme6/TB4 Motherboard...
-
Seite 5: Package Contents
In case any modifications of this manual occur, the updated version will be available on ASRock website without further notice. You may find the latest VGA cards and CPU support lists on ASRock website as well. ASRock website http://www.asrock.com If you require technical support related to this motherboard, please visit our website for specific information about the model you are using. -
Seite 6: Specifications
- Pixel Shader 5.0, DirectX 11 with Intel Ivy Bridge CPU. ® Pixel Shader 4.1, DirectX 10.1 with Intel Sandy Bridge CPU - Max. shared memory 1760MB (see CAUTION 5) - Three VGA Output options: D-Sub, HDMI and Thunderbolt ASRock Z77 Extreme6/TB4 Motherboard... - Seite 7 - 1 x RJ-45 LAN Port with LED (ACT/LINK LED and SPEED LED) - 1 x IEEE 1394 Port - 1 x Clear CMOS Switch with LED - HD Audio Jack: Rear Speaker/Central/Bass/Line in/Front Speaker/Microphone (see CAUTION 8) ASRock Z77 Extreme6/TB4 Motherboard...
- Seite 8 - 1 x Reset Switch with LED BIOS Features - 64Mb AMI UEFI Legal BIOS with GUI support - Supports “Plug and Play” - ACPI 1.1 Compliance Wake Up Events - Supports jumperfree - SMBIOS 2.3.1 Support ASRock Z77 Extreme6/TB4 Motherboard...
- Seite 9 64-bit / XP / XP 64-bit compliant (see CAUTION 23) Certifications - FCC, CE, WHQL - ErP/EuP Ready (ErP/EuP ready power supply is required) (see CAUTION 24) * For detailed product information, please visit our website: http://www.asrock.com ASRock Z77 Extreme6/TB4 Motherboard...
- Seite 10 6-channel, and 8-channel modes. Please check the table on page 3 for proper connection. ASRock Extreme Tuning Utility (AXTU) is an all-in-one tool to ne-tune dif- ferent system functions in a user-friendly interface, which includes Hard- ware Monitor, Fan Control, Overclocking, OC DNA and IES. In Hardware Monitor, it shows the major readings of your system.
- Seite 11 Please visit our website for the operation procedures of ASRock Extreme Tuning Utility (AXTU). ASRock website: http://www.asrock.com 10. ASRock Instant Flash is a BIOS flash utility embedded in Flash ROM. This convenient BIOS update tool allows you to update system BIOS ®...
- Seite 12 15. ASRock XFast RAM is a new function that is included into ASRock Ex- treme Tuning Utility (AXTU). It fully utilizes the memory space that cannot ®...
- Seite 13 5v, and the standby power efficiency should be higher than 50% under 100 mA current consumption. For EuP ready power sup- ply selection, we recommend you to check with the power supply manu- facturer for more details. ASRock Z77 Extreme6/TB4 Motherboard...
-
Seite 14: Installation
When placing screws to secure the motherboard to the chassis, please do not over-tighten the screws! Doing so may damage the motherboard. 2.2 Screw Holes Place screws into the holes indicated by circles to secure the motherboard to the chassis. ASRock Z77 Extreme6/TB4 Motherboard... -
Seite 15: Cpu Installation
2.3 CPU Installation In order to provide the LGA 1155 CPU sock- ets more protection and make the instal- lation process easier, ASRock has added a new protection cover on top of the load plate to replace the former PnP caps that were under the load plate. - Seite 16 The protection cover will automatically come off by itself. Please save and replace the cover if the processor is removed. The cover must be placed if you wish to return the motherboard for after service. ASRock Z77 Extreme6/TB4 Motherboard...
- Seite 17 Step 5. Connect CPU fan connector with the fan header on the motherboard. Step 6. Secure redundant cable with tie-wrap to ensure that the cable does not interfere with the fan’s operation or contact other components. ASRock Z77 Extreme6/TB4 Motherboard...
- Seite 18 It is not recommended to install them on this motherboard. For optimal compatibility and stability while overclocking memory frequency, it is recommended to install one memory module in DDR3_B2 slot or two memory modules in DDR3_A2 and DDR3_B2 slots. ASRock Z77 Extreme6/TB4 Motherboard...
-
Seite 19: Installing A Dimm
DIMM if you force the DIMM into the slot in incorrect orientation. Step 3. Firmly insert the DIMM into the slot until the retaining clips at both ends fully snap back in place and the DIMM is properly seated. ASRock Z77 Extreme6/TB4 Motherboard... -
Seite 20: Installing An Expansion Card
Step 4. Align the card connector with the slot and press firmly until the card is completely seated on the slot. Step 5. Fasten the card to the chassis with screws. Step 6. Replace the system cover ASRock Z77 Extreme6/TB4 Motherboard... - Seite 21 PCIE2 slot and the other graphics card to PCIE4 slot. Make sure that the cards are properly seated on the slots. Step2. If required, connect the auxiliary power source to the PCI Express graphics cards. ASRock Z77 Extreme6/TB4 Motherboard...
- Seite 22 Step3. Align and insert the ASRock SLI_Bridge_2S Card to the goldfingers on each graphics card. Make sure the ASRock SLI_Bridge_2S Card is firmly in place. ASRock SLI_Bridge_2S Card Step4. Connect a VGA cable or a DVI cable to the monitor connector or the DVI connector of the graphics card that is inserted into PCIE2 slot.
- Seite 23 B. From the pop-up menu, select Set SLI and PhysX configuration. In Set PhysX GPU acceleration item, please select Enabled. In Select an SLI configuration item, please select Enable SLI. And click Apply. C. Reboot your system. D. You can freely enjoy the benefits of SLI ASRock Z77 Extreme6/TB4 Motherboard...
- Seite 24 G. You can freely enjoy the benefits of SLI or Quad SLI ® * SLI appearing here is a registered trademark of NVIDIA Technologies Inc., and is used only for identification or explanation and to the owners’ benefit, without intent to infringe. ASRock Z77 Extreme6/TB4 Motherboard...
- Seite 25 AMD graphics card manuals for detailed installation guide. Step 1. Insert one Radeon graphics card into PCIE2 slot and the other Radeon graphics card to PCIE4 slot. Make sure that the cards are properly seated on the slots. ASRock Z77 Extreme6/TB4 Motherboard...
- Seite 26 Connect the DVI monitor cable to the DVI connector on the Radeon graph- ics card on PCIE2 slot. (You may use the DVI to D-Sub adapter to convert the DVI connector to D-Sub interface, and then connect the D-Sub monitor cable to the DVI to D-Sub adapter.) ASRock Z77 Extreme6/TB4 Motherboard...
- Seite 27 AMD Catalyst Control Center Step 6. Double-click “AMD Catalyst Control Center”. Click “View”, select “CrossFi- ”, and then check the item “Enable CrossFireX ”. Select “2 GPUs” and click “Apply” (if you install two Radeon graphics cards). ASRock Z77 Extreme6/TB4 Motherboard...
- Seite 28 AMD Technologies Inc., and is used only for identification or explanation and to the owners’ benefit, without intent to infringe. * For further information of AMD CrossFireX technology, please check AMD’s website for updates and details. ASRock Z77 Extreme6/TB4 Motherboard...
- Seite 29 Thunderbolt cables are provided by your monitor supplier. Internal VGA If you want to use the internal VGA with the Thunderbolt ports, simply connect your monitor to either Thunderbolt port (see p.3, No. 12,13) on the motherboard using a Thunderbolt cable. ASRock Z77 Extreme6/TB4 Motherboard...
- Seite 30 If you haven’t installed the onboard VGA driver yet, please install the onboard VGA driver from our support CD to your system and restart your computer. D-Sub, HDMI and Thunderbolt monitors cannot be enabled at the same time. You can only choose two of them. ASRock Z77 Extreme6/TB4 Motherboard...
- Seite 31 F. Set the appropriate “Screen Resolution” and “Color Quality” for the second monitor. Click “Apply” or “OK” to apply these new values. G. Repeat steps C through F for the display icons identified by the numbers. ASRock Z77 Extreme6/TB4 Motherboard...
- Seite 32 HDTV set-top-boxes, as well as few entertainment PCs requires a secure connection to a compliant display. Due to the increase in manufacturers employing HDCP in their equipment, it is highly recommended that the HDTV or LCD monitor you purchase is compatible. ASRock Z77 Extreme6/TB4 Motherboard...
- Seite 33 2.11 ASRock Smart Remote Installation Guide ASRock Smart Remote is only used for ASRock motherboards with a CIR header. Please refer to the procedures below for the quick installation and usage of ASRock Smart Remote. Step1. Find the CIR header located next to the USB 2.0 header on your...
- Seite 34 The Multi-Angle CIR Receiver does not support Hot-Plug. Please install it before you boot the system. * ASRock Smart Remote is only supported by some ASRock motherboards. Please refer to ASRock's website for the motherboard support list: http://www.asrock.com ASRock Z77 Extreme6/TB4 Motherboard...
- Seite 35 Please be noted that the password, date, time, user default profile, 1394 GUID and MAC address will be cleared only if the CMOS battery is removed. The Clear CMOS Switch has the same function as the Clear CMOS jumper. ASRock Z77 Extreme6/TB4 Motherboard...
- Seite 36 USB 2.0 Headers Besides two default USB 2.0 ports on the I/O panel, there are (9-pin USB2_3) three USB 2.0 headers on this (see p.2, No. 25) motherboard. Each USB 2.0 header can support two USB 2.0 ports. ASRock Z77 Extreme6/TB4 Motherboard...
- Seite 37 (4-pin CIR1) receiver. (see p.2, No. 28) Front Panel Audio Header This is an interface for front panel audio cable that allows (9-pin HD_AUDIO1) convenient connection and (see p.2, No. 32) control of audio devices. ASRock Z77 Extreme6/TB4 Motherboard...
- Seite 38 S1/S3 sleep state. The LED is off when the system is in S4 sleep state or powered off (S5). HDLED (Hard Drive Activity LED): Connect to the hard drive activity LED on the chassis front panel. The LED is on when the hard drive is reading or writing data. ASRock Z77 Extreme6/TB4 Motherboard...
- Seite 39 (3-pin PWR_FAN1) +12V (see p.2, No. 9) CPU Fan Connectors Please connect the CPU fan cable to the connector and FAN_SPEED_CONTROL (4-pin CPU_FAN1) FAN_SPEED match the black wire to the (see p.2, No. 3) +12V ground pin. ASRock Z77 Extreme6/TB4 Motherboard...
- Seite 40 Though this motherboard provides 8-pin ATX 12V power connector, it can still work if you adopt a traditional 4-pin ATX 12V power supply. To use the 4-pin ATX power supply, please plug your power supply along with Pin 1 and Pin 5. 4-Pin ATX 12V Power Supply Installation ASRock Z77 Extreme6/TB4 Motherboard...
- Seite 41 HDMI_SPDIF header, providing SPDIF audio output to HDMI (2-pin HDMI_SPDIF1) VGA card, allows the system to (see p.2, No. 33) connect HDMI Digital TV/ projector/LCD devices. Please connect the HDMI_SPDIF connector of HDMI VGA card to this header. ASRock Z77 Extreme6/TB4 Motherboard...
-
Seite 42: Smart Switches
Reset Switch is a smart switch, allowing users to quickly reset (RSTBTN) the system. (see p.2 No. 16) Clear CMOS Switch Clear CMOS Switch is a smart switch, allowing users to quickly (CLRCBTN) clear the CMOS values. (see p.3 No. 18) ASRock Z77 Extreme6/TB4 Motherboard... - Seite 43 CPU post-memory initialization is started 0x33 CPU post-memory initialization. Cache initialization 0x34 CPU post-memory initialization. Application Processor(s) (AP) initialization 0x35 CPU post-memory initialization. Boot Strap Processor (BSP) selection 0x36 CPU post-memory initialization. System Management Mode (SMM) initialization ASRock Z77 Extreme6/TB4 Motherboard...
- Seite 44 Reserved for future AMI progress codes 0xF8 Recovery PPI is not available 0xF9 Recovery capsule is not found 0xFA Invalid recovery capsule 0xFB – 0xFF Reserved for future AMI error codes 0x60 DXE Core is started 0x61 NVRAM initialization ASRock Z77 Extreme6/TB4 Motherboard...
- Seite 45 0x9C USB Detect 0x9D USB Enable 0x9E – 0x9F Reserved for future AMI codes 0xA0 IDE initialization is started 0xA1 IDE Reset 0xA2 IDE Detect 0xA3 IDE Enable 0xA4 SCSI initialization is started 0xA5 SCSI Reset ASRock Z77 Extreme6/TB4 Motherboard...
- Seite 46 No Console Input Devices are found 0xD8 Invalid password 0xD9 Error loading Boot Option (LoadImage returned error) 0xDA Boot Option is failed (StartImage returned error) 0xDB Flash update is failed 0xDC Reset protocol is not available ASRock Z77 Extreme6/TB4 Motherboard...
-
Seite 47: Installing Windows
B. Set the option “SATA Mode Selection” to [IDE]. (For SATA2_2 to SATA2_5, SATA3_0 and SATA3_1 ports.) Set the option “ASMedia SATA3 Mode” to [IDE]. (For SATA3_A1 and SATA3_A2 ports.) ® STEP 2: Install Windows XP / XP 64-bit OS on your system. ASRock Z77 Extreme6/TB4 Motherboard... - Seite 48 Set the option “ASMedia SATA3 Mode” to [IDE]. (For SATA3_A1 and SATA3_A2 ports.) ® STEP 2: Install Windows 8 / 8 64-bit / 7 / 7 64-bit / Vista / Vista 64-bit OS on your system. ASRock Z77 Extreme6/TB4 Motherboard...
- Seite 49 It will display the Main Menu automatically if “AUTORUN” is enabled in your computer. If the Main Menu does not appear automatically, locate and double-click on the file “ASRSETUP.EXE” in the Support CD to display the menu. ASRock Z77 Extreme6/TB4 Motherboard...
- Seite 50 1. Einführung Wir danken Ihnen für den Kauf des ASRock Z77 Extreme6/TB4 Motherboard, ein zuverlässiges Produkt, welches unter den ständigen, strengen Qualitätskontrol- len von ASRock gefertigt wurde. Es bietet Ihnen exzellente Leistung und robustes Design, gemäß der Verpflichtung von ASRock zu Qualität und Halbarkeit. Diese Schnellinstallationsanleitung führt in das Motherboard und die schrittweise Instal-...
-
Seite 51: Spezifikationen
Video-Technik (HD), Intel Insider und Intel HD Graphics 2500/4000 ® - Pixel Shader 5.0, DirectX 11 mit Intel Ivy Bridge-Prozessor, ® Pixel Shader 4.1, DirectX 10.1 mit Intel Sandy Bridge- Prozessor - Maximal gemeinsam genutzter Speicher 1760MB ASRock Z77 Extreme6/TB4 Motherboard... - Seite 52 - 4 x Standard-USB 3.0-Anschlüsse - 1 x RJ-45 LAN Port mit LED (ACT/LINK LED und SPEED LED) - 1 x IEEE 1394 Port - 1 x CMOS löschen-Schalter - HD Audiobuchse: Lautsprecher hinten / Mitte / Bass / ASRock Z77 Extreme6/TB4 Motherboard...
- Seite 53 - 1 x Dr. Debug (Debug-LED mit 7 Segmenten) - 1 x CMOS löschen-Schalter mit LED - 1 x Netzschalter mit LED - 1 x Rücksetzschalter (Reset) mit LED BIOS - 64Mb AMIs Legal BIOS UEFI mit GUI-Unterstützung ASRock Z77 Extreme6/TB4 Motherboard...
- Seite 54 - SMBIOS 2.3.1 - CPU Core, IGPU, DRAM, 1.8V PLL, VTT, VCCSA Stromspannung Multianpassung CD d’assistance - Treiber, Dienstprogramme, Antivirussoftware (Probeversion), CyberLink MediaEspresso 6.5-Testversion, ASRock MAGIX- Multimedia-Suite - OEM, Google Chrome-Browser und Toolbar - Überwachung der CPU/Gehäuse Temperatur Hardware Monitor - Drehzahlmessung für CPU/Gehäuse/Strom lüfter...
-
Seite 55: Einstellung Der Jumper
Sie zuerst das System hoch. Fahren Sie es dann vor der CMOS-Löschung herunter. Bitte beachten Sie, dass Kennwort, Datum, Uhrzeit, benutzerdefiniertes Profil, 1394 GUID und MAC-Adresse nur gelöscht werden, wenn die CMOS-Batterie entfernt wird. Der CMOS löschen-Schalter hat dieselbe Funktion wie der CMOS löschen-Jumper. ASRock Z77 Extreme6/TB4 Motherboard... -
Seite 56: Integrierte Header Und Anschlüsse
SATA3_A2-Anschluss nicht. Serial ATA- (SATA-) SJedes Ende des SATA Datenkabel Datenkabels kann an die SATA / SATA2 / SATA3 Festplatte (Option) oder das SATA2 / SATA3 Verbindungsstück auf dieser Hauptplatine angeschlossen werden. ASRock Z77 Extreme6/TB4 Motherboard... - Seite 57 Header kann zwei USB 3.0- Ports unterstützen. Infrarot-Modul-Header Dieser Header unterstützt ein optionales, drahtloses Sende- (5-pin IR1) und Empfangs-Infrarotmodul. (siehe S.2 - No. 30) Consumer Infrared-Modul-Header Dieser Header kann zum Anschließen Remote- (4-pin CIR1) Empfänger. (siehe S.2 - No. 28) ASRock Z77 Extreme6/TB4 Motherboard...
- Seite 58 Hinweise zur Pinbelegung. Beachten Sie die positiven und negativen Pins, bevor Sie die Kabel anschließen. PWRBTN (Ein-/Ausschalter): Zum Anschließen des Ein-/Ausschalters an der Frontblende des Gehäu ses. Sie können konfigurieren, wie das System mit Hilfe des Ein-/Ausschalters ausgeschaltet werden können soll. ASRock Z77 Extreme6/TB4 Motherboard...
- Seite 59 Anzeige des (siehe S.2 - No. 18) Systembetriebsstatus an diesem Header an. Die LED leuchtet, wenn das System in Betrieb ist. Die LED blinkt im S1/S3-Zustand. Im S4- oder S5-Zustand (ausgeschaltet) leuchtet die LED nicht. ASRock Z77 Extreme6/TB4 Motherboard...
- Seite 60 Pins 1 – 3. Pins 1–3 anschließen Lüfter mit dreipoligem Anschluss installieren (3-pin CPU_FAN2) FAN_SPEED +12V (sieche S.2 - No. 4) ATX-Netz-Header Verbinden Sie die ATX Stromversorgung mit diesem (24-pin ATXPWR1) Header. (siehe S.2 - No. 7) ASRock Z77 Extreme6/TB4 Motherboard...
- Seite 61 Installation der 4-Pin ATX 12V Energieversorgung SLI/XFIRE-Stromanschluss Sie müssen diesen Anschluss nicht zwingend verwenden. (4-pin SLI/XFIRE_PWR1) Wenn allerdings zwei (siehe S.2 - No. 40) Grafikkarten gleichzeitig am SLI/XFIRE_POWER1 Motherboard angeschlossen sind, verbinden Sie diesen Anschluss bitte mit einem Festplatten-Stromversorgungs- stecker. ASRock Z77 Extreme6/TB4 Motherboard...
- Seite 62 (2-pin HDMI_SPDIF1) Audioausgang für eine HDMI- (siehe S.2 - No. 33) VGA-Karte zur Verfügung und ermöglicht den Anschluss von HDMI-Digitalgeräten wie Fernsehgeräten, Projektoren, LCD-Geräten an das System. Bitte verbinden Sie den HDMI_SPDIF-Anschluss der HDMI-VGA-Karte mit diesem Anschluss. ASRock Z77 Extreme6/TB4 Motherboard...
- Seite 63 Schnellschalter, mit dem (RSTBTN) Benutzer das System schnell (siehe S.2 - No. 16) zurücksetzen können. CMOS löschen-Schalter Der CMOS löschen-Schalter ist ein Schnellschalter, mit dem (CLRCBTN) Benutzer die CMOS-Werte (siehe S.3 - No. 18) schnell löschen können. ASRock Z77 Extreme6/TB4 Motherboard...
- Seite 64 ASRSETUP.EXE im der Support-CD, um die Menüs aufzurufen. Das Setup-Programm soll es Ihnen so leicht wie möglich machen. Es ist menüges- teuert, d.h. Sie können in den verschiedenen Untermenüs Ihre Auswahl treffen und die Programme werden dann automatisch installiert. ASRock Z77 Extreme6/TB4 Motherboard...
-
Seite 65: Contenu Du Paquet
1. Introduction Merci pour votre achat d’une carte mère ASRock Z77 Extreme6/TB4, une carte mère très fiable produite selon les critères de qualité rigoureux de ASRock. Elle offre des performances excellentes et une conception robuste conformément à l’engagement d’ASRock sur la qualité et la fiabilité au long terme. -
Seite 66: Spécifications
à GPU intégré. ® ® - Supporte Intel HD Graphics Built-in Visuals: Intel Quick ® ® Sync Video 2.0, Intel InTru 3D, Intel Clear Video HD ® ® Technology, Intel Insider et Intel HD Graphics 2500/4000 ASRock Z77 Extreme6/TB4 Motherboard... - Seite 67 - 1 x Port de sortie optique SPDIF - 2 x ports USB 2.0 par défaut - 1 x Connecteur eSATA3 - 4 x ports USB 3.0 par défaut - 1 x port LAN RJ-45 avec LED (ACT/LED CLIGNOTANTE et ASRock Z77 Extreme6/TB4 Motherboard...
- Seite 68 - 3 x En-tête USB 2.0 (prendre en charge 6 ports USB 2.0 supplémentaires) - 1 x En-tête USB 3.0 (prendre en charge 2 ports USB 3.0 supplémentaires) - 1 x Dr. Debug (LED de débogage à 7 segments) ASRock Z77 Extreme6/TB4 Motherboard...
- Seite 69 - CPU Core, IGPU, DRAM, 1.8V PLL, VTT, VCCSA Tension Multi-ajustement CD d’assistance - Pilotes, utilitaires, logiciel anti-virus (version d’évaluation), CyberLink MediaEspresso 6.5 Trial, Suite multimédia ASRock MAGIX - OEM, Navigateur et barre d’outils Google Chrome Surveillance - Détection de la température de l’UC/châssis système - Tachéomètre ventilateur processeur/châssis/pouvoir...
- Seite 70 CMOS. Veuillez noter que le mot de passe, la date, l’heure, le profil par défaut de l’utilisateur, 1394 GUID et l’adresse MAC seront effacés seulement si la batterie du CMOS est enlevée. Le commutateur Effacer CMOS présente la même fonction que le cavalier Effacer CMOS. ASRock Z77 Extreme6/TB4 Motherboard...
- Seite 71 Câble de données Toute cote du cable de data Série ATA (SATA) SATA peut etre connecte au disque dur SATA / SATA2 / (en option) SATA3 ou au connecteur SATA2 / SATA3 sur la carte mere. ASRock Z77 Extreme6/TB4 Motherboard...
- Seite 72 (IR1 br. 5) et de réception sans fil. (voir p.2 No. 30) Barrette pour module à infrarouges grand public Cette barrette peut être utilisée pour connecter des récepteur. (CIR1 br.4) (voir p.2 No. 28) ASRock Z77 Extreme6/TB4 Motherboard...
- Seite 73 (voir p.2 No. 20) Connectez l’interrupteur d’alimentation, l’interrupteur de réinitialisation et l’indicateur d’état du système du châssis sur cette barrette en respectant l’affectation des broches décrite ci-dessous. Faites attention aux broches positives et négatives avant de connecter les câbles. ASRock Z77 Extreme6/TB4 Motherboard...
- Seite 74 (PLED1 br. 3) alimentazione del sistema. Il (voir p.2 Nr. 18) LED è acceso quando il sistema è in funzione. Il LED continua a lampeggiare in stato S1/S3. Il LED è spento in stato S4 o S5 (spegnimento). ASRock Z77 Extreme6/TB4 Motherboard...
- Seite 75 Installation de ventilateur à 3 broches Broches 1-3 connectées (CPU_FAN2 br. 3) FAN_SPEED (voir p.2 No. 4) +12V En-tête d’alimentation ATX Veuillez connecter l’unité d’alimentation ATX sur cet en- (ATXPWR1 br. 24) tête. (voir p.2 No. 7) ASRock Z77 Extreme6/TB4 Motherboard...
- Seite 76 1394 sur le panel I/O, il y a un (FRONT_1394 br. 9) header de IEEE1394 (voir p.2 No. 19) (FRONT_1394) sur cette carte mere. Le header de IEEE 1394 peut supporter un port de IEEE 1394. ASRock Z77 Extreme6/TB4 Motherboard...
- Seite 77 SPDIF vers la carte VGA HDMI, (voir p.2 No. 33) et permettant au système de se connecter au un téléviseur numérique HDMI /un projecteur / un périphérique LCD. Veuillez brancher le connecteur HDMI_SPDIF de la carte VGA HDMI sur ce connecteur. ASRock Z77 Extreme6/TB4 Motherboard...
- Seite 78 à l’utilisateur de réinitia- liser rapidement le système. Interrupteur d’effacement de CMOS L’interrupteur d’effacement de (CLRCBTN) CMOS est un interrupteur (voir p.3 No. 18) rapide qui permet à l’utilisateur d’effacer rapidement les valeurs du CMOS. ASRock Z77 Extreme6/TB4 Motherboard...
- Seite 79 Pour utiliser le CD technique, insérez-le dans le lecteur de CD-ROM. Le Menu principal s’affiche automatiquement si “AUTORUN” est activé dans votre ordinateur. Si le Menu principal n’apparaît pas automatiquement, localisez dans le CD technique le fichier “ASRSETUP.EXE” et double-cliquez dessus pour afficher les menus. ASRock Z77 Extreme6/TB4 Motherboard...
-
Seite 80: Contenuto Della Confezione
1. Introduzione Grazie per aver scelto una scheda madre ASRock Z77 Extreme6/TB4, una scheda madre affidabile prodotta secondo i severi criteri di qualità ASRock. Le prestazioni eccellenti e il design robusto si conformano all’impegno di ASRock nella ricerca della qualità e della resistenza. - Seite 81 ® Shader 4.1, DirectX 10.1 con CPU Intel Sandy Bridge - Memoria massima condivisa 1760MB - Tre opzioni d’output VGA: D-Sub, HDMI e Thunderbolt - Supporta HDMI 1.4a con risoluzione massima fino a 1920x1200 @ 60Hz ASRock Z77 Extreme6/TB4 Motherboard...
- Seite 82 / ingresso linea / cassa frontale / microfono ® SATA3 - 2 x Connettori SATA3 6,0Gb/s Z77 Intel , supporto RAID (RAID 0, RAID 1, RAID 5, RAID 10, Intel Rapid Storage e tecnologia Intel Smart Response), NCQ, AHCI e Hot Plug ASRock Z77 Extreme6/TB4 Motherboard...
- Seite 83 - Compatibile con ACPI 1.1 wake up events - Supporta jumperfree - Supporta SMBIOS 2.3.1 - Regolazione multi-voltaggio CPU Core, IGPU, DRAM, 1.8V PLL, VTT, VCCSA CD di - Driver, Utilità, Software AntiVirus (versione di prova), ASRock Z77 Extreme6/TB4 Motherboard...
- Seite 84 - FCC, CE, WHQL - Predisposto ErP/EuP (è necessaria l’alimentazione predisposta per il sistema ErP/EuP) * Per ulteriori informazioni, prego visitare il nostro sito internet: http://www.asrock.com AVVISO Si prega di prendere atto che la procedura di overclocking implica dei rischi, come anche la regolazione delle impostazioni del BIOS, l’applicazione della tecnologia...
- Seite 85 CMOS. Notare che password, data, ore, profilo utente predefinito, 1394 GUID e indirizzo MAC saranno cancellati solo se è rimossa la batteria della CMOS. L’interruttore Clear CMOS (Cancella CMOS) ha la stessa funzione del jumper Clear CMOS. ASRock Z77 Extreme6/TB4 Motherboard...
- Seite 86 Cavi dati Serial ATA (SATA) Una o altra estremità del cavo di dati SATA può essere (Opzionale) collegata al disco rigido SATA / SATA2 / SATA3 o al connettore di SATA2 / SATA3 su questa cartolina base. ASRock Z77 Extreme6/TB4 Motherboard...
- Seite 87 (5-pin IR1) la trasmissione e la ricezione (vedi p.2 Nr. 30) senza fili. Connettore modulo infrarosso consumer Questo connettore può essere utilizzato per collegare (4-pin CIR1) ricevitore remoto. (vedi p.2 Nr. 28) ASRock Z77 Extreme6/TB4 Motherboard...
- Seite 88 Determinare i pin positivi e negativi prima di collegare i cavi. PWRBTN (interruttore d’alimentazione): Va collegato all’interruttore d’alimentazione del pannello frontale del telaio. Usando l’interruttore d’alimentazione si può configurare il modo in cui si spegne il sistema. ASRock Z77 Extreme6/TB4 Motherboard...
- Seite 89 (3-pin PLED1) alimentazione del sistema. Il (vedi p.2 Nr. 18) LED è acceso quando il sistema è in funzione. Il LED continua a lampeggiare in stato S1/S3. Il LED è spento in stato S4 o S5 (spegnimento). ASRock Z77 Extreme6/TB4 Motherboard...
- Seite 90 1-3. Piedini 1-3 collegati Installazione della ventola a 3 piedini (3-pin CPU_FAN2) FAN_SPEED (vedi p.2 Nr. 4) +12V Connettore alimentazione ATX Collegare la sorgente d’alimentazione ATX a questo (24-pin ATXPWR1) connettore. (vedi p.2 Nr. 7) ASRock Z77 Extreme6/TB4 Motherboard...
- Seite 91 Intestazione IEEE 1394 Accanto alla porta di default IEEE 1394 sul pannello I/O, e‘ (9-pin FRONT_1394) presente un‘intestazione IEEE (vedi p.2 Nr. 19) 1394 (FRONT_1394) sulla scheda madre. Questa intestazione IEEE 1394 puo‘ supportare una porta IEEE 1394. ASRock Z77 Extreme6/TB4 Motherboard...
- Seite 92 SPDIF su scheda (2-pin HDMI_SPDIF1) HDMI VGA, consente al (vedi p.2 Nr. 33) sistema di collegare dispositivi per TV digitale HDMI/proiettori/ LCD . Collegare il connettore HDMI_SPDIF della scheda VGA HDMI a questo header. ASRock Z77 Extreme6/TB4 Motherboard...
- Seite 93 (vedi p.2 Nr. 16) rapidamente il sistema. Interruttore pulizia CMOS L’interruttore di pulizia CMOS è un interruttore rapido che (CLRCBTN) consente agli utenti di (vedi p.3 Nr. 18) cancellare velocemente i valori CMOS. ASRock Z77 Extreme6/TB4 Motherboard...
- Seite 94 Inserire il CD di supporto nel lettore CD-ROM. Se la funzione “AUTORUN” è attivata nel computer, apparirà automaticamente il Menù principale. Se il Menù principale non appare automaticamente, posizionarsi sul file “ASRSETUP.EXE” del CD di sup- porto e cliccare due volte per visualizzare i menù. ASRock Z77 Extreme6/TB4 Motherboard...
-
Seite 95: Contenido De La Caja
1. Introducción Gracias por su compra de ASRock Z77 Extreme6/TB4 placa madre, una placa de confianza producida bajo el control de calidad estricto y persistente. La placa madre provee realización excelente con un diseño robusto conforme al compromiso de calidad y resistencia de ASRock. - Seite 96 ® Shader 4.1, DirectX 10.1 con CPU Intel Sandy Bridge - 1760MB de Memoria máxima compartida - Tres opciones de salida VGA: D-Sub, HDMI y Thunderbolt - Admite HDMI 1.4a con una resolución máxima de 1920x1200 ASRock Z77 Extreme6/TB4 Motherboard...
- Seite 97 LED de VELOCIDAD) - 1 x puerto IEEE 1394 - 1 x conmutador de borrado de memoria CMOS - Conexión de audio: Altavoz trasero / Central / Bajos / Entrada de línea / Altavoz frontal / Micrófono ASRock Z77 Extreme6/TB4 Motherboard...
- Seite 98 - 1 x conmutador de encendido con indicador LED - 1 x conmutador de reinicio con indicador LED - 1 x conmutador de borrado de memoria CMOS con indicador LED BIOS - 64Mb AMI BIOS legal UEFI AMI compatible con GUI ASRock Z77 Extreme6/TB4 Motherboard...
- Seite 99 VCCSA Voltage CD de soport - Controladores, utilidades, software de antivirus (versión de prueba), Prueba de CyberLink MediaEspresso 6.5, Conjunto multimedia ASRock MAGIX - OEM, Explorador y barra de herramientas Google Chrome Monitor - Sensibilidad a la temperatura del procesador/chasis Hardware - Taquímetros de los ventiladores del procesador y del CPU /...
- Seite 100 Tenga en cuenta que la contraseña, la fecha, la hora, el perfil predeterminado del usuario, el GUID 1394 y la dirección MAC solamente se borrará si la batería CMOS se quita. El conmutador Borrar CMOS tiene la misma función que el puente Borrar CMOS. ASRock Z77 Extreme6/TB4 Motherboard...
- Seite 101 Cualquier extremo del cable de serie ATA (SATA) los datos de SATA puede ser conectado con el disco duro de (Opcional) SATA / SATA2 / SATA3 o el conectador de SATA2 / SATA3 en esta placa base. ASRock Z77 Extreme6/TB4 Motherboard...
- Seite 102 (5-pin IR1) recepción wireless opcional. (vea p.2, N. 30) Base de conexiones del módulo de Esta base de conexiones se infrarrojos para el consumidor puede utilizar para conectar receptor remoto. (4-pin CIR1) (vea p.2, N. 28) ASRock Z77 Extreme6/TB4 Motherboard...
- Seite 103 Conecte el interruptor de alimentación, el interruptor de restablecimiento y el indicador de estado del sistema situados en el chasis con esta cabecera en función de las siguientes asignaciones de contacto. Preste atención a los contactos positivos y negativos antes de conectar los cables. ASRock Z77 Extreme6/TB4 Motherboard...
- Seite 104 (vea p.2, N. 18) sistema. El indicador LED se encenderá si el sistema se encuentra en funcionamiento. El indicador LED parpadeará en el estado S1/S3. El indicador LED se apagará en los estados S4 o S5 (apagado). ASRock Z77 Extreme6/TB4 Motherboard...
- Seite 105 Contacto 1-3 conectado Instalación del ventilador de 3 contactos (3-pin CPU_FAN2) FAN_SPEED (vea p.2, N. 4) +12V Cabezal de alimentación ATX Conecte la fuente de alimentación ATX a su cabezal. (24-pin ATXPWR1) (vea p.2, N. 7) ASRock Z77 Extreme6/TB4 Motherboard...
- Seite 106 1394 del defecto en el panel de (9-pin FRONT_1394) I/O, hay un jefe de IEEE 1394 (ver p.2, N. 19) (FRONT_1394) en esta placa base. Este jefe de IEEE 1394 puede apoyar un puerto de IEEE 1394. ASRock Z77 Extreme6/TB4 Motherboard...
- Seite 107 SPDIF la tarjeta VGA (2-pin HDMI_SPDIF1) HDMI, permite al sistema (vea p.2, N. 33) conectarse a dispositivos de TV Digital HDMI / proyectores / Dispositivos LCD. Conecte el conector HDMI_SPDIF de la tarjeta VGA HDMI a esta cabecera. ASRock Z77 Extreme6/TB4 Motherboard...
- Seite 108 CMOS. Conmutador de borrado de memoria CMOS El conmutador de encendido es un conmutador rápido que (CLRCBTN) (vea p.3, N. 18) permite al usuario encender / apagar rápidamente el sistema. ASRock Z77 Extreme6/TB4 Motherboard...
- Seite 109 Para iniciar la instalación, ponga el CD en el lector de CD y se desplegará el Menú Principal automáticamente si «AUTORUN» está habilitado en su computado- Si el Menú Principal no aparece automáticamente, localice y doble-pulse en el ar- chivo “ASRSETUP.EXE” para iniciar la instalación. ASRock Z77 Extreme6/TB4 Motherboard...
- Seite 110 1. Введение Благодарим вас за покупку материнской платы ASRock Z77 Extreme6/TB4 надежной материнской платы, изготовленной в соответствии с постоянно предъявляемыми ASRock жесткими требованиями к качеству. Она обеспечивает превосходную производительность и отличается отличной конструкцией, которые отражают приверженность ASRock качеству и долговечности.
- Seite 111 - три VGA-выхода: D-Sub, HDMI и Thunderbolt - Поддержка HDMI 1.4a с максимальным разрешением до 1920х1200 @ 60 Гц - Поддержка D-Sub с максимальным разрешением до 2048х1536 @ 75 Гц - Поддержка Thunderbolt с максимальным разрешением до ASRock Z77 Extreme6/TB4 Motherboard...
- Seite 112 - 2 x задних порта USB 3.0 на контроллере Intel Z77, с поддержкой интерфейсов USB 1.1/2.0/3.0 и скорости передачи данных до 5 Гбит/с - 2 x задних порта USB 3.0 на контроллере ASMedia ASM1042, с поддержкой интерфейсов USB 1.1/2.0/3.0 и скорости передачи ASRock Z77 Extreme6/TB4 Motherboard...
- Seite 113 VCCSA Компакт- диск - Драйверы, служебные программы, антивирусное программное поддержки обеспечение (пробная версия), Пробная версия программы CyberLink MediaEspresso 6.5, ASRock MAGIX Multimedia Suite - поставщик, Браузер и панель инструментов Google Chrome Контроль - Датчики температуры ЦП/Шасси/SB оборудо-вания - Тахометры вентиляторов CPU/Chassis/Power FAN - Бесшумный...
- Seite 114 системы и даже вызвать повреждение входящих в нее компонентов и устройств. Приступая к оверклокингу, вы полностью берете на себя все связанные с ним риски и расходы. Мы не будем нести ответственность за любые возможные повреждения в результате оверклокинга. ASRock Z77 Extreme6/TB4 Motherboard...
- Seite 115 затем завершить ее работу. Примите во внимание, что пароль, дата, время, профиль пользователя по умолчанию, идентификатор 1394 GUID и MAC-адрес будут очищены только тогда, когда будет извлечена из своего гнезда батарейка CMOS. Переключатель Clear CMOS работает так же, как перемычка Clear CMOS. ASRock Z77 Extreme6/TB4 Motherboard...
- Seite 116 Информационный Информационный кабель кабель Serial ATA (SATA) интерфейса SATA / SATA2 / SATA3 не является направленным. (дополнительно) Любой из его соединителей может быть подключен либо к жесткому диску интерфейса SATA2 / SATA3 либо к материнской плате. ASRock Z77 Extreme6/TB4 Motherboard...
- Seite 117 Колодка инфракрасного модуля Данная колодка позволяет подключить дополнительный (5-контактный IR1) модуль беспроводного (см. стр. 2, п. 30) инфракрасного приемопередатчика. Датчик пользовательского инфракрасного модуля Датчик можно использовать для подключения дистанционный (4-контактный CIR1) приемник. (см. стр. 2, п. 28) ASRock Z77 Extreme6/TB4 Motherboard...
- Seite 118 64-бита: Перейдите к вкладке «FrontMic» (Передний микрофон) в панели управления Realtek. Отрегулируйте уровень «Recording Volume» (Громкость записи). Колодка системной панели Данная колодка обеспечивает работу нескольких функций (9-контактный PANEL1) передней панели системы. (см. стр. 2, п. 20) ASRock Z77 Extreme6/TB4 Motherboard...
- Seite 119 Подключите индикатор Power LED к этому разъему для отображения (3-контактный PLED1) статуса питания системы. Этот (см. стр. 2, п. 18) светодиод продолжит мигать в режиме S1/S3. Светодиод будет выключен в режимах S4 или S5 (система выключена). ASRock Z77 Extreme6/TB4 Motherboard...
- Seite 120 материнской плате, для этого следует использовать контакты 1-3. Контакты 1-3 подключены Установка вентилятора с 3-контактным разъемом (3-контактный CPU_FAN2) FAN_SPEED (см. стр. 2, п. 4) +12V Колодка питания ATX Подключите к этой колодке кабель питания ATX. (24-контактный ATXPWR1) (см. стр. 2, п. 7) ASRock Z77 Extreme6/TB4 Motherboard...
- Seite 121 плату одновременно установлены две видеокарты. Колодки IEEE 1394 Помимо четырех портов IEEE 1394 на панели ввода-вывода (9-контактный FRONT_1394) имеются две группы контактов (см. стр. 2, п. 19) на материнской плате для подключения двух дополнительных портовIEEE 1394 каждая. ASRock Z77 Extreme6/TB4 Motherboard...
- Seite 122 обеспечивает подачу выходного (2-контактный HDMI_SPDIF1) аудиосигнала на VGA-карту HDMI, (см. стр. 2, п. 33) что позволяет подключать к системе цифровые телевизоры, проекторы или жидкокристаллические панели HDMI. Соедините эту колодку с разъемом HDMI_SPDIF на VGA- карте HDMI. ASRock Z77 Extreme6/TB4 Motherboard...
- Seite 123 (см. стр. 2, п. 17) систему. Reset Switch Кнопка Reset Switch позволяет быстро перезагрузить систему. (RSTBTN) (см. стр. 2, п. 16) Clear CMOS Switch Кнопка Clear CMOS Switch (CLRCBTN) позволяет быстро сбросить (см. стр. 3, п. 18) установки CMOS. ASRock Z77 Extreme6/TB4 Motherboard...
- Seite 124 Если в вашем компьютере включена функция автозапуска (AUTORUN), то на экране автоматически появится главное меню компакт-диска (Main Menu). Если этого не произошло, найдите в на компакт-диске поддержки файл ASRSETUP.EXE и дважды щелкните на нем, чтобы открыть меню. ASRock Z77 Extreme6/TB4 Motherboard...
- Seite 125 1. Giriş ASRock’ın kesintisiz titiz kalite denetimi altında üretilen güvenilir bir anakart olan AS- Rock Z77 Extreme6/TB4 anakartını satın aldığınız için teşekkür ederiz. ASRock’ın kalite ve dayanıklılık konusundaki kararlılığına uygun güçlü tasarımıyla mükemmel bir performans sunar. Bu Hızlı Takma Kılavuzu anakarta giriş ve adım adım takma kılavuzu içerir. Anakart hakkında daha ayrıntılı...
- Seite 126 Ivy Bridge işlemciye sahip DirectX 11. ® Pixel Shader 4.1,Intel Sandy Bridge işlemciye sahip DirectX 10.1 - Maks. paylaюэlan bellek 1760 MB - üç VGA Зэkэю seзeneрi: D-Sub, HDMI ve Thunderbolt - 60Hz’de 1920x1200’e kadar maks. зцzьnьrlьkle HDMI 1.4a Teknolojisini destekler ASRock Z77 Extreme6/TB4 Motherboard...
- Seite 127 Z77 konektör, donanım RAID (RAID 0, RAID 1, RAID 5, RAID 10, Intel Rapid Storage ve Intel Smart Response Teknolojisini), NCQ, AHCI ve Sistem Açıkken Bileşen Takma - 2 x SATA3 6,0Gb/sn ASMedia ASM1061 konektör, donanım ASRock Z77 Extreme6/TB4 Motherboard...
- Seite 128 - SMBIOS 2.3.1 Desteği - CPU Core, IGPU, DRAM, 1.8V PLL, VTT, VCCSA Voltaj Çoklu ayarı Destek CD’si - Sürücüler, Yardımcı Programlar, AntiVirüs Yazılımı (Deneme Sürümü), CyberLink MediaEspresso 6.5 Deneme Sürümü, ASRock MAGIX Multimedya Seti - OEM, Google Chrome ASRock Z77 Extreme6/TB4 Motherboard...
- Seite 129 Sertifikalar - FCC, CE, WHQL - ErP/EuP Hazır (ErP/EuP hazır güç kaynağı gerekli) * Ayrıntılı ürün bilgileri için lütfen web sitemizi ziyaret edin: http://www.asrock.com UYARI Lütfen, ayarı BIOS'da ayarlama, Untied Overclocking Teknolojisi'ni uygulama veya üçüncü taraf aşırı hızlandırma araçlarını kullanma gibi durumlarda aşırı hızlandırmayla ilgili risk olduğunu unutmayın.
- Seite 130 CMOS temizleme işlemini gerçekleştirmeden önce kapatmanız gereklidir. Parola, tarih, saat, kullanıcı varsayılan profili, 1394 GUID ve MAC adresinin yalnızca CMOS pili çıkarıldığında temizleneceğini lütfen aklınızda bulundurunuz. CMOS Devresini Temizle, CMOS Ayarı'nı Temizle ile aynı işleve sahiptir. ASRock Z77 Extreme6/TB4 Motherboard...
- Seite 131 SATA2 / SATA3 konektörüne bağlanabilir. USB 2.0 Fişleri G/Ç panelindeki varsayılan iki USB 2.0 portundan başka, bu (9-pinli USB_2_3) anakartta üç USB 2.0 fişi (bkz. s.2 No. 25) bulunur. Her USB 2.0 fişi iki USB 2.0 portunu destekler. ASRock Z77 Extreme6/TB4 Motherboard...
- Seite 132 Bu fiş, uzaktan kumanda alıcısı destekler. (4-pinli CIR1) (bkz. s.2 No. 28) Ön Panel Ses Fişi Bu, panel ses kablosu için uygun bağlantı sağlayan ve (9-pinli HD_AUDIO1) ses cihazlarını kontrol etmeyi (bkz. s.2 No. 32) sağlayan bir arayüzdür. ASRock Z77 Extreme6/TB4 Motherboard...
- Seite 133 çalışırken LED yanar. Sistem S1/S3 uyku modunda iken LED yanıp sön meye devam eder. Sistem S4 uyku modunda veya kapalı (S5) iken LED söner. HDLED (Sabit Disk Çalışma LED’i): Kasa üzerindeki sabit disk çalışma LED’ini ön panele bağlayın. Sabit disk veri okurken veya yazarken LED yanar. ASRock Z77 Extreme6/TB4 Motherboard...
- Seite 134 (bkz. s.2 No. 24) (3-pinli PWR_FAN1) FAN_SPEED (bkz. s.2 No. 9) +12V CPU Fan Konektörü Lütfen fan kablolarını CPU fanına bu konektöre bağlayın ve FAN_SPEED_CONTROL 4-pinli CPU_FAN1) FAN_SPEED siyah kabloyu toprak pinine (bkz. s.2 No. 3) +12V bağlayın. ASRock Z77 Extreme6/TB4 Motherboard...
- Seite 135 Bu anakart 8-pinli ATX 12V güç konektörü sağlasa da geleneksel bir 4-pinli ATX 12V güç kaynağı bağlarsanız da çalışabilir. 4-pinli ATX güç kaynağını kullanmak için, lütfen güç kaynağınızı Pin 1 ve Pin 5'le birlikte takın. 4-Pinli ATX 12V Güç Kaynağını Takma ASRock Z77 Extreme6/TB4 Motherboard...
- Seite 136 (bkz. s.2 No. 31) HDMI_SPDIF Fişi HDMI_SPDIF fişi, SPDIF ses çıkışını HDMI VGA kartına (2-pinli HDMI_SPDIF1) sağlar, sistemin HDMI Dijital (bkz. s.2 No. 33) TV/projektör/LCD cihazlarını bağlamasına izin verir. Lütfen HDMI VGA kartının HDMI_SPDIF konektörünü bu fişe bağlayın. ASRock Z77 Extreme6/TB4 Motherboard...
- Seite 137 Sıfırlama Anahtarı, kullanıcıların hızlı bir şekilde sistemi (RSTBTN) sıfırlamalarını sağlayan akıllı bir (bkz. s.2 No.16) anahtardır. CMOS'u Temizleme Anahtarı CMOS'u Temizleme Anahtarı, kullanıcıların hızlı bir şekilde (CLRSBTN) CMOS değerlerini (bkz. s.3 No.18) temizlemelerini sağlayan akıllı bir anahtardır. ASRock Z77 Extreme6/TB4 Motherboard...
- Seite 138 Destek CD'sini kullanmaya başlamak için, CD'yi CDROM sürücünüze takın. Bilgisayarınızda "OTOMATİK KULLAN" özelliği etkinleştirilmişse, Ana Menüyü otomatik olarak görüntüler. Ana Menü otomatik olarak görüntülenmezse, menüleri görüntülemek için Destek CD'sinin "ASRSETUP.EXE" dosyasını bulun ve çift tıklatın. ASRock Z77 Extreme6/TB4 Motherboard...
- Seite 139 ASRock 의 Z77 Extreme6/TB4 메인 보드를 구매하여 주신것에 대하여 감사 드립니 다 . 이 메인보드는 엄격한 품질관리 하에 생산되어진 신뢰성 있는 메인보드 입니다 . 이 제품은 고 품격 디자인과 함께 ASRock 의 우수한 품질과 최고의 안정성을 자랑하 고 있습니다 . 이 빠른 설치 안내서에는 마더보드에 대한 설명과 단계별 설치 방법이...
- Seite 140 Shader 4.1 - 최대 공유 메모리 1760MB - 3 개의 VGA 출력 옵션 : D-Sub, HDMI 및 Thunderbolt - 최대 해상도 1920x1200 @ 60Hz 까지 HDMI 1.4a 지원 - 최대 해상도 2048x1536 @ 75Hz 까지 D-Sub 지원 ASRock Z77 Extreme6/TB4 Motherboard...
- Seite 141 포트와공유됨 ) ® USB 3.0 - Intel 에 의한 후면 패널 USB 3.0 포트 2 개 , 최고 5Gb/s 의 USB 1.1/2.0/3.0 지원 - ASMedia ASM1042 에 의한 후면 패널 USB 3.0 포트 2 개 , 최 ASRock Z77 Extreme6/TB4 Motherboard...
- Seite 142 - CPU Core, IGPU, DRAM, 1.8V PLL, VTT, VCCSA 전압 멀 티 조절 지원 CD - 드라이버 , 유틸리티 , 백신 소프트웨어 ( 시험판 ), CyberLink MediaEspresso 6.5 평가판 , ASRock MAGIX Multimedia Suite - OEM, Chrome 브라우저및 도구 모음 하드웨어 모니터 - CPU/ 마더보드 온도 감지...
- Seite 143 인증서 - FCC, CE, WHQL - ErP/EuP 지원 (ErP/EuP 지원 전원 공급기가 요구됨 ) * 상세한 제품정보는 당사의 웹사이트를 방문할수있습니다 . http://www.asrock.com 경고 오버클로킹에는 BIOS 설정을 조정하거나 Untied Overclocking Technology 를 적 용하거나타업체의 오버클로킹 도구를 사용하는 것을 포함하여 어느 정도의 위험이따...
- Seite 144 삭제해야 하는 경우 먼저 시스템을 부팅하고 CMOS 를 종료하고 삭제 작업을 해 야 합니다 . CMOS 배터리를 제거할 경우에만 암호 , 날짜 , 시간 , 사용자 기본 프 로파일 , 1394 GUID, MAC 주소가 삭제됩니다 . Clear CMOS Switch는 Clear CMOS 점퍼와 동일한 기능을 갖고 있습니다. ASRock Z77 Extreme6/TB4 Motherboard...
- Seite 145 우 , 내부 SATA3_A2 가 작동하 지 않습니다 . 시리얼 ATA(SATA) SATA 데이터 케이블의 임의적 데이터 케이블 인 측을 마더보드의 SATA / SATA2 / SATA3 하드 디스크 ( 선택 사양 ) 혹은 SATA2 / SATA3 커넥터 에 연결합니다 . ASRock Z77 Extreme6/TB4 Motherboard...
- Seite 146 (5 핀 IR1) (2 페이지 , 30 번 항목 참조 ) 소비자용 적외선 모듈 헤더 이 헤더는 리모콘 수신기 연결하 는 데 사용될수 있습니다 . (4 핀 CIR1) (2 페이지 , 28 번 항목 참조 ) ASRock Z77 Extreme6/TB4 Motherboard...
- Seite 147 에 따라 이헤더에 연결합니다 . 케이블을 연결하기 전에 양극 핀과 음극 핀 을 기록합니다 . PWRBTN( 전원 스위치 ): 섀시 전면 패널의 전원 스위치에 연결합니다 . 전원 스위치를 이용해 시스 템을 끄는방법을 구성할 수 있습니다 . ASRock Z77 Extreme6/TB4 Motherboard...
- Seite 148 고 접지 핀에는 검은색 전선을 (4 핀 CHA_FAN1) 연결하십시오 . CHA_FAN1, (2 페이지 , 23 번 항목 참조 ) CHA_FAN2 및 CHA_FAN3 은 FAN_SPEED 팬 제어를 지원합니다 . (3 핀 CHA_FAN2) +12V (2 페이지 , 41 번 항목 참조 ) ASRock Z77 Extreme6/TB4 Motherboard...
- Seite 149 이 마더보드는 24 핀 ATX 전원 커넥터를 제공하지만 , 종래의 20 핀 ATX 전원 공급장치를 사용해도 작동이 가능합니다 . 20 핀 ATX 전원 공급장치를 사용하려면 , Pin 1 과 Pin 13 으로 전원공급장치를 연결하십시오 . 20 핀 ATX 전원 공급장치 설치 ASRock Z77 Extreme6/TB4 Motherboard...
- Seite 150 습니다 . 각각의 IEEE 1394 헤 더는 1 개의 IEEE 1394 포트를 지원할 수 있습니다 . 시리얼포트 컨넥터 이 콘넥터는 시리얼 포트 모듈을 지원합니다 . (9 핀 COM1) (2 페이지 , 31 번 항목 참조 ) ASRock Z77 Extreme6/TB4 Motherboard...
- Seite 151 (2 핀 HDMI_SPDIF1) HDMI_SPDIF 헤더는 시스템이 (2 페이지 , 33 번 항목 참조 ) HDMI 디지털 TV/ 프로젝터 / LCD 장치에 연결할 수 있게 합 니다 . HDMI VGA 카드의 HDMI_SPDIF 커넥터를 이 헤 더에 연결하십시오 . ASRock Z77 Extreme6/TB4 Motherboard...
- Seite 152 (2 페이지 , 16 번 항목 참조 ) 할 수 있습니다 . CMOS 삭제 스위치 CMOS 삭제 스위치는 빠른 스위 (CLRCBTN) 치로서 , 사용자가 CMOS 값을 (3 페이지 , 18 번 항목 참조 ) 빠르게 삭제할 수 있습니다 . ASRock Z77 Extreme6/TB4 Motherboard...
- Seite 153 니다 . 만일 고객님의 컴퓨터가 “AUTORUN” 이 가능하다면 자동으로 메인 메뉴 를 모니터에 디스플레이 시켜 줄 것입니다 . 만일 자동으로 메인 메뉴가 나타나지않는 다면 , 보조 CD 의 디스플레이 메뉴 안에 있는 ASRSETUP.EXE 더블 클릭하여 주시 기 바랍니다 . ASRock Z77 Extreme6/TB4 Motherboard...
- Seite 154 1.1 パッケージ内容 ASRock Z77 Extreme6/TB4 マザーボード: (ATX フォームファクター : 12.0-in x 9.6-in, 30.5 cm x 24.4 cm) ASRock Z77 Extreme6/TB4 クイックインストレーションガイド ASRock Z77 Extreme6/TB4 サポート CD 6 x シリアル ATA (SATA) データケーブル(オプション) 1 x I/O パネルシールド 1 x ASRock SLI_Bridge_2S カード...
- Seite 155 ® ® - Intel HD グラフィックス内蔵ビジュアルのサポート : Intel ® ® Quick Sync Video 2.0、Intel InTru 3D、Intel Clear ® ® Video HD Technology、Intel Insider および Intel Graphics 2500/4000 ® - Intel Ivy Bridge CPU を搭載した DirectX 11、Pixel ASRock Z77 Extreme6/TB4 Motherboard...
- Seite 156 - IEEE 1394 ポート x 1 - クリア CMOS スイッヱ x 1 - オーディオジャック: 後部スピーカー、中央、低音、入力、前部スピー カー、マイク入力 ® SATA3 - Intel Z77 SATA3 6.0Gb/ 秒 コネクタ x 2 ハードウェア RAID (RAID 0, RAID 1, RAID 5, RAID 10, Intel Rapid ASRock Z77 Extreme6/TB4 Motherboard...
- Seite 157 - 1 x クリア CMOS スイッヱ(LED 付き) BIOS 関連機能 - 64Mb AMI UEFI Legal BIOS(GUI サポート) - プラグ&プレイをサポート - ACPI 1.1 準拠ウェイクアップイベント - jumperfree モードサポート - SMBIOS 2.3.1 サポート - CPU Core, IGPU, DRAM, 1.8V PLL, VTT, VCCSA 電圧のマ ASRock Z77 Extreme6/TB4 Motherboard...
- Seite 158 ルチ調整 サポート CD - ドライバ、ユーティリティ、AntiVirus ソフトウェア ( 試用バージョン )、 CyberLink MediaEspresso 6.5 試用版、ASRock MAGIX Multimedia Suite - OEM, Google Chrome ブラウザとツー ルバー モニター - CPU/ シャーシ温度検知 - CPU/ シャーシ / 電源ファンタコメータ - CPU/ シャーシ静音ファン(CPU 温度によりシャーシファン速度の 自動調整が可能) - CPU/ シャーシファンマルチ速度制御 - 電源モニター : +12V, +5V, +3.3V, Vcore ®...
- Seite 159 CMOS の消去 デフォルト設定 注 : CLRCMOS1 により、CMOS のデータをクリアできます。システムパラメータをクリアしデフォルト設定にリ セットするには、コンピュータの電源をオフにし、電源装置から電源コードを抜いてください。15 秒待って から、ジャンパキャップを使用して CLRCMOS1 のピン 2 とピン 3 を 5 秒間ショートしてください。ただし、 BIOS 更新の後すぐには CMOS をクリアしないでください。BIOS の更新の終了後直ちに CMOS をクリア する必要がある場合、まずシステムを起動してからシャットダウンし、その後クリア CMOS アクションを実 行する必要があります。パスワード、日付、時刻、ユーザーデフォルトのプロファイルを忘れずにメモして ください。1394 GUID と MAC アドレスは、CMOS バッテリを取り外した場合のみ消去されます。 クリアCMOSスイッチには、クリアCMOSジャンパと同じ機能があります。 ASRock Z77 Extreme6/TB4 Motherboard...
- Seite 160 / SATA3 コネクタに接続できます。 USB 2.0 ヘッダ I/O パネルには、デフォルトの 2 つの USB 2.0 ポート以外に、このマザーボ (9 ピン USB_2_3) ードに 3 つの USB 2.0 ヘッダが搭載 ページ2, アイテム 25 を参照 されています。それぞれの USB 2.0 ヘッダは 2 つの USB 2.0 ポートをサ ポートできます。 ASRock Z77 Extreme6/TB4 Motherboard...
- Seite 161 ヘッダは 2 つの USB 3.0 ポートをサ ポートできます。 赤外線モジュールコネクタ このコネクタは赤外線の無線送受信モ ジュールに対応します。 (5 ピン IR1) ページ2, アイテム 30 を参照 コンシューマー赤外線モジュールヘッダー このヘッダーは、リモコン受光部の接続 に使用することができます。 (4 ピン CIR1) ページ2, アイテム 28 を参照 フロントオーディオパネルコネクタ このコネクタは、オーディオ機器との便 利な接続とコントロールを可能にする (9 ピン HD_AUDIO1) フロンとオーディオパネルのためのイン ページ2, アイテム 32 を参照 ターフェイスです。 ASRock Z77 Extreme6/TB4 Motherboard...
- Seite 162 ク ) タブを開きます。 “ Recording Volume ” ( 録音音量 ) を 調整します。 システムパネルコネクタ このコネクタは数種類のシステムフロン トパネルの機能を提供します。 (9 ピン PANEL1) ページ2, アイテム 20 を参照 シャーシに付いている電源スイッチ、リセットスイッチ、システムステータスイン ジケータを下記のピン割り当て指示に従ってこのヘッダに接続します。ケーブ ルを接続する前にピンの正負極性にご注意ください。 PWRBTN ( 電源スイッチ ): 前面パネルに付いている電源スイッチに接続します。電源スイッチによるシス テム電源オフ方法を設定して変更することも可能です。 RESET ( リセットスイッヱ ): シャーシの前面パネルに付いているリセットスイッチに接続します。コンピュータ がフリーズし、 正常な再起動をしない場合は、 リセットスイッチを押してコンピュー タを再起動します。 ASRock Z77 Extreme6/TB4 Motherboard...
- Seite 163 します。 シャーシおよび電源ファンコネクタ ファンケーブルをファンコネクタに接続 し、黒いワイヤをアースピンに合わせて (4 ピン CHA_FAN1) ください。CHA_FAN1, CHA_FAN2 お ページ2, アイテム 23 を参照 よび CHA_FAN3 は、ファンコントロール FAN_SPEED をサポートします。 (3 ピン CHA_FAN2) +12V ページ2, アイテム 41 を参照 FAN_SPEED (3 ピン CHA_FAN3) +12V ページ2, アイテム 24 を参照 ASRock Z77 Extreme6/TB4 Motherboard...
- Seite 164 このマザーボードには 24 ピン ATX 電源コネクタが装備されてお り、従来の 20 ピン ATX 電源装置を採用している場合でも作動し ます。20 ピン ATX 電源を使用するには、ピン 1 およびピン 13 と 共に電源装置にプラグを差し込みます。 20 ピン ATX 電源装置の取り付け ATX 12V コネクタ ATX 電 12V 源コネクタを接続します。 (8 ピン ATX12V1) ページ2, アイテム 1 を参照 ASRock Z77 Extreme6/TB4 Motherboard...
- Seite 165 (9 ピン COM1) ページ2, アイテム 31 を参照 HDMI_SPDIF ヘッダ HDMI_SPDIF ヘッダは、SPDIF 音声 出力を HDMI VGA カードに提供し、 (2- ピン HDMI_SPDIF1) システムで HDMI デジタル TV/ プロ ページ2, アイテム 33 を参照 ジェクタ /LCD デバイスに接続できる ようにします。HDMI VGA カードの HDMI_SPDIF コネクタを、このヘッダに 接続してください。 ASRock Z77 Extreme6/TB4 Motherboard...
- Seite 166 行うことができます。 電源スイッチ 電源スイッチはクイックスイッチで、シス (PWRBTN) テム電源のオン / オフを素早く切り替え ページ2, アイテム 17 を参照 ることができます。 リセットスイッヱ リセットスイッヱはクイックスイッヱで、シ (RSTBTN) ステムを素早くリセットすることができま ページ2, アイテム 16 を参照 す。 クリア CMOS スイッヱ クリア CMOS スイッヱはクイックス (CLRCBTN) イッヱで、CMOS 値を素早くクリア ページ 3, アイテム 18 を参照 できます。 ASRock Z77 Extreme6/TB4 Motherboard...
- Seite 167 Windows 8 / 8 64-bit / 7 / 7 64-bit / Vista / Vista 64-bit といった様々なマイクロソフト ウインドウズ オペレーティング システムをサポートします。マザーボードに付属しているサポート CD はマザーボードの特 徴を有効にするために必要なドライバやユーティリティを含んでいます。サポート CD を使 用するには、CDROM ドライブに CD を挿入してください。AUTORUN 機能が有効な場合、自 動的にメインメニュウが立ち上がります。AUTORUN 機能が無効な場合、サポート CD 内に ある ASRSETUP.EXE をダブルクリックすることにより、メインメニュウが立ち上がります。 ASRock Z77 Extreme6/TB4 Motherboard...
- Seite 168 1. 主板簡介 謝謝你采用了華擎 Z77 Extreme6/TB4 主板 , 本主板由華擎嚴格制造 , 質量可靠 , 穩 定性好 , 能夠獲得卓越的性能。本安裝指南介紹了安裝主板的步驟。更加詳細的主板 信息可參看驅動光盤的用戶手冊。 由于主板規格和 BIOS 軟件將不斷升級 , 本手冊之相關內容變更恕不另行 通知。請留意華擎网站上公布的升級版本。你也可以在華擎網站找到最新 的顯卡和 CPU 支持表。 華擎网址:http://www.asrock.com 如果您需要與此主板有關的技術支持 , 請參觀我們的網站以了解您使用機 種的規格信息。 www.asrock.com/support/index.asp 1.1 包裝盒內物品 華擎 Z77 Extreme6/TB4 主板 (ATX 規格 : 12.0 英吋 X 9.6 英吋 , 30.5 厘米 X 24.4 厘米 ) 華擎...
- Seite 169 - 支持三個 VGA 輸出選項 :D-Sub、HDMI 和 Thunderbolt - 支持 HDMI 1.4a, 最高分辨率達 1920x1200 @ 60Hz - 支持 D-Sub, 最高分辨率達 2048x1536 @ 75Hz - 支持 Thunderbolt, 最高分辨率達 2560x1600 @ 60Hz - 支持 HDMI, 可支持 Auto Lip Sync、Deep Color (12bpc)、 ASRock Z77 Extreme6/TB4 Motherboard...
- Seite 170 5Gb/s - 2 x ASMedia ASM1042 的后置 USB 3.0 接口,支持 USB 1.1/2.0/3.0 到 5Gb/s ® - 1 x Intel 的前置 USB 3.0 接針 ( 支持 2 個 USB 3.0 接口 ), 支持 USB 1.1/2.0/3.0 到 5Gb/s ASRock Z77 Extreme6/TB4 Motherboard...
- Seite 171 - CPU/ 機箱 / 電源風扇轉速計 - CPU/ 机箱靜音風扇(允許根据 CPU 溫度自動調整机箱風扇速 度) - CPU/ 機箱風扇多速控制 - 電壓範圍:+12V, +5V, +3.3V, 核心電壓 ® ® 操作系統 - Microsoft Windows 8/8 64 位元 /7/7 64 位元 /Vista Vista 64 位元 /XP/XP 64 位元适用于此主板 ASRock Z77 Extreme6/TB4 Motherboard...
- Seite 172 認證 - FCC, CE, WHQL - 支持 ErP/EuP( 需要同時使用支持 ErP/EuP 的電源供應器 ) * 請參閱華擎網站了解詳細的產品信息 : http://www.asrock.com 警告 請了解超頻具有不可避免的風險 , 這些超頻包括調節 BIOS 設置、運用異步超 頻技術或使用第三方超頻工具。超頻可能會影響您的系統穩定性 , 甚至會導 致系統組件和設備的損壞。這種風險和代價須由您自己承擔 , 我們對超頻可 能導致的損壞不承擔責任。 ASRock Z77 Extreme6/TB4 Motherboard...
- Seite 173 線帽將 C L R C M O S1 上的插針 2 和插針 3 短接 5 秒。但是,請勿在更新 B I O S 后 立即清除 C M O S。如果需要在更新 B I O S 后立即清除 C M O S,必須在執行 C M O S 清除操作之前,先啟動然后關閉系統。請注意,只有取出 C M O S 電池,密碼、 日期、時間、用戶默認配置文件、1394 GUID 和 MAC 地址才會被清除。 清除CMOS開關与清除CMOS跳線具有相同的功能。 ASRock Z77 Extreme6/TB4 Motherboard...
- Seite 174 除了位於 I/O 面板的兩個默認 USB 2.0 接口之外,這款主板有 (9 針 USB_2_3) 三組 USB 2.0 接針。 這組 USB 2.0 ( 見第 2 頁第 25 項 ) 接針可以支持兩個 USB 2.0 接 口。 (9 針 USB_4_5) ( 見第 2 頁第 26 項 ) ASRock Z77 Extreme6/TB4 Motherboard...
- Seite 175 1. 高保真音頻 (High Definition Audio, HDA) 支持智能音頻接口檢測功能 (Jack Sensing), 但是機箱面板的連線必須支持 HDA 才能正常使用。請按我們提供的手冊 和機箱手冊上的使用說明安裝您的系統。2. 如果您使用 AC’97 音頻面板 , 請按 照下面的步驟將它安裝到前面板音頻接針 : A. 將 Mic_IN(MIC) 連接到 MIC2_L。 B. 將 Audio_R(RIN) 連接到 OUT2_R, 將 Audio_L(LIN) 連接到 OUT2_L。 C. 將 Ground(GND) 連接到 Ground(GND)。 ASRock Z77 Extreme6/TB4 Motherboard...
- Seite 176 統處于 S1/S3 待機模式時 , 此指示燈保持閃爍。當系統處于 S4 待機模式 或關機 (S5) 模式時 , 此指示燈熄滅。 HD LED( 硬盤活動指示燈 ): 連接機箱前面板的硬盤動作指示燈。當硬盤正在讀取或寫入數據時 , 此指 示燈亮起。 前面板設計因機箱不同而有差異。前面板模塊一般由電源開關、重啟開 關、電源指示燈、硬盤動作指示燈、喇叭等構成。將您的機箱前面板連接 到此排針時 , 請確認連接線與針腳上的說明相對應。 機箱喇叭接頭 請將機箱喇叭連接到這個接頭。 (4 針 SPEAKER1) ( 見第 2 頁第 22 項 ) ASRock Z77 Extreme6/TB4 Motherboard...
- Seite 177 雖然此主板支持 4-Pin CPU 風扇 (Quiet Fan, 靜音風扇 ), 但是沒有調速功能的 3-Pin CPU 風扇仍然可以在此主板上正常運行。如果您打算將 3-Pin CPU 風扇 連接到此主板的 CPU 風扇接口 , 請將它連接到 Pin 1-3。 Pin 1-3 連接 3-Pin 風扇的安裝 (3 針 CPU_FAN2) FAN_SPEED ( 見第 2 頁第 4 項 ) +12V ASRock Z77 Extreme6/TB4 Motherboard...
- Seite 178 ( 見第 2 頁第 40 項 ) IEEE 1394 接口 除了位於 I/O 面板的一個默認 IEEE 1394 接口之外,這款主板 (9 針 FRONT_1394) 有一組 IEEE 1394 接針。這組 ( 見第 2 頁第 19 項 ) IEEE 1394 接針可以支持一個 IEEE 1394 接口。 ASRock Z77 Extreme6/TB4 Motherboard...
- Seite 179 ( 見第 2 頁第 31 項 ) HDMI_SPDIF 接頭 HDMI_SPDIF 接頭,提供 SPDIF 音頻輸出至 HDMI 顯卡,支持將 (2 針 HDMI_SPDIF1) 電腦連接至帶 HDMI 的數字電視 ( 見第 2 頁第 33 項 ) / 投影儀 / 液晶顯示器等設備。 請將 HDMI 顯卡的 HDMI_SPDIF 接 口連接到這個接頭。 ASRock Z77 Extreme6/TB4 Motherboard...
- Seite 180 ( 見第 2 頁第 17 項 ) 復位開關 復位開關是一種快速開關 , 可讓 用戶快復位系統。 (RSTBTN) ( 見第 2 頁第 16 項 ) CMOS 數據清除開關 CMOS 數據清除開關是一種快速 開關 , 可讓用戶快速清除 CMOS (CLRCBTN) 中的數據。 ( 見第 3 頁第 18 項 ) ASRock Z77 Extreme6/TB4 Motherboard...
- Seite 181 進行常規檢驗。如果你需要在開機自檢 ( P O S T ) 之后進入 B I O S 設置程序,請按下 <Ctrl>+<Alt>+<Delete> 鍵重新啟動電腦,或者按下系統面板上的重啟按鈕。有關 BIOS 設置的詳細信息,請查閱隨機支持光盤裡的用戶手冊 (PDF 文件 )。 3. 支持光盤信息 ® ® 本主板支持各種微軟視窗操作系統:Microsoft Windows 8/8 64 位元 /7/7 64 位元 /Vista /Vista 64 位元。主板隨機支持光盤包含各種有助于提高主板效能的必要驅 動和實用程序。請將隨機支持光盤放入光驅裡,如果電腦的“自動運行”功能已啟用, 屏幕將會自動顯示主菜單。如果主菜單不能自動顯示,請查找支持光盤內的“A S R - SETUP.EXE”,并雙擊它,即可調出主菜單。 ASRock Z77 Extreme6/TB4 Motherboard...
- Seite 182 明。 有害物質或元素 部件名稱 鉛 (Pb) 鎘 (Cd) 汞 (Hg) 六价鉻 (Cr(VI)) 多溴聯苯 (PBB) 多溴二苯醚 (PBDE) 印刷電路板 及電子組件 外部信號連 接頭及線材 O: 表示該有毒有害物質在該部件所有均質材料中的含量均在 SJ/T 11363-2006 標準規定 的限量要求以下。 X: 表示該有毒有害物質至少在該部件的某一均質材料中的含量超出 SJ/T 11363-2006 標準 規定的限量要求,然該部件仍符合歐盟指令 2002/95/EC 的規範。 備註 : 此產品所標示之環保使用年限,系指在一般正常使用狀況下。 ASRock Z77 Extreme6/TB4 Motherboard...
- Seite 183 1. 主機板簡介 謝謝你採用了華擎 Z77 Extreme6/TB4 主機板 , 本主機板由華擎嚴格製造 , 品質可靠 , 穩定性好 , 能夠獲得卓越的性能。此快速安裝指南包括了主機板介紹和分步驟安裝指 導。您可以查看支持光碟裡的使用手冊了解更詳細的資料。 由於主機板規格和 BIOS 軟體將不斷更新 , 本手冊之相關內容變更恕不另 行通知。請留意華擎網站上公布的更新版本。你也可以在華擎網站找到最 新的顯示卡和 CPU 支援列表。 華擎網址:http://www.asrock.com 如果您需要與此主機板有關的技術支援 , 請參觀我們的網站以了解您使用 機種的規格訊息。 www.asrock.com/support/index.asp 1.1 包裝盒內物品 華擎 Z77 Extreme6/TB4 主機板 (ATX 規格 : 12.0 英吋 x 9.6 英吋 , 30.5 公分 x 24.4 公分 ) 華擎...
- Seite 184 技術。Intel Sandy Bridge CPU 支援 Pixel Shader 4.1、 DirectX 10.1 技術 - 最大共享記憶體 1760MB - 支援三個 VGA 輸出選項 :D-Sub、HDMI 和 Thunderbolt - 支援 HDMI 1.4a, 最高解析度達 1920x1200 @ 60Hz - 支援 D-Sub, 最高解析度達 2048x1536 @ 75Hz ASRock Z77 Extreme6/TB4 Motherboard...
- Seite 185 AHCI 和熱插拔 (SATA3_A2 接頭和 eSATA 接口共享資源 ) ® USB 3.0 - 2 x Intel 的後置 USB 3.0 接口,支援 USB 1.1/2.0/3.0 到 5Gb/s - 2 x by ASMedia ASM1042 的後置 USB 3.0 接口,支援 USB 1.1/2.0/3.0 到 5Gb/s ASRock Z77 Extreme6/TB4 Motherboard...
- Seite 186 MediaEspresso 6.5 試用版 , 華擎 MAGIX 多媒體套餐 - OEM, Google Chrome 瀏覽器和工具列 硬體監控 - CPU/ 主機板溫度偵測 - CPU/ 機箱 / 電源風扇轉速計 - CPU/ 機箱靜音風扇 ( 可透過 CPU 溫度自動調節機箱的風扇速 度 ) - CPU/ 機箱風扇多速控制 - 電壓範圍:+12V, +5V, +3.3V, 核心電壓 ASRock Z77 Extreme6/TB4 Motherboard...
- Seite 187 8/8 64 位元 /7/7 64 位元 /Vista Vista 64 位元 /XP/XP 64 位元 認證 - FCC, CE, WHQL - 支援 ErP/EuP( 需要同時使用支援 ErP/EuP 的電源供應器 ) * 請參閱華擎網站了解詳細的產品訊息 : http://www.asrock.com 警告 請了解超頻具有不可避免的風險 , 這些超頻包括調節 BIOS 設置、運用非同步 超頻技術或使用第三方超頻工具。超頻可能會影響您的系統穩定性 , 甚至會 導致系統組件和設備的損壞。這種風險和代價須由您自己承擔 , 我們對超頻 可能導致的損壞不承擔責任。 ASRock Z77 Extreme6/TB4 Motherboard...
- Seite 188 註: C L R C M O S1 可供您清除 C M O S 中的資料。若要清除及重設系統參數並恢復為預設設 定,請先關閉電腦電源,並從電源插座中拔下電源線,等待 15 秒鐘之後,使用跳 線帽使 CLRCMOS1 的 pin2 及 pin3 短路 5 秒的時間。但請勿於更新 BIOS 後立即清除 CMOS。如需於更新 BIOS 後立即清除 CMOS,您必須先開機再關機,然後再執行 CMOS 清除操作。請注意,只有在移除 C M O S 電池的情況下,密碼、日期、時間、使用者 預設設定檔、1394 GUID 及 MAC 位址才會清除。 Clear CMOS開關的功能與Clear CMOS跳線相同。 ASRock Z77 Extreme6/TB4 Motherboard...
- Seite 189 除了位於 I/O 面板的兩個 USB 2.0 接口之外,這款主機板有三 (9 針 USB_2_3) 組 USB 2.0 接針。每組 USB 2.0 ( 見第 2 頁第 25 項 ) 接針可以支援兩個 USB 2.0 接口 。 (9 針 USB_4_5) ( 見第 2 頁第 26 項 ) ASRock Z77 Extreme6/TB4 Motherboard...
- Seite 190 ( 見第 2 頁第 32 項 ) 1. 高清晰音效 (High Definition Audio, HDA) 支援智能音效接口檢測功能 (Jack Sensing), 但是機箱面板的連線必須支持 HDA 才能正常使用。請按我們提供的手冊 和機箱手冊上的使用說明安裝您的系統。 2. 如果您使用 AC’97 音效面板 , 請按照下面的步驟將它安裝到前面板音效接針 : A. 將 Mic_IN(MIC) 連接到 MIC2_L。 B. 將 Audio_R(RIN) 連接到 OUT2_R, 將 Audio_L(LIN) 連接到 OUT2_L。 ASRock Z77 Extreme6/TB4 Motherboard...
- Seite 191 統處於 S1/S3 待命模式時 , 此指示燈保持閃爍。當系統處於 S4 待命模式 或關機 (S5) 模式時 , 此指示燈熄滅。 HD LED( 硬碟活動指示燈 ): 連接機箱前面板的硬碟動作指示燈。當硬碟正在讀取或寫入數據時 , 此指 示燈亮起。 前面板設計因機箱不同而有差異。前面板模組一般由電源開關、重開開 關、電源指示燈、硬碟活動指示燈、喇叭等構成。將您的機箱前面板連接 到此接頭時 , 請確認連接線與針腳上的說明相對應。 機箱喇叭接頭 請將機箱喇叭連接到這個接頭。 (4 針 SPEAKER1) ( 見第 2 頁第 22 項 ) ASRock Z77 Extreme6/TB4 Motherboard...
- Seite 192 雖然此主板支持 4-Pin CPU 風扇 (Quiet Fan, 靜音風扇 ), 但是沒有調速功能的 3-Pin CPU 風扇仍然可以在此主板上正常運行。如果您打算將 3-Pin CPU 風扇 連接到此主板的 CPU 風扇接口 , 請將它連接到 Pin 1-3。 Pin 1-3 連接 3-Pin 風扇的安裝 (3 針 CPU_FAN2) FAN_SPEED +12V ( 見第 2 頁第 4 項 ) ASRock Z77 Extreme6/TB4 Motherboard...
- Seite 193 ( 見第 2 頁第 40 項 ) 口。 IEEE 1394 接口 除了位於 I/O 面板的一個默認 IEEE 1394 接口之外,這款主機 (9 針 FRONT_1394) 板有一組 IEEE 1394 接針。這組 ( 見第 2 頁第 19 項 ) IEEE 1394 接針可支援一個 IEEE 1394 接口。 ASRock Z77 Extreme6/TB4 Motherboard...
- Seite 194 ( 見第 2 頁第 31 項 ) HDMI_SPDIF 接頭 HDMI_SPDIF 接頭,提供 SPDIF 音效輸出至 HDMI 顯示卡,支援 (2 針 HDMI_SPDIF1) 將電腦連接至帶 HDMI 的數位電 ( 見第 2 頁第 33 項 ) 視 / 投影機 / 液晶銀幕等設備。 請將 HDMI 顯示卡的 HDMI_SPDIF 接口連接到這個接頭。 ASRock Z77 Extreme6/TB4 Motherboard...
- Seite 195 ( 見第 2 頁第 17 項 ) 重置開關 重置開關是一種快速開關 , 可讓 用戶快重置系統。 (RSTBTN) ( 見第 2 頁第 16 項 ) CMOS 數據清除開關 CMOS 數據清除開關是一種快速 開關 , 可讓用戶快速清除 CMOS (CLRCBTN) 中的數據。 ( 見第 3 頁第 18 項 ) ASRock Z77 Extreme6/TB4 Motherboard...
- Seite 196 <Delete> 鍵重新啟動電腦,或者按下系統面板上的重開按鈕。功能設置程序儲存有主 板自身的和連接在其上的設備的缺省和設定的參數。這些訊息用於在啟動系統和系統 運行需要時,測試和初始化元件。有關 B I O S 設置的詳細訊息,請查閱隨機支援光碟 裡的使用手冊 (PDF 文件 )。 3. 支援光碟訊息 ® ® ® 本主板支援各種微軟 Windows 操作系統:Microsoft Windows 8/8 64 位元 /7/7 64 位元 /Vista /Vista 64 位元。主板附帶的支援光碟包含各種有助於提高主板效能 的必要驅動和實用程式。請將隨機支援光碟放入光碟機裡,如果系統的“自動運行” 功能已啟用,銀幕將會自動顯示主菜單。如果主菜單不能自動顯示,請查閱支援光碟 內的 ASRSETUP.EXE 文件並雙點它,即可調出主菜單。 ASRock Z77 Extreme6/TB4 Motherboard...
- Seite 197 Dalam kondisi terjadinya modifikasi buku pedoman ini, versi baru akan diperlihatkan dalam website ASRock tanpa peringatan lebih. Anda dapat mendapatkan kartu- kartu yang paling baru dan daftar bantuan CPU pada website ASRock.
- Seite 198 3D, Intel Clear Video HD ® ® Technology, Intel Insider dan Intel HD Graphics 2500/4000 ® - Pixel Shader 5.0, DirectX 11 dengan Intel Ivy Bridge CPU, ® Pixel Shader 4.1, DirectX 10.1 dengan Intel Sandy Bridge ASRock Z77 Extreme6/TB4 Motherboard...
- Seite 199 - 1 x RJ-45 LAN Port LED (ACT/LINK LED dan SPEED LED) - 1 x Port IEEE 1394 - 1 x Tombol Clear CMOS dengan LED - HD Audio Jack: Penyuara Belakang/Pusat/Bass/Line in/ Penyuara Depan/mikropon ® SATA3 - 2 x penghubung Intel Z77 SATA3 6.0Gb/s, dapat digunakan ASRock Z77 Extreme6/TB4 Motherboard...
- Seite 200 - 1 x Clear CMOS LED Ciri-ciri BIOS - 64Mb AMI UEFI Legal BIOS dengan dukungan GUI - Menggunakan “Plug and Play” - ACPI 1.1 Compliance Wake Up Events - Menggunakan jumperfree - Penyokong AMBIOS 2.3.1 ASRock Z77 Extreme6/TB4 Motherboard...
- Seite 201 8 / 8 64-bit / 7 / 7 64-bit / Vista / Vista 64-bit / XP / XP 64-bit Sertifikasi - FCC, CE, WHQL - ErP/EuP Ready (memerlukan catu daya ErP/EuP ready) * Untuk informasi rinci, silakan kunjungi website kami: http://www.asrock.com ASRock Z77 Extreme6/TB4 Motherboard...
- Seite 202 (“xxx” is the device which contains your Windows installation files. Normally it is an optical drive.) You can also press <F11> to launch boot menu at system POST and choose the item “UEFI:xxx“ to boot. ® 4. Start Windows installation. ASRock Z77 Extreme6/TB4 Motherboard...
- Seite 203 RAID drivers into a USB flash disk. You can download the driver from ASRock's website and unzip the file into a USB flash disk OR copy the file from ASRock motherboard support CD. (please copy the files under the following directory: 32 bit: ..\i386\Win7_Vista_Intel..
- Seite 204 Microsoft 's suggested solution: A. Disable System Restore. a. Type “systempropertiesprotection” in the Start Menu. Then press "Enter". b. De-select Local Disks for System Restore. Then Click “Turn System Restore Off” to confirm. Then Press “Ok”. ASRock Z77 Extreme6/TB4 Motherboard...
- Seite 205 B. Disable “Volume Shadow Copy” service. a. Type “computer management” in the Start Menu, then press “Enter”. b. Go to “Services and Applications>Services”; Then double click “Volume Shadow Copy”. ASRock Z77 Extreme6/TB4 Motherboard...
- Seite 206 (This may take a long time; >30 mins.) C. Reboot your system. (It may take about 5 minutes to reboot.) ® D. Windows will install this hotfix then reboot by itself. E. Please start to install motherboard drivers and utilities. 6. Finish. ASRock Z77 Extreme6/TB4 Motherboard...