Inhaltsverzeichnis
Werbung
Verfügbare Sprachen
Verfügbare Sprachen
Quicklinks
Werbung
Inhaltsverzeichnis

Verwandte Anleitungen für ION Total PA Glow 2


Inhaltszusammenfassung für ION Total PA Glow 2
- Seite 1 iPA69D Quickstart Guide English ( 3 – 9 ) Guía de inicio rápido Español ( 10 – 16 ) Guide d’utilisation rapide Français ( 17 – 23 ) Guida rapida Italiano ( 24 – 30 ) Schnellstart-Anleitung Deutsch ( 31 – 37 ) Snelstartgids Nederlands ( 38 –...
- Seite 3 Safety Instructions & Warranty Information Booklet Support For the latest information about this product (system requirements, compatibility information, etc.) and product registration, visit ionaudio.com. For additional product support, visit ionaudio.com/support. Caution: Do not expose Total PA Glow 2 to rain or standing water.
-
Seite 4: Quick Setup
4. On Total PA Glow 2, adjust the bottom knob counter-clockwise so the screw is not blocking the opening. 5. Line up the Total PA Glow 2 mounting hole with the speaker stand pole and place on the pole. 6. Tighten the mounting knob clockwise on Total PA Glow 2. -
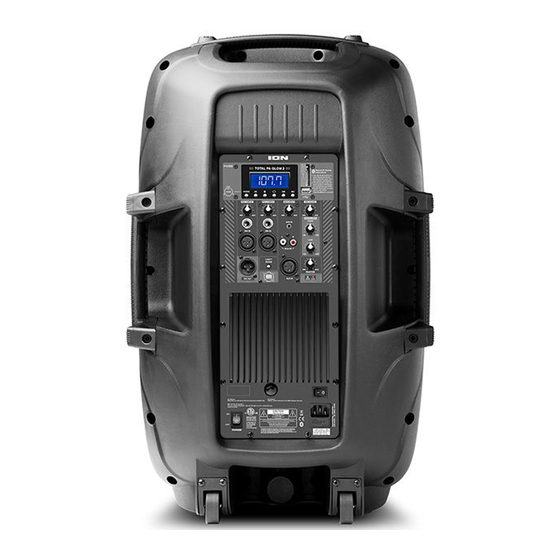
Seite 5: Rear Panel
XLR line-level input. Control the volume using the Aux Input Volume knob. Use this line-level input when linking together two Total PA Glow 2 units. 9. RCA Inputs: Connect a CD player, digital media player, mixer, or other media source to these inputs. Control the volume using the Aux Input Volume knob. - Seite 6 Fuse Holder, above the triangle symbol ( If you are using Total PA Glow 2 in a region with a voltage different than the unit’s current setting, change the setting by removing the Fuse Holder, inverting it, and reinserting it.
- Seite 7 Media Panel Remote Aim the remote straight at the front of the speaker woofer. Room lighting and battery life can affect the operating range of the remote control. Note: In order to use the remote control for the first time, first pull out the tab attached to the battery compartment.
-
Seite 8: Pairing A Bluetooth Device
2. Plug an XLR cable into the Mix Out located on the rear panel of one Total PA Glow 2 speaker. This speaker (the master) is the one to which you will connect audio sources such as a Bluetooth device, microphone, or USB flash drive. - Seite 9 You can find this under the Bluetooth menu in the Settings for your phone or other audio device. If this does not work, and you have connected to Total PA Glow 2 before, find Total PA Glow 2 in the list of available or previously connected devices in your audio device's Bluetooth menu, tap the "gear"...
-
Seite 10: Contenido De La Caja
Para obtener la información más completa acerca de este product (los requisitos del sistema, compatibilidad, etc) y registro del producto, visite ionaudio.com. Para obtener soporte adicional del producto, visite ionaudio.com/support. Precaución: No exponga el Total PA Glow 2 a lluvia ni lo coloque en agua. -
Seite 11: Instalación Rápida
5. Alinee el orificio de montaje del Total PA Glow 2 con el poste del soporte del altavoz y colóquelo en el poste. 6. Apriete la perilla de montaje en el Total PA Glow 2 en el sentido de las agujas del reloj. -
Seite 12: Características
Utilice esta entrada de nivel de línea para vincular dos unidades Total PA Glow 2 entre sí. Entradas RCA: Conecte a estas entradas un reproductor de CD, un reproductor de medios digitales, un mezclador u otras fuentes de medios. - Seite 13 (). Si está utilizando el Total PA Glow 2 en una región cuyo voltaje difiere del ajuste actual de la unidad, modifique dicho ajuste retirando el portafusibles, invirtiendo y reinsertándolo.
- Seite 14 Control remoto del panel de medios Apunte el control remoto hacia la parte frontal del altavoz. La iluminación de la sala y la vida útil de la pila pueden afectar al alcance operacional del control remoto. Nota: A fin de usar el control remoto por primera vez, extraiga primero la lengüeta fijada al compartimiento de las pilas.
- Seite 15 Además, los avisos de voz automáticos del altavoz le avisarán sobre el estado del dispositivo: Bluetooth Pairing, Bluetooth Connected o Bluetooth Disconnected. 4. Navegue a la pantalla de configuración de su dispositivo Bluetooth, busque Total PA Glow 2 y realice la conexión. El icono Bluetooth permanecerá encendido.
-
Seite 16: Solución De Problemas
Si esto no funciona y ya se había conectado al Total PA Glow 2 anteriormente, busque Total PA Glow 2 en la lista de dispositivos disponibles o previamente conectados en el menú Bluetooth de su dispositivo de audio, toque el icono de engranaje o "i"... -
Seite 17: Présentation
Pour les dernières informations concernant ce produit (la configuration système minimale requise, la compatibilité, etc) et l'enregistrement du produit, veuillez visitez le site ionaudio.com. Pour de l'assistance supplémentaire, veuillez visiter ionaudio.com/support. Mise en garde : Ne pas exposer le Total PA Glow 2 aux intempéries ou reposer dans l'eau. -
Seite 18: Démarrage Rapide
4. Serrez la vis inférieure de la Total PA Glow 2 dans le sens antihoraire afin qu'elle ne bloque pas l'ouverture. 5. Alignez le trou de fixation de la Total PA Glow 2 à la perche du support et placez l'enceinte sur la perche. -
Seite 19: Panneau Arrière
14. Égalisation des basses fréquences : Augmente ou diminue les basses fréquences pour les sources des entrées microphone, ligne et panneau des médias entre -12 dB à +12 dB. 15. Volume principal : Cette commande permet d'ajuster le volume principal du haut-parleur Total PA Glow 2. - Seite 20 Pour remédier à l'écrêtage, diminuez le réglage des boutons volume des entrées microphone, volume d'entrée auxiliaire et volume principal. 17. Témoin d'alimentation DEL : Indique si l'enceinte Total PA Glow 2 est sous ou hors tension. Touche de mode d'éclairage : Cette touche permet de commuter entre les quatre modes d’éclairage du panneau avant : •...
- Seite 21 Télécommande du panneau des médias Pointez la télécommande vers le haut-parleur d'extrêmes graves de l'enceinte. L'éclairage de la pièce et la charge de la pile peuvent affecter la plage de fonctionnement de la télécommande. Remarque : Avant d'utiliser la télécommande pour la première fois, retirez la languette du compartiment à pile.
- Seite 22 à une prise secteur. 2. Reliez un câble XLR à la Sortie mix du panneau arrière d’une des enceintes Total PA Glow 2. C’est à cette enceinte (maître) que vous devrez relier les sources audio comme un appareil Bluetooth, un microphone ou une clé...
- Seite 23 Bluetooth de votre appareil audio, puis appuyer sur l'icône engrenage ou « i » située à côté de « Oublier cet appareil ». Mettez la Total PA Glow 2 hors tension et de nouveau sous tension et réessayez de la jumeler une fois qu’elle apparaît dans la liste des appareils disponibles.
-
Seite 24: Contenuti Della Confezione
5. Collegare tutti i dispositivi come illustrato. 6. Accendere tutto nel seguente ordine: • Sorgenti di ingresso audio (microfoni, strumenti, lettori CD) • Total PA Glow 2 7. Al momento dello spegnimento, invertire questa operazione spegnendo: • Total PA Glow 2 •... -
Seite 25: Inizio Rapido
4. Sul Total PA Glow 2, regolare la manopola inferiore in senso antiorario in modo che la vite non blocchi l'apertura. 5. Allineare il foro di montaggio del Total PA Glow 2 al palo di supporto dell'altoparlante e collocarlo sul palo. -
Seite 26: Caratteristiche
-12 dB e +12 dB. 15. Volume principale: girare questa manopola per regolare il volume principale del altoparlante Total PA Glow 2. 16. LED clip: questo LED lampeggia di rosso se il segnale dagli ingressi o dal pannello dei media salta. Se ciò... - Seite 27 17. LED di alimentazione: indica se il Total PA Glow 2 è acceso o è spento. 18. Tasto di modalità luci: Premere questo tasto per commutare tra quattro modalità per le luci sul pannello anteriore: • Auto 1: le luci commutano saldamente tra diversi colori. Durante il ciclo, l’anello luminoso sarà dello stesso colore del woofer illuminato.
- Seite 28 Telecomando pannello dei media Puntare il telecomando verso la parte anteriore del woofer dell'altoparlante. L’illuminazione della stanza e la durata della batteria possono influenzare la portata operativa del telecomando. Nota bene: per poter utilizzare il telecomando per la prima volta, prima estrarre la linguetta fissata allo scomparto batterie.
- Seite 29 1. Accendere il dispositivo Bluetooth. 2. Accendere il Total PA Glow 2. 3. Servirsi del tasto Mode per selezionare Bluetooth che compare come "bt" a display. Total PA Glow 2 entrerà automaticamente in modalità di collegamento per cercare dispositivi Bluetooth. Si entra in modalità...
-
Seite 30: Risoluzione Di Problemi
Inoltre, provare a ridurre il volume complessivo del Total PA Glow 2. Eccessivi bassi: provare a regolare la tonalità o il comando EQ sul Total PA Glow 2 o a livello della fonte audio per abbassare il livello dei bassi. Ciò permetterà di suonare la musica più forte prima che salti (che si verifichi distorsione). -
Seite 31: Einführung
5. Verbinden Sie alle Geräte wie angegeben. 6. Schalten Sie alles in folgender Reihenfolge ein: • Audio-Eingangsquellen (z.B. Mikrofone, Instrumente, CD/MP3-Player) • Total PA Glow 2 7. Beim Ausschalten gehen Sie in umgekehrter Reihenfolge vor: • Total PA Glow 2 •... -
Seite 32: Schnelles Einrichten
3. Stecken Sie den Stift in das untere Loch, so dass die Montagestange auf Ihrer eingestellten Höhe bleibt. 4. Drehen Sie den unteren Drehknopf am Total PA Glow 2 gegen den Uhrzeigersinn, so dass die Schraube die Öffnung nicht blockiert. -
Seite 33: Funktionen
Medien-Panelquellen in einem Bereich von -12 dB bis +12 dB. 15. Hauptlautstärke: Mit diesem Regler stellen Sie die Hauptlautstärke des Total PA Glow 2 Lautsprecher ein. 16. Clip-LED: Diese LED blinkt rot, wenn das Signal von den Eingängen oder von der Medien-Panelquelle übersteuert. - Seite 34 Farbe wie der leuchtende Woofer annehmen. In diesem Modus können Sie die Lichtmodus-Taste gedrückt halten, um die Lichter in ihrer aktuellen Farbe "einzufrieren". Halten Sie die Taste erneut, um diese Fixierung aufzuheben. Auto 1 ist der Standardmodus, wenn Ihr Total PA Glow 2 eingeschaltet ist. •...
-
Seite 35: Fernbedienung Für Das Medien-Panel
Fernbedienung für das Medien-Panel Richten Sie die Fernbedienung direkt auf die Vorderseite des Woofers. Die Zimmerbeleuchtung und die Lebensdauer der Batterie können die Reichweite der Fernbedienung beeinträchtigen. Hinweis: Um die Fernbedienung zum ersten Mal zu verwenden, ziehen Sie zuerst den Streifen aus dem Batteriefach heraus. -
Seite 36: Betrieb
1. Bringen Sie die Ein-/Ausschalter an jedem Lautsprecher in die Position "Aus" und stecken Sie jeden Lautsprecher dann an eine Steckdose an. 2. Schließen Sie ein XLR-Kabel an den Mix Out auf der Rückseite eines Total PA Glow 2 Lautsprechers an. Dieser Lautsprecher (der Master) ist jener Lautsprecher, an den Sie Audioquellen, wie ein Bluetooth- Gerät, ein Mikrofon oder ein USB-Flash-Laufwerk anschließen. - Seite 37 Glow 2, tippen neben dem Gerät auf das "Zahnrad"-Symbol oder “i” und wählen dann Trennen oder Gerät ignorieren. Schalten Sie Total PA Glow 2 aus und wieder ein und versuchen Sie es erneut, sobald es wieder in der Liste der verfügbaren Geräte angezeigt wird.
-
Seite 38: Inhoud Van De Doos
Snelstartgids Veiligheidsvoorschriften & boekje met garantie-informatie Ondersteuning Voor de laatste informatie over dit product (systeemvereisten, compatibiliteitsinformatie, enz.) en productregistratie, bezoek ionaudio.com. Voor aanvullende productondersteuning naar ionaudio.com/support. Let op: Total PA Glow 2 niet blootstellen aan regen of in water plaatsen. -
Seite 39: Snelstart
3. Plaats de pin in het onderste pingaatje, zodat de staander op de ingestelde hoogte blijft staan. 4. Draai de onderste knop op de Total PA Glow 2 linksom, zodat de schroef de opening niet blokkeert. 5. Plaats de montageopening van de Total PA Glow 2 op één lijn met de staander van het luidsprekerstatief en plaats het apparaat op de staander. -
Seite 40: Achterpaneel
-12 dB tot +12 dB. 15. Hoofdvolume: Draai aan deze knop om het hoofdvolume van de Total PA Glow 2-luidspreker aan te passen. 16. Clip-LED: Deze LED begint rood te knipperen als het signaal van de ingangen of de bron van het mediapaneel overstuurd wordt. - Seite 41 In deze modus kunt u de knop Lichtmodus ingedrukt houden om de lampjes hun huidige kleur te doen behouden. Deze knop opnieuw indrukken en vasthouden om van kleur te veranderen. Auto 1 is de standaardmodus wanneer de Total PA Glow 2 wordt ingeschakeld.
- Seite 42 Afstandsbediening mediapaneel Richt de afstandsbediening recht op de voorkant van de woofer van de luidspreker. De verlichting in de kamer en de levensduur van de batterij kunnen het werkingsbereik van de afstandsbediening beïnvloeden. Opmerking: Om de afstandsbediening voor de eerste keer te gebruiken, moet u het lipje uit het batterijcompartiment trekken.
-
Seite 43: Een Bluetooth-Apparaat Koppelen
1. Sluit de luidsprekers aan op een stopcontact met de Aan/uit-schakelaar op elke luidspreker in de uitstand. 2. Sluit een XLR-kabel aan op de Mix Out-uitgang op het achterpaneel van een Total PA Glow 2- luidspreker. Sluit op deze luidspreker (de master) audiobronnen aan zoals een Bluetoothapparaat, microfoon of USB-flashstation. -
Seite 44: Problemen Oplossen
Hiervoor kunt u terecht in het Bluetooth-menu van de Instellingen van uw telefoon of ander audioapparaat. Als dat niet werkt en u voorheen al verbinding hebt gemaakt met Total PA Glow 2, zoek dan naar Total PA Glow 2 in de lijst met beschikbare of voorheen aangesloten apparaten in het Bluetooth-menu van uw audioapparaat, tik op het tandwielpictogram of het "i"-pictogram naast de naam en kies vervolgens... -
Seite 45: Appendix (English)
Trademarks & Licenses ION Audio is a trademark of ION Audio, LLC, registered in the U.S. and other countries. The Bluetooth word mark and logos are owned by the Bluetooth SIG, Inc. and any use of such marks by ION Audio is under license. All other product names, company names,... - Seite 48 ionaudio.com Manual Version 1.1...