Inhaltsverzeichnis
Werbung
Verfügbare Sprachen
Verfügbare Sprachen
Quicklinks
Werbung
Kapitel
Inhaltsverzeichnis
Fehlerbehebung

Verwandte Anleitungen für Torgeedo Ultralight 403

Inhaltszusammenfassung für Torgeedo Ultralight 403
- Seite 1 Ultralight 403 Bedienungsanleitung (Deutsch) Operating Manual (English)
-
Seite 3: Inhaltsverzeichnis
1. Inhalt 2. Wichtige Sicherheits- und Handhabungshinweise ............4 3. Einleitung ........................... 6 4. Gesetzlich vorgeschriebene Angaben ................7 4.1 Identifizierung und technische Daten ..............7 4.2 Konformitätserklärung ..................... 9 5. Ausstattung und Bedienelemente ................. 10 5.1 Lieferumfang......................10 5.2 Übersicht Bedienelemente und Komponenten ............ 11 6. -
Seite 4: Wichtige Sicherheits- Und Handhabungshinweise
2. Wichtige Sicherheits- und Handhabungshinweise GEFAHR Dieses Symbol warnt vor Verletzungsgefahren für Sie und andere. Torqeedo Motoren sind so konzipiert, dass sie sicher und zuverlässig arbeiten, sofern sie entsprechend der Bedienungsanleitung benutzt werden. Bitte lesen Sie diese Bedie- nungsanleitung sorgfältig, bevor Sie den Motor in Betrieb nehmen. Fehlende Berück- sichtigung der Hinweise dieser Bedienungsanleitung kann Sach- oder Personenschäden zur Folge haben. - Seite 5 - Falls aus dem beschädigten Akku Elektrolyt austreten sollte, vermeiden Sie Hautkontakt und direktes Einatmen der Gase. Sollten Sie in Kontakt mit aus dem Akku ausgetretenen Elektrolyt gekommen sein (z.B. auf der Haut oder in den Augen), spülen Sie die betref- fenden Stellen gründlich mit klarem Wasser.
-
Seite 6: Einleitung
• Die Ladebuchse ist außerhalb des Ladeprozesses stets verschlossen zu halten. Bitte be- nutzen Sie hierzu die an der Buchse befestigte Kappe. • Sie verlängern die Lebensdauer Ihres Akkus, wenn Sie ihn nicht länger als notwendig direkter Sonneneinstrahlung aussetzen. • Bei längerer Einlagerung Ihres Akkus sollten Sie folgende Regeln beachten. Einlagerung für ca. ein halbes Jahr: Ladestand bei Einlagerung 50%. Einlagerung für ein ganzes Jahr: Ladestand bei Einlagerung 100%. Bei mehrjähriger Lagerung sollte der Ladestand des Ak- kus ein Mal jährlich nachgeladen werden, um eine Tiefentladung des Akkus zu vermeiden. -
Seite 7: Gesetzlich Vorgeschriebene Angaben
4. Gesetzlich vorgeschriebene Angaben 4.1 Identifizierung und technische Daten Die Typenschilder mit der vollständigen Produktbezeichnung befinden sich an den in der Abbildung angezeigten Stellen. -
Seite 8: Erklärung Und Beschreibung Der Symbole
Entsorgung der Implantaten – mind. 50 cm. Batterie Abstand halten von Magnetkarten (z. B. Kreditkarten) und anderen magnetisch sensiblen Informationsträgern – mind. 50 cm Technische Daten Typenbezeichnung Ultralight 403 Max. Eingangsleistung (in Watt) Max. Vortriebsleistung (in Watt) Max. Gesamtwirkungsgrad (in %) Vergleichbarer Benzin-Außenborder (Vortriebsleistung) 1 PS Integrierte Batterie 320 Wh Li-Ion Nennspannung (in Volt) -
Seite 9: Konformitätserklärung
4.2 Konformitätserklärung EG-Konformitätserklärung nach EG-Maschinenrichtlinie 2002/96/EG, Anhang IIA Hiermit erklären wir, die Torqeedo GmbH Petersbrunner Str. 3a 82319 Starnberg , dass die nachfolgend bezeichneten Außenbordmotoren Produktreihe: Torqeedo Ultralight 403 Produktvarianten: alle aufgrund ihrer Konzipierung und Bauart in der von uns in den Verkehr gebrachten Ausführungen den grundlegenden Sicherheits- und Gesundheitsanforderungen der nachfolgend aufgeführten EG-Richtlinien entspricht. Maschinenrichtlinie 2006/42/EG EMV-Richtlinie 2004/108/EG Sportbootrichtlinie 94/25/EG Angewandte harmonisierte Normen: • DIN EN ISO 12100-1:2004... -
Seite 10: Ausstattung Und Bedienelemente
5. Ausstattung und Bedienelemente 5.1 Lieferumfang Zum vollständigen Lieferumfang Ihres Torqeedo Ultralight gehören folgende Teile: • Motoreinheit mit Schaft und Anschlusskabel (2 m), Kreuzgelenk mit Schwenkarm, Pylon und Propeller • Ausleger mit Klemmvorrichtung und Montagekugel • Lithium-Ionen Akku mit integriertem GPS-Empfänger • Ferngashebel mit integriertem Display • Magnetpin • Montagesatz mit Befestigungsmaterial, Gummiauflage, Leine, Gummikordel, Arretierungsstift und Zubehör • Inbusschlüssel SW5 • Verbindungskabel Akku - Ferngas (1,5 m) • Packsack • Netzgerät inkl. Euro-Netzkabel, US-Netzkabel • Bedienungsanleitung • Garantieschein • Verpackung... -
Seite 11: Übersicht Bedienelemente Und Komponenten
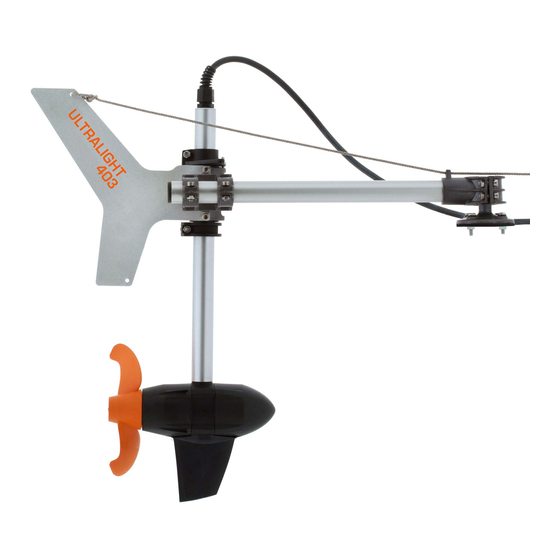
5.2 Übersicht Bedienelemente und Komponenten Anbringungspunkt Leine für manuelles Kippen des Motors Anschlusskabel Schwenkarm Anschluss an Kajak-Lenkung bzw. Fixierung Gummikordel der Lenkung Ausleger Anbringungs- Gummiauflage punkt für Leine Spacer „Rückwärtsfahrt“ Schaft Montagekugel Propeller Pylon Finne Ferngashebel Magnetpin Akku... -
Seite 12: Inbetriebnahme
6. Inbetriebnahme 6.1 Anbau des Antriebs an das Boot Nutzen Sie den Motor nicht als Befestigungspunkt für Ihr Kajak; nutzen Sie den Motor nicht als Griff zum Anheben oder zum Tragen. 1. Bereiten Sie den Motor für den Anbau vor: Entnehmen Sie die zum Lieferumfang des Ultralight gehörigen Teile der Verpackung. - Seite 13 Zur Anbringung des Antriebes an Ihr Kajak gibt es drei Möglichkeiten: A Keine Verbindung des Motors mit der Lenkanlage des Kajaks: Bei Fahrten unter Motor müssen Sie entweder mit dem Paddel lenken oder mit einem Ruder, das nicht mit dem Motor verbunden ist. Hierbei können keine engen Kurvenradien unter Motor gefahren werden. Diese Art der Anbringung empfiehlt sich, wenn Ihr Kajak nicht mit einer Lenkanlage ausgerüstet ist, oder wenn Sie den Motor nur als Unterstützung oder Reserve für lange Kajak Ruder...
- Seite 14 C Anbindung des Motors an die Lenkanlage des Kajaks zusätzlich zum Ruder: Diese Anbringung empfiehlt sich, wenn Sie sowohl Wendigkeit unter Motor als auch den Einsatz des Ruders beim Paddeln wünschen. Verbindung des Motors mit der Ruderanlage des Kajaks Lenkanlage des Kajaks Motor Ruder Montagekugel • Testen Sie, ob in der gewünschten Position die Lenkung funktioniert, und ob sich Kajak Motor und Ruder aus dem Wasser kippen lassen, bevor Sie die Montagekugel am Kajak fixieren. • Die Bohrlöcher für den Spreizdübel müssen mindestens 2 cm von eventuellen Kanten des Bootes entfernt sein.
- Seite 15 Befestigen Sie die Montagekugel mit den beigelegten Schrauben und Muttern. Um die Bohrlöcher wasserdicht zu verschließen und um leichte Unebenheiten auf der Ober- fläche des Kajaks auszugleichen, sollten Sie die beigelegte Gummiauflage (schwarz) benutzen. Zur Verstärkung der Kajak-Innenwand benutzen Sie bitte die mit 8 Bohrun- gen versehene weiße Kunststoff-Platte. Schrauben Isolierhülsen Montagekugel Gummiauflage (schwarz)
- Seite 16 Entfernen Sie die Schrauben aus den Dübeln. Stecken Sie den Aluminium-Schlüssel von oben auf einen der Dübel. Der Schlüssel verhindert, dass sich der Dübel beim Festschrauben mit dreht. Stecken Sie den Dübel in eines der Bohrlöcher. Be- achten Sie, dass der Dübel leichtgängig durch das Bohrloch passen muss, ohne zusammengedrückt zu werden.
- Seite 17 Lösen Sie die Schraube und entfernen Sie den Schlüssel. Befestigen Sie anschließend die anderen Dübel auf gleiche Weise am Kajak. Legen Sie die Gummiauflage (schwarz) auf die vier befestigten Dübel. Platzieren Sie die Montagekugel auf der Gum- miauflage (schwarz). Stecken Sie die Kunststoff- Isolierhülsen durch die Löcher der Montagekugel und schrauben Sie die Montagekugel in den Dübeln fest.
- Seite 18 4. Montieren Sie den Antrieb, indem Sie die Kugelaufnahme auf die Montagekugel klem- men. Dabei muss der Ausleger waagerecht zur Wasserlinie ausgerichtet sein. Achten Sie beim Anziehen der Schrauben in der Kugel- klemmung darauf, dass der Spalt zwischen den Kugelschalen gleich groß ist. 5.
-
Seite 19: Inbetriebnahme Der Kippvorrichtung
• Bei Unsicherheit bzgl. der Positionierung und Montage Ihres Motors, wenden Sie sich an Ihren Torqeedo Händler. • Achten Sie darauf, dass beim Kippen das Motorkabel nicht gequetscht wird. 6.2 Inbetriebnahme der Kippvorrichtung 1. Montieren Sie einen Klemmblock auf Höhe des Fahrersitzes. Der Klemmblock ist so auszurichten, dass er eine Leine gegen Zug in Richtung Heck des Kajaks sichert. 2. Schneiden Sie die mitgelieferte Leine 2 x 3 m und 2 x 0,5 m ab. Verschmelzen Sie die Enden z.B. durch Erhitzen mit einem Feuerzeug. -
Seite 20: Anschluss Des Ferngashebel Mit Integriertem Display Und Magnetpin
erforderlich, gegebenenfalls können Sie die mitgelieferten Karabinerhaken zur Befesti- gung der Leinen am Klemmring nutzen. 2. Wenn Sie den Motor zusätzlich zum Ruder an die Lenkanlage des Kajaks anschließen möchten: Befestigen Sie die zwei mitgelieferten Karabinerhaken an den kurzen Lei- nen. Verbinden Sie mit den kurzen Leinen nun das Ruder des Kajaks mit dem dreiecki- gen Klemmring am oberen Ende des Motorschafts. -
Seite 21: Bedienung
7. Bedienung 7.1 Akku und Netzteil Der Akku ist mit Hochleistungs-Lithium-Ionen-Zellen bestückt. Die Zellen haben eine Selbstentladung bei 20 °C von unter 1% pro Monat, sind zyklenstabil und haben keinen Memory-Effekt. Der Lithium Akku ist in einer Umgebungstemperatur von -20 °C bis +60 °C einsatzbereit. Im Akku ist ein Controller integriert, der mehrere Funktionen zum Schutz und zur Pflege ihres Akkus enthält. Unter anderem schützt der Controller den Akku gegen Tiefentladung sowie gegen Überladung. -
Seite 22: Solar-Laden Des Akkus
• Benutzen Sie den Ultralight Akku 403 ausschließlich mit dem Ultralight 403 Außenbordmotor. • Benutzen Sie nur das mitgelieferte Netzteil oder das Torqeedo Solar-Lade- gerät zum Laden des Akkus. • Öffnen Sie nicht das Gehäuse des Akkus. Schützen Sie den Akku vor mechanischen Beschädigungen. Sollte das Akku-Gehäuse beschädigt werden: - Benutzen Sie den Akku nicht mehr und laden Sie ihn nicht mehr. Es besteht Brandgefahr. - Falls aus dem beschädigten Akku Elektrolyt austreten sollte, vermeiden Sie Hautkontakt und direktes Einatmen der Gase. -
Seite 23: Kippvorrichtung Und Arretierung
Die Ladung des Akkus mit Solar-Ladegerät außerhalb dieser Spezifi- kation führt zu Schäden am Gerät, die nicht unter die Garantie fallen. Gleiches gilt für Nicht-Beachtung der Polarität. (Siehe Polarität der Ladebuchse). • Laden Sie den Akku stets unter Aufsicht einer erwachsenen Person auf feuerfestem Untergrund. • Wenn Sie ein anderes als das von Torqeedo empfohlene Solar-Lade- gerät nutzen, stellen Sie sicher, dass ausreichende Kabeldurchmesser verwendet werden – Brandgefahr! 7.3 Kippvorrichtung und Arretierung Bei normaler Fahrt sollte die Fixierleine, die zum unteren Ende des Schwenkarms führt,... -
Seite 24: Ferngashebel Mit Integriertem Display Und Magnetpin
• Kippen Sie den Schaft nur, wenn die untere Fixierleine gelöst ist. • Zum Lenken muss der Arretierbolzen aus dem oberen Klemmring entfernt werden. 7.4 Ferngashebel mit integriertem Display und Magnetpin Die Leistungssteuerung – Drehzahl und Drehrichtung – des Antriebs erfolgt durch Verstel- len des Ferngashebels. Bewegung des Ferngashebels nach vorn bedeutet Vorwärtsfahrt des Kajaks, Bewegung des Ferngashebels nach hinten bedeutet Rückwärtsfahrt des Ka- jaks. Bitte beachten Sie, dass die Rückwärtsfahrt nicht über die gleiche Leistung verfügt wie die Vorwärtsfahrt. Die Mittel-Stellung entspricht der Stopp-Stellung. Der Ferngashebel ist mit einem Magnetpin mit einer Ein/Aus-Funktion ausgestattet. Der Motor funktioniert nur, wenn Sie den mitgelieferten Magnetpin auf die dafür vorgesehene Vertiefung auf dem Ferngashebel platzieren (siehe Zeichnung). Das Abziehen des Magnet- pins stoppt den Motor. - Seite 25 Der Magnetpin kann magnetische Informationsträger löschen (insbe- sondere Kreditkarten, Scheckkarten etc.). Halten Sie den Magnetpin von Kreditkarten und anderen magnetischen Informationsträgern fern. Der Ferngashebel ist mit einem integrierten Display bzw. Bordcomputer und drei Tasten ausgestattet. Wenn Sie die „Ein/Aus“-Taste für 1 Sekunde betätigen, schalten Sie den Motor ein.
- Seite 26 Anzeige-Beispiel im Normalbetrieb: Batterie-Ladestand in Prozent Verbleibende Reichweite bei aktueller Geschwindigkeit Geschwindigkeit über Grund Aktueller Leistungsverbrauch in Watt Andere Anzeigen: Drive slowly: Erscheint, wenn die Akkukapazität < 30 % ist. Charging: Wird während des Ladens angezeigt. Siehe Abschnitt 7.1. : Das im Akku integrierte GPS Modul sucht Satellitensignale zur Positions- und Geschwindigkeitsbestimmung.
-
Seite 27: Pylon
7.5 Pylon Im Pylon sind der Motor und der elektronische Controller untergebracht. Diese erbringen die Antriebsleistung. Darüber hinaus sind mehrere Schutzfunktionen integriert: 1. Temperaturschutz: Wird der Motor zu heiß, so reduziert der Motorcontroller die Leistung des Antriebes, bis sich ein Temperaturgleichgewicht zwischen entstehender und abgeführter Wärme einstellt. -
Seite 28: Optimale Eintauchtiefe
7.6 Optimale Eintauchtiefe Die Eintauchtiefe des Propellers im Wasser hat Einfluss auf die Effizienz Ihres Antriebs. Mit Hilfe der im Display angezeigten Angaben zu Geschwindigkeiten und verbrauchter Leistung können Sie die Eintauchtiefe des Propellers optimieren. 7.7 Außergewöhnliche Funktionen/Notsituationen Sie können Ihren Motor auf 3 verschiedene Arten stoppen: 1.Ferngas in Stopp-Position bringen 2. - Seite 29 Überstrom am Motor Mit geringerer Leistung weiter fahren. Torqeedo Service kontaktieren. Übertemperatur Motor kann nach kurzer Wartezeit (ca. 10 Minuten) Leiterplatte langsam weiter betrieben werden. Torqeedo Service kontaktieren. Kalibrierung Ferngas fehlerhaft • Neukalibrierung durchführen: Für 10 Sekunden „cal“-Taste drücken. • Im Display erscheint „cal up“: Ferngashebel auf Vollgas vorwärts, anschließend „cal“-Taste drücken. • Im Display erscheint „cal stp“: Ferngashebel in die Mittel-(Stopp-)Stellung bringen, anschließend „cal“-Taste drücken.
-
Seite 30: Demontage
9.1 Allgemeine Pflegehinweise, Wartung und Korrosionsschutz Bei der Auswahl der Materialien wurde auf ein hohes Maß an Korrosionsbeständigkeit geachtet. Alle im Ultralight 403 verbauten Materialien sind, wie die meisten maritimen Produkte für den Freizeitbereich, als „seewasserbeständig“ und nicht als „seewasserfest“... -
Seite 31: Akkupflege
• Nach Gebrauch sollte der Motor grundsätzlich aus dem Wasser genommen werden. Dies kann über den Kippmechanismus erfolgen. • Nach Betrieb im Salz- oder Brackwasser sollten alle Komponenten mit Frischwasser abgespült werden. • Bewahren Sie Motor, Akku und Ferngashebel nur in trockenem Zustand im wasserdichten Packsack auf. Bei längerer Lagerung im Packsack diesen nicht luftdicht verschließen. • Einmal im Monat sollten alle elektronischen Kontakte mit Kontaktspray behandelt werden. -
Seite 32: Wechseln Des Propellers
9.3 Wechseln des Propellers 2. Zylinderstift 3. Propeller 4. Äußere Federscheibe 1. Innere Federscheibe 5. Selbstsichernde Ausrichtung Sechskantmutter Federscheiben 1. Lösen Sie das Kabel zwischen Motor und Akku. 2. Zentrale Mutter am Propeller lösen und abschrauben. 3. Propeller von der Motorwelle ziehen. 4. -
Seite 33: Garantiebedingungen
10. Garantiebedingungen 10.1 Garantieumfang Die Torqeedo GmbH, Petersbrunner Straße 3a in D-82319 Starnberg garantiert dem Endabnehmer eines Torqeedo Außenborders, dass das Produkt während des nachste- hend festgelegten Deckungszeitraumes frei von Material- und Verarbeitungsfehlern ist. Torqeedo wird den Endabnehmer von den Kosten der Beseitigung eines Material- oder Verarbeitungsfehlers freihalten. Diese Freihalteverpflichtung gilt nicht für alle durch einen Garantiefall veranlassten Nebenkosten und alle sonstigen finanziellen Nachteile (z.B. Ko- sten für Abschleppen, Telekommunikation, Verpflegung, Unterkunft, entgangene Nutzung, Zeitverlust usw.). -
Seite 34: Garantieprozess
Neben den Ansprüchen aus dieser Garantie hat der Endabnehmer gesetzliche Gewähr- leistungsansprüche aus seinem Kaufvertrag mit dem jeweiligen Händler, die durch diese Garantie nicht eingeschränkt werden. 10.2 Garantieprozess Die Einhaltung des nachfolgend beschriebenen Garantieprozesses ist Voraussetzung für die Erfüllung von Garantieansprüchen. Bevor der Versand von reklamierten Produkten an Torqeedo erfolgen darf, ist die Einsen- dung unbedingt mit dem Torqeedo Service abzustimmen. Die Kontaktaufnahme kann per Telefon, Mail oder postalisch erfolgen. Kontaktadressen befinden sich auf der Rückseite dieser Bedienungsanleitung. -
Seite 35: Zubehör
Beschreibung 1413-00 Wechselakku Ultralight 403 Li-Ion-Hochleistungsakku mit integriertem GPS- Empfänger, 320 Wh, 29,6 V, 11 Ah 1127-00 Ladegerät für Wechselakku 40 Watt Ladegerät (12 V, 3,3 A), für Steckdosen Ultralight 403, Travel 503 und zwischen 100-240 V und 50-60 Hz 1003 1912-00 Ersatzpropeller v10/p350 8‘‘ x 8‘‘ Variable-Pitch-Variable-Camber (VPVC) Propeller, speziell für Kajaks und andere Ultraleicht- Boote entwickelt; aus schlagzähem, glasfaserver- stärktem PBT (Polybutylenterephthalat), komplett... - Seite 37 1. Contents 2. Important safety and operating instructions ..............38 3. Introduction ........................40 4. Information required by law ..................41 4.1 Identification and technical data ................41 4.2 Conformity declaration ..................43 5. Equipment and operating elements ................44 5.1 Items supplied ......................
-
Seite 38: Important Safety And Operating Instructions
2. Important safety and operating information DANGER This symbol warns about the risk of injury to yourself or others. Torqeedo motors are designed to operate safely and reliably as long as they are used according to the operating manual. Please read this manual carefully before you start the motor. - Seite 39 • Always charge the battery on a non-flammable base under the supervision of an adult. • Only charge the battery at environmental temperatures between 0°C and 45°C. • Please note that since 2009 lithium batteries with a capacity of >100 Wh may no longer be carried as luggage in passenger planes. The battery supplied with this product ex- ceeds this threshold and may therefore not be transported in the cargo area of passenger planes. • The battery of your Ultralight motor has been declared a hazardous item in UN Class 9. Transportation companies must use original packaging to transport the product. Private transport is not affected by this rule.
-
Seite 40: Introduction
• Comply with the following rules if you are storing your battery for a longer period of time. Storage for around six months: Charging level when stored 50%. Storage for a whole year: Charging level when stored 100%. If the battery is to be stored for several years the battery should be charged once a year in order to prevent the battery from completely discharging. -
Seite 41: Information Required By Law
4. Information required by law 4.1 Identification and technical data The name plates with the complete product name are found at the locations stated in the diagram. -
Seite 42: Technical Data
Keep at least 50 cm away from magnetic cards (e.g. credit cards) and other sensitive magnetic information media Technical data Name of model Ultralight 403 Max. input power (in Watt) Max. propulsive power (in Watt) Max. overall efficiency (in %) Comparable gasoline outboard motor (propulsive power) -
Seite 43: Conformity Declaration
Petersbrunner Str. 3a 82319 Starnberg hereby declare that the outboard motors defined below Product range: Torqeedo Ultralight 403 Product variants: all, their design and construction type in the versions sold by us meet the fundamental safety and health requirements of the EU Directives listed below. -
Seite 44: Equipment And Operating Elements
5. Equipment and operating elements 5.1 Items supplied The full supply scope of your Torqeedo Ultralight should include the following parts: • Motor unit with shaft and connection cable (2 m), universal joint with pivot arm, pylon, and propeller • Boom with clamping device and mounting ball • Lithium ion battery with integrated GPS receiver • Remote throttle lever with integrated display • Magnetic key • Assembly set with fixing material, rubber rest, cord, rubber trim, lock pin and accesso- ries • Allen key SW5 • Battery connection cable – remote throttle (1.5 m) • Pack sack • Mains power supply incl. Euro mains cable, US mains cable • Operating manual... -
Seite 45: Plan Of Operating Elements
5.2 Operating element summary Attachment point for line to manually tip the motor Connection cable Swing arm Connection to kayak steering or steering Rubber trim fixing Boom Rubber rest Attachment point (black) for “reverse” line Spacer Shaft Mounting ball Propeller Pylon Remote throttle Magnetic key Battery... -
Seite 46: Starting Up
6. Starting up 6.1 Fitting the drive onto the boat Never use the motor as a fixing point for your kayak; never use the motor as a handle for lifting or carrying. 1. Prepare the motor for fitting: Remove the parts that belong to the Ultralight supply scope from the packaging. Slide the boom with the clamp into the universal joint and clamp it lightly with the two screws. - Seite 47 There are three options for connecting the drive to your kayak: A No connection of the motor to the kayak’s steering system: When travelling with the motor you must either steer using the paddle or with a rudder that is not con- nected to the motor.
- Seite 48 C Fixing the motor to the kayak’s steering system in addition to a rudder: We recom- mend this attachment option if you want flexibility when the motor is running and to use the rudder when paddling. Connection of the motor to the kayak’s rudder system Kayak‘s steering system Motor...
- Seite 49 Fix the mounting ball with the enclosed screws and nuts. You should use the enclosed rubber rest (black) to close the drill holes so they are watertight and to balance out slight unevenness in the surface of the kayak. To strengthen the kayak internal wall please use the white plastic plate with 8 holes. Screws Insulating sleeves Mounting ball...
- Seite 50 Remove the screws from the bolts. Insert the aluminum keys from the top onto a bolt. The screw prevents the bolt from turning when being tightened. Insert the bolt into one of the drill holes. Ensure that the bolt fits easily through the drill hole wit- hout being pressed together. If possible insert the white plastic plate with 8 drill holes over the bolt from the inside.
- Seite 51 Loosen the screw and remove the key. Then fix the other bolt to the kayak in the same way. Lay the rubber rest (black) on to the four fixed bolts. Place the mounting ball on the rubber rest (black). Insert the plastic insulating sleeves through the holes on the mounting ball and tigh- ten the mounting ball into the bolts.
- Seite 52 4. Assemble the drive by clamping the ball receiver to the mounting ball. For this the boom must be aligned horizontally to the water line. When tightening the screws in the ball clamp, ensure that the gap between the ball halves is the same size. 5.
-
Seite 53: Commissioning The Tilting Device
• If you are unsure about the position and assembly of your motor contact your Torqeedo dealer. • Ensure that when tipping the motor the cables are not squashed. 6.2 Commissioning the tilting device 1. Mount a clamp block at the level of the driver’s seat. The clamp block must be aligned to provide a line that prevents pulls towards the rear of the kayak. 2. Cut the supplied line to 2 x 3 m and 2 x 0.5 m. Merge the ends, e.g. -
Seite 54: Connecting The Remote Throttle Lever With The Integrated Display And Magnetic Key
2. If you want to connect the motor to both the kayak’s rudder and steering system: Fix the two karabiner hooks supplied to the short line. Now connect the short line to the kayak’s rudder with the triangular clamp ring at the upper end of the motor shaft. To do so insert the karabiner hooks into the holes in the clamp ring that are designed for this purpose and tie the other end of the line to the kayak’s rudder. Movements of the rudder to the left or right should produce the corresponding steering movements in the motor. -
Seite 55: Operation
7. Operation 7.1 Battery and power supply unit The battery is equipped with high performance lithium ion batteries. The cells have a self- discharge of less than 1% per month at 20°C, have stable cycles, and no memory effect. The lithium battery can be used at environmental temperatures from -20°C to +60°C. A controller that has several functions to protect and care for your battery is integrated in the battery. -
Seite 56: Using Solar Module To Charge Battery
• Use the Ultralight battery 403 exclusively with the Ultralight403 outboard motor. • Only use the power supply unit supplied or the Torqeedo solar charger to charge the battery. • Never open the battery casing. Protect the battery from mechanical da- mage. If the battery casing is damaged: - Do not use the battery any more and do not charge it. There is a risk of fire. - If electrolytes leak from the damaged battery avoid skin contact and directly breathing in the gases. -
Seite 57: Tilting Device And Lock
Charging the battery with the solar charger outside these specifications will damage the device and will not be covered by the warranty. This also applies if the wrong polarity is used. (Refer to the polarity of the charging socket). • Always charge the battery on a non-flammable base under the supervision of an adult. • If you use a solar charger other than the one recommended by Torqeedo, ensure that the cable has an appropriate diameter – risk of fire! 7.3 Tilting device and lock For normal movement the fixing lines that go to the lower end of the pivot arm should not be fixed in the clamp block. -
Seite 58: Remote Throttle Lever With Integrated Display And Magnetic Key
• Only tip the shaft when the lower fixing line is loose. • For steering the lock bolt must be removed from the upper clamp ring. 7.4 Remote throttle lever with integrated display and magnetic key Control the drive power – revs and rotation direction - by adjusting the remote throttle. Forward movement of the remote throttle means the kayak moves forward, backward movement of the remote throttle means the kayak moves backwards. Please note that moving in reverse does not have the same output as moving forwards. - Seite 59 The magnetic key may delete magnetic information media (especially credit and debit cards etc.). Keep the magnetic key away from credit cards and other magnetic information media. The remote throttle lever is equipped with an integrated display and on-board computer and three buttons. If you press the “on/off button”...
- Seite 60 Sample display in normal operation: Battery charging status in percent Remaining range at current speed Land speed Current consumption in Watt Other displays: Drive slowly: Is displayed when the battery capacity is < 30 %. Charging: Is displayed when charging. See Section 7.1. : The GPS module integrated into the battery searches for satellite signals to determine the position and speed.
-
Seite 61: Pylon
7.5 Pylon The motor and the electronic control system are located in the pylon. They generate the propulsion. In addition, several protective functions are integrated: 1. Temperature protection: If the motor overheats, the motor control system reduces the output of the drive until a temperature equilibrium is established between generated and disposed heat. -
Seite 62: Ideal Insertion Depth
7.6 Ideal insertion depth The insertion depth of the propeller in the water affects the efficiency of your drive. You can optimize the propeller’s insertion depth with the aid of the information on speed and consumption shown on the display. 7.7 Unusual functions/emergency situations You can stop your motor in 3 different ways: 1. Move remote throttle to stop position 2. Pull magnetic key 3. Remove motor cable from the battery (main switch) In the unlikely event that your lithium battery catches fire try to position it such that it causes the least possible damage. - Seite 63 Motor overcurrent Continue at low output. Contact Torqeedo Service. Circuit board overheating Motor can be used again after a short wait about 10 minutes). Contact Torqeedo Service. remote throttle calibration • Re-calibrate: defective Press “cal” button for 10 seconds. • The display shows “cal up”: Press remote throttle lever forward to full gas then press the “cal”...
-
Seite 64: Dismantling
9. Storage and care instructions 9.1 General care advice, maintenance and corrosion protection Materials were chosen with a high level of corrosion-resistance. All of the materials used in the Ultralight 403 are, as with most leisure maritime products, classed as “seawater resistant”, not “seawater-proof”. -
Seite 65: Caring For The Battery
• After use you should always remove the motor from the water. The tipping mechanism can be used for this. • After operation in salty or brackish water, wash all components in fresh water. • Store the motor, battery, and remote throttle lever in the waterproof pack sack only when dry. If storing the items for longer periods of time in the pack sack, do not close it so it is airtight. • Treat all electronic parts with contact spray once a month. -
Seite 66: Changing The Propeller
9.3 Changing the propeller 2. Cylindrical pin 3. Propeller 4. Outer spring washer 1. Inner spring washer 5. Self-locking Install spring washers hexagonal nut this way round. 1. Loosen the cable between the motor and battery. 2. Loosen and unscrew the central nut on the propeller. 3. -
Seite 67: Warranty Terms
10. Warranty terms 10.1 Extent of warranty Torqeedo GmbH, Petersbrunner Straße 3a in D-82319 Starnberg, Germany, guarantees the final purchaser of a Torqeedo outboard motor that the product is free from material and manufacturing faults during the period stated below. Torqeedo will indemnify the final purchaser for any expense for the repair of a material or manufacturing fault. -
Seite 68: Warranty Process
10.2 Warranty process Adhering to the following warranty process is a prerequisite to the satisfaction of any warranty claims. Before dispatching any apparently faulty goods, it is imperative to coordinate the delivery with Torqeedo Services. You can contact us by phone, email or post. The ability to make contact via the www.torqeedo.com website is being extended successively. You can find the contact details on the back of this manual. Please understand that we are unable to deal with products of which we have not been notified and will therefore refuse to accept delivery. -
Seite 69: Accessories
Description 1413-00 Spare battery Ultralight 403 Li-Ion high performance battery with integrated GPS receiver, 320 Wh, 29.6 V, 11 Ah 1127-00 Charger for spare battery 40 Watt charger (12 V, 3.3 A), for plugs between Ultralight 403, Travel 503 and 100-240 V and 50-60 Hz 1003 1912-00 Replacement propeller 8“ x 8“ variable pitch-variable camber (VPVC) v10/p350 propeller, developed especially for kayaks and other ultralight boats; made from impact-resistant PBT... -
Seite 72: Torqeedo Service Center
Version 2.0 039-00009 Torqeedo Service Center Europa und International Europe and international Torqeedo GmbH - Service Center - Friedrichshafener Straße 4a 82205 Gilching Germany service_international@torqeedo.com T +49 - 8151 - 268 67 -26 F +49 - 8151 - 268 67 -29 Noramerika North America Torqeedo Inc. 171 Erick Street, Unit A-1 Crystal Lake, IL 60014 service_usa@torqeedo.com T +1 – 815 – 444 88 06 F +1 – 847 – 444 88 07...