Celestron Signature FirstScope Series Handbuch
Robert reeves edition
INSTRUCTION MANUAL - MODEL #22016
This manual covers basic instructions. For more detailed
instructions, information, please visit celestron.com.
1
6
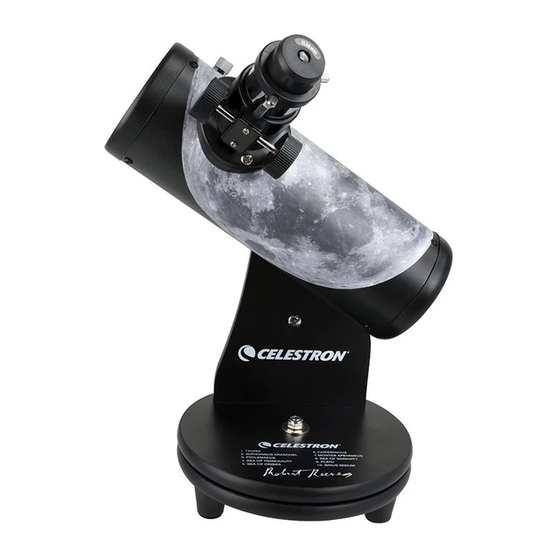
1. Thumbscrew
4. Focus Knob
2. Eyepiece
5. Tube End
3. Focuser
6. Optical Tube
Your telescope is ready to use right out of the
carton. Two eyepieces are included – 20 mm
(15 power), and 4 mm (75 power). Remove the
lens cap from the front of the optical tube before
searching for objects.
INSTALLING THE EYEPIECES
an optical element that magnifies the image
focused by the telescope. It fits directly into the
focuser (after removing the cap). Make sure the
thumbscrews are not protruding into the focuser
tube. Then, insert the chrome barrel of the eyepiece
into the focuser and tighten the thumbscrews,
being careful not to overtighten. Locate objects
with the low power eyepiece (15x). Once you've
centered your object, you can change to the higher
power eyepiece (75x) for more magnification.
The eyepieces can be changed by reversing the
procedure described above.
POINTING THE TELESCOPE
designed to be used on a table or other flat, sturdy
surface. The FirstScope is easy to move wherever
you want to point it. Turn counterclockwise to
loosen the lock nut and hold the tube end. Sight
along the optical tube towards the object you want
to find. Move the tube end until you find the object
you are searching for and then tighten the lock nut.
IMAGE ORIENTATION
When looking through the
eyepiece from the rear or side of the optical tube
(natural position), your image will be inverted
(upside down and backwards) or angled. If you
view from the front (slightly to either side) of the
optical tube, the image will be correct. Use this
technique for looking at terrestrial subjects.
FOCUSING
object comes in sharp. Turning the knob clockwise
allows you to focus on an object that is farther than
the one you are currently observing and vice versa.
You will have to refocus after changing eyepieces.
BONUS MATERIALS
a free download of Robert Reeves' ebook,
Lunar Landscapes. Visit www.celestron.com/
robertreeves to access the PDF.
2
The box that your FirstScope came in has a map of
the lunar surface on the back. Cut it out and store
3
it with your telescope so you can refer to it during
future lunar observations.
4
5
SOLAR WARNING
naked eye or with a telescope (unless you have the proper solar filter). Permanent
and irreversible eye damage may result!
FRANÇAIS
GAMME SIGNATURE FIRSTSCOPE
ROBERT REEVES LA LUNE
GUIDE DE L'UTILISATEUR • MODÈLES N°. 22016
Ce mode d'emploi couvre les instructions de base. Pour
obtenir des instructions plus détaillées et des informations
supplémentaires, visitez celestron.com.
1. Vis
2. Oculaire
3. Bouton de mise au point
Votre télescope est prêt à l'utilisation dès la sortie
du carton. Deux oculaires sont inclus: 20mm
(puissance de 15), et 4mm (puissance de 75).
Enlevez le protège-objectif de l'avant du tube
optique avant de commencer à observer.
An eyepiece is
INSTALLATION DES OCULAIRES
élément optique qui grossit l'image focalisée par le
télescope. Il s'installe directement sur le dispositif
de mise au point (après retrait du cache). Vérifiez
que les vis moletées ne dépassent pas dans le tube
du dispositif de mise au point. Insérez ensuite le
barillet chromé de l'oculaire dans le tube de mise
au point, puis serrez les vis moletées, en veillant à
ne pas serrer excessivement. Localiser des objets
avec l'oculaire de plus basse puissance (15x).
Une fois l'objet centré, vous pouvez basculer sur
un oculaire de plus grande puissance (75x) pour
agrandir encore plus l'image. Il est possible de
The telescope is
changer les oculaires en inversant la procédure
décrite ci-dessus.
POINTAGE DU TÉLESCOPE
pour être utilisé sur une table ou une autre surface
plane et solide. Il est facile de déplacer le FirstScope
sur le lieu depuis lequel vous souhaitez observer.
Faites tourner la molette dans le sens inverse des
aiguilles d'une montre et tenez l'extrémité du tube.
Regardez dans la longueur du tube vers l'objet que
vous souhaitez trouver. Déplacez l'extrémité du
tube jusqu'à ce que vous trouviez l'objet que vous
recherchez et serrez la molette.
Simply turn the focus knob until the
Your FirstScope includes
Never look directly at the sun with the
4. Dispositif de mise au point
5. Extrémité du tube
6. Tube optique
L'oculaire est un
Le télescope est conçu
ORIENTATION DE L'IMAGE
Lorsque vous regardez
dans l'oculaire depuis l'arrière ou le côté du tube
optique (en position naturelle), votre image sera
inversée (verticalement et horizontalement), ou
visible selon un angle différent. Si vous regardez
depuis l'avant (en vous décalant légèrement d'un
côté ou de l'autre) du tube optique, l'image sera
correcte. Utilisez cette technique pour observer
des objets terrestres.
MISE AU POINT
Tournez la molette de mise au point
jusqu'à l'obtention d'une image nette. Le fait de
faire tourner la molette dans le sens horaire vous
permet de faire la mise au point sur un objet qui est
plus loin que celui que vous observez actuellement,
et vice-versa. Vous aurez besoin de refaire la mise
au point après changement des oculaires.
LITTÉRATURE EN BONUS
Votre FirstScope est
livré avec un téléchargement gratuit du livre
électronique de Robert Reeves, Paysages lunaires.
Visitez
www.celestron.com/robertreeves
accéder au fichier PDF.
La boîte contenant votre FirstScope comporte une
carte imprimée de la Lune sur l'arrière. Découpez-la
et rangez-la avec votre télescope de manière à ce
que vous puissiez vous y référer lors d'observations
futures.
AVERTISSEMENT SUR LE SOLEIL
Ne regardez jamais directement le soleil à l'œil nu ou avec un télescope
(à moins d'utiliser un filtre adapté.) Des dommages oculaires permanents
et irréversibles peuvent être encourus.
DEUTSCH
SIGNATURE SERIES FIRSTSCOPE
ROBERT REEVES MOND
BEDIENUNGSANLEITUNG • MODELL-NR. 22016
Diese Betriebsanleitung enthält grundlegende Hinweise.
Für weitere ins Detail gehende Informationen besuchen Sie
bitte celestron.com.
1. Flügelschraube
4. Fokussierknopf
2. Okular
5. Tubusende
3. Fokussierer
6. Optischer Tubus
Das Teleskop ist gebrauchsfertig vormontiert
verpackt. Im Lieferumfang sind zwei Okulare
enthalten: 20 mm (15x) und 4 mm (75x). Entfernen
Sie vor dem Beobachten von Objekten den
Objektivdeckel vorne am optischen Tubus.
OKULARE AUFSETZEN
Das Okular ist ein optisches
Element, das das vom Teleskop fokussierte Bild
vergrößert. Es passt direkt in den Fokussierer (nach
dem Entfernen der Kappe). Achten Sie darauf, dass
die Rändelschrauben nicht in den Fokussiertubus
ragen. Stecken Sie dann die Chrom-Steckhülse
des Okulars in den Fokussiertubus und ziehen
Sie die Rändelschrauben fest, nicht zu fest ziehen.
Lokalisieren Sie Objekte zuerst mit dem Okular
von geringer Vergrößerungsleistung (15x). Sobald
Sie Ihr Objekt zentriert haben, können Sie zum
Okular mit höherer Vergrößerungsleistung (75x)
wechseln. Die Okulare können durch Umkehren
des oben beschriebenen Vorgangs gewechselt
werden.
pour

Verwandte Anleitungen für Celestron Signature FirstScope Series


Inhaltszusammenfassung für Celestron Signature FirstScope Series
- Seite 1 This manual covers basic instructions. For more detailed jusqu’à l’obtention d’une image nette. Le fait de Lunar Landscapes. Visit www.celestron.com/ instructions, information, please visit celestron.com. faire tourner la molette dans le sens horaire vous robertreeves to access the PDF. permet de faire la mise au point sur un objet qui est...
- Seite 2 4 mm (75 potenza). Rimuovere il tappo Este manual cubre instrucciones básicas. Para instrucciones © 2018 Celestron • All rights reserved • celestron.com della lente dalla parte frontale del tubo ottico prima más detalladas e información, visite celestron.com.