Werbung
Verfügbare Sprachen
Verfügbare Sprachen
ACCESSORIO OPTIONAL
Italiano
- COMANDO A PARETE T-MB
NOTE GENERALI
T-MB è un comando per installazione a parete collega-
bile ad apparecchi equipaggiati di scheda elettronica
SELV.
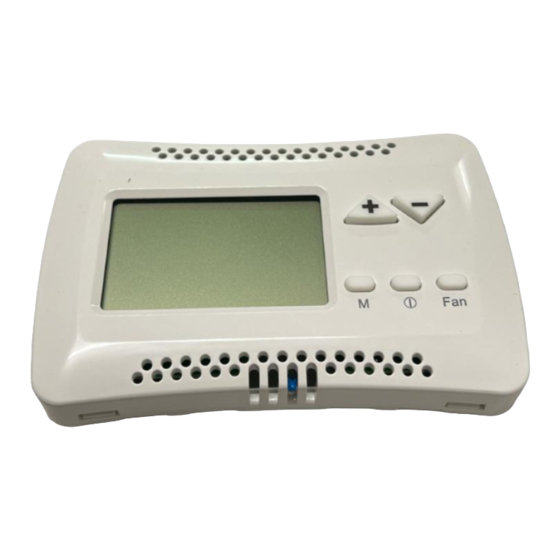
7
6
5
°C
8
SET
10
11
Fig.1
Con il comando è possibile (Fig. 1):
1 - accendere e spegnere l'apparecchio
2 - impostare la velocità del ventilatore
3 - impostare il Set di temperatura desiderato
4 - impostare la modalità di funzionamento desiderata
Segnalazioni del Comando (Fig. 1):
5 - Solo ventilazione
6 - Riscaldamento con Potenza Max resistenza
elettrica
7 - Riscaldamento con ON/OFF Valvola
Riscaldamento con Potenza Min reistenza elettrica
8 - Temperatura ambiente / SET / OFF
9 - Ventilazione impostata
10 - Orologio
11 - Timer attivo
LEGGERE ATTENTAMENTE
IL PRESENTE MANUALE PRIMA
DI EFFETUARE L'INSTALLAZIONE
ED USARE IL COMANDO
3
+
9
2
M
Fan
1
4
INSTALLAZIONE COMANDO
Separare la parte frontale del comando dalla piastra
posteriore premendo, con un cacciavite, la linguetta di
bloccaggio posta sulla parte superiore del comando.
Posizionare il pannello posteriore sul muro e segnare i
punti di fissaggio. Predisporre i fori, posizionare i tasselli
nel muro e bloccare il pannello con viti.
Eseguire i collegamenti elettrici come indicato dallo
schema elettrico riportato sulle pagina successive.
Cod. 4051084
60 mm
84 mm
E 02/17
C 02/17
Werbung
Inhaltsverzeichnis

Verwandte Anleitungen für Arbonia T-MB


Inhaltszusammenfassung für Arbonia T-MB
- Seite 1 NOTE GENERALI T-MB è un comando per installazione a parete collega- Posizionare il pannello posteriore sul muro e segnare i bile ad apparecchi equipaggiati di scheda elettronica punti di fissaggio.
- Seite 2 (sonda T1). - IMPOSTAZIONE DIP N°3 Ugualmente anche il comando a parete T-MB è equi- paggiato di sonda aria. - DIP nr. 2 OFF viene attivata la sonda aria del comando T-MB - DIP nr.
-
Seite 3: Funzionamento Master-Slave
DEFAULT - non posare il conduttore di segnale assieme a quelli Utilizzo con Utilizzo con secondi di post entilAzione COMANDO T-MB TELECOMANDO di potenza. dip1 dip2) pArAmetro indipendente dA impostAzione SLAVE MASTER - se si deve incrociare il conduttore di segnale con... - Seite 4 Italiano UTILIZZO DEL COMANDO (fig. “A”) On/Off: (fig. “A”) • Premendo il tasto ON/OFF il comando viene acceso. • Premendo nuovamente il tasto ON/OFF il comando viene spento. • L’indicazione dello stato “ON” o “OFF” viene visualiz- zata sul display. °C (fig.
- Seite 5 Italiano IMPOSTAZIONE OROLOGIO (fig. “E”) (fig. “E”) - Premere il tasto “M”: il simbolo della modalità inizierà a lampeggiare. - Premere i tasti ( ) o ( ), fino alla selezione del sim- bolo orologio “ ”; °C AUTO Confermare con il tasto “M”. - Premendo nuovamente il tasto “...
- Seite 6 Italiano 2 - Programmazione (fig.”G”) (fig. “G”) - Premere il tasto “M”; il simbolo della modalità di fun- zionamento inizierà a lampeggiare; - Premere il tasto ( ) o ( ) fino alla selezione del sim- bolo orologio “ “; confermare con il tasto “M”. °C - Premere il tasto “...
- Seite 7 English CONTROL INSTALLATION - T-MB WALL-MOUNTED Separate the front of the controller from the rear plate by CONTROLLER using a screwdriver to press the locking tongue on the top of the controller. – GENERAL NOTES – Place the rear plate on the wall and mark the mounting The T–MB is a wall-mounted controller that can be...
- Seite 8 The T–MB control is also equipped with air probe. - DIP nr. 2 OFF The inside T-MB sensor is activate; - DIP nr. 2 ON The T1 probe, connected to the device main board (intake air probe) is activated.
- Seite 9 Note!: The Master unit will have Dip 4 positioned on OFF, while all other devices connected as Slave will have Dip 4 positioned ON. DIP 4 OFF DIP 4 ON Master Slave T-MB TX-RX GND TX-RX GND TX-RX GND TX-RX GND SELV °C SELV BOARD AUTO...
- Seite 10 English USING THE CONTROL (fig. “A”) On/Off: (fig. “A”) • Press the ON/OFF button to activate the thermostat. • Press the ON/OFF button to deactivate the thermostat. • The word “ON” or “OFF” will appear in the display. °C (fig. “B”) Set Temperature: (fig.
- Seite 11 English SETTING THE CLOCK (fig. “E”) (fig. “E”) - By pressing the “M” button: the mode symbol starts flashing. - Press buttons ( ) or ( ), until selecting the watch symbol “ ”; °C AUTO Confirm using the “M” button. - Press button “+”...
- Seite 12 English 2 - Programming (fig.”G”) (fig. “G”) - Press the “ ” button; the operation mode symbol will start flashing. - Press button ( ) or ( ) until selecting the watch symbol “ “; Confirm using the “M” button. °C - Press button “...
-
Seite 13: Allgemeine Hinweise
ALLGEMEINE HINWEISE Die hintere Hälfte an der Wand positionieren und die Befestigungs- Der Regler T-MB ist eine Regelung für die Wandmontage, punkte markieren. Die Bohrstellen einzeichnen, die Dübel in der die mit den Geräten die mit der Steuerkarte SELV aus- Wand positionieren und die hintere Hälfte mit Hilfe von Schrauben... -
Seite 14: Einstellung Dip-Schalter
(siehe unten stehende Tabelle). POSITION ACHTUNG! RICHTIGE POLUNG BEACHTEN DEFAULT nicht nicht ACHTUNG! Zur Herstellung der Verbindungen zum Regler T-MB verwendet verwendet Wählt den am Gerät Wählt den auf T–MB müssen die Schutzisolierungen von den Klemmen abgenommen montierten Temperaturfühler vorhandenen Temperaturfühler... - Seite 15 Anmerkung: der Dip 4 der Master-Einheit muss sich in der Position OFF befinden, während der Dip 4 aller anderen, als Slave verbundenen Geräte, auf ON steht. DIP 4 OFF DIP 4 ON Master Slave T-MB TX-RX GND TX-RX GND TX-RX GND TX-RX GND SELV SELV BOARD °C AUTO BOARD DIP Nr 1 und 2 - EINSTELLUNG DER ZEITEN FÜR DIE NACH-...
- Seite 16 Deutsch VERWENDUNG DES REGLERS T-MB (Abb. "A") On/Off: (Abb. "A") • Durch Drücken der Taste ON/OFF wird der Regler einge- schaltet. • Durch erneutes Drücken der Taste ON/OFF wird der Regler ausgeschaltet. • Der Status "ON" oder "OFF" wird am Display angezeigt.
- Seite 17 Deutsch UHREINSTELLUNG (Abb. "E") (Abb. "E") - Die Taste "M" drücken, das Symbol des Betriebsmo- dus beginnt zu blinken. - Die Tasten ( ) oder ( ) drücken, bis das Uhrensymbol " " ausgewählt wurde. °C AUTO Mit der Taste "M" bestätigen. - Erneut die Taste "...
- Seite 18 Deutsch 2 - Programmierung (Abb. "G") (Abb. "G") - Die Taste "M" drücken; das Symbol des Betriebsmo- dus beginnt zu blinken. - Die Tasten ( ) oder ( ) drücken, bis das Uhrensym- bol " " ausgewählt wurde und mit der Taste "M" bestä- tigen.
-
Seite 19: Remarques Générales
(Fig.1) ; REMARQUES GÉNÉRALES T-MB est un dispositif de commande pour installation Positionner le panneau arrière sur le mur et marquer les points de murale qui peut être connecté aux appareils équipés fixage. - Seite 20 ATTENTION ! Pour effectuer les branchements électriques au dis- mode de fonctionnement mode de fonctionnement RIDEAUX D’AIRE positif de commande T-MB, il est nécessaire de retirer le protection mode de fonctionnement mode de fonctionnement isolante de la borne. Une fois les branchements électriques effec- RIDEAUX D’AIRE et AU...
-
Seite 21: Fonctionnement Master-Slave
OFF tandis que tous les autres appareils connectés en tant que Slave devront avoir le commutateur DIP 4 en position ON. DIP 4 OFF DIP 4 ON Master Slave T-MB TX-RX GND TX-RX GND TX-RX GND TX-RX GND SELV °C SELV BOARD... - Seite 22 Français UTILISATION DU DISPOSITIF DE COMMANDE (Fig. « A ») On/Off : (Fig. « A ») • Appuyer sur la touche ON/OFF pour allumer le dispo- sitif de commande. • Appuyer à nouveau sur la touche ON/OFF pour éteindre le dispositif de commande. •...
- Seite 23 Français CONFIGURATION DE L'HORLOGE (Fig. « E ») (Fig. « E ») - Appuyer sur la touche « M » : le symbole du mode commence alors à clignoter. - Appuyer sur les touches ( ) ou ( ), jusqu'à la sélec- tion du symbole de l'horloge «...
- Seite 24 Français 2 - Programmation (Fig. 2 - « G ») (Fig. « G ») - Appuyer sur la touche « M » ; le symbole du mode de fonctionnement commence alors à clignoter ; - Appuyer sur les touches ( ) ou ( ) jusqu'à...