Herunterladen Inhalt Inhalt Diese Seite drucken

Werbung

Verfügbare Sprachen
  • DE

Verfügbare Sprachen

  • DEUTSCH, seite 28
Universal Audio/MIDI Interface
for iPhone, iPod touch, iPad and Mac
QUICK START GUIDE
GUIDE DE PRISE EN MAIN RAPIDE
GUÍA RÁPIDA DE INICIO
GUIDA RAPIDA
KURZANLEITUNG
クイッ ク ・ スタート ・ ガイ ド
快速入门指南

Werbung

Inhaltsverzeichnis
loading

Inhaltszusammenfassung für iRig PRO

  • Seite 1 Universal Audio/MIDI Interface for iPhone, iPod touch, iPad and Mac QUICK START GUIDE GUIDE DE PRISE EN MAIN RAPIDE GUÍA RÁPIDA DE INICIO GUIDA RAPIDA KURZANLEITUNG クイッ ク ・ スタート ・ ガイ ド 快速入门指南...
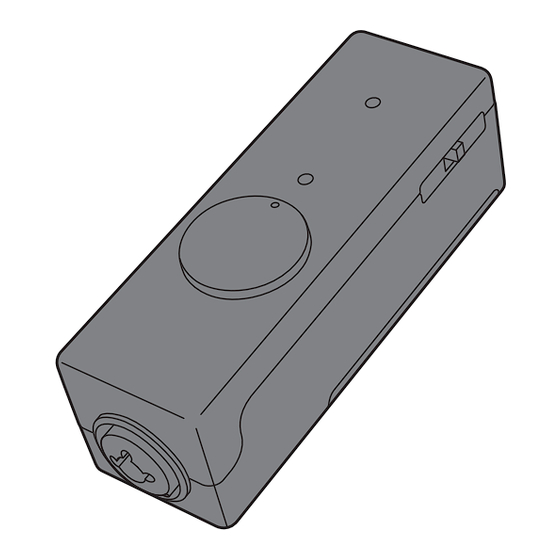
  • Seite 3 ENGLISH ITALIANO 中文 簡体字 1. Phantom / MIDI LED 1. LED Phantom / MIDI 1. 幻象电源 / MIDI LED 指示灯 2. Power / Audio Level LED 2. LED Power / Livello Audio 2. 电源 / 音频电平 LED 指示灯 3. GAIN control 3. Controllo GAIN 3. 增益控制 4. Microphone / Instrument input 4. Ingresso Microfono / Strumento 4. 麦可风 / 乐器输入插口 5. Battery compartment 5. Alloggiamento Batteria 5. 电池盒...
  • Seite 4 • Quick Start Guide level for your microphone or instrument, and two multicolor • Registration Card status LEDs give a clear indication about the correct input gain setting, phantom power status, and incoming MIDI iRig PRO is the universal high-quality digital audio and messages. MIDI interface for your iPhone, iPod touch, iPad and Mac. iRig PRO allows you to connect microphones, instruments iRig PRO is designed primarily for use with microphones, and MIDI devices, opening endless recording and control guitars and basses as audio sources, but its preamp can possibilities for your mobile audio rig.
  • Seite 5: Installation And Setup

    Register at: www.ikmultimedia.com/registration Installation and setup Insert the included 9V battery in the battery compartment (5) on the bottom side of iRig PRO. Depending on the battery brand and model, it may be necessary to close the compartment to keep the battery in place. This is normal, and it doesn’t interfere with the proper operation. If you don’t plan on using condenser microphones that require...
  • Seite 6 Mac: 1. Connect the included USB cable to iRig PRO Mini DIN connector (6), first. 2. Connect the USB cable to a free USB port on your Mac. The Power / Audio Level LED (2) on iRig PRO will turn dark blue, meaning that iRig PRO is powered and in Standby mode. 3. Make sure phantom power is turned off by setting the Phantom Power switch (7) to the OFF position. 4. If you are using a microphone, connect it using an XLR cable, to the iRig PRO microphone input (4). 5. If you are using an instrument like a guitar or a bass,...
  • Seite 7: Connecting Microphones

    If you’re in low, the red LED blinks to indicate that the battery should be doubt just leave it off. If the microphone won’t work, check its replaced as soon as possible. user manual, it may need phantom power. • Blue: iRig PRO is receiving MIDI messages. Connecting Instruments Connecting Microphones Connect your guitar, bass or any other mono instrument to the instrument input (4) on iRig PRO using an ¼” plug Always connect microphones to iRig PRO by using XLR-to- unbalanced (TS or “mono”) guitar cord. XLR balanced cables. This will ensure a pristine and clean...
  • Seite 8: Troubleshooting

    IMPORTANT: the instrument input on iRig PRO will NOT work if a cable with balanced (TRS or “stereo”) ¼” plugs is used. I connected iRig PRO to my iOS device, but the device doesn’t recognize it, and none of my audio apps work Connecting MIDI keyboards or controllers with it.
  • Seite 9: Specifications

    Warranty power on by moving the iRig PRO switch (7) to the ON position and check that the Phantom / MIDI LED (1) has turned red. Please visit: www.ikmultimedia.com/warranty I can’t get any sound from my guitar / instrument input. for the complete warranty policy. iRig PRO only works with ¼” MONO plugs guitar cables.
  • Seite 10: Caractéristiques

    L’iRig PRO est l’interface Audio/MIDI universelle de haute réception des messages MIDI. qualité pour iPhone, iPod touch, iPad et Mac. L’iRig PRO vous permet de brancher des micros, instruments et appareils L’iRig PRO est conçu principalement pour l’utilisation de MIDI, ouvrant d’innombrables possibilités d’enregistrement micros, guitares et basses comme sources audio, mais et de contrôle pour votre instrumentation mobile.
  • Seite 11: Installation Et Configuration

    Enregistrez dès maintenant votre produit sur : www.ikmultimedia.com/registration Installation et configuration Introduisez la pile 9V incluse dans le compartiment à pile (5) sur la face inférieure de l’iRig PRO. Selon la marque et le modèle de la pile, il peut être nécessaire de fermer le compartiment pour maintenir la pile en place. Ceci est tout à fait normal et n’empêche pas le fonctionnement correct de l’appareil. Si vous ne prévoyez pas d’utiliser de micros à condensateur, vous pouvez éviter d’installer la batterie.
  • Seite 12 6. Lancez AmpliTube ou n’importe quelle application disponibles), et lancez celle qui correspond le mieux compatible Core Audio, et sélectionnez l’iRig PRO à vos exigences audio musicales. L’iRig PRO est comme périphérique d’entrée dans les préférences compatible avec n’importe quelle autre app supportant audio. Le voyant Alimentation / Niveau Audio (2) de l’entrée audionumérique des connecteurs 30-pin...
  • Seite 13 Voyants d’état de l’iRig PRO Branchement de micros Les deux voyants de l’iRig PRO (1,2) vous donnent des Toujours brancher les micros à l’iRig PRO en utilisant des informations importantes sur l’état opérationnel de l’unité. câbles XLR-XLR symétriques. Ceci garantira une prestation Chaque état est indiqué par une couleur différente. optimale de votre microphone avec l’iRig PRO. Voyant Alimentation / Niveau Audio (2) : Micros dynamiques : avant de brancher un micro dynamique, assurez-vous que l’alimentation fantôme soit éteinte. Vérifier...
  • Seite 14: Résolution Des Problèmes

    Résolution des problèmes Branchement de claviers ou contrôleurs MIDI Je branche mon iRig PRO à mon dispositif iOS, mais le dispositif ne le reconnaît pas, et aucune de mes apps Branchez le câble MIDI 2.5mm inclus au connecteur MIDI (8) de audio ne fonctionne avec lui. l’iRig PRO et à la prise MIDI OUT de votre clavier ou contrôleur. Souvenez-vous de toujours brancher le câble 30-pin ou Lightning inclus à l’iRig PRO avant de le brancher au...
  • Seite 15: Spécifications

    Je n’obtiens aucun son de mon micro à condensateur. Garantie Votre micro requiert peut-être l’alimentation fantôme. Allumez l’alimentation fantôme en plaçant l’interrupteur (7) Veuillez visiter : www.ikmultimedia.com/warranty de l’iRig PRO sur la position ON. Le voyant Alimentation pour consulter notre politique de garantie complète. Fantôme / MIDI (1) doit devenir rouge. Assistance et informations Je n’obtiens aucun son de mon instrument. L’iRig PRO fonctionne seulement avec les câbles guitare MONO de 6.35mm. N’utilisez pas de câble stéréo (TRS) car...
  • Seite 16 El control de ganancia del preamplificador le permite • Tarjeta de Registración configurar el nivel de entrada perfecto para su micrófono o instrumento, y dos luces LED multicolor indican claramente iRig PRO es el interfaz universal de audio digital y MIDI la configuración correcta del nivel de entrada, el estado de de alta calidad para su iPhone, iPod touch, iPad y Mac. potencia Phantom, y mensajes MIDI entrantes. iRig PRO le permite conectar micrófonos, instrumentos y dispositivos MIDI, ofreciendo amplias posibilidades de iRig PRO es diseñado para usarse principalmente con...
  • Seite 17: Instalación Y Configuración

    ¡JamPoints™ le permiten recibir descuentos en compras futuras de IK! Al registrarse también lo mantendremos al día con noticias sobre productos nuevos e información actual. Regístrese aquí: www.ikmultimedia.com/registration Instalación y configuración Inserte la batería 9V incluida al compartimiento de batería (5) en la parte inferior del iRig PRO. Dependiendo de la marca o modelo de la batería, puede ser necesario cerrar el compartimiento de batería para mantener la batería en su sitio. Esto es normal, y no interfiere con la operación. Si no planea usar micrófonos condensadores que requieren potencia Phantom, puede omitir la instalación de la batería.
  • Seite 18 Mac: 1. Primero, conecte el cable USB incluido a la conexión Mini DIN (6) del iRig PRO. 2. Conecte el conector USB a una conexión USB libre en su Mac. La luz LED de Nivel de Potencia / Audio en el iRig PRO se encenderá de un color azul oscuro, indicando que iRig PRO está encendido y en modo Standby. 3. Asegúrese que la potencia Phantom esté apagada moviendo el interruptor Phantom Power (7) a la posición...
  • Seite 19 Micrófonos Condensadores: la mayoría de los micrófonos condensadores requieren potencia Phantom. Si la potencia • Verde: iRig PRO está activo y la señal de entrada está baja. Phantom está encendida, apáguela, y conecte su micrófono. • Naranja: iRig PRO está activo y la señal de entrada está Encienda la potencia Phantom sólo después de conectar regular. el micrófono. Una vez encendido, verifique que la luz LED • Rojo: iRig PRO está activo y la señal de entrada está muy alta.
  • Seite 20: Resolución De Problemas

    Conecte el cable incluido 2.5mm-a-MIDI al conector MIDI audio funcionan con él. del iRig PRO (8) y al conector MIDI OUT de su teclado o Recuerde siempre conectar el cable incluido 30-pin o controlador.
  • Seite 21: Especificaciones

    +48V Su micrófono probablemente requiere potencia Phantom. Encienda la potencia Phantom moviendo el interruptor Garantía iRig PRO (7) a la posición ON y verifique que la luz LED Phantom / MIDI se muestre de color rojo. Por favor visite: www.ikmultimedia.com/warranty No se oye sonido usando mi guitarra / instrumento.
  • Seite 22 • Pila 9 volt LED multicolore danno chiare indicazioni sullo stato di • Guida Rapida funzionamento di iRig PRO, sul livello del segnale in • Cartolina di registrazione ingresso, sullo stato dell’alimentazione Phantom e della ricezione di segnali MIDI. iRig PRO è l’interfaccia Audio/MIDI universale di alta qualità per iPhone, iPod touch, iPad e Mac che consente...
  • Seite 23: Installazione Ed Impostazione

    è connesso e non richiede l’uso di batterie, a meno che sul dispositivo iOS. Il LED Power (2) su iRig PRO si non si utilizzino microfoni a condensatore che richiedono illuminerà emettendo luce blu tenue. Questo indica che l’alimentazione Phantom +48V. In questo caso è necessario iRig PRO è acceso, in modalità stand-by. installare la batteria 9V nell’apposito comparto. 3. Assicurati che l’alimentazione Phantom sia spenta impostando l’interruttore Phantom Power (7) sulla...
  • Seite 24 VocaLive, iRig Recorder and SampleTank dall’App con Core Audio e seleziona iRig PRO come dispositivo Store e apri quella che più si addice alla tua musica d’ingresso dal pannello delle preferenze audio o alle tue necessità. iRig PRO è compatibile con ogni dell’applicazione che stai utilizzando. Il LED Power (2) applicazione che supporta l’ingresso audio digitale su iRig PRO si illuminerà emettendo luce blu chiara.
  • Seite 25 LED Power / Audio Level (2): Microfoni dinamici: prima di collegare microfoni dinamici ad iRig PRO, assicurati che l’alimentazione Phantom sia • Spento: iRig PRO non è connesso ad alcuna sorgente di spenta. Controlla che l’interruttore Phantom Power (7) sia alimentazione.
  • Seite 26: Risoluzione Dei Problemi

    Quando iRig PRO riceve dati MIDI validi il LED Phantom / MIDI si illumina di luce blu. Il LED Power / Livello audio su iRig PRO è sempre blue tenue e non ottengo nessun suono. Impostazione del gain d’ingresso su Per far si che iRig PRO si attivi è necessario che almeno iRig PRO un’app compatibile con Core Audio sia aperta su tuo dispositivo iOS o sul Mac.
  • Seite 27: Specifiche Tecniche

    Phantom portando l’interruttore (7) sulla www.ikmultimedia.com/warranty posizione ON e controlla che il LED Phantom / MIDI sia rosso. per il completo contratto di garanzia. Non riesco ad avere alcun suono dal mio strumento. Supporto tecnico ed ulteriori L’ingresso strumento di iRig PRO funziona solo con cavi informationi sbilanciati da 6.3mm (mono). L’ingresso strumento non funzionerà utilizzando cavi stereo / TRS / bilanciati. www.ikmultimedia.com/support Specifiche Tecniche Apple declina ogni responsabilità in merito al funzionamento del...
  • Seite 28 PRO iRig PRO ist kompatibel mit professionellen Kondensatormikrofonen und stellt die hierzu benötigte Phantomspeisung von 48 V bereit. Herzlichen Glückwunsch zum Erwerb Ihres iRig PRO, einem hochwertigen universellen Audio/MIDI-Interface für iPhone, iPod Zusätzlich zum kombinierten Mikrofon-/Instrumenten-Eingang touch, iPad und Mac. bietet das iRig PRO einen MIDI-Eingang zum Anschluss eines Standard-Keyboards. Virtuelle Instrumente wie SampleTank Lieferumfang: lassen sich somit leicht einspielen oder Sie steuern einfach mit • iRig PRO einem Pedalboard komfortabel gewünschte Effektparameter in • Lightning-Kabel Apps wie AmpliTube.
  • Seite 29: Installation Und Einstellungen

    In allen anderen Fällen ist die Batterie für den Betrieb des iRig Phantomspeisung (7) auf der Position OFF einrastet, PRO nicht notwendig. die Phantom / MIDI LED (1) am iRig PRO sollte nicht aufleuchten. Registrieren Sie Ihr iRig PRO 4. Zum Anschluss eines Mikrofons via XLR-Kabel nutzen Sie den Mikrofoneingang (4) am iRig PRO. Mit der Registrierung können Sie unseren technischen Support in Anspruch nehmen, die Garantie Ihres Gerätes aktivieren und zusätzliche JamPoints™ für Ihren Account sammeln.
  • Seite 30 2. Schließen Sie das USB-MiniDIN- Kabel an einen freien USB-Port Ihres Mac an. Die Power / Audio Level LED (2) am iRig PRO leuchtet tiefblau - Ihr iRig PRO ist damit eingeschaltet und befindet sich im Standby-Mode. 3. Vergewissern Sie sich, dass der Schalter für die...
  • Seite 31: Anschluss Eines Mikrofons

    Dynamisches Mikrofon: Vergewissern Sie sich, dass die Phantomspeisung ausgeschaltet ist. Der Schalter Phantom Power (7) muss sich in der Position OFF befinden und die Die zwei Status-LEDs (1,2) am iRig PRO vermitteln Ihnen Phantom / MIDI LED (1) darf nicht rot aufleuchten. wichtige Informationen über den aktuellen Betriebszustand.
  • Seite 32: Anschluss Von Midi-Keyboards Oder Midi-Controllern

    Eingangsempfindlichkeit mit dem Regler Einstellen der Eingangsempfindlichkeit INPUT GAIN (3) wie in dieser Dokumentation beschrieben. am iRig PRO Die Power / Audio Level LED am iRig PRO leuchtet blau und es ist kein Sound zu hören. Beim Sprechen/Singen via Mikrofon oder beim Spielen Um das iRig PRO einzuschalten muss in Ihrem iOS-Gerät oder eines Instrumentes via Audioeingang müssen Sie stets den...
  • Seite 33: Technische Daten

    Support und weitere Informationen Es ist kein Sound von meiner Gitarre bzw. meinem Instrument zu hören. www.ikmultimedia.com/support iRig PRO lässt sich ausschließlich mit Mono-Gitarrenkabeln betreiben. Verwenden Sie keine Stereo- bzw. symmetrischen Apple ist nicht für den Betrieb dieses Geräts oder die Einhaltung von Klinkenkabel. Andernfalls wird der Instrumenteneingang des iRig PRO gemutet.
  • Seite 34 的な MIDI キーボードで、SampleTank のようなバーチャル・イン • 2.5mm ジャック MIDI ケーブル ストゥルメントを演奏したり、MIDI に対応したペダル・ボードで • 9V 電池 AmpliTube のようなアプリをコントロールするために非常に役に立 • クイック・スタート・ガイド ちます。 • 登録カード(Registration Card) プリアンプにはゲイン・コントロールがあるので、使用しているマ iRig PRO は iPhone、iPod touch、iPad と Mac に対応した、ユニバー イク、またはインストゥルメントそれぞれにとって最適な入力レベ サル・タイプの高音質デジタル・オーディオ MIDI インターフェー ルを得ることができます。またマルチカラー・ステータス LED は入 スです。iRig PRO があれば、マイクやインストゥルメント、MIDI デ 力ゲインの最適なレベルを示すだけでなく、ファンタム電源の状態 バイスを自分のモバイル・オーディオ・デバイスに接続することが を表したり、MIDI メッセージの入力インジケーターとしても機能し でき、ハイクオリティなレコーディングやコントロールが可能にな...
  • Seite 35 製品登録していただくことにより、テクニカル・サポートや保証を て、iRig PRO のマイク入力 (4) に接続してください。 受けることができます。また無料の JamPoints ™をアカウントに追 加することもできます。JamPoints ™をお持ちであれば、今後 IK 製 品を購入する際にディスカウントを受けることができます!また登 録により最新の製品ニュースや更新情報を受け取ることも可能です。 登録はこちらから : www.ikmultimedia.com/registration インストールおよびセッ トアップ 付属の 9V バッテリーを iRig PRO の底面のバッテリー部 (5) に入れ てください。バッテリーをしっかりとセットするために、 バッテリー 部のふたを閉めておいてください。バッテリーの種類によっては閉 められない場合もありますが、閉められなくても製品の動作自体に 影響はございません。ファンタム電源を必要とするコンデンサー・ マイクを使う予定がないならば、バッテリーは入れなくてもかまい ません。 iOS デバイス : 1. まず最初に付属の 30-pin または Lightning ケーブルを iRig PRO...
  • Seite 36 Mac: 1. 付属の USB ケーブルを、iRig PRO の Mini DIN コネクター (6) に 接続してください。 2. USB ケ ー ブ ル を Mac の USB ポ ー ト に 接 続 し て く だ さ い。iRig PRO の電源 / オーディオ・レベル LED(2) が濃い青色に変わりま す。これは iRig PRO がバスパワーで電源供給され、スタンバイ・ モードになっていることを表します。...
  • Seite 37 PRO ステータス LED ランプ マイクの接続 iRig PRO の 2 つの LED インジケーター (1 と 2) は、iRig PRO の動作 iRig PRO にマイクを接続する場合は、 必ず XLR-XLR のバランス ・ キャ 状態について重要な情報をお知らせします。各ステータスは異なる ノン・ケーブルを使用してください。こうすることで iRig PRO と使 色で表示されます。 用しているマイクで、ピュアでクリーンなサウンドでパフォーマン スを集音することができます。 電源 / オーディオ・レベル LED(2): ダイナミック・マイク:ダイナミック・マイクを接続する前に、必 • 消灯している : iRig PRO が電源に接続されていません。...
  • Seite 38 PRO の電源 / オーディオ・レベル LED が濃い青色のままで音が iRig PRO が MIDI メッセージを受けとっている時は、ファンタム / 出ない。 MIDI LED が青く点灯します。 iRig PRO を 動 作 さ せ る に は、iOS デ バ イ ス ま た は Mac 上 で Core Audio 対応オーディオ・アプリを起動する必要があります。 iRig PRO での入力ゲインの設定 • iOS:30-pin または Lightning ドック・コネクターからのオーディ...
  • Seite 39 定しているかどうかご確認ください。 • 周波数特性:20Hz-20kHz +/- 0.5 dB • A/D コンバーター:24-bit A/D ファンタム電源がオンにならない。 • サンプリングレート:44.1kHz、48 kHz iRig PRO のバッテリー部 (5) に、 新しい 9V バッテリーが入っていて、 • バッテリー:9V(アルカリ推奨) 、+48V ファンタム電源駆動用。 しっかり接続されているかご確認ください。 製品保証 コンデンサー・マイクで音が収録できない。 ご使用のマイクが、ファンタム電源を必要とするタイプのものの可 製品保証の詳細については : 能性があります。iRig PRO のファンタム電源スイッチ (7) をオンに www.ikmultimedia.com/warranty して、ファンタム / MIDI LED(1) が赤く点灯するのを確認した上で、 をご確認ください。 再度収録してみてください。 サポート情報・その他 ギターやインストゥルメントを接続しても音が収録できない。 iRig PRO は一般的なギター・シールドのような、標準ジャックのモ www.ikmultimedia.com/support ノラル(TS タイプ)ケーブルでのみ、ギターやインストゥルメント...
  • Seite 40 PRO iRig PRO 兼容专业的电容式麦克风使用,可以提供 +48V 幻象电源。 感谢您购买了 iRig PRO,这是专为 iPhone、iPod touch、iPad 以 除了可以支持麦克风 / 乐器输入外,iRig PRO 还设有便携的 MIDI 及 Mac 设计的一款高品质通用型 Audio/MIDI 转接头。 输入端口,可以很方便的连接标准的 MIDI 键盘演奏虚拟乐器,如 : SampleTank 或者是 AmpliTube 搭配效果器控制踏板使用。 包装内含有以下物品 : · iRig PRO 并设有前置放大器增益控制,让您能够精准调节麦克风或乐器输入水 · Lightning 闪电接头连接线...
  • Seite 41 置。 检查 iRig PRO 上的幻象电源 /MIDI LED 指示灯 (1) 是否熄灭。 频输入的应用程序。只要数字音频应用可通过数字音频输入,当 4. 如 果 您 是 使 用 麦 克 风, 需 要 将 卡 侬 头 XLR 连 接 线 连 接 到 iRig 初始化完成后,iRig PRO 上的电量 / 音频电平 LED 信号灯 (2) PRO 麦克风输入端...
  • Seite 42 耳机接口。 3. 检查幻象电源是否已关闭,将幻象电源的开关设置在 OFF(7) 位置。 4. 如 果 您 是 使 用 麦 克 风, 需 要 将 卡 侬 头 XLR 连 接 线 连 接 到 iRig iRig PRO上的LED信号灯显示 PRO 麦克风输入端 (4)。 iRig PRO 上的两个 LED 信号灯 (1,2) 将会提示您重要的操作状态信...
  • Seite 43 重要提示 :如果使用平衡(TRS 或 “ 立体声” )插头连接线,iRig PRO 乐器输入端将无法正常工作。 连接麦克风 连接MIDI键盘或控制器 连接麦克风需使用卡侬头转卡侬头平衡连接线。这将确保通过 iRig PRO 连接麦克风得到一个原始的清洁的声音效果。 先将 2.5-mm 转 MIDI 接口连接线连接到 iRig PRO 的 MIDI 连接口 (8), 动圈式麦克风 : 在连接动圈式麦克风之前,先要确保幻象电源已关闭。 然后再连接键盘或控制器。 检查幻象电源的开关是否设置在 OFF(关闭)位置(7) ,并且幻象电 源 /MIDI 指示灯 (1) 并未显示为红色。 打开 iOS 设备上兼容的 Core MIDI 应用软件,或者 Mac 上的软件,...
  • Seite 44 · 如果 LED 信号灯不时闪烁为红色,则应该逆时针方向旋转输入增 无法启用幻象电源。 益旋钮 (3) 来降低输入增益。 检查您是否在 iRig PRO 的电池盒 (5) 中。安装了一个可使用的 9 v 电池。 · 当 LED 信号灯在绿色到橙色之间变化,则表明增益设置在最佳状 态。 使用的电容式麦克风没有任何的声音。 您的麦克风可能需要使用幻象电源。将 iRig PRO 开关幻象电源的开 疑难排解 关 (7) 设置在 ON 的位置,幻象电源 /MIDI 信号灯 (1) 将变为红色。 我已将 iRig PRO 与我的 iOS 设备连接,但设备却无法被识别,而且...
  • Seite 45 · 失真范围 ( 总谐波失真 ) : 0.01% · 频率响应 : 20Hz-20kHz +/- 0.5 dB · 转换器 : 24-bit A/D · 采样率 : 44.1 和 48 kHz · 电池 : 9V(建议使用碱性电池) : 仅需 +48V 幻象电源时使用 保修 请浏览 : www.ikmultimedia.com/warranty 了解完整的保修条款。 售后服务及更多详细信息 www.ikmultimedia.com/support 苹果公司对本设备的操作以及其遵守的相关安全法规标准不负有责任。...
  • Seite 46 IK Multimedia IK Multimedia Production Srl Via dell’Industria 46, 41122 Modena, Italy Phone: +39-059-285496 - Fax: +39-059-2861671 IK Multimedia US LLC 1153 Sawgrass Corporate Parkway, Sunrise, FL 33323 Phone: 954-846-9101 - Fax: 954-846-9077 IK Multimedia Asia TB Tamachi Bldg. 1F, MBE #709, 4-11-1 Shiba, Minato-ku, Tokyo 108-0014 www.ikmultimedia.com/contact-us www.ikmultimedia.com...
  • Seite 47 “Made for iPod,” “Made for iPhone,” and “Made for iPad” mean that an electronic accessory has been designed to connect specifically to iPod, iPhone, or iPad, respectively, and has been certified by the developer to meet Apple performance standards. Apple is not responsible for the operation of this device or its compliance with safety and regulatory standards. Please note that the use of this accessory with iPod, iPhone, or iPad may affect wireless performance. iRig® PRO, AmpliTube®, SampleTank®, iRig® Recorder, VocaLive™ are trademarks or registered trademarks property of IK Multimedia Srl. All other product names and images, trademarks and artists names are the property of their respective owners, which are in no way associated or affiliated with IK Multimedia. iPad, iPhone, iPod touch Mac and Mac logo are trademarks of Apple Computer, Inc., registered in the U.S. and other countries. Lightning is a trademark of Apple Inc. App Store is a service mark of Apple Inc.
  • Seite 48 www.ikmultimedia.com/irigpro P.N: STG-IRIGPRO-0001...

Inhaltsverzeichnis