Herunterladen Inhalt Inhalt Diese Seite drucken
Perel Tools CWS1 Bedienungsanleitung
Vorschau ausblenden Andere Handbücher für CWS1:

Werbung

Verfügbare Sprachen
  • DE

Verfügbare Sprachen

  • DEUTSCH, seite 26
CWS1
WALL/DESKTOP DCF CLOCK
DCF WAND-/BUREAUKLOK
HORLOGE DCF MURALE/DE BUREAU
RELOJ DCF MURAL/DE SOBREMESA
DCF WAND-/TISCHUHR
RELÓGIO DCF DE PAREDE/MESA
3
8
 
14
 
20
 
25
 
32
 

Werbung

Inhaltsverzeichnis
loading

Inhaltszusammenfassung für Perel Tools CWS1

  • Seite 1: Inhaltsverzeichnis

    CWS1 WALL/DESKTOP DCF CLOCK DCF WAND-/BUREAUKLOK HORLOGE DCF MURALE/DE BUREAU RELOJ DCF MURAL/DE SOBREMESA DCF WAND-/TISCHUHR RELÓGIO DCF DE PAREDE/MESA USER MANUAL GEBRUIKERSHANDLEIDING   NOTICE D’EMPLOI   MANUAL DEL USUARIO   BEDIENUNGSANLEITUNG   MANUAL DO UTILIZADOR  ...
  • Seite 2 CWS1 19.02.2010 ©Velleman nv...
  • Seite 3: Safety Instructions

    CWS1 User manual Introduction To all residents of the European Union Important environmental information about this product This symbol on the device or the package indicates that disposal of the device after its lifecycle could harm the environment. Do not dispose of the unit (or batteries) as unsorted municipal waste;...
  • Seite 4: Working Principle

    C SET-button battery compartment Working principle The CWS1 contains a receiver which receives a radio-signal from a radio station located at Mainflingen near Frankfurt, Germany. This long-wave radio-signal (DCF77, 77.5 kHz) is based on atomic clocks and contains time and date information. For more information refer to www.ptb.de...
  • Seite 5 CWS1 metal. Therefore the clock must not be installed in concrete basements or inside metal cages. In large concrete office buildings or apartments, the clock should be located near a window for better reception. Also avoid installing the clock near strong magnetic fields or other devices that generate a lot of electrical noise (e.g.
  • Seite 6 CWS1 • Press and hold the ALARM-button [D] for ±5s. The display shows the alarm time; the hours are flashing. • To change the setting, use the UP-[E] or DOWN-[F] button. • Press the ALARM-button [D] to confirm and move to the minutes-setting.
  • Seite 7 CWS1 raising steady falling Humidity display [6] • The humidity range is 20~95%. Comfort indication [5] • The comfort level is based on the current temperature and humidity and is indicated by following icons: temp.: 0~50°C temp.: 0~50°C humidity <40% humidity >70%...
  • Seite 8: Technical Specifications

    CWS1 Technical specifications temperature range 0 ~ +50°C (32 ~ 122°F) humidity range 20 ~ 95% sampling period power supply 2 x 1.5V AA batteries LR6C (not incl.) dimensions 175 x 175 x 28mm weight 360g Use this device with original accessories only. Velleman nv cannot be held responsible in the event of damage or injury resulted from (incorrect) use of this device.
  • Seite 9: Algemene Richtlijnen

    CWS1 Er zijn geen door de gebruiker vervangbare onderdelen in dit toestel. Voor onderhoud of reserveonderdelen, contacteer uw dealer. Algemene richtlijnen ® Raadpleeg de Velleman service- en kwaliteitsgarantie achteraan deze handleiding. Gebruik het toestel enkel binnenshuis. Bescherm tegen regen, vochtigheid en opspattende vloeistoffen.
  • Seite 10: De Klok Instellen

    Frankfurt uitgezonden kan ontvangen. De tijdseinzender is gekoppeld aan een atoomklok die de tijd- en datuminformatie bevat. Uw CWS1 zal bij ontvangst van het DCF-signaal de wijzers automatisch met de atoomklok synchroniseren. Het radiosignaal is gemakkelijk binnenshuis te ontvangen. De ontvangst kan echter verzwakken indien er beton en metaal aanwezig is.
  • Seite 11 CWS1 • Indien de klok het signaal niet ontvangt, dan verschijnt het symbool niet en al de klok een verkeerde tijd weergeven. U kunt de tijd dan handmatig instellen (zie hieronder). • Houd de CF-knop [F] gedurende ±5s ingedrukt om de signaalontvangst te forceren.
  • Seite 12 CWS1 11~20s: 2 pieptonen per seconde 21~30s: 4 pieptonen per seconde 31~120s: onophoudelijke pieptoon. • Schakel de snoozefunctie in met de SNOOZE-knop [A]. Het alarm wordt gedurende ±5 minuten in stand-by geplaatst en het snoozesymbool wordt weergegeven. • Druk op een willekeurige knop om het alarm uit te schakelen.
  • Seite 13: Technische Specificaties

    CWS1 comfort geen temp. <20°C of >28°C temp. 20~28°C symbool vochtigheid: 40~70% vochtigheid: 40~70% Maanfasen [3] • Op de display verschijnt een symbool afhankelijk van de stand van de maan, de zon en de aarde: nieuwe maan jonge maansikkel eerste kwartier...
  • Seite 14: Notice D'emploi

    CWS1 informatie in deze handleiding kan te allen tijde worden gewijzigd zonder voorafgaande kennisgeving. © AUTEURSRECHT Velleman nv heeft het auteursrecht voor deze handleiding. Alle wereldwijde rechten voorbehouden. Het is niet toegestaan om deze handleiding of gedeelten ervan over te nemen, te kopiëren, te vertalen, te bewerken en op te slaan op een elektronisch medium zonder voorafgaande schriftelijke toestemming van de rechthebbende.
  • Seite 15 CWS1 • Toute modification est interdite pour des raisons de sécurité. Les dommages occasionnés par des modifications par le client ne tombent pas sous la garantie. • N’utiliser qu’à sa fonction prévue. Un usage impropre annule d'office la garantie. • La garantie ne s’applique pas aux dommages survenus en négligeant certaines directives de cette notice et votre revendeur déclinera toute...
  • Seite 16: Principe De Fonctionnement

    CWS1 Principe de fonctionnement La CWS1 intègre un récepteur qui capte le signal DCF transmit par l’émetteur situé près de Francfort en Allemagne. Cet émetteur est connecté à une horloge atomique qui contient les données de temps et de date. La CWS1 se synchronise automatiquement sur l’horloge atomique afin de...
  • Seite 17 CWS1 temporairement inaccessible. Il est à noter que, dû aux conditions atmosphériques, le signal DCF est plus puissant la nuit. • Maintenir enfoncé la touche SET [C] pendant ±5s. L’année clignote sur l’afficheur. • Configurer l’année avec les touches UP [E] et DOWN [F], et confirmer avec la touche SET [C].
  • Seite 18 CWS1 Affichage de la température [5] • La plage de température est de 0~50°C (32~122°F). • Sélectionner l’unité de mesure °C ou °F avec la touche CF [F]. • La tendance météo est calculée sur base des températures de référence et actuelle.
  • Seite 19: Spécifications Techniques

    CWS1 Entretien • Nettoyer régulièrement l’horloge avec un chiffon humide non pelucheux. Éviter l’usage d’alcools ou de solvants. Ne pas appuyer sur l’afficheur. • Ne jamais immerger l’horloge dans un liquide quelconque. Les piles • Remplacer les piles dès que le symbole s’affiche.
  • Seite 20: Manual Del Usuario

    Si tiene dudas, contacte con las autoridades locales para residuos. Gracias por haber comprado el CWS1! Lea atentamente las instrucciones del manual antes de usarlo. Si el aparato ha sufrido algún daño en el transporte no lo instale y póngase en contacto con su distribuidor.
  • Seite 21: Características

    El CWS1 incorpora un receptor que capta la señal DCF transmitida por el emisor situado cerca de Francfort en Alemania. Este emisor está conectado a un reloj atómico que contiene los datos de tiempo y fecha. El CWS1 se sincroniza automáticamente con el reloj atómico para ajustar las agujas.
  • Seite 22: Configuración

    CWS1 Es posible captar esta señal radio de forma perfecta en el interior de un edificio. Sin embargo, su potencia se debilita a causa de hormigón y metal. Por tanto, no monte el reloj en sótanos o un lugar demasiado aislado. El lugar más adecuado en una oficina o un apartamiento de hormigón es cerca...
  • Seite 23 CWS1 *idiomas disponibles: EN (inglés), GE (alemán), DA (danés), ES (español), NE (neerlandés), FR (francés) e IT (italiano). • El reloj vuelve a la visualización normal 8 segundos después del último ajuste. Ajustar la alarma • Mantenga pulsada la tecla ALARM [D] durante ± 5 segundos. El reloj visualiza la hora de alarma (las horas parpadean).
  • Seite 24: Las Pilas

    CWS1 La flecha apunta hacia abajo y la temperatura actual se vuelve la temperatura medida si la temperatura actual es mín. 1°C más baja que la temperatura medida. En cualquier otro caso, la flecha apunta hacia la derecha. Nota: La temperatura actual vuelve automáticamente la temperatura medida al activar o reinicializar el reloj.
  • Seite 25: Bedienungsanleitung

    CWS1 • Vuelva a cerrar el compartimiento de pilas [G]. ADVERTENCIA: Nunca perfore las pilas y no las eche al fuego. Nunca recargue pilas alcalinas. Respete las leyes locales en relación con el medio ambiente al tirar las pilas. Mantenga las pilas lejos del alcance de niños.
  • Seite 26: Sicherheitshinweise

    CWS1 Wir bedanken uns für den Kauf der CWS1! Lesen Sie diese Bedienungsanleitung vor Inbetriebnahme sorgfältig durch. Überprüfen Sie, ob Transportschäden vorliegen. Sollte dies der Fall sein, verwenden Sie das Gerät nicht und wenden Sie sich an Ihren Händler. Sicherheitshinweise Halten Sie Kinder und Unbefugte vom Gerät fern.
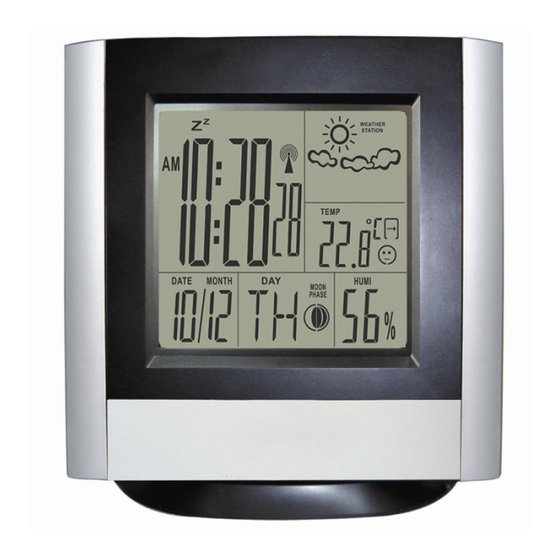
  • Seite 27: Umschreibung

    (DCF77) vom Sender in Frankfurt empfangen kann. Der Sender ist mit der Atomuhr, die die Zeit- und Datuminformationen enthält, verbunden. Die CWS1 wird die Zeiger bei Empfang des DCF-Signals automatisch mit der Atomuhr synchronisieren. Das Radiosignal ist einfach im Innenbereich zu empfangen.
  • Seite 28 CWS1 Die Uhrzeit einstellen • Wählen Sie eine Position für die Uhr (siehe §5). Sie können die Uhr an der Wand befestigen oder über den mitgelieferten Ständer auf einem Tisch installieren. • Warten Sie bis die Uhr das Signal vom Hauptuhr empfängt. Die Uhr sucht nun während etwa 7 Minuten Kontakt mit der Hauptuhr.
  • Seite 29: Anwendung

    CWS1 • Bestätigen Sie mit der ALARM-Taste [D]. Das Display zeigt nun die Minuten an. • Stellen Sie die Minuten mit der UP-[E] oder DOWN-Taste [F] ein und bestätigen Sie mit der ALARM-Taste [D]. • Die Uhr kehrt zur normalen Display-Anzeige zurück, wenn Sie 8 Sekunden keine einzige Taste drücken.
  • Seite 30: Wartung

    CWS1 Bemerkung: Die aktuelle Temperatur wird automatisch die gemessene Temperatur bei Einschaltung oder Reset der Uhr. steigend sinkend konstant Anzeige der Luftfeuchtigkeit [6] • Der Bereich beträgt 20~95%. Komfortanzeige [5] • Das Komfortniveau wird über die aktuelle Temperatur und Luftfeuchtigkeit berechnet, und wird über ein Symbol angezeigt:...
  • Seite 31: Technische Daten

    CWS1 WARNUNG: Durchbohren Sie nie die Batterien und werfen Sie diese nicht ins Feuer. Laden Sie keine Alkalinebatterien. Respektieren Sie die örtlichen Umweltvorschriften beim Entsorgen der Batterien. Halten Sie die Batterien von Kindern fern. Technische Daten Temperaturbereich 0 ~ +50°C (32 ~ 122°F)
  • Seite 32: Manual Do Utilizador

    Em caso de dúvidas contacte as autoridades locais para os resíduos. Obrigada por ter adquirido o CWS1! Leia atentamente as instruções deste manual antes de o usar. Caso o aparelho tenha sofrido algum dano durante o transporte não o instale e entre em contacto com o seu distribuidor.
  • Seite 33 Funcionamento O CWS1 tem um receptor de sinal DCF transmitido através de um emissor localizado próximo de Frankfurt na Alemanha. Este emissor está ligado a um relógio atómico que contem os dados relativos ao tempo e data. O CWS1 é...
  • Seite 34 CWS1 É possível captar perfeitamente este sinal de rádio estando no interior de um edifício. No entanto, a sua potência é reduzida devido à presença de cimento e metal. Por isso, não instale o relógio em sótãos ou locais demasiado isolados. O local mais apropriado dentro de um escritório ou apartamento construídos em cimento, é...
  • Seite 35 CWS1 fuso horário – sair do modo de ajuste *idiomas disponíveis: EN (inglês), GE (alemão), DA (dinamarquês), ES (espanhol), NE (holandês), FR (francês) e IT (italiano). • O relógio volta ao modo de visualização normal 8 segundos após o último...
  • Seite 36: Manutenção

    CWS1 medida. A seta aponta para baixo e a temperatura actual passa a ser a temperatura medida caso a temperatura actual seja no mínimo 1°C mais baixa que a temperatura medida. Em qualquer outro caso, a seta aponta para a direita.
  • Seite 37: Especificações

    CWS1 ADVERTÊNCIA: Nunca perfure as pilhas nem as deite no lume. Nunca recarregue pilhas alcalinas. Respeite as leis locais relativas ao meio ambiente ao retirar as pilhas. Mantenha as pilhas fora do alcance das crianças. Especificações temperatura 0 ~ +50°C (32 ~ 122°F)
  • Seite 38 by obvious causes prior to presenting the article Velleman® Service and Quality Warranty for repair. Note that returning a non-defective Velleman® has over 35 years of experience in article can also involve handling costs. the electronics world and distributes its products •...
  • Seite 39 apparaat (bij professioneel gebruik wordt de impureté…) et provoqué par l’appareil, ainsi que garantieperiode herleid tot 6 maand). son contenu (p.ex. perte de données) et une - schade veroorzaakt door onvoldoende indemnisation éventuelle pour perte de revenus ; bescherming bij transport van het apparaat. - tout bien de consommation ou accessoire, ou - alle schade door wijzigingen, reparaties of pièce qui nécessite un remplacement régulier...
  • Seite 40 Condiciones generales referentes a la • Consejo: Lea el manual del usuario y controle garantía sobre productos de venta al público los cables, las pilas, etc. antes de devolver el (para la Unión Europea): aparato. Si no se encuentra un defecto en el •...
  • Seite 41 desproporcionados, Velleman® autoriza-se a schlechte Wartung, zweckentfremdete substituir o dito artigo por um artigo equivalente Anwendung oder Nichtbeachtung von ou a devolver a totalidade ou parte do preço de Benutzerhinweisen in der Bedienungsanleitung. compra. Em outro caso, será consentido um - Schäden, infolge einer kommerziellen, artigo de substituição ou devolução completa do professionellen oder kollektiven Anwendung des...

Inhaltsverzeichnis