Herunterladen Diese Seite drucken

Werbung

Verfügbare Sprachen
  • DE

Verfügbare Sprachen

  • DEUTSCH, seite 9
Dual Joy-Con charge base
for NINTENDO
SWITCH
®
TM
User manual
G A M I N G

Werbung

loading

Inhaltszusammenfassung für Konix Dual Joy-Con

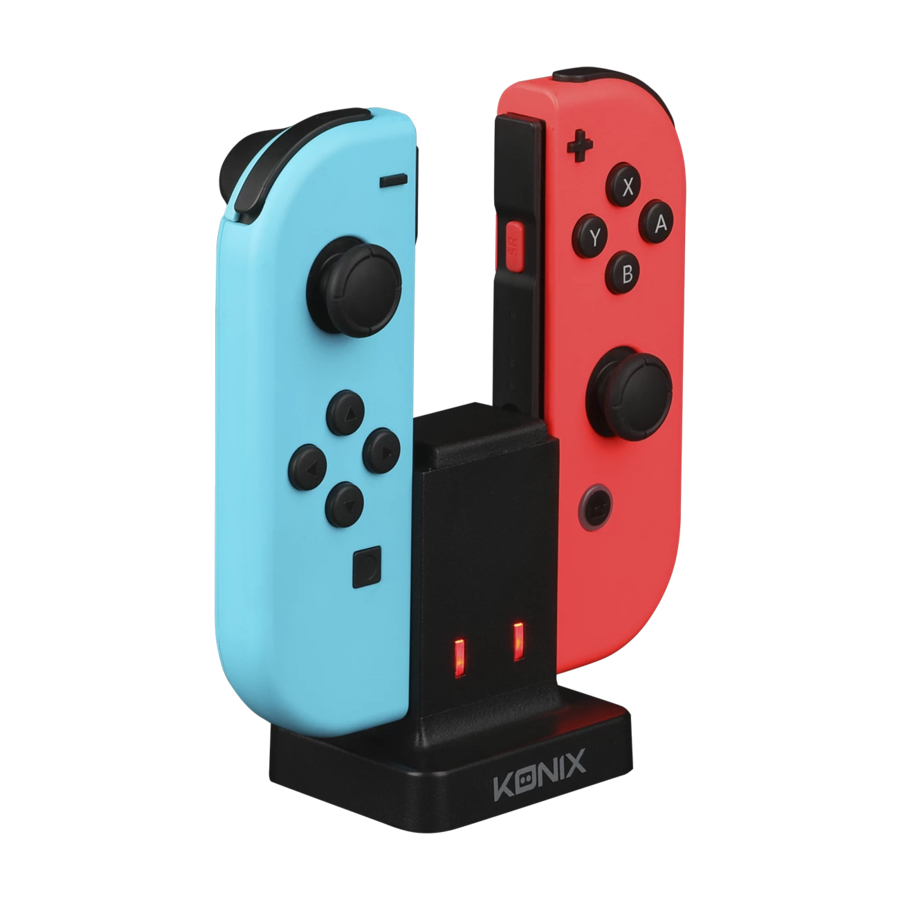
  • Seite 1 Dual Joy-Con charge base for NINTENDO SWITCH ® User manual G A M I N G...
  • Seite 3: Specification

    Package Content: • Joy-Con Mini charging Dock • User manual USB Power cable Left Rail Right Rail Charging LED Specification: • Powered by USB • Charges up to 2 Joy-Con controllers simultaneously • Individual LEDs indicate charge level for each Joy-Con •...
  • Seite 4 Charge the Joy-Con: 1. Connect the USB to Switch TV dock or a USB power source, both LEDs will light up red to indicate it is connected to a power source. 2. Follow the illustration to slide the Joy-Con to the end of left / right rails.
  • Seite 5 3. After inserting the Joycon, the corresponding LED will turn red to indicate the Joycon is in charging. The LED will turn green when fully charged. Precaution and Maintenance: 1. Please make sure there is no extreme pressure put on this product. 2.
  • Seite 6 Contenu de la boîte : • Mini dock de charge pour 2 Joy-Con • Manuel d’utilisateur Cordon USB de charge Rail gauche Rail droit LED de charge Spécifications : • Alimenté via une prise USB • Charge jusqu’à 2 Joy-Cons simultanément •...
  • Seite 7 Charge du Joy-Con : 1. Connecter le la prise USB du chargeur au port USB de la Switch ou toute autre source de courant, les 2 LED s’allument en rouge pour indiquer que le chargeur est relié à une source de courant. 2.
  • Seite 8 3. Après avoir insérer le Joy-Con, la LED correspondante sera rouge pour indiquer que le Joy-Con est en charge et la LED passera en vert lorsque la charge sera complète. Précautions et entretien : 1. Veillez à ce que le produit ne subisse pas de pression extrême. 2.
  • Seite 9 Packungsinhalt: • Joy-Con Mini-Aufladedock • Bedienungsanleitung USB-Stromkabel Linke Schiene Rechte Schiene Lade-LED Technische Daten: • USB-Stromversorgung • Lädt bis zu 2 Joy-Con-Controller gleichzeitig auf • Einzelne LEDs zeigen den Ladezustand für jeden Joy-Con an • Einfache Einschubkonstruktion...
  • Seite 10 Joy-Con aufladen: 1. Verbinden Sie den USB mit dem Switch TV-Dock oder einer USB- Stromquelle, beide LEDs leuchten rot, um anzuzeigen, dass er an eine Stromquelle angeschlossen ist. 2. Folgen Sie der Abbildung, um den Joy-Con bis zum Ende der linken/rechten Schienen zu schieben.
  • Seite 11 3. Nach dem Einsetzen des Joy-Con wird die entsprechende LED rot, um anzuzeigen, dass der Joy-Con lädt. Die LED leuchtet grün, wenn er voll aufgeladen ist. Vorsichtsmassnahmen Und Wartung: 1. Sorgen Sie bitte dafür, dass kein übermäßiger Druck auf das Gerät ausgeübt wird.
  • Seite 12: Especificaciones

    Contenido: • Base de carga mini Joy-Con • Manual de usuario Cable de alimentación USB Carril izquierdo Carril derecho LED de carga Especificaciones: • Alimentado por un cable USB • Carga hasta dos controladores Joy-Con a la vez • Los LED individuales indican el nivel de carga de cada Joy-Con •...
  • Seite 13 Cargue el Joy-Con: 1. Conecte el puerto USB del cargador a la Switch o a alguna otra fuente de alimentación USB, ambos LED se encenderán en rojo para indicar que el cargador está conectado a una fuente de alimentación. 2. Siga el esquema para deslizar el Joy-Con en el cargador respetando el sentido de los carriles.
  • Seite 14 3. Después de insertar el Joy-Con, el LED correspondiente se encenderá en rojo para indicar que el Joy-Con está cargando, el LED pasará a verde cuando esté completamente cargado. Precauciones y Mantenimiento: 1. Asegúrese de no someter el producto a una presión extrema. 2.
  • Seite 15 Conteúdo da embalagem: • Base de encaixe de carregamento Joy-Con Mini • Manual do utilizador Cabo de alimentação USB Calha esquerda Calha direita LED de carregamento Especificações: • Alimentado por USB • Carrega até 2 controladores Joy-Con simultaneamente • LEDs individuais indicam o nível de carga para cada Joy-Con •...
  • Seite 16 Carregue o JoyCon: 1. Conete o USB ao interruptor TV ou fonte de energia USB, e ambos os LEDs ficarão vermelhos, indicando que se encontra ligado a uma fonte de energia. 2. Siga a ilustração para deslizar o Joycon ao longo das calhas esquerda/direita.
  • Seite 17 3. Depois de inserir o Joycon, o LED correspondente ficará vermelho indicando que o mesmo se encontra em carga. O LED fica verde quando ficar totalmente carregado. Cuidados e Manutenção: 1. Certifique-se de que não existe pressão extrema sobre este produto.
  • Seite 18 Contenuto della confezione : • Mini stazione di ricarica JoyCon • Manuale utente Cavo di alimentazione USB Guida sinistra Guida destra LED di ricarica Specifiche tecniche: • Alimentato da USB • Carica simultaneamente fino a 2 controller Joy-Con • I singoli LED indicano il livello di carica per ogni Joy-Con •...
  • Seite 19 Carica il JoyCon: 1. Collega la presa USB alla stazione Switch TV o a una sorgente di alimentazione USB, entrambi i LED si illuminano di rosso per indicare il collegamento a una fonte di alimentazione. 2. Segui l'illustrazione per scorrere il Joycon fino alla fine delle guide sinistra/destra.
  • Seite 20 3. Dopo aver inserito il Joycon, il LED corrispondente diventerà rosso per indicare che il Joycon è in carica. Il LED diventa verde quando è stato caricato completamente. Precauzione E Manutenzione: 1. Si prega di assicurarsi che non venga esercitata una forte pressione su questo prodotto.
  • Seite 21: Verpakkingsinhoud

    Verpakkingsinhoud: • Joy-Con-mini-oplaadstation • Gebruikershandleiding USB-stroomsnoer Linkerspoor Rechterspoor Oplaadledlampje Specificaties: • Stroomvoorziening via USB • Laadt maximaal 2 Joy-Con-controllers tegelijkertijd op • Individuele leds geven het laadniveau aan voor elke Joy-Con • Gemakkelijk inschuifontwerp...
  • Seite 22 Joy-Con opladen: 1. Sluit de USB aan op het Switch TV-station of een USB- voedingsbron, beide leds zullen rood oplichten om aan te geven dat hij op een voedingsbron is aangesloten. 2. Volg de afbeelding om de Joy-Con naar het einde van het linker-/ rechterspoor te schuiven.
  • Seite 23 3. Nadat u de Joy-Con hebt ingevoerd zal de bijbehorende led rood worden om aan te geven dat de Joy-Con aan het opladen is. De led wordt groen wanneer de Joy-Con volledig opgeladen is. Voorzorgsmaatregelen En Onderhoud: 1. Zorg ervoor dat er geen extreme druk op dit artikel wordt uitgeoefend.
  • Seite 24 Joycon .Joy-con...
  • Seite 25 Joy-Con Joy-con...
  • Seite 26 JoyCon • • • • Joy-Con • Joy-Con •...
  • Seite 27 • • • • • •...
  • Seite 28 - i n t e r a c t i v e . c o m © 2017 Konix. Innelec Multimedia – 45 rue Delizy, 93692 Pantin Cedex, FRANCE. The Konix brand and logo are trademarks of Innelec Multimedia S.A. Nintendo Switch™...