Inhaltsverzeichnis
Werbung
Verfügbare Sprachen
Verfügbare Sprachen
Quicklinks
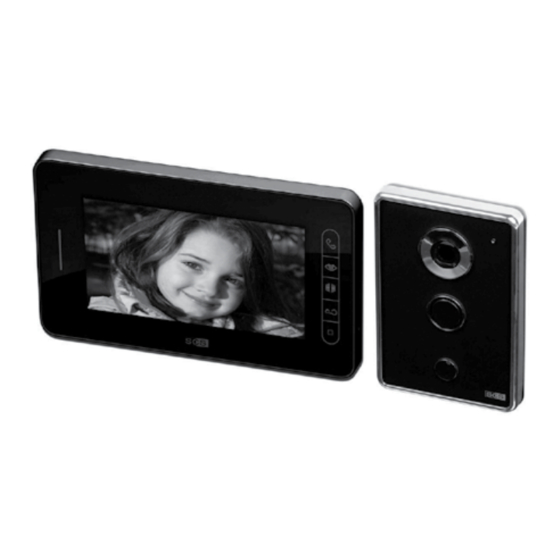
Kit portier vidéo couleur 2 fils - Ecran tactile - Mémorisation images
Video-Türsprechanlage mit Farbbildschirm – 2-Draht - Touchscreen - Bildspeicherfunktion
Colour video door entry kit – 2 wires - Touch screen - Image storage
Equipo de portero con vídeo en color -2 cables - Pantalla táctil – Memorización de imágenes
Kit videocitofono a colori – 2 fili - Schermo tattile – Memorizzazione immagini
Zestaw wideodomofonowy kolor – 2-przewodowy - Dotykowy ekran – Zapamiętywanie obrazów
SOFIA M7E8 TOP B
SOFIA M7E8 TOP W
Manuel d'installation et d'utilisation
Montage- und Bedienungsanleitung
Installation and user manual
Manual de instalación y uso
Manuale di installazione e d'uso
Instrukcja montażu i użytkowania
V.01-2011
Werbung
Inhaltsverzeichnis

Verwandte Anleitungen für SCS SOFIA M7E8 TOP B


Inhaltszusammenfassung für SCS SOFIA M7E8 TOP B
- Seite 1 Equipo de portero con vídeo en color -2 cables - Pantalla táctil – Memorización de imágenes Kit videocitofono a colori – 2 fili - Schermo tattile – Memorizzazione immagini Zestaw wideodomofonowy kolor – 2-przewodowy - Dotykowy ekran – Zapamiętywanie obrazów SOFIA M7E8 TOP B SOFIA M7E8 TOP W Manuel d’installation et d’utilisation...
- Seite 2 Important : Avant toute installation lire attentivement ce manuel. Cette notice fait partie intégrante de votre produit. Conservez-la soigneusement en vue de toute consultation ultérieure. Avertissements généraux La mise en œuvre, les connections électriques et les réglages doivent être effectués dans les règles de l’art par une personne qualifiée et spécialisée.
-
Seite 3: Caractéristiques Du Produit
FRANCAIS SOMMAIRE 1. Caractéristiques du produit 2. Description des éléments 3. Fixation et connexion des éléments 4. Utilisation des éléments 5. Avertissements à respecter CARACTÉRISTIQUES DU PRODUIT Ce kit vidéo couleur extrêmement facile à installer dispose d’une excellente qualité d’image et vous permet de voir et de discuter avec vos visiteurs. Equipé... -
Seite 4: Description Des Éléments
FRANCAIS DESCRIPTION DES ÉLÉMENTS LE MONITEUR Bouton de réponse Activer la vue extérieure Activer l’automatisme de portail Activer la gache ou serrure électrique Changer la mélodie Réglages (vue arrière) Haut parleur Microphone Ecran Réglage volume mélodie Languette à tirer pour ouverture boîtier LA PLATINE DE RUE Réglages (vue arrière) Microphone... - Seite 5 FRANCAIS FIXATION ET CONNEXION DES ÉLÉMENTS Fixation de la platine 1) Fixer la caméra extérieure à 1.5 mètre de hauteur en applique sur un mur plat. 2) Fixer d’abord le support arrière. Terminer en vissant la vis en bas de la platine. 3) Connecter les fils de la caméra (comme indiqué...
- Seite 6 FRANCAIS UTILISATION DES ÉLÉMENTS 1) OPERATION BASIQUES : UTILISATION DES TOUCHES SENSITIVES => COMMUNIQUER AVEC SON VISITEUR Lorsque le visiteur appuie sur le bouton d’appel de la caméra, le moniteur intérieur sonne, la vidéo s’allume. Pour décrocher, appuyer sur et vous pourrez communiquer avec votre visiteur. Le temps de communication est de 60 secondes maximum.
- Seite 7 b) Réglages des options Réglages de l’heure et la date => Réglages (logo clé)/ date & heure / format horloge => 1) Choisissez le type d’heure : digitale ou analogique (un point bleu apparaît sur le mode choisi.) Pour valider appuyer sur le logo clé. =>...
- Seite 8 3) UTILISATION DE LA MEMORISATION D’IMAGES (Logo clé / capture auto./ allumer) IMPORTANT : Le mode capture automatique ne s’utilise que lorsque vous n’êtes pas présent à votre domicile. Celui - ci permet de prendre en photo votre visiteur (3 images). Votre moniteur intérieur ne sonne que quelques secondes dans ce mode.
- Seite 9 - Les dommages résultant des conséquences de l’utilisation de composants ne provenant formateur. Cette action entraînerait la perte automatique de toute garantie sur le produit. pas de SCS SENTINEL. - Nettoyer les parties vitrées avec un chiffon doux. Les liquides de nettoyage pouvant - Les dommages dus à...
-
Seite 10: Produkteigenschaften
DEUTCH INHALT 1. Produkteigenschaften 2. Beschreibung der Komponenten 3. Befestigung und Anschluss der Komponenten 4. Bedienung der Komponenten 5. Warnhinweise PRODUKTEIGENSCHAFTEN Diese Video-Türsprechanlage ist kinderleicht zu montieren, bietet eine ausgezeichnete Bildqualität und ermöglicht Ihnen somit Ihre Besucher zu sehen und mit diesen zu sprechen. . -
Seite 11: Beschreibung Der Komponenten
DEUTCH BESCHREIBUNG DER KOMPONENTEN DER BILDSCHIRM Verbindungsknopf Aktivierungsknopf Video Activer l’automatisme de portail Öffnungsknopf Klingeltöne Einstellungen (Rückansicht) Lautsprecher Bildschirm Mikrofon Einstellung Melodielautstärke DIE TÜRSTATION Einstellungen (Rückansicht) Mikrofon Objektiv Lautsprecher Klingelknopf Einstellung Einstellung Öffnungsdauer Sprachlautstärke Schloss... -
Seite 12: Befestigung Und Anschluss Der Komponenten
DEUTCH BEFESTIGUNG UND ANSCHLUSS DER KOMPONENTEN Befestigung 1) Die Außenkamera auf 1,5 Meter Höhe an einer glatten Wand befestigen. 2) Zuerst den hinteren Halter anbringen. Zuletzt die Schraube unterhalb der Türsprechanlage anziehen. 3) Die Drähte der Kamera anschließen (wie auf der unteren Abbildung gezeigt) und die Kamera auf dem Halter positionieren. -
Seite 13: Bedienung Der Komponenten
DEUTCH BEDIENUNG DER KOMPONENTEN 1) BEDIENUNG MIT DEM BESUCHER SPRECHEN Wenn der Besucher auf den Klingelknopf der Kamera drückt, ertönt am Innenbildschirm der Klingelton und die Übertragung wird angezeigt. Drücken Sie auf , um abzuheben und mit Ihrem Besucher zu reden. Die maximale Gesprächsdauer beträgt 60 Sekunden. - Seite 14 4) EINSTELLEN DES BILDERRAHMENS => 1) Zurück zum Startbildschirm => 2) Foto-Slideshow: automatische oder manuelle Aufnahme => 3) Voriges Foto => 4) Automatische Slideshow => 5) Nächstes Foto => 6) Verwaltung der Fotoalben => 7) Fortgeschrittene Einstellungen des Bilderrahmens (siehe nächste Seite) Drücken Sie auf 6, um zu erfahren, ob Ihre SD-Karte eingesteckt wurde.
- Seite 15 11) ANZEIGEN DER MANUELL AUFGENOMMENEN FOTOS Berühren Sie das Bild, um auf das Menü Manuelle Aufnahme zuzugreifen 1=> Anzeige manuelle Aufnahme 2=> Datum der Aufnahme 3=> Zurück zum Startbildschirm 4=> Ansicht der automatisch aufgenommenen Fotos 5=> Voriges Foto 5=> Nächstes Foto 7 =>...
- Seite 16 WAHRNHINWEISE - Dieser Bausatz darf ausschließlich mit dem mitgelieferten 18V/1.5A Transformator verwendet werden. - Alle Komponenten müssen vor dem Anschluss des Bausatzes an das Stromnetz angeschlossen werden. - Mindestens 25 cm Abstand zwischen Innenbildschirm und anderen Geräten bewahren. - Bildschirm und Transformator nicht abdecken. - Außenkamera niemals dem Feuer oder starkem Licht aussetzen.
-
Seite 17: Product Characteristics
ENGLISH CONTENTS 1. Product characteristics 2. Description of the elements 3. Attaching and connecting the elements 4. Using the elements 5. Warnings to be respected PRODUCT CHARACTERISTICS This extremely easy to install colour video kit has excellent image quality and lets you see and talk to your visitors. - Seite 18 ENGLISH DESCRIPTION OF THE ELEMENTS THE MONITOR Response button Video activation button Activer l’automatisme de portail Opening button Ring tones Settings (rear view) Loudspeaker Microphone Screen Melodie volume setting THE STREET PANEL Settings (rear view) Microphone Lens Loudspeaker Call button Lock activation time Voice volume setting...
- Seite 19 ENGLISH ATTACHING AND CONNECTING THE ELEMENTS Attaching 1) Attach the exterior camera at a height of 1.5 metres mounted on a flat wall. 2) First fit the rear support. Finish by tightening the screw at the bottom of the panel. 3) Connect the camera wire (as shown in the diagram below) and insert the camera onto its support.
- Seite 20 ENGLISH USING THE ELEMENT 1) GENERAL USING COMMUNICATING WITH YOUR VISITOR When the visitor presses the camera call button, the interior monitor rings and the video switches on. To pick up press and you may communicate with your visitor. Communication time is a maximum of 60 seconds.
-
Seite 21: Choosing The Mode
4) PHOTO FRAME SETTINGS => 1) Back to the home screen => 2) Reading the images: automatic or manual image capture => 3) Previous image => 4) Automatic reading of the album => 5) Next image => 6) Photo album management =>... - Seite 22 11) LOOKING AT MANUALLY CAPTURED IMAGES Press image to access the manual capture menu 1 => Manual image capturing indicator 2 => Date of the shot 3 => Back to the home screen 4 => View the captured images automatically 5 =>...
- Seite 23 WARNINGS TO BE RESPECTED - This kit must be connected with the 18V/1.5A transformer provided. - Connect up all the elements before you power up the kit - Leave a minimum of 25 cm between the interior monitor and any other installation. - Never cover the monitor or transformer.
- Seite 24 ESPAñOL ÍNDICE 1. Características del producto 2. Descripción de los elementos 3. Fijación y conexión de los elementos 4. Uso de los elementos 5. Advertencias que hay que respetar CARACTERISTICAS DEL PRODUCTO Este equipo de vídeo a color es muy fácil de instalar y ofrece una exce- lente calidad de imagen, lo que permite ver y hablar con los visitantes.
- Seite 25 ESPAñOL DESCRIPCION DE LOS ELEMENTOS EL MONITOR Botón de respuesta Botón de activación de vídeo Activer l’automatisme de portail Botón de apertura Melodías Reglajes (vista trasera) Pantalla Altavoz Micrófono Reglaje del volumen de melodía LA PLACA DE CALLE Reglajes (vista trasera) Micrófono Objetivo Altavoz...
-
Seite 26: Diagrama De Cableado
ESPAñOL FIJACION Y CONEXION DE LOS ELEMENTOS Fijación Fijar la cámara exterior a 1,5 metros de altura en un muro plano. 2) En primer lugar, fijar el soporte posterior. Terminar atornillando el tornillo inferior de la placa. 3) Conectar los cables de la cámara (como se indica en el diagrama que sigue) y unir la cámara a su soporte. - Seite 27 ESPAñOL USO DE LOS ELEMENTOS 1) USO °COMUNICACIÓN CON LA VISITA Cuando la visita pulsa el botón de llamada de la cámara, el monitor interior suena y el vídeo se enciende. Para descolgar, pulse y podrá comunicarse con la visita. La duración máxima de la comunicación es de 60 segundos.
- Seite 28 4) AJUSTES DEL MARCO DE FOTOS => 1) Vuelva a la pantalla de bienvenida => 2) Lectura de las imágenes: captura automática o manual => 3) Imagen anterior => 4) Lectura automática del álbum => 5) Imagen siguiente => 6) Gestión del álbum de fotos =>...
- Seite 29 11) MIRAR LAS IMÁGENES CAPTURADAS MANUALMENTE Pulse la imagen para acceder al menú de captura manual 1 => Indicador captura manual 2 => Fecha de la toma 3 => Volver a la pantalla de bienvenida 4 => Ver las imágenes capturadas automáticamente 5 =>...
- Seite 30 ADVERTENCIA QUE HAY QUE RESPETAR – Este equipo se debe conectar con el transformador de 18V/1.5A que se suministra. – Haga todas las conexiones entre los elementos antes de hacer llegar energía al equipo – Deje no menos de 25 cm entre el monitor interior y cualquier otra instalación. –...
-
Seite 31: Caratteristiche Del Prodotto
ITALIANO INDICE 1. Caratteristiche del prodotto 2. Descrizione degli elementi 3. Fissaggio e collegamento degli elementi 4. Uso degli elementi 5. Avvertenze da rispettare CARATTERISTICHE DEL PRODOTTO Questo kit videocitofono a colori, estremamente facile da installare, dispone di un’eccellente qualità di immagine e vi permette di vedere e di parlare con i vostri visitatori. -
Seite 32: Descrizione Degli Elementi
ITALIANO DESCRIZIONE DEGLI ELEMENTI IL MONITOR Pulsante di risposta Pulsante di attivazione video Activer l’automatisme de portail Pulsante di apertura Suonerie Regolazioni (vista posteriore) Altoparlante Display Microfono Regolazione volume suoneria LA PIASTRA ESTERNA Reglajes (vista trasera) Micrófono Objetivo Altavoz Botón de llamada Reglaje del tiempo Reglaje del... -
Seite 33: Schema Di Cablaggio
ITALIANO FISSAGGIO E COLLEGAMENTO DEGLI ELEMENTI Fissaggio 1) Fissare la telecamera esterna 1,5 metri di altezza su una parete piana. 2) Fissare innanzitutto il supporto posteriore. Terminare avvitando la vite inferiore della piastra. 3) Collegare i fili della telecamera (come indicato nello schema sottostante) e inserire la telecamera nel suo supporto. - Seite 34 ITALIANO USO DEGLI ELEMENTI 1) USO COMUNICARE CON I VISITATORI Quando il visitatore preme il pulsante di chiamata della telecamera, il monitor interno suona e il video si ac- cende. Per rispondere, premere il pulsante ; questo consentirà di comunicare con il visitatore. Il tempo di comu- nicazione è...
- Seite 35 4) IMPOSTAZIONI CORNICE FOTOGRAFIA => 1) Ritorno alla schermata principale => 2) Lettura delle immagini: cattura automatica o manuale => 3) Immagine precedente => 4) Lettura automatica dell’album => 5) Immagine seguente => 6) Gestione album fotografico => 7) Impostazioni avanzate della cornice fotografia (vedere pagina seguente) Per sapere se la scheda SD è...
- Seite 36 11) GUARDARE LE IMMAGINI CATTURATE MANUALMENTE Premere sulla voce “Immagine” per accedere al menu di cattura manuale 1 => Indicatore cattura manuale 2 => Data dello scatto 3 => Ritorno alla schermata principale 4 => Vedere le immagini catturate automaticamente 5 =>...
- Seite 37 AVVERTENZE DA RISPETTARE - Questo kit deve essere collegato con il trasformatore18V/1.5A fornito. - Eseguire tutti i collegamenti tra gli elementi prima di alimentare il kit. - Lasciare almeno 25 cm tra il monitor interno e ogni altra installazione. - Non coprire il monitor, né il trasformatore. - Non esporre la telecamera esterna al fuoco o a una luce violenta.
- Seite 38 POLSKI SPIS TREśCI 1. Parametry produktu 2. Opis elementów 3. Mocowanie i łączenie elementów 4. Zastosowanie elementów 5. Ostrzeżenia PARAMETRY PRODUKTU Ten zaskakująco łatwy w montażu zestaw wideodomofonowy charakteryzuje się doskonałą jakością obrazu. Dzięki niemu można zobaczyć gości i porozmawiać z nimi. .
-
Seite 39: Opis Elementów
POLSKI OPIS ELEMENTÓW MONITOR Przycisk odpowiedzi Przycisk uruchamiający przekaz wideo Activer l’automatisme de portail Przycisk otwierający Dzwonki Ustawienia (widok z tyłu) Głośnik Mikrofon Ekran Regulacja Dzwonek PANEL ZEWNĘTRZNY Regulacja (widok z tyłu) Mikrofon Obiektyw Głośnik Przycisk wywołania Regulacja czasu Regulacja głośności aktywacji zamka... - Seite 40 POLSKI MOCOWANIE I ŁĄCZENIE ELEMENTÓW Mocowanie 1) Przymocować kamerę zewnętrzną na wysokości 1,5 metra, montaż natynkowy na płaskiej ścianie. 2) Najpierw należy przymocować tylną podstawę. Na końcu należy przykręcić wkręty w dolnej części panelu. 3) Połączyć przewody kamery (zgodnie z poniższym schematem) i umieścić kamerę na podstawie. Nie należy montować...
- Seite 41 POLSKI ZASTOSOWANIE ELEMENTÓW 1) ZASTOSOWANIE ROZMOWA Z GOśCIEM Po naciśnięciu przez gościa przycisku wywołania w kamerze, uruchamia się dzwonek w monitorze wewnętrznym, włącza się przekaz wideo. Aby odebrać należy nacisnąć na i można rozmawiać z gościem. Maksymalny czas rozmowy wynosi 60 sekund.
- Seite 42 4) USTAWIENIA RAMKI ZE ZDJĘCIEM => 1) Powrót do ekranu głównego => 2) Odczyt obrazów: zrzut automatyczny lub ręczny => 3) Poprzedni obraz => 4) Automatyczny odczyt albumu => 5) Następny obraz => 6) Obsługa albumu ze zdjęciami => 7) Zaawansowane ustawienia ramki ze zdjęciem (patrz następna strona) Aby dowiedzieć...
- Seite 43 OGLĄDANIE OBRAZÓW WYKONYWANYCH RĘCZNIE Aby przejść do menu zrzut ręczny należy nacisnąć obraz. 1 => Symbol zrzutu ręcznego 2 => Data ujęcia 3 => Powrót do ekranu głównego 4 => Oglądanie obrazów wykonanych automatycznie 5 => Poprzedni obraz 6 => Następny obraz 7 =>...
-
Seite 44: Ostrzeżenia
OSTRZEŻENIA - Przy podłączaniu zestawu należy użyć transformatora 18V/1.5A znajdującego się w zestawie. - Przed podłączeniem zasilania należy wykonać wszystkie połączenia między elementami. - Należy zachować minimalną odległość 25 cm między monitorem a innymi instalacjami. - Nigdy nie należy przykrywać monitora ani transformatora. - Nigdy nie należy wystawiać... - Seite 45 A votre disposition du lundi au samedi de 9h00 à 12h00 et de 14h00 à 18h00 au 0 892 350 490 (0,34 €/minute) Retrouvez nous sur WWW.SCS-SENTINEL.COM LÍNEA DE ASISTENCIA : LÍnea de asistencia : 902 16 16 16 (0.34 €TTC la minute).