Inhaltsverzeichnis

Inhaltszusammenfassung für Helmac GP
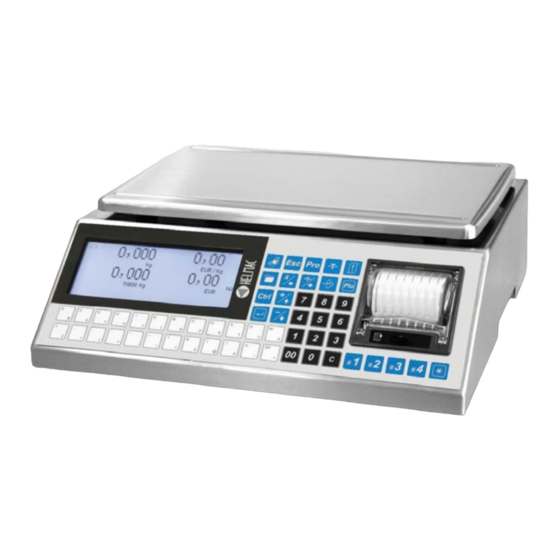
- Seite 1 GP - GPE Retail scales - Balances poids/prix - Einzelhandel Waagen - Balanzas comerciales - Bilance retail Quick start guide No ce rapide u lisateur Schnellanleitung Guía rápida del usuario Guida rapida utente...
- Seite 2 GP / GPE models quick start guide Notice rapide modèles GP / GPE Bedienungsanleitung für die GP / GPE-Modelle Guía rápida del usuario modelos GP / GPE Guida rapida utente modelli GP / GPE English Français Deutsch Español Italiano...
- Seite 3 GP/GPE models quick start guide Index Chap. 1. Power supply: ........................2 Chap. 2. Display: ..........................2 Chap. 3. Keyboard: ..........................2 Chap. 4. Type of Paper ........................2 Chap. 5. Language selection ......................3 Chap. 6. Scales reset ........................3 Chap.
-
Seite 4: Power Supply
1. Power supply The scales can be powered at 230 Vac or operate with the rechargeable internal batteries. (Autonomy 40h) (the recharge time is about 8 hours) 0,000 0,00 Recharge can be carried out both with the scales switched on and off. 0,000 0,00 Do not let the battery run down completely... -
Seite 5: Language Selection
5. Language selection # Language Italian (Conf.) The scales restart automatically in the selected language 6. Scales reset Make sure the plate is empty, press the key and the weight value is reset. 7. How to tare? ... - Seite 6 10. Tare associated to an operator Note: Before using this function, from the menu one must first activate Then enable OPERATOR TARE to confirm ( The operator puts a container on the plate, presses The tare is saved on the operator ...
- Seite 7 14. Deleting a transaction on a receipt Note: Before using this function, one must activate it in the programming menu Then Rebate to confirm ( Choose the Choose the To confirm the transaction operator cancellation. - Proceed with another operation or close the receipt. 15.
- Seite 8 16. Cash register management Note : the cash register management function must be enabled from the programming menu then Cash register management to confirm ( By default the types of payment are in cash, return and credit are already configured ...
- Seite 9 17. Discount on a transaction Note : the discount function on a transaction must be enabled from the programming menu then Discounts to confirm ( Perform the desired operation Enter the unit price Enter the discount value in % The transaction shows «Discount 10.00% - 0.35»...
- Seite 10 19. Entering a PLU # Complete # PLU-Item Choose the Complete 0000 PLU Nr. ---- number (DBase) # Complete # Complete Enter the To choose the text of the type of PLU PLU « C » 0001 PLU-Text 1 0001 PLU type ...
- Seite 11 23. Creation of a PLU group (PLU family) Enter the name of the group # PLU-groups (from 10 to 50 groups depending if one works on GPE or GP) 24. Add operators onto the keyboard # PLU / TLU 24 Plu T = Number of TLU ...
- Seite 12 (conf.) (conf.) 29. Ticket Headings # Ticket # Ticket 1 Line 1 HELMAC - # Ticket Press enter for the 6 1 Line 2 lines To exit from the programming 5th Avenue Rev 1.1...
- Seite 13 Normal – Double height # ( 1 ) Z – Characters format [ ] – Normal [ ] – Bold Company HELMAC- K – Justification ] – None ► ] – Right Next line Previous line [ = ] –...
- Seite 14 31. Advertising texts To exit # Advertising # Advertising Enter the 1 line 1 advertising line Advertising text-- To confirm 31.1 To define the type of advertising (fixed, descending or scrolling) # View Mode With choose the way the advertising is displayed None then...
-
Seite 15: Declaration Of Conformity
DECLARATION OF CONFORMITY This device meets the essential requirements and other relevant conditions of the applicable European regulations. The Declaration of Conformity is available at this Internet address www.helmac.it. WARRANTY The warranty term is one year from delivery of the instrument and... - Seite 16 Notice rapide modèles GP / GPE Sommaire Chap 1. Alimentation : ....................15 Chap 2. Présentation de l’afficheur : ................15 Chap 3. Clavier ......................15 Chap 4. Gestion du papier .................... 15 Chap 5. Sélection de la langue d’affichage ..............16 Chap 6.
-
Seite 17: Gestion Du Papier
1. Alimentation La balance peut être alimenté en 230 Vac ou fonctionnement sur batterie interne rechargeable. (Autonomie 40h) (Le temps de charge est d’ environ 8h) 0,000 0,00 La recharge de la balance se fait allumé ou éteinte. Ne jamais décharger complètement la batterie 0,000 0,00 Pour voir l’état de la batterie... -
Seite 18: Sélection De La Langue D'affichage
5. Sélection de la langue d’affichage # Langue French (Conf.) La balance reboote automatiquement et la langue choisie est activée. 6. Mise a zéro du plateau Assurez vous que le plateau est vide, Appuyez sur la touche la valeur du poids passe à... - Seite 19 10. Tare associée a un opérateur REMARQUE : avant d’utiliser cette fonction, il faut l’activer dans le menu de programmation Puis Jusqu’à Tare vendeur pour valider ( L’opérateur pose un récipient sur le plateau puis & La tare est enregistrée dans ...
- Seite 20 14. Effacement d’une erreur sur une transaction en cours REMARQUE : avant d’utiliser cette fonction, il faut l’activer dans le menu de programmation Puis Jusqu’à Annulation pour valider ( Choisir la Choisir le Pour confirmer transaction à vendeur l’annulation. effacer Procéder avec une autre transaction ou sortir le ticket du montant.
- Seite 21 16. Gestion des paiements (Rendu de monnaie) REMARQUE : la fonction de Rendue de Monnaie doit être activée par le menu de la programmation. Puis Jusqu’à rendu Monnaie pour valider ( Par défaut les paiement par Espèce, rendu et avoir sont déjà paramétré. ...
- Seite 22 17 Rabais sur une transaction REMARQUE : la fonction de rabais doit être activée dans le menu de la programmation. Puis Rabais pour valider ( Exécuter la transaction souhaitée Tapez le prix unitaire Tapez la valeur du rabais en % Sous la transaction apparait «...
- Seite 23 19 Création d’un PLU # Complete # PLU-Article Tapez le N° de PLU à 0000 PLU Nr. Complete programmer ---- (BDonn) # Complete # Complete Tapez le Pour choisir le texte du type de PLU ...
- Seite 24 23 Création d’un groupe PLU (famille PLU) # PLU-Groupes Tapez le nom du Groupes (de 10 à 50 familles selon GPE ou GP) 24 Rajouter des vendeurs sur le clavier 24 Plu # PLU / TLU T = Nbre de TLU ...
-
Seite 25: Réglage Du Rétro Éclairage
29 Création du texte de l’entête ticket # Ticket # Ticket 1 Ligne 1 Société HELMAC - # Ticket Appuyer sur entrée 1 Ligne 2 Pour les 6 lignes Jusqu’à sortir de la programmation Bd Gambetta... - Seite 26 Normal – Double hauteur # ( 1 ) Z – Format caractères [ ] – Normal [ ] – Gras Societe HELMAC- K – Justification ] – None ► ] – Gauche Ligne suivante Ligne précédente [ = ] –...
- Seite 27 31 Texte publicitaires Pour sortir # Publicite # Publicite Tapez les 1 ligne 1 lignes de publicité Texte de publicité Pour valider 31.1 Pour définir le type d’affichage publicitaire (fixe, defilant ou clignotant) # Mode Avec choisir le type ...
-
Seite 28: Garantie
DÉCLARATION DE CONFORMITÉ Ce dispositif est conforme aux standards et aux normes et règlements européens à appliquer. La Déclaration de Conformité est disponible à l’adresse Internet www.helmac.it. GARANTIE La garantie est de un an à compter de la date de livraison de l’indicateur, et couvre gratuitement la main d'œuvre et les pièces... - Seite 29 Bedienungsanleitung für die GP/GPE-Modelle Inhalt Kap 1. Versorgung .......................28 Kap 2. Display ........................28 Kap 3. Tastatur ........................28 Kap 4. Papiertyp........................28 Kap 5. Sprachwahl .......................29 Kap 6. Nullstellung der Waage .....................29 Kap 7. Ausführen einer Tara ....................29 Kap 8. Vorgespeicherte ......................29 Kap 9.
- Seite 30 1. Versorgung Die Waage kann mit 230 V AC versorgt oder mit den internen aufladbaren Batterien betrieben werden. (Autonomie 40 h) (Ladedauer circa 8 Std.) Der Ladevorgang kann bei ein- und ausgeschalteter 0,000 0,00 Waage stattfinden. 0,000 0,00 Batterie nicht komplett entladen lassen. Zur Kontrolle des Batteriestatus Batt 12.00V 100% 2.
-
Seite 31: Bedienung
5. Sprachwahl # Sprache Deutsch (Konf.) Die Waage wird automatisch in der gewählten Sprache neugestartet. 6. Nullstellung der Waage Prüfen, ob die Lastplatte leer ist. Taste drücken, und der Wert des Gewichts wechselt auf Null. Bedienung 7. Ausführen einer Tara ... -
Seite 32: Einem Bediener Zugeordnete Tara
10. Einem Bediener zugeordnete Tara Hinweis: Vor der Verwendung dieser Funktion muss sie im Menü aktiviert werden. Dann aktiviert TARA BEDIENER. Mit bestätigen ( Der Bediener legt einen Behälter auf die Lastplatte und drückt Die Tara wird beim Bediener gespeichert ... -
Seite 33: Löschen Einer Transaktion An Einem Aktuell Bearbeiteten Kassenbon
14. Löschen einer Transaktion an einem aktuell bearbeiteten Kassenbon Hinweis: Vor der Verwendung dieser Funktion muss sie im Programmierungsmenü aktiviert werden Dann Rückgängig. Mit bestätigen ( ) Transaktion Bediener Zum Bestätigen des wählen wählen Löschvorgangs. Weiteren Vorgang ausführen oder Kassenbon abschließen. 15. - Seite 34 16. Kassenverwaltung Hinweis : Die Kassenverwaltungsfunktion muss im Programmierungsmenü aktiviert werden. dann Kassenverwaltung. Mit bestätigen ( ) Die Barzahlungsarten, Rückgabe und Kredit sind bereits als Defaultwerte konfiguriert. Hinweis : Es können verschiedene Zahlungsarten eingegeben werden (von 0 bis 7). # Zahlungsarten # # Zahlungen Text für...
-
Seite 35: Skonto Auf Eine Transaktion
17 Skonto auf eine Transaktion Hinweis : Die Funktion des Skonto auf eine Transaktion muss im Programmierungsmenü aktiviert werden. dann Skonti. Mit bestätigen ( Die gewünschte Transaktion durchführen Eingabe Einzelpreis Eingabe Prozentrabatt Auf Transaktion erscheint « Skonto 10.00% - 0.35 » 18 Skonto auf Gesamtsumme ... -
Seite 36: Eingabe Eines Plu
19 Eingabe eines PLU # alle Daten # PLU (Artikel) PLU-Nr. wählen 0000 PLU-Nr. Alle Daten ---- (DBank) # alle Daten # alle Daten Bitte Zum Wählen geben Sie des PLU-Typs 0001 PLU-Text 1 0001 PLU-Typ. -
Seite 37: Erstellen Einer Plu-Gruppe
23 Erstellen einer PLU-Gruppe Namen der Gruppe eingeben (von 10 # Warengruppen # bis 50 Gruppen, je nachdem, ob mit GPE oder GP gearbeitet wird) 24 Hinzufügen von Bedienern auf der Tastatur 24 Plu # PLU / TLU / T = TLU-Nr. -
Seite 38: Hinterbeleuchtungeinstellung
25 Ausdrucken der Gesamtsummen-Ebenen I Zum Verlassen ohne Löschen # Umsatx I (kurz # Auszudruckende PLU (Artikel) Gesamtsumme wählen (Summe) Zum Löschen der Gesamtsummen 26 Ausdrucken der Gesamtsummen-Ebenen II Zum Verlassen ohne Löschen # Umsatx II (kurz # Auszudruckende ... -
Seite 39: Eingabe Bonkopftexten
29 Eingabe Bonkopftexten # Bon # Bon 1 Zeile 1 Firma HELMAC - # Bon Taste « Enter » 1 Zeile 2 drucken für die 6 Zeilen bis zur Quitt. der Progammierung Schillerstrasse 29.1 Format von Bonkopftext (Stellung und größe der Schriftzeichen) - Seite 40 30.1 Druck der Verkäufername auf dem Bon # Bon # Bon Anzeige Verkäufer Logo (Konf.) (Konf.) 31 Werbetexte # Laufschift # Werbung Verlassen Zeile der 1 Zeile 1 Werbung eingeben Zum Bestätigen Werbetext ...
-
Seite 41: Konformitätserklärung
KONFORMITÄTSERKLÄRUNG Die vorliegende Vorrichtung entspricht den grundlegenden Normen sowie den anderen Richtlinien der anwendbaren europäischen Regelungen. Die Konformitätserklärung ist auf der Webseite www.helmac.it erhältlich. GARANTIE Die Garantie beträgt ein Jahr ab Lieferung des Gerätes und besteht in der kostenlosen Abdeckung der Arbeitskosten und der Ersatzteile für GERÄTE, die AUF KOSTEN DES KUNDEN AN DEN SITZ DES... - Seite 42 Guía rápida del usuario, modelos GP/GPE Índice Cap 1. Alimentación: ......................41 Cap 2. Pantalla: ........................41 Cap 3. Teclado ........................41 Cap 4. Tipo de papel ......................41 Cap 5. Selección de idioma ....................42 Cap 6. Puesta a cero de la balanza ..................42 Cap 7.
- Seite 43 1. Alimentación La balanza puede alimentarse a 230 Vca o funcionar con las baterías internas recargables. (Autonomía 40h) (el tiempo de recarga es de unas 8 horas) 0,000 0,00 La recarga se puede efectuar tanto con la balanza encendida como apagada. 0,000 0,00 No deje que se descargue completamente la batería...
-
Seite 44: Selección Del Idioma
5. Selección del idioma # Ticket Espagnol (Conf.) La balanza se reinicia automáticamente en el idioma seleccionado 6. Puesta a cero de la balanza Asegúrese de que el plato esté vacío, pulse la tecla y el valor del peso se pone a cero Utilización 7. - Seite 45 10. Tara asociada a un operador Nota: Antes de utilizar esta función, debe haber sido activada desde el menú Después habilita TARA OPERADOR para confirmar ( ) El operador pone un recipiente en el plato, pulsa La tara se guarda en el operador ...
- Seite 46 14. Cancelación de una transacción en un recibo en curso Nota: Antes de utilizar esta función, es necesario activarla en el menú de programación Después Anular para confirmar ( Elegir la Elegir el Para confirmar la transacción operador cancelación. Proceder con otra operación o cerrar el recibo 15.
- Seite 47 16. Gestión de caja Nota : la función de gestión de caja debe ser habilitada desde el menú de programación después Gestión de caja para confirmar ( De manera predeterminada los tipos de pago al contado, devolución y crédito ya están configurados ...
- Seite 48 17. Descuento en una transacción Nota : la función de descuento en una transacción debe habilitarse desde el menú de programación después Descuentos para confirmar ( Efectúe la operación deseada Introducir el precio por unidad Introducir el valor del descuento en En la transacción aparece «...
- Seite 49 19. Introducción de un PLU # Completar # PLU-Artículo Elija el Completar número de 0000 N. Plu ---- (DBase) # Completar # Completar Introducir Para elegir el el texto del tipo de PLU 0001 Texto 1 PLU 0001 Tipo de PLU PLU «...
- Seite 50 23. Creación de un grupo de PLU # Grupos PLU # Introducir el nombre del grupo (de 10 a 50 grupos dependiendo si se trabaja en GPE o GP) (conf.) 24. Añadir operadores en el teclado...
- Seite 51 (conf.) 29. Cabecera del recibo # Ticket # Ticket 1 Linea 1 HELMAC - # Ticket Pulsar enter para las 6 1 Linea 2 líneas para salir de la programación Avenida San Jos Rev 1.1...
- Seite 52 – Doble altura Z – Formato caracteres # ( 1 ) [ ] – Normal [ ] – Audaz K – Justificación HELMAC- ] – Ninguna ► ] – Derecha [ = ] – Centro [◄] – Izquierda Línea siguiente Línea anterior...
- Seite 53 30.1 Imprimir el nombre operador en el recibo # Ticket # Ticket Logotipo Operador (conf.) (conf.) 31. Textos publicitarios Para salir # Publicidad # Publicidad Introducir la 1 línea 1 línea de la publicidad Texto de la publicidad Para confirmar...
-
Seite 54: Declaración De Conformidad
La declaración de conformidad está disponible en la dirección de Internet www.helmac.it GARANTÍA La garantía es de UN AÑO desde la entrega del instrumento y consiste en la cobertura gratuita de la mano de obra y de los repuestos para INSTRUMENTOS ENTREGADOS FRANCO LA SEDE del VENDEDOR. - Seite 55 Guida rapida utente modelli GP/GPE Indice Cap 1. Alimentazione: ......................54 Cap 2. Display : ........................54 Cap 3. Tastiera ........................54 Cap 4. Tipo Carta .........................54 Cap 5. Selezione lingua .......................55 Cap 6. Azzeramento della bilancia ..................55 Cap 7. Come fare una tara ....................55 Cap 8.
- Seite 56 1. Alimentazione La bilancia può essere alimentata a 230 Vac o funzionare con le batterie interne ricaricabili. (Autonomia 40h) (il tempo di ricarica è di circa 8 ore) 0,000 0,00 La ricarica può essere effettuata sia con la bilancia accesa che spenta. 0,000 0,00 Non fare scaricare completamente la batteria...
-
Seite 57: Selezione Della Lingua
5. Selezione della lingua # Lingua Italiano (Conf.) La bilancia si riavvia automaticamente nella lingua selezionata 6. Azzeramento della bilancia Accertarsi che il piatto sia vuoto, Premere il tasto e il valore del peso va a zero Utilizzo 7. - Seite 58 10. Tara associata ad un operatore Nota : Prima di utilizzare questa funzione , deve essere attivata dal menu abilita TARA OPERATORE per confermare ( L’operatore mette un recipiente sul piatto, preme La tara viene salvata sull’operatore ...
- Seite 59 14. Cancellazione di una transazione su uno scontrino in corso Nota : Prima di utilizzare questa funzione, bisogna attivarla nel menu di programmazione Stornate per confermare ( Scegliere la Scegliere Per confermare la transazione l’operatore cancellazione. Procedere con un ‘altra operazione o chiudere lo scontrino. 15.
- Seite 60 16. Gestione cassa Nota : la funzione di gestione cassa deve essere abilitata dal menu di programmazione Gestione cassa per confermare ( Per default i tipi di pagamento in contanti, reso e credito sono già configurati Nota : è possibile configurare diversi tipi di pagamento (da 0 a 7). # Pagamenti # Pagamenti # Tipo Pagament #...
- Seite 61 17. Sconto su una transazione Nota : la funzione di sconto su una transazione deve essere abilitata dal menu di programmazione Sconti per confermare( Eseguire l’operazione desiderata Inserire il prezzo unitario Inserire il valore dello sconto in % Sulla transazione appare «...
- Seite 62 19. Inserimento di un PLU # Completa # PLU-Articolo Scegliere il numero di 0000 Nr PLU Completa ---- (DBase) # Completa # Completa Inserire il Per scegliere il testo del tipo di PLU 0001 Testo 1 PLU 0001 Tipo PLU...
-
Seite 63: Aggiungere Operatori Sulla Tastiera
23. Creazione di un gruppo di PLU (famiglia PLU) # GRUPPI PLU # Inserire il nome del gruppo (da10 a 50 gruppi a seconda se si lavora su GPE o GP) 24. Aggiungere operatori sulla tastiera # PLU / TLU 24 Plu Per confermare ... - Seite 64 (conf.) (conf.) 29. Intestazioni scontrino # Scontrino # Scontrino 1 Linea 1 HELMAC - # Scontrino Premere enter per le 6 1 Linea 2 linee Per uscire dalla programmazione Via Manzoni Rev 1.1...
- Seite 65 Doppia altezza Z – Formato caratteri [ ] – # ( 1 ) Normale [ ] – Grassetto K – Giustificazione ] – Ditta HELMAC- Nessuna ► ] – Destra [ = ] – Centro [◄] – Sinistra Riga successiva Riga precedente ...
- Seite 66 31. Messaggi pubblicitari Per uscire # Pubblicità # Pubblicità Inserire la 1 linea 1 linea della Testo della pubblicità-- pubblicità (conf.) (conf.) Per confermare 31.1. Per definire il tipo di pubblicità (fissa, a discesa o scorrimento) # Modo Visual.
-
Seite 67: Garanzia
Il presente dispositivo è conforme agli standard essenziali e alle altre normative pertinenti dei regolamenti europei applicabili. La Dichiarazione di Conformità è disponibile all'indirizzo internet www.helmac.it GARANZIA La garanzia è di UN ANNO dalla consegna dello strumento e consiste nella copertura gratuita della manodopera e dei ricambi per STRUMENTI RESI FRANCO SEDE della VENDITRICE. - Seite 68 HELMAC S.r.l Via Manzoni, 86 26016 Spino d’Adda (CR) Tel. +39 0373 980395 Fax +39 0373 965788 www.helmac.it...