Herunterladen Inhalt Inhalt Diese Seite drucken
Vorschau ausblenden Andere Handbücher für GT-ZSd-01:
Inhaltsverzeichnis

Werbung

Verfügbare Sprachen

Verfügbare Sprachen

Temporizador digital para interiores GT-ZSd-01
Temporizador digital, para o interior GT-ZSd-01
Digitale Zeitschaltuhr für Innen GT-ZSd-01
Digital indoor timer switch GT-ZSd-01
Manual de operación + Garantía
Funcionamento + Garantia
Bedienung + Garantie
Operating instructions + Guarantee
I/11/09 (ES), IV/10/09(PT)

Werbung

Inhaltsverzeichnis
loading

Inhaltszusammenfassung für Tevion GT-ZSd-01

  • Seite 1 Temporizador digital para interiores GT-ZSd-01 Temporizador digital, para o interior GT-ZSd-01 Digitale Zeitschaltuhr für Innen GT-ZSd-01 Digital indoor timer switch GT-ZSd-01 Manual de operación + Garantía Funcionamento + Garantia Bedienung + Garantie Operating instructions + Guarantee I/11/09 (ES), IV/10/09(PT)
  • Seite 2: Inhaltsverzeichnis

    ÍNDICE ÍNDICE Denominación de los componentes ............Página Desactivación de todos los programas..........Página Elementos de indicación y operación ............Página Desbloquear la desactivación ............... Página Le agradecemos la confianza depositada en nosotros ......Página Temporizador (función cuenta atrás) ..........Página 16-18 Indicaciones de seguridad ................
  • Seite 3: Índice

    ÍNDICE ÍNDICE Designação das peças ................. Página Desactivação de todas as programações ..........Página Visor e elementos de controlo ..............Página Suspensão da desactivação ..............Página Introdução ....................Página Temporizador (função de contagem decrescente) ......Página 39-40 Advertências de segurança ................. Página 26-27 O gerador aleatório ................
  • Seite 4 INHALTSANGABE INHALTSANGABE Deaktivierung aufheben ................Seite Teilebezeichnung ................... Seite Timer (Countdown-Funktion) ..............Seite 60-61 Anzeige- und Bedienelemente ..............Seite Der Zufallsgenerator ................Seite Herzlichen Dank für Ihr Vertrauen ............... Seite Ein-/Ausschalten manuell ................Seite Sicherheitshinweise ..................Seite 48-49 Kindersicherung ..................... Seite Entsorgung .....................
  • Seite 5 TABLE OF CONTENTS TABLE OF CONTENTS Resetting deactivation ................Page Description of components ................Page Timer (countdown function) ..............Page 82-83 Indicator and operating components ............Page The random generator ................Page We thank you for choosing the Globaltronics Digital timer switch... Page Manual ON/OFF switching ................
  • Seite 6: Denominación De Los Componentes

    DENOMINACIÓN DE LOS COMPONENTES ELEMENTOS DE INDICACIÓN Y OPERACIÓN 1. Símbolo de encendido 9. Botón Reset 2. Símbolo de apagado 10. Botón programa 1. LED ON/OFF 3. T iempo de conmutación OFF 11. B otón CD (temporizador) 2. Campo de operación 4. Símbolo de hora 12. Botón hora (HOUR) 3. Seguro para niños 5. B otón verano/ 13. Botón día/segundos (DAY/SEC) 4.
  • Seite 7: Le Agradecemos La Confianza Depositada En Nosotros

    INTRODUCCIÓN INSTRUCCIONES DE SEGURIDAD Le agradecemos la confianza depositada en nosotros. • Antes de poner en marcha el temporizador inspecciónelo para detectar posibles daños. Si Gracias por adquirir su nuevo temporizador. Estamos convencidos de que este moderno aparato detecta cualquier daño diríjase a nuestro servicio técnico (pág. 68). le proporcionará...
  • Seite 8: Eliminación

    INSTRUCCIONES DE SEGURIDAD ELIMINACIÓN • Tenga presente que al conectar aparatos no debe superarse la carga máxima admisible Embalaje del temporizador (3680 W de carga óhmica o 690 W de carga inductiva, p.ej. dispositivos Su temporizador se encuentra protegido en su embalaje para evitar daños de transporte. Los accionados mediante motor, transformadores).
  • Seite 9: Elementos Incluidos En El Suministro

    ELEMENTOS INCLUIDOS EN EL SUMINISTRO ANTES DE COMENZAR 1 Temporizador Cómo insertar/sustituir las pilas 1 manual de instrucciones Inserte las pilas incluidas antes de encender el aparato para que los datos almacenados en la 2 pilas AAA / LR 03, 1,5 V memoria no se borren si se produce un corte de luz.
  • Seite 10: Puesta En Marcha

    ANTES DE COMENZAR PUESTA EN MARCHA Inserte las dos pilas en el compartimento. Preste atención a la correcta polaridad. Vuelva a Inserte el temporizador en una toma de alimentación con contactos de protección de 230 V colocar la tapa. Los contactos de la tapa deben adaptarse exactamente a la ranura guía. ~ 50 Hz de tensión alterna.
  • Seite 11: Programación

    PUESTA EN MARCHA PROGRAMACIÓN En el temporizador es posible almacenar 20 programas con una función de ON y de OFF cada CONSEJO uno. Si desea ver los programas pulse en el modo hora dos veces el botón PRG (PROGRAMA). Pulse el botón S/W en el modo temporizador para pasar del horario de verano al de invierno o Aparecerá...
  • Seite 12: Tiempo De Apagado

    PROGRAMACIÓN PROGRAMACIÓN Durante el ajuste de los días de la semana, cada vez que pulse el botón DAY/SEC dispondrá de 3. Pulse el botón MIN (MIN) para ajustar los minutos diferentes opciones de selección. 4. Pulse el botón PRG para finalizar los ajustes y pasar al siguiente programa. Programe más •...
  • Seite 13: Desactivación De Los Programas Individuales

    PROGRAMACIÓN PROGRAMACIÓN Desactivación de los programas individuales Desbloquear la desactivación Si no necesita una o varias funciones de conmutador por el momento. puede desactivar un 1. Para volver a desbloquear la desactivación, seleccione mediante el botón PRG el programa programa previamente guardado en la memoria sin borrar los datos de conmutación corre- que desea activar.
  • Seite 14: El Generador Aleatorio

    PROGRAMACIÓN PROGRAMACIÓN CONSEJO 1. Pulse brevemente y a la vez los botones PRG y DAY/SEC para acceder al modo de tempo- Si el temporizador se para y vuelve a arrancar, la cuenta atrás comenzará de nuevo desde rizador. el principio. 2.
  • Seite 15: Encendido Y Apagado Manual

    RESET ENCENDIDO Y APAGADO MANUAL Puede encender o apagar el temporizador en cualquier momento pulsando el botón ON/OFF (restablecimiento a los ajustes de fábrica) (el generador aleatorio se apagará también de este modo). Utilizando un objeto afilado (un bolígrafo o un objeto similar), pulse el botón RESET R (9) para El símbolo ON u OFF parpadeante indica que usted ha utilizado la función „encendido/apagado borrar todos los programas y restablecer los ajustes de fábrica.
  • Seite 16: Datos Técnicos

    LOCALIZACIÓN Y SOLUCIÓN DE FALLOS DATOS TÉCNICOS Modelo: GT-ZSd-01 Problema Solución Tensión: 230 V ~ 50 Hz Carga de conmutación a 230 V: 16 A (carga óhmica) / 3 A (carga inductiva) La indicación en pantalla está congelada. Pulse el botón RESET para restaurar el Temperatura de funcionamiento: de 0°...
  • Seite 17: Designação Das Peças

    DESIGNAÇÃO DAS PEÇAS VISOR E ELEMENTOS DE CONTROLO 1. Símbolo de ligação 10. Botão programa 2. Símbolo de desconexão 11. Botão CD (temporizador) 1. LED de controlo “ligado/desligado” 3. Tmporização DESLIGADA 12. Botão „hora“ 2. Painel de controlo 4. Símbolo do relógio 13. Botão dia/segundos 3. Protecção para crianças, 5. Botão horário de Verão/Inverno 14. Dia da semana* tomada de 230 V~50 Hz 6. Botão dos minutos 15. Símbolo da hora de Verão 4. Compartimento das pilhas 7. Botão LIGAR/DESLIGAR 16. Hora (traseira)
  • Seite 18: Introdução

    INTRODUÇÃO ADVERTÊNCIAS DE SEGURANÇA Agradecemos a sua confiança • Antes da colocação em funcionamento verifique se o temporizador apresenta danos! Se Felicitamo-lo(a) pela aquisição do seu novo temporizador digital. Temos a certeza de que for o caso, contacte o nosso serviço de apoio ao cliente (pág. 24). ficará...
  • Seite 19: Eliminação

    ADVERTÊNCIAS DE SEGURANÇA ELIMINAÇÃO • Nunca tente abrir o temporizador. Poderão ficar expostas partes condutoras de tensão. Embalagem Caso o aparelho apresenta danos deverá desligar imediatamente o temporizador da tomada. Para uma melhor protecção de danos de transporte, o seu temporizador encontra-se dentro As reparações no aparelho apenas podem ser executadas por um técnico qualificado ou de uma embalagem.
  • Seite 20: Conteúdo

    CONTEÚDO ANTES DE INICIAR 1 Temporizador Introdução / Substituição das pilhas 1 Manual de instruções Antes da colocação em funcionamento introduza as pilhas fornecidas de forma a não se 2 Pilhas AAA / LR 03, 1,5 V apagarem as informações guardadas em caso de uma falha de corrente. Poderá...
  • Seite 21: Colocação Em Funcionamento

    ANTES DE INICIAR COLOCAÇÃO EM FUNCIONAMENTO Retire a tampa das pilhas na parte traseira do aparelho. Para o fazer apenas deverá carregar Ligue o temporizador a uma tomada com contactos de protecção, com uma tensão de ao mesmo tempo em ambos os dispositivos de suporte. Coloque ambas as pilhas na tampa. 230 V~, 50 Hz.
  • Seite 22: Programação

    COLOCAÇÃO EM FUNCIONAMENTO PROGRAMAÇÃO O temporizador contém espaço para um total de 20 programações, podendo cada uma ser NOTA programada com uma função de LIGAR e uma função de DESLIGAR. Se pretender consultar as Carregue no botão S/W no modo da hora, para comutar entre o horário de Verão e o programações efectuadas carregue (no modo da hora) 2 vezes no botão PRG (PROGRAMA).
  • Seite 23: Hora De Desconexão

    PROGRAMAÇÃO PROGRAMAÇÃO Ao regular os dias da semana terá diversas possibilidades de escolha de cada vez que carregar 2. Carregue no botão STD para regular a hora. no botão TAG/SEK. 3. Carregue no botão MIN para regular os minutos. • Poderá...
  • Seite 24: Desactivação De Programações Individuais

    PROGRAMAÇÃO PROGRAMAÇÃO Desactivação de programações individuais Suspensão da desactivação Se não necessitar de usar provisoriamente uma ou várias das funções de ligação, poderá pro- 1. Para suspender a desactivação apenas precisa de escolher, com o botão PRG, o lugar de ceder à...
  • Seite 25: O Gerador Aleatório

    PROGRAMAÇÃO PROGRAMAÇÃO NOTA 1. Carregue simultânea e brevemente nos botões PRG e TAG/SEK para passar ao modo de Se o temporizador for parado e voltar a ser colocado em funcionamento, a contagem contagem decrescente. decrescente volta ao início. 2. Carregue no botão STD para regular a hora (1). 3.
  • Seite 26: Ligar/Desligar Manualmente

    RESET LIGAR/DESLIGAR MANUALMENTE Poderá ligar e/ou desligar o temporizador a qualquer momento, bastando para isso carregar (Reposição dos parâmetros de fábrica) apenas no botão LIGAR/DESLIGAR (o gerador aleatório é também desligado nestes casos). Com um objecto pontiagudo (caneta, lápis ou outro) carregue no botão Reset R (9) para O símbolo „ON”...
  • Seite 27: Resolução De Avarias

    RESOLUÇÃO DE AVARIAS ESPECIFICAÇÃO TÉCNICAS Modelo: GT-ZSd-01 Problema Solução Tensão: 230 V~ 50 Hz Carga de comutação a 230 V: 16 A (carga resistiva) / 3 A (carga indutiva) A indicação LCD parece ter „congelado”. Carregue no botão RESET para repor os Temperatura de operação:...
  • Seite 28: Teilebezeichnung

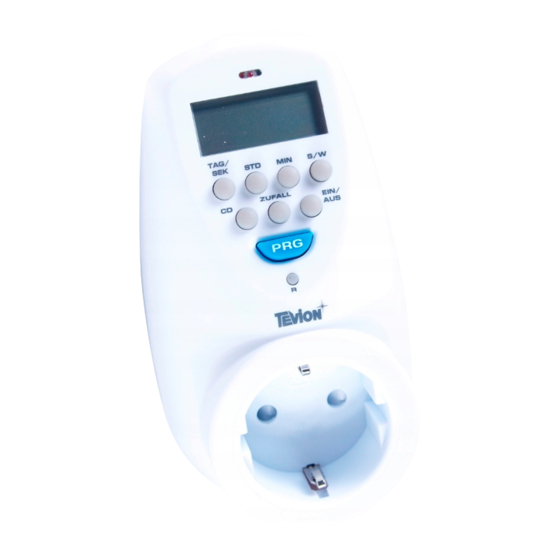
    TEILEBEZEICHNUNG ANZEIGE- UND BEDIENELEMENTE 1. Einschalt-Symbol 10. Taste Programm 2. Ausschalt-Symbol 11. Taste CD (Timer) 1. LED Kontrollleuchte EIN/AUS 3. Schaltzeit AUS 12. Taste Stunde (HOUR) 2. Bedienfeld 4. Uhrzeit-Symbol 13. T aste Tag/Sekunden 3. Kindersicherung 5. T aste Sommer/Winterzeit (S/W) (DAY/SEC) 4. 230 V~50 Hz Steckdose 6. Taste Minuten 14. Wochentage* 5. Batteriefach (Rückseite) 7. Taste ON/OFF (EIN/AUS) 15. Sommerzeitsymbol 6. LCD Anzeige 8. Taste Zufall (RANDOM) 16. Uhrzeit 9. Taste Reset...
  • Seite 29: Einleitung

    EINLEITUNG SICHERHEITSHINWEISE Herzlichen Dank für Ihr Vertrauen • Überprüfen Sie vor der Inbetriebnahme die Zeitschaltuhr auf Beschädigungen! Wir gratulieren Ihnen zu Ihrer neuen digitalen Zeitschaltuhr und sind überzeugt, dass Sie mit • Setzen Sie das Gerät keinen hohen Temperaturen oder Feuchtigkeit aus. Vermeiden Sie zu diesem modernen Gerät zufrieden sein werden.
  • Seite 30: Entsorgung

    SICHERHEITSHINWEISE ENTSORGUNG Kundenservice ausgeführt werden. Verpackung • Achten Sie darauf, beim Anschluss von Geräten die maximale Belastbarkeit der Zeitschaltuhr Ihre Zeitschaltuhr befindet sich zum Schutz vor Transportschäden in einer Verpackung. (3680 W Ohmsche Last oder 690 W induktive Last, z. B. motorbetriebene Geräte, Trans- Verpackungen sind Rohstoffe und somit wieder verwendungsfähig oder können dem formatoren) nicht zu überschreiten.
  • Seite 31: Lieferumfang

    LIEFERUMFANG VOR DEM START 1 Zeitschaltuhr Einlegen / Wechseln der Batterien 1 Bedienungsanleitung Setzen Sie die mitgelieferten Batterien vor der Inbetriebnahme des Gerätes ein, um bei 2 Batterien AAA / LR 03, 1,5 V einem möglichen Netzausfall die gespeicherten Daten nicht zu löschen. Sie können für die Zeitschaltuhr auch wiederaufladbare Batterien verwenden.
  • Seite 32: Inbetriebnahme

    VOR DEM START INBETRIEBNAHME Setzen Sie beide Batterien in die Abdeckung ein. Achten Sie auf die richtige Polarität. Stecken Sie die Zeitschaltuhr in eine Schutzkontaktsteckdose mit 230 V~, 50 Hz Wechselspannung. Setzen Sie die Abdeckung wieder ein. Die Kontakte der Abdeckung müssen genau in die Führung am Gerät passen.
  • Seite 33: Programmieren

    INBETRIEBNAHME PROGRAMMIEREN Bei der Schaltuhr können insgesamt 20 Programmplätze mit je einer EIN- und einer AUS- HINWEIS Funktion gespeichert werden. Wenn Sie die Programmplätze anschauen möchten, drücken Drücken Sie die Taste S/W im Uhrzeit-Modus, um zwischen Sommer- und Winterzeit umzu- Sie im Uhrzeit-Modus 2-mal die Taste PRG (PROGRAMM).
  • Seite 34: Ausschaltzeit

    PROGRAMMIEREN PROGRAMMIEREN Beim Einstellen der Wochentage haben Sie mit jedem Tastendruck DAY/SEC verschiedene 2. Drücken Sie die Taste HOUR, um die Stunde einzustellen. Auswahlmöglichkeiten. 3. Drücken Sie die Taste MIN, um die Minuten einzustellen. • Sie können einen einzelnen Tag einstellen (z. B. MO). 4.
  • Seite 35: Deaktivierung Einzelner Programmierungen

    PROGRAMMIEREN PROGRAMMIEREN Deaktivierung einzelner Programmierungen Deaktivierung aufheben Wenn Sie eine oder mehrere Schaltfunktionen vorübergehend nicht benötigen, können Sie 1. Um die Deaktivierung wieder aufzuheben, wählen Sie mit der Taste PRG den entspre- ein bereits gespeichertes Programm deaktivieren, ohne dass die betreffenden Schaltdaten chenden Programmplatz für die Aktivierung von einem Programm.
  • Seite 36: Der Zufallsgenerator

    PROGRAMMIEREN PROGRAMMIEREN HINWEIS 1. Drücken Sie gleichzeitig kurz die Taste PRG und die Taste DAY/SEC, um in den Timer- Wird der Timer gestoppt und wieder neu gestartet, beginnt der Countdown wieder von Modus zu gelangen. vorn. 2. Drücken Sie die Taste HOUR, um die Stunde (1) einzustellen. 3.
  • Seite 37: Ein-/Ausschalten Manuell

    RESET EIN-/AUSSCHALTEN MANUELL Sie können die Zeitschaltuhr jederzeit durch Drücken der Taste ON/OFF ein- bzw. ausschalten (Rückstellung auf den Auslieferungszustand) (der Zufallsgenerator wird dadurch ebenfalls beendet). Drücken Sie mit einem spitzen Gegenstand (Kugelschreiber o.ä.) die Reset-Taste R (9), um alle Das blinkende „ON“, bzw.
  • Seite 38: Fehlerbeseitigung

    FEHLERBESEITIGUNG TECHNISCHE DATEN Modell: GT-ZSd-01 Problem Lösung Netzspannung: 230 V~ 50 Hz Schaltlast bei 230 V: 16 A (Ohmsche Last) / 3 A (Induktive Last) Die LCD-Anzeige scheint eingefroren. Drücken Sie die Taste RESET, um den Betriebstemperatur: 0° - +40°C Die Tasten reagieren nicht.
  • Seite 39: Description Of Components

    DESCRIPTION OF COMPONENTS INDICATOR AND OPERATING COMPONENTS 1. Activation symbol 9. Reset button 2. Deactivation symbol 10. Programming button 1. LED indicator light ON/OFF 3. Switching time OFF 11. CD (timer) button 2. Control panel 12. Hour button 4. Time symbol 3.
  • Seite 40: Safety Instructions

    INTRODUCTION SAFETY INSTRUCTIONS We thank you for choosing the Digital timer switch. • Check the timer switch for any damage, before you take it into operation! We congratulate you to your new digital timer switch, and we are convinced that you will be •...
  • Seite 41: Packaging

    SAFETY INSTRUCTIONS DISPOSAL Repairs on the device may only be carried out by a qualified technician, or by our Customer Packaging Service Department. Your timer switch has been packed carefully, to prevent damage during transport. Our • Please make sure that the maximum load of the timer switch (3680 W ohmic load or 690 packaging consists of raw materials that can be reused or recycled.
  • Seite 42: Delivery Scope

    DELIVERY SCOPE BEFORE STARTING 1 Timer switch Inserting / changing batteries 1 Operating manual Please insert the supplied batteries before taking the device into operation, so that, in the 2 batteries AAA / LR 03, 1.5 V event of a power-out, the data that has been stored is not deleted. Rechargeable batteries may also be used in the timer switch.
  • Seite 43: Taking Into Operation

    BEFORE STARTING TAKING INTO OPERATION Insert both batteries in the cover. Make sure to observe the correct polarity. Replace the cover. Insert the timer switch in an earthed wall socket, which provides alternating current of 230 V~, The contact of the cover must fit precisely into the guides on the device. 50 H.
  • Seite 44: Programming

    TAKING INTO OPERATION PROGRAMMING It is possible to save up to a total of 20 programming locations, each of which has been pro- grammed with an ON and an OFF function. If you would like to review the locations you have While in timer mode, push on the S/W button for switching between the summertime and programmed, push the PRD (PROGRAM) button twice while you are in timer mode.
  • Seite 45: Deactivation Period

    PROGRAMMING PROGRAMMING When setting the day of the week, each push of the button DAY/SEC provides you with a 2. Push the HRS button for setting the desired hour. number of different selection possibilities. 3. Then push the MIN button for setting the desired minutes. •...
  • Seite 46: Deactivation Of All Programs

    PROGRAMMING PROGRAMMING Deactivation of individual programming Resetting deactivation If there should be one or more switching functions that are temporarily not required, then 1. To reverse a deactivation, simply use the PRG button to select the corresponding program you can deactivate a program that has already been stored, without deleting the correspon- location and then activate the desired program.
  • Seite 47: The Random Generator

    PROGRAMMING PROGRAMMING 1. Simultaneously push the PRG and the DAY/SEC buttons shortly, for switching to the timer If the timer is stopped and restarted, the countdown starts from the beginning. mode. 2. Then push the HRS button for setting the desired hour (1). The random generator 3.
  • Seite 48: Manual On/Off Switching

    RESET MANUAL ON/OFF SWITCHING You can turn off or turn on the timer switch at any time, simply by pushing on the ON/OFF (Reset to the factory settings) button (the random generator is also terminated by this step). Use a sharp object, such as for instance a ballpoint pen, to push on the Reset button R (9), The blinking „ON“...
  • Seite 49: Error Correction

    ERROR CORRECTION TECHNICAL DATA Model: GT-ZSd-01 Problem Solution Mains voltage: 230 V~ 50 Hz Switched load at 230 V: 16 A (ohmic load) / 3 A (inductive load) The LCD display seems to be frozen. The Puch the RESET button, to return the device Operating temperature: 0°...
  • Seite 50: Condiciones De Garantía

    CONDICIONES DE GARANTÍA CONDICIONES DE GARANTÍA El producto adquirido por Ud. ha sido fabricado con el mayor cuidado y bajo un control per- Sírvase guardar el registro de caja como comprobante de la compra. manente de la producción. La presente garantía no vale en el caso de daños producidos por accidente, manejo inadecuado El período de garantía asciende a tres años y comienza con la fecha de la adquisición.
  • Seite 51: Condições De Garantia

    CONDIÇÕES DE GARANTIA CONDIÇÕES DE GARANTIA O produto adquirido por si foi fabricado com o maior cuidado e submetido a um controlo A presente garantia não se aplica no caso de danos causados por acidente, manuseamento permanente durante a sua produção. inadequado e/ou força maior.
  • Seite 52 DESTAQUE ESTE CARTÃO E JUNTE-O AO APARELHO. HOT-LINE: 00800 - 2804 2804 (gratuito) Lunes - Viernes 9 - 17°° Artículo / Artigo: Temporizador digital, Temporizador digital GT-ZSd-01 Disponible en la red de Telefonica Madrid Número verde: 00800 - 2804 2804 (gratuito) Segunda-feira Sexta-feira 8 - 16°°...

Inhaltsverzeichnis