
Verwandte Anleitungen für Mc Haus ARTIC-10


Inhaltszusammenfassung für Mc Haus ARTIC-10
- Seite 1 ARTIC-10 Manual de Manuel Manuale di instrucciones d’utilisation istruzioni Instruction Betriebsanleitung manual...
-
Seite 2: Normas Y Precauciones De Seguridad
INTRODUCCIÓN Gracias por elegir este producto Mc Haus. Estamos seguros de que apreciará la calidad y prestaciones de esta máquina, que le facilitará su tarea por un largo periodo de tiempo. Recuerde que puede contactar con nuestro Servicio Técnico Oficial para consultas sobre montaje o mantenimiento, resolución de problemas y para la compra de recambios y/o accesorios. -
Seite 3: Seguridad Eléctrica
Lea atentamente este manual antes de poner la máquina en Deshágase de su aparato de marcha. manera ecológica. No lo tire a los contenedores de Mantenga a los niños alejados de basura doméstica. la máquina. Cumple con las directivas CE. ARTIC-10... -
Seite 4: Descripción Del Producto
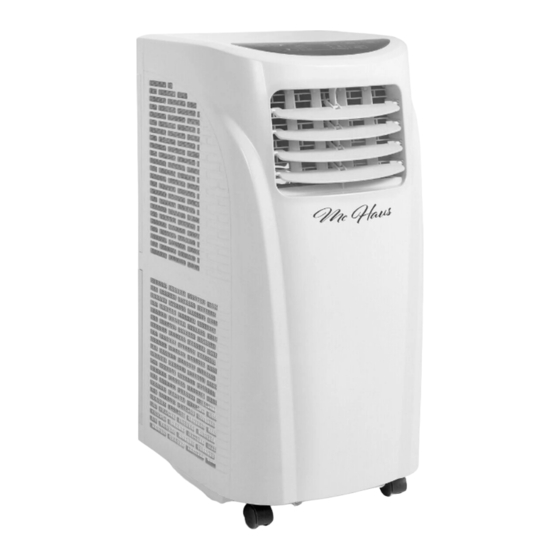
Mango Filtro Salida de drenaje Cable eléctrico con enchufe Hebilla del cable eléctrico Salida de escape Fig.1 Fig.2 NOTA: Los productos detallados en este manual pueden variar en apariencia, inclusiones, descripción y embalaje de los mostrados o aquí descritos. ARTIC-10... -
Seite 5: Características Técnicas
1 pz • Placa de soporte ajustable ventana 1 conjunto Longitud 90cm~130cm Junta redonda Ventana Round joint Window • Tornillo (longitud 10mm) 2 pz sealplate NOTA: Mc Haus se reserva el derecho de modificar las características técnicas sin previo aviso. ARTIC-10... -
Seite 6: Lugar De Montaje
(Fig. 4) Coloque la placa del sello de la ventana fija en la ventana (Fig. 5 y Fig. 6) Inserte el tubo de escape en la placa del sello de la ventana, apriete con tornillos (Fig. 7 y Fig. 8). ARTIC-10... - Seite 7 Huecos Atornillar Insertar ARTIC-10...
- Seite 8 ILUSTRACIÓN DEL MONTAJE Montado a la pared Arco alineado Inclinación incorrecta ARTIC-10...
-
Seite 9: Utilización Del Producto
UP▲/DOWN▼: Presione UP o DOWN para configurar la temperatura o ajustar el temporizador. HIGH: Presione este botón para seleccionar la velocidad alta. LOW: Presione este botón para seleccionar la velocidad baja. SLEEP: Presione este botón para seleccionar esta modalidad. Presione de nuevo este botón para anular. ARTIC-10... -
Seite 10: Configuración Del Temporizador
Cuando el aparato está encendido o el temporizador está activado, presione MODE para seleccionar la modalidad FAN. En este momento la luz indicadora correspondiente se activará. • Presione SPEED par seleccionar la velocidad adecuada. Las velocidades LOW y HIGH pueden ser seleccionadas diréctamente. • La temperatura no es ajustable. ARTIC-10... - Seite 11 Destornille la tuerca y saque el tapón para drenar toda el agua. Coloque de nuevo el tapón de drenaje y la tuerca antes del uso. PRECAUCIÓN: Cuando el depósito del agua está lleno, por favor mueva el aire acondicionado con firmeza, de lo contrario el agua puede desbordarse del interior. Tuerca Tapón de drenaje ARTIC-10...
-
Seite 12: Mantenimiento
Limpie los filtros. Temperatura configurada apropiada? bueno Cambie la temperatura. Seleccione la Velocidad del ventilador configurada al velocidad apropiada. mínimo? Demasiado Estructura inclinada? Coloque el aire acondicionado en una ruido y vibración Suelo irregular? superficie regular. ARTIC-10... -
Seite 13: Transporte Y Almacenamiento
Quite el cable eléctrico, lo sujete y lo conserve. • Quite el tubo de escape y consérvelo adecuadamente. • Ponga el aire acondicionado en una bolsa de plástico y en un lugar seco. • Quite las pilas del mando a distancia y consérvelo adecuadamente. ARTIC-10... -
Seite 14: Eliminación / Reciclaje
GARANTÍA Mc Haus garantiza todos los productos por un periodo de 2 años (válido para Europa). La garantía está sujeta a la fecha de compra teniendo en cuenta la intención de uso del producto. Como condición sujeta a la garantía, se debe presentar el recibo original indicando la fecha de compra y su descripción así... -
Seite 15: Declaración De Conformidad (Ce)
DECLARACIÓN DE CONFORMIDAD (CE) Nosotros, PRAT INTERNATIONAL BRANDS S.L., propietaria de la marca Mc Haus, con sede en Calle Migdia S/N. 43830 - Torredembarra, SPAIN, declaramos que los aires acondicionados ARTIC-10 y ARTIC-20, a partir del número de serie del año 2017 en adelante, son conformes con los requerimientos de las Directivas del Parlamento Europeo y del Consejo aplicables: •... -
Seite 16: Sécurité Personnelle
N’utilisez pas cette machine si vous êtes fatigué, ou après avoir ingéré des drogues, de l’alcool et/ou des médicaments. • Tenir à l’écart du combustible, des cuisinières et des sources de chaleur. • Ne placez pas d’objets sur l’appareil ou dans l’entrée ou la sortie d’air. ARTIC-10... -
Seite 17: Sécurité Électrique
Lisez attentivement ce manuel l’environnement. avant de démarrer la machine. Ne pas jeter dans les poubelles ménagères. Tenez les enfants à l’écart de cette machine. Cet appareil est conforme aux normes CE. Carburant inflammable ! Risque d’incendie ou d’explosion. ARTIC-10... -
Seite 18: Description Du Produit
Poignée Filtre Sortie d’évacuation Cordon d’alimentation avec fiche Boucle de câble électrique Sortie d’échappement Fig.1 Fig.2 NOTE: Les produits décrits dans ce manuel peuvent varier en apparence, en inclusions, en description et en emballage, comme indiqué ou décrit ici. ARTIC-10... -
Seite 19: Caractéristiques Techniques
• Plaque de support de fenêtre réglable 1 ensemble Longueur 90cm~130cm Table ronde Fenêtre Round joint Window sealplate • Vis (Longueur 10mm) 2 pc NOTE: Mc Haus se réserve le droit de modifier les caractéristiques techniques de l’appareil sans préavis. ARTIC-10... -
Seite 20: Lieu De Montage
(Fig. 4). Placer la plaque d’étanchéité de fenêtre fixe dans la fenêtre (Fig. 5 et Fig. 6). Insérer le tuyau d’échappement dans la plaque d’étanchéité de la fenêtre, serrer avec des vis (Fig. 7 et Fig. 8). ARTIC-10... - Seite 21 Brèches Visser Insérer ARTIC-10...
- Seite 22 ILLUSTRATION DE L’ASSEMBLAGE Montage mural Arc aligné Inclinaison incorrecte ARTIC-10...
-
Seite 23: Utilisation Du Produit
HIGH: Appuyez sur ce bouton pour sélectionner la vitesse élevée. LOW: Appuyez sur cette touche pour sélectionner la vitesse lente. SLEEP: Appuyez sur cette touche pour sélectionner ce mode. Appuyez de nouveau sur ce bouton pour annuler. ARTIC-10... -
Seite 24: Réglage De La Minuterie
Lorsque l’appareil est allumé ou que la minuterie est allumée, appuyez sur MODE pour sélectionner le mode FAN. A ce moment, le voyant lumineux correspondant s’active. • Appuyez sur SPEED pour sélectionner la vitesse appropriée. Les vitesses BASSE et HAUTE peuvent être sélectionnées directement. • La température n’est pas réglable. ARTIC-10... - Seite 25 Dévisser l’écrou et retirer le bouchon pour drainer toute l’eau. Replacez le bouchon de vidange et l’écrou avant l’utilisation. PRUDENCE: Lorsque le réservoir d’eau est plein, déplacez fermement la climatisation, sinon l’eau peut déborder de l’intérieur. Écrou Bouchon de vidange ARTIC-10...
-
Seite 26: Entretien
Modifier la température. Sélectionnez la Réglage approprié de la température ? vitesse appropriée. Vitesse du ventilateur réglée au minimum ? Trop de bruit Structure inclinée ? Placez le climatiseur sur une surface et de vibrations Terrain accidenté ? régulière. ARTIC-10... -
Seite 27: Transport Et Entreposage
• Retirez le cordon d’alimentation, tenez-le et rangez-le. • Retirez le tuyau d’échappement et rangez-le correctement. • Placez le climatiseur dans un sac en plastique dans un endroit sec. • Retirez les piles de la télécommande et rangez-les correctement. ARTIC-10... -
Seite 28: Élimination / Recyclage
GARANTIE Mc Haus garantit tous ses produits pour une période de 2 ans (valable pour l’Europe). La garantie est soumise à la date d’achat en tenant compte de l’utilisation prévue du produit. Comme condition soumise à la garantie, le reçu original doit être présenté en indiquant la date d’achat et sa description ainsi que l’outil défectueux. -
Seite 29: Déclaration De Conformité (Ce)
Nous, PRAT INTERNATIONAL BRANDS S.L., propriétaire de la marque GREENCUT, située Calle Migdia S / N. 43830 - Torredembarra, ESPAGNE, nous déclarons que les climatiseurs ARTIC-10 et ARTIC-20, à partir du numéro de série de l’année 2017, est conforme aux exigences des directives applicables du Parlement européen et du Conseil:... -
Seite 30: Norme E Precauzioni Di Sicurezza
Mantenere le entrate e le uscite dell’aria libere da ostruzioni. • Non utilizzare la macchina se si è stanchi o dopo aver assunto droghe, alcol e/o farmaci. • Tenere lontano da combustibile, fornelli e fonti di calore. • Non collocare oggetti sopra l’unità o nell’ingresso o nell’uscita dell’aria. ARTIC-10... -
Seite 31: Sicurezza Elettrica
Legga attentamente questo manuale prima di mettere in moto Smaltisca il suo apparato in la macchina. modo ecologico. Non lo getti nei contenitori della spazzatura Mantenga i bambini lontani dalla domestica. macchina. Rispetta le norme CE. ARTIC-10... -
Seite 32: Descrizione Del Prodotto
Uscita di scarico Cavo di alimentazione con spina Fig.1 Fibbia ad ardiglione del cavo elettrico Uscita di scarico Fig.2 NOTA: I prodotti descritti in questo manuale possono variare nell’aspetto, inclusioni, descrizione e imballaggio da quelli mostrati o qui descritti. ARTIC-10... -
Seite 33: Caratteristiche Tecniche
Giunto tondo 1 pc • Piastra di supporto finestra regolabile 1 collegiale Lunghezza 90cm~130cm Giunto tondo Finestra Round joint Window • Vite (lunghezza 10mm) 2 pc sealplate NOTA: Mc Haus si riserva il diritto di modificare le specifiche dell’apparato senza preavviso. ARTIC-10... -
Seite 34: Luogo D'installazione
(Fig. 4) Posizionare la guarnizione fissa della finestra nella finestra (fig. 5 e fig. 6) Inserire il tubo di scarico nella piastra di tenuta della finestra, serrare con le viti (Fig. 7 e Fig. 8). ARTIC-10... - Seite 35 Vuoti Avvitare Inserire ARTIC-10...
- Seite 36 ILLUSTRAZIONE DEL MONTAGGIO Montaggio a parete Arco allineato Inclinazione errata ARTIC-10...
-
Seite 37: Uso Del Prodotto
UP▲/DOWN▼: Premere UP o DOWN per impostare la temperatura o il timer. HIGH: Premere questo pulsante per selezionare l’alta velocità. LOW: Premere questo pulsante per selezionare la velocità bassa. SLEEP: Premere questo pulsante per selezionare questa modalità. Premere nuovamente questo pulsante per annullare. ARTIC-10... -
Seite 38: Impostazione Del Timer
Quando l’unità è accesa o il timer è acceso, premere MODE per selezionare il modo FAN. A questo punto la spia corrispondente si attiverà. • Premere SPEED per selezionare la velocità appropriata. Le velocità LOW e HIGH possono essere selezionate direttamente. • La temperatura non è regolabile. ARTIC-10... -
Seite 39: Operazione Di Drenaggio
Svitare il dado e rimuovere il tappo per scaricare tutta l’acqua. Sostituire il tappo di scarico e il dado prima dell’uso. PRECAUZIONE: Quando il serbatoio dell’acqua è pieno, spostare saldamente l’aria condizionata, altrimenti l’acqua potrebbe fuoriuscire dall’interno. Dado Tappo di scarico ARTIC-10... -
Seite 40: Manutenzione
Pulire i filtri. buono Regolazione della temperatura adeguata? Cambiare la temperatura. Selezionare la La velocità della ventola è impostata al minimo? velocità appropriata. Troppo rumore Struttura inclinata? Collocare il condizionatore d’aria su una e vibrazioni Terreno irregolare? superficie regolare. ARTIC-10... -
Seite 41: Trasporto E Stoccaggio
Rimuovere il cavo di alimentazione, tenerlo e conservarlo. • Rimuovere il tubo di scarico e conservarlo correttamente. • Mettere il condizionatore d’aria in un sacchetto di plastica in un luogo asciutto. • Rimuovere le batterie dal telecomando e conservarle correttamente. ARTIC-10... -
Seite 42: Smaltimento / Riciclaggio
GARANZIA Mc Haus garantisce tutti i prodotti per un periodo di 2 anni (valido per l’Europa). La garanzia è soggetta alla data di acquisto, tenendo in conto l’intenzione dell’uso del prodotto. Come condizione di garanzia, si deve presentare la ricevuta originale indicando la data di acquisto e la sua descrizione così come lo strumento difettoso. -
Seite 43: Dichiarazione Di Conformità (Ce)
Noi, PRAT INTERNATIONAL BRANDS S.L., proprietaria della marca GREENCUT, con sede presso Calle Migdia S/N. 43830 - Torredembarra, SPAIN, dichiariamo che i condizionatori d’aria ARTIC-10 e ARTIC-20, a partire dal numero di serie dell’anno 2017 in avanti, sono conformi ai requisiti delle Direttive del Parlamento Europeo e del Consiglio applicabili: •... -
Seite 44: Safety Rules And Precautions
Do not use this machine if you are tired, or after ingesting drugs, alcohol, and/or medications. • Keep away from fuel, cooking stoves and heat sources. • Do not place objects on top of the unit or in the air inlet or outlet. ARTIC-10... -
Seite 45: Electrical Safety
This product should not be disposed Read this manual carefully before of with household waste. starting or using the machine. Complies with the European Union Keep children away from this Directive. machine. Flammable fuel! Risk of fire or explosion. ARTIC-10... -
Seite 46: Product Description
Input grid Exhaust pipe Wheels Handle Filter Drain outlet Power cord with plug Electric cable buckle Exhaust outlet Fig.1 Fig.2 NOTE: The products detailed in this manual may vary in appearance, inclusions, description and packaging as shown or described here. ARTIC-10... -
Seite 47: Technical Data
1 pc • Adjustable window support plate 1 set Length 90cm~130cm Round joint Window Round joint Window • Screw (length 10mm) 2 pc sealplate NOTE: Mc Haus reserves the right to modify the specifications of the device without prior notice. ARTIC-10... - Seite 48 After adjusting the window seal plate, tighten with screws (Fig. 4) Place the fixed window seal plate in the window (Fig. 5 and Fig. 6) Insert the exhaust pipe into the window seal plate, tighten with screws (Fig. 7 and Fig. 8). ARTIC-10...
- Seite 49 Small gaps Screw Insert ARTIC-10...
- Seite 50 ILLUSTRATION OF THE ASSEMBLY Wall mounted Aligned arc Incorrect inclination ARTIC-10...
-
Seite 51: Use Of The Product
UP▲/DOWN▼: Press UP or DOWN to set the temperature or set the timer. HIGH: Press this button to select the high speed. LOW: Press this button to select the low speed. SLEEP: Press this button to select this mode. Press this button again to cancel. ARTIC-10... -
Seite 52: Setting The Timer
When the unit is on or the timer is on, press MODE to select FAN mode. At this time the corresponding indicator light will activate. • Press SPEED to select the appropriate speed. The LOW and HIGH speeds can be selected directly. • The temperature is not adjustable. ARTIC-10... - Seite 53 (the bathroom or a sewer). Unscrew the nut and remove the plug to drain all the water. Replace drain plug and nut before use. CAUTION: When the water tank is full, please move the air conditioning firmly, otherwise the water may overflow from the inside. Drain plug ARTIC-10...
-
Seite 54: Maintenance
Filters too dirty? Clean the filters. good Appropriate temperature setting? Change temperature. Select Fan speed set to minimum? appropriate speed. Too much noise Inclined structure? Place the air conditioner on a regular and vibration Uneven ground? surface. ARTIC-10... -
Seite 55: Transportation And Storage
Remove the power cord, hold it and store it. • Remove the exhaust pipe and store it properly. • Put the air conditioner in a plastic bag in a dry place. • Remove the batteries from the remote control and store them properly. ARTIC-10... - Seite 56 Package materials are recyclables. Please, throw them away on the appropriate rubbish bin. GUARANTEE Mc Haus guarantees a 2 years warrantee for all its products (valid in Europe). This guarantee is subject to the purchasing date and taking into consideration the purpose of use of the product. In order to claim your guarantee, you must present your receipt of purchase and its description, as well as the defective product.
-
Seite 57: Declaration Of Conformity (Ec)
PRAT INTERNATIONAL BRANDS S.L. owner of GREENCUT brand, with legal address in Calle Migdia S/N. 43830 – Torredembarra, SPAIN, declares that the air conditioners ARTIC-10 and ARTIC-20, as from 2017 series onwards, is in accordance with the European Parliament Directives and of the Council: •... -
Seite 58: Sicherheitsregeln Und Vorsichtsmassnahmen
EINLEITUNG Vielen Dank, dass Sie sich für dieses Mc Haus Produkt entschieden haben. Wir sind sicher, dass Sie die Qualität und Leistung dieser Maschine schätzen werden, die Ihnen Ihre Arbeit über einen langen Zeitraum erleichtern wird. Denken Sie daran, dass Sie sich bei Fragen zur Montage oder Wartung, zur Fehlerbehebung und zum Kauf von Ersatzteilen und / oder Zubehör an unseren Technischen Service wenden können. -
Seite 59: Elektrische Sicherheit
Entzündlicher Brennstoff! Brand- Achtung Gefahr! und Explosionsgefahr. Lesen Sie diese Anleitung Entsorgen Sie Ihr Gerät sorgfältig durch, bevor Sie die umweltgerecht. Maschine in Betrieb nehmen. Nicht in den Hausmülltonnen entsorgen. Halten Sie Kinder von der Maschine fern. Entspricht den CE-Richtlinien. ARTIC-10... -
Seite 60: Produktbeschreibung
DETAILLIERTE PRODUKTBESCHREIBUNG Führungsfläche Bedienfeld Eingangsgitter Auspuffrohr Räder Griff Filter Entwässerungsanschluss Elektrokabel mit Stecker Schnalle für Elektrokabel Abgasauslass Fig.1 Fig.2 NOTIZ: Die in diesem Handbuch beschriebenen Produkte können in Aussehen, Einschlüssen, Beschreibung und Verpackung von den gezeigten oder hier beschriebenen abweichen. ARTIC-10... -
Seite 61: Technische Merkmale
1 Stück • Placa de soporte ajustable ventana 1 Satz Länge 90cm~130cm Rundverbindung Fenster Round joint Window • Schraube (Länge 10mm) 2 Stück sealplate NOTIZ: Mc Haus behält sich das Recht vor, die technischen Daten ohne vorherige Ankündigung zu ändern. ARTIC-10... -
Seite 62: Montage
Nach dem Einstellen der Fensterdichtungsplatte mit Schrauben anziehen (Abb. 4). Legen Sie die feste Fensterdichtungsplatte auf das Fenster (Abb. 5 und Abb. 6). Setzen Sie das Abgasrohr in die Fensterdichtungsplatte ein und ziehen Sie es mit Schrauben an (Abb. 7 und Abb. 8). ARTIC-10... - Seite 63 Hohl Anschrauben Einfügen ARTIC-10...
-
Seite 64: Darstellung Der Baugruppe
DARSTELLUNG DER BAUGRUPPE Wandmontage Ausgerichteter Bogen Falsche Neigung ARTIC-10... -
Seite 65: Schaltflächen Und Bildschirm
Timer einzustellen. HIGH: Drücken Sie diese Taste, um eine hohe Geschwindigkeit auszuwählen. LOW: Drücken Sie diese Taste, um eine niedrige Geschwindigkeit auszuwählen. SLEEP: Drücken Sie diese Taste, um diesen Modus auszuwählen.Drücken Sie diese Taste erneut, um den Vorgang abzubrechen. ARTIC-10... -
Seite 66: Einstellen Des Timers
Wenn das Gerät eingeschaltet ist oder der Timer eingeschaltet ist, drücken Sie MODUS, um den FAN- Modus auszuwählen. An dieser Stelle leuchtet die entsprechende Kontrollleuchte auf. • Drücken Sie SPEED, um die gewünschte Geschwindigkeit auszuwählen. Die Geschwindigkeiten LOW und HIGH können direkt ausgewählt werden. • Die Temperatur ist nicht einstellbar. ARTIC-10... -
Seite 67: Entwässerungsbetrieb
Badezimmer oder einen Kanal). Schrauben Sie die Mutter ab und entfernen Sie den Stopfen, um das gesamte Wasser abzulassen. Vor Gebrauch Ablassschraube und Mutter wieder einsetzen. ACHTUNG! Wenn der Wassertank voll ist, bewegen Sie bitte die Klimaanlage fest, da sonst das Wasser von innen überlaufen kann. Mutter Entleerungsstopfen ARTIC-10... -
Seite 68: Wartung
Reinigen Sie die Filter. nicht gut. Angemessene Solltemperatur? Ändern Sie die Temperatur. Wählen Sie die Lüfterdrehzahl auf Minimum eingestellt? gewünschte Geschwindigkeit aus. Zu viel Lärm und Schiefe Struktur? Stellen Sie die Klimaanlage auf eine Vibrationen Unebener Boden? normale Fläche. ARTIC-10... -
Seite 69: Transport Und Lagerung
Entfernen Sie das Netzkabel, halten Sie es fest und bewahren Sie es auf. • Entfernen Sie das Auspuffrohr und bewahren Sie es ordnungsgemäß auf. • Stellen Sie die Klimaanlage in einen Plastikbeutel und an einen trockenen Ort. • Entfernen Sie die Batterien aus der Fernbedienung und bewahren Sie sie ordnungsgemäß auf. ARTIC-10... -
Seite 70: Entsorgung / Recycling
Behälter. GARANTIE Mc Haus gewährt auf alle Produkte eine Garantie von 2 Jahren (gültig für Europa). Die Garantie gilt ab dem Kaufdatum unter Berücksichtigung des Verwendungszwecks des Produkts. Als Garantiebedingung muss der Originalbeleg mit Angabe des Kaufdatums und der Beschreibung sowie des defekten Werkzeugs vorgelegt werden. -
Seite 71: Eg-Konformitätserklärung
EG-KONFORMITÄTSERKLÄRUNG Wir, PRAT INTERNATIONAL BRANDS S.L., Inhaber der Marke Mc Haus mit Sitz in der Straße Migdia S/N. 43830 - Torredembarra, Spanien, erklären, dass die Klimaanlagen ARTIC-10 und ARTIC-20 ab der Seriennummer 2017 den Anforderungen der geltenden Richtlinien des Europäischen Parlaments und des Rates entsprechen: •... - Seite 72 Manual revisado en febrero de 2019...