Herunterladen Inhalt Inhalt Diese Seite drucken

Werbung

Verfügbare Sprachen
  • DE

Verfügbare Sprachen

  • DEUTSCH, seite 6
Code Handle
Window
®

Werbung

Inhaltsverzeichnis
loading

Inhaltszusammenfassung für Mul-t-lock Code Handle Window

  • Seite 1 Code Handle Window ®...
  • Seite 2 Code record Administrator: Code User codes: Code 1 Code 2 Code 3 Code 4 In case of questions or problems, take your code record and Code Handle along to your reseller.
  • Seite 3: Inhaltsverzeichnis

    Contents Tools required Optional Fitting Instructions Code Handle Window ® Montageanleitung Code Handle Window ® Instructions de mise en place de la poignée Code Handle Window ® Istruzioni per il montaggio della Code Handle Window ® Code Handle ® Window Montage-instructies Code Handle Window ®...
  • Seite 4: Fitting Instructions Code Handle ® Window

    Check that all parts are included as described on page 3: e. Enter the new administrator code according to 1. Code Handle Window step (a) – 6 digits. The LED turns steady green. 2. Mounting screws: f. Re-enter your new administrator code. The new a.
  • Seite 5 Operating Instructions Code Handle Window ® Operation - unlocking/locking Reset / change administrator code If you change the administrator code, the handle will Once the Code Handle has been programmed, the handle can be operated. also be reset (audio signal enabled and additional 1.
  • Seite 6: Montageanleitung Code Handle

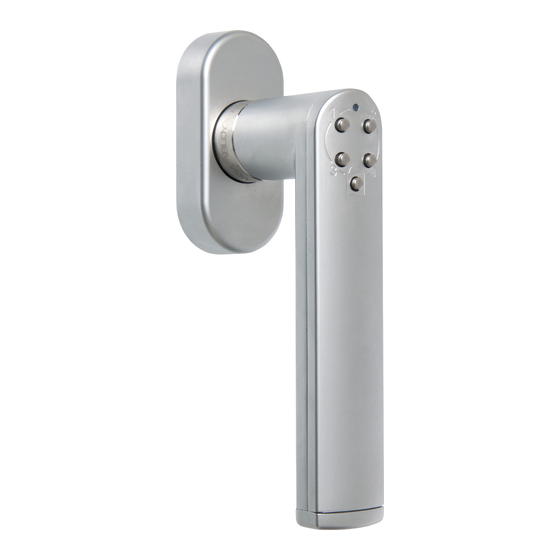
    Überprüfen Sie, ob sämtliche Komponenten, wie auf Administratorcode: 123412). Die LED leuchtet Seite 3 beschrieben, im Lieferumfang enthalten sind: durchgehend grün. 1. Code Handle Window d. Betätigen Sie Taste 3, um den Administratorcode zu 2. Befestigungsschrauben ändern. Die LED leuchtet durchgehend grün.
  • Seite 7 Bedienungsanleitung Code Handle Window ® auf die Griffplatte. Überprüfen Sie alle Funktionen Benutzercodes löschen (entriegeln, Fenster öffnen, Fenster schließen, verriegeln). a. Um den Programmiermodus zu aktivieren, drücken Sie die Verriegelungstaste bis die grüne LED d. Wahlfrei: Zusätzliche Sicherheit lässt sich erzielen, indem die M5-Schrauben durch Einwegschrauben durchgehend leuchtet.
  • Seite 8: Instructions De Mise En Place De La Poignée Code Handle

    Mise en place de la poignée Avant de procéder à l’installation, vérifier que la Configuration/modification du code poignée Code Handle Window fonctionne avec le administrateur code nouvellement configuré. Appuyer sur le bouton de verrouillage pour verrouiller, puis entrer le nouveau Toutes les poignées ASSA ABLOY Code Handle...
  • Seite 9 Instructions d’utilisation de la poignée Code Handle Window ® Remarque : toute activation des boutons est Suppression des codes utilisateur confirmée par un bip lorsque la fonction de signal a. Appuyer sur le bouton de verrouillage jusqu’à ce Utilisation - Verrouillage/déverrouillage sonore est activée.
  • Seite 10: Istruzioni Per Il Montaggio Della Code Handle

    Verificare che siano presenti tutti i particolari come in verde. descritto a pagina 3: 1. Code Handle Window c. Inserire il codice di amministratore esistente (se la maniglia è nuova: 123412). Il LED rimane acceso in 2. Viti di montaggio: verde.
  • Seite 11 Istruzioni per l’uso della Code Handle Window ® d. Opzionale: Per maggiore sicurezza, è possibile Cancellazione dei codici utente utilizzare viti autofilettanti al posto delle viti M5. a. Tenere premuto il pulsante di chiusura per entrare in Nota: Ogni pressione dei pulsanti è confermata modalità...
  • Seite 12: Nld Montage-Instructies Code Handle

    Controleer of alle onderdelen aanwezig zijn zoals brandt continu groen. beschreven op pagina 3: c. Voer de bestaande beheerderscode in (nieuwe 1. Code Handle Window deurkruk: 123412). De LED brandt continu groen. 2. Montageschroeven: d. Druk op knop 3 om de beheerderscode te wijzigen.
  • Seite 13 Montage-instructies Code Handle Window ® Waarschuwing: Bij het indrukken van een toets op Gebruikerscodes wissen het numerieke toetsenbord klinkt er een pieptoon a. Houd de knop met het hangslotsymbool ingedrukt als de geluidssignalen zijn ingeschakeld. om naar de programmeermodus te gaan. De LED Bediening –...
  • Seite 14: Esp Instrucciones De Montaje De Code Handle

    (nueva manilla: 123412). El LED se pone en luz verde Comprobar que están todas las piezas descritas en la fija. página 3: 1. Code Handle Window d. Pulsar el botón 3 para cambiar el código de administrador. El LED se pone en luz verde fija. 2. Tornillos de montaje e.
  • Seite 15 Instrucciones de empleo de Code Handle Instrucciones de empleo de Code Handle Window Window ® ® Manejo: desbloquear/bloquear Manejo: desbloquear/bloquear Borrar códigos de usuario Borrar códigos de usuario La manilla se puede usar en cuanto se ha La manilla se puede usar en cuanto se ha a.
  • Seite 16  ...
  • Seite 17 Programming functions...
  • Seite 18 Open/unlocked...
  • Seite 19 Ventilation mode (locked or unlocked)
  • Seite 20: Window

    The Mul-T-Lock name and the muscleman logo, and any other name, mark or logo used by Mul-T-Lock and marked by ® or ™ sign, are registered/pending trademarks of Mul-T-Lock Ltd. in various countries. Mul-T-Lock reserves the right to make any product improvements or modifications without prior notice.

Inhaltsverzeichnis