Herunterladen Inhalt Inhalt Diese Seite drucken

Werbung

Verfügbare Sprachen
  • DE

Verfügbare Sprachen

  • DEUTSCH, seite 14
DM7
DRUM MODULE
MODULE OVERVIEW
::: ENGLISH ( 3 – 7 ) :::
VISTA DEL MÓDULO
::: ESPAÑOL ( 8 – 9 ) :::
CARACTERISTIQUES DU MODULE
::: FRANÇAIS ( 10 – 11 ) :::
PANORAMICA DI MODULO
::: ITALIANO ( 12 – 13 ) :::
OBERSEITE DER MODUL
::: DEUTSCH ( 14 – 15 ) :::

Werbung

Inhaltsverzeichnis
loading

Inhaltszusammenfassung für Alesis DM7

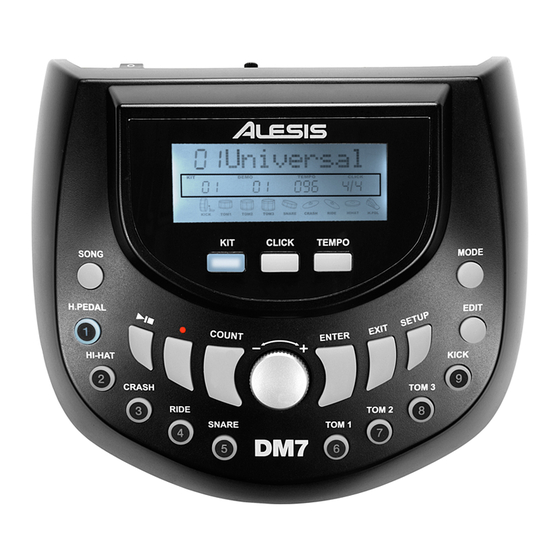
  • Seite 1 DRUM MODULE MODULE OVERVIEW ::: ENGLISH ( 3 – 7 ) ::: VISTA DEL MÓDULO ::: ESPAÑOL ( 8 – 9 ) ::: CARACTERISTIQUES DU MODULE ::: FRANÇAIS ( 10 – 11 ) ::: PANORAMICA DI MODULO ::: ITALIANO ( 12 – 13 ) ::: OBERSEITE DER MODUL ::: DEUTSCH ( 14 –...
  • Seite 3: Getting Started

    Insert the connector's cables to the jacks of their respective drum pads, cymbal pads, and hi-hat control pedal. (Each cable is labeled with the name of its corresponding pad or pedal.) Make sure all your devices' volumes are at "0" (DM7 module, external speakers or headphones, a device connected to the LINE IN, etc.).
  • Seite 4: Rear Panel Features

    REAR PANEL FEATURES POWER IN – Connect the included power adapter to this input, then plug the adapter into your power source. POWER SWITCH – Turns the module on/off. Note: If you want to turn the module on after turning it off, wait at least five seconds in between so the electronic circuits can properly reset.
  • Seite 5 SONGS There are two types of songs – 52 Demo Songs, to play back and or practice to, and 10 User Songs, which you can record yourself. To play Demo/User Songs: Press the SONG button to enter Song Mode – once to play Demo Songs, twice to play User Songs. (The button will illuminate.) Depending on whether you selected Demo Songs or User Songs, the DISPLAY will show "All Demo"...
  • Seite 6 COUNT This feature allows you to test how fast you can strike the pads. Press the COUNT button, and turn the DATA dial to set the length of time for 1, 2, or 3 minutes. Press the ENTER button to select it. "Ready" will flash on the DISPLAY. Strike any pad to begin and counting will start automatically.
  • Seite 7 Crosstalk ("Cross Talk") Crosstalk occurs when you strike one pad and the sound of another pad is heard. This "crosstalk" is a result of pads detecting the vibrations in the rack as you hit other pads. The module's crosstalk feature allows you to reduce how much the selected pad receives crosstalk from other pads.
  • Seite 8: Para Comenzar

    (Cada cable está rotulado con el nombre de su correspondiente pad o pedal.) Asegúrese de que los volúmenes de todos sus dispositivos estén en "0" (módulo DM7, altavoces o auriculares externos, un dispositivo conectado a la ENTRADA DE LÍNEA, etc.).
  • Seite 9 CARACTERÍSTICAS DEL PANEL TRASERO ENTRADA ALIMENTACIÓN – Conecte a esta entrada el adaptador de alimentación incluido y luego enchufe el adaptador al suministro eléctrico. INTERRUPTOR ENCENDIDO – Enciende y apaga el módulo. Nota: Si desea encender el módulo después de apagarlo, espere como mínimo cinco segundos, para que los circuitos electrónicos se restablezcan correctamente.
  • Seite 10: Guide De Démarrage

    Branchez les câbles aux pads de batterie, pads de cymbale respectifs et à la pédale charleston. Chaque câble est étiquetté avec le nom du pad ou pédale correspondant. Veuillez vous assurer que le volume de tous les appareils est à « 0 » (module DM7, haut-parleurs externes ou casque d’écoute, appareil à niveau ligne, etc.).
  • Seite 11: Caractéristiques Du Panneau Arrière

    CARACTÉRISTIQUES DU PANNEAU ARRIÈRE POWER – Branchez câble d’alimentation inclus à cette entrée, puis l'autre extrémité à la prise électrique. ON/OFF – Cet interrupteur permet de mettre l’appareil sous et hors tension. Remarque : Si vous désirez mettre le module à nouveau sous tension après l’avoir éteint, veuillez attendre au moins cinq secondes afin de les circuits électroniques se réinitialisent correctement.
  • Seite 12: Primi Passi

    Inserire i cavi di collegamento ai jack dei rispettivi pad batteria, pad dei piatti e al pedale di controllo dell'hi-hat. (Ciascun cavo è etichettato con il nome del pad o del pedale corrispondente.) Assicurarsi che il volume di tutti i dispositivi sia su "0" (modulo DM7, altoparlanti esterni o cuffie, dispositivi collegati all'ingresso di linea LINE IN, ecc.).
  • Seite 13 CARATTERISTICHE PANNELLO POSTERIORE INGRESSO ALIMENTAZIONE – Collegare l’adattatore di alimentazione in dotazione a questo ingresso, quindi collegare l’adattatore ad una sorgente di alimentazione. INTERRUTTORE DI ALIMENTAZIONE (POWER) – Accende e spegne il modulo. Nota bene: se si desidera accendere il modulo dopo averlo spento, attendere almeno cinque secondi in modo che i circuiti elettronici si azzerino adeguatamente.
  • Seite 14: Erste Schritte

    Stecken Sie die Steckerkabel in die jeweiligen Buchsen der Drum-Pads, Becken-Pads und des Hi-Hat Pedals. (Jedes Kabel ist mit dem Namen des zugehörigen Pads oder Pedals beschriftet.) Achten Sie darauf, dass die Lautstärke all Ihrer Geräte auf "0" steht (DM7 Modul, externe Lautsprecher oder Kopfhörer oder ein Gerät, das an LINE IN etc. angeschlossen ist).
  • Seite 15: Elemente Der Rückseite

    ELEMENTE DER RÜCKSEITE POWER Verbinden mitgelieferte Netzteil mit diesem Eingang und anschließend mit Ihrer Stromquelle. POWER SWITCH – Schaltet das Modul ein/aus. Hinweis: Wenn Modul einschalten möchten, nachdem Sie es ausgeschaltet haben, warten mindestens fünf Sekunden bis Sie dies tun, damit die elektronischen Schaltungen ordnungsgemäß zurückgesetzt werden können.
  • Seite 16: Specifications

    THIS DEVICE COMPLIES WITH PART 15 OF THE FCC RULES. OPERATION IS SUBJECT TO THE FOLLOWING TWO CONDITIONS: (1) THIS DEVICE MAY NOT CAUSE HARMFUL INTERFERENCE, AND (2) THIS DEVICE MUST ACCEPT ANY INTERFERENCE RECEIVED, INCLUDING INTERFERENCE THAT MAY CAUSE UNDESIRED OPERATION. www.alesis.com 7-51-0320-A...

Inhaltsverzeichnis