Herunterladen Inhalt Inhalt Diese Seite drucken

Werbung

Verfügbare Sprachen
  • DE

Verfügbare Sprachen

  • DEUTSCH, seite 64
Carony
Transfers a person between wheelchair and car
Model 16"
SV
4 Bruksanvisning
EN
34 User manual
DE
64 Gebrauchsanweisung
FR
94 Instructions d'utilisation
ES
124 Instrucciones de uso
IT
154 Istruzioni per l'uso

Werbung

Inhaltsverzeichnis

Fehlerbehebung

loading

Inhaltszusammenfassung für BraunAbility Carony

  • Seite 1 Carony Transfers a person between wheelchair and car Model 16” 4 Bruksanvisning 34 User manual 64 Gebrauchsanweisung 94 Instructions d’utilisation 124 Instrucciones de uso 154 Istruzioni per l’uso...
  • Seite 4 Förvara därför manualen så att den lätt återfinns vid behov. Har du frågor kring din anpassning vänligen kontakta din installatör. Vill du veta mer om oss och vårt utbud av bilanpassningslösningar besök www.braunability.eu. Än en gång, tack för ditt förtroende!
  • Seite 5 Carony 16” Presentation Säkerhet Funktioner Handhavande Skötsel Felsökare Teknisk specification Introduktion för användare Reservdelar Tillverkarintyg (Product certificate) längst bak i manualen.
  • Seite 6 Därmed elimineras alla svåra, tunga och farliga moment som en överflytt innebär. Carony är lika säker och bekväm som ett vanligt bilsäte och lika mångsidig och lätt att använda som en vanlig rullstol.
  • Seite 7 Carony 16” Product Carony 16” Date 2017-09-01 DOWN Article No. 123456 1234567 Serial No. Åkeriv. 7, 443 61 Stenkullen, Sweden +46 302 254 00 BRAKE MAX 120 KG WARNING DO NOT USE AS WHEELCHAIR DURING TRANSPORT IN VEHICLE WHEEL BASE 15.5 KG Sitter på...
  • Seite 8 Carony 16” Säkerhet En spärrtapp på varje sida om sätet. Vev för höjd- justering.
  • Seite 9 Carony 16” Tippskydd (tillval) Använd tippskyddet vid behov. Tryck på stödets ovansida för att fälla ner det. Tryck ner, eller upp, den svarta spärren för att fälla upp stödet igen.
  • Seite 10 Carony 16” Funktioner Körhandtag Dra ut spärren på vänster handtag och vinkla båda handtagen rakt bakåt. Dra hand- tagen max upp och vinkla ut. Ett klick hörs när handtaget låser sin position. Dra ut respektive spärr för att vika in handtagen igen. Vik in höger handtag först.
  • Seite 11 Carony 16” Bromsar Vårdarbroms Parkeringsbroms Tryck ner den röda spärren för att låsa Båda bakhjulen bromsas då bromsspaken bromsen. fälls framåt.
  • Seite 12 Carony 16” Fotstöd Tryck ner spärrtappen för att montera/demontera fotstödet. Se till att spärrtappen låser fotstödet vid montering.
  • Seite 13 Carony 16” Vid behov, skifta plats på fotplattorna för att flytta dessa närmare brukaren. Höjdjustering Vinkeljustering Rekommendation: justera fotplattan så att brukarens fotled vilar på plattan med 90° vinkel.
  • Seite 14 Lossa skruvarna till ryggstödet . Välj mellan fyra möjliga positioner i längsled. Sittdynans höjd i framkant Pumpa med luftblåsan, placerad i nätet baktill på Carony, för att höja. Tryck på luftblåsans ventil- knapp för att släppa ut luft och sänka.
  • Seite 15 Carony 16” Svankstöd Avlägsna svankstödet vid behov. Stick ner handen mellan körhandtagen för att ta tag i svankstödet.
  • Seite 16 Carony 16” Montera säte på chassi Aktivera parkeringsbromsen. Den främre delen av sätet ska skjutas in baktill på chassit. Passa in de två hjulen, samt spärren, på sätets undersida i skenorna på chassit. Spärr framtill på sätet.
  • Seite 17 Carony 16” Tryck ner frigöringsspaken. Skjut sätet hela vägen in och lås fast det på chassit med ett distinkt tryck. En utstickande spärrtapp, på varje sida om sätet, indikerar att sätet är korrekt låst. En spärrtapp på varje sida om sätet.
  • Seite 18 Carony 16” Demontera säte från chassi Aktivera parkeringsbromsen. Tryck ner frigöringsspaken och skjut sätet bakåt tills det tar stopp. Lyft upp spärren baktill på sätet. Spärr baktill på sätet. Skjut ut resterande del av sätet.
  • Seite 19 När en person skjuts till och från bilen påverkas bilens fjädring För en optimal och säker frigöring måste Carony höjdjuste- och orsakar en lutning av Carony. Om Carony frigörs i detta ras för att linjera med vridplatta/säteslyft i bilen. Följ instruk- läge kan det orsaka obehag för brukaren och skada någon av...
  • Seite 20 Körteknik Lutning Trappa Använd vårdarbromsen för att kontrollera farten. Fäll upp tippskydden. Använd underredets bakkant som trampbåge för att tippa Carony bakåt. Håll i handtag och Tips! Vid lutning, pumpa upp sittdynans framkant för bättre fotstöd vid eventuella lyft. sittkomfort.
  • Seite 21 Parkering och överflytt Lastning och lyft Fäll upp tippskydden. Använd under- Backa Carony så att framhjulen vänder Veva ner Carony till sitt nedersta läge, redets bakkant som trampbåge för att sig framåt. Lås parkeringsbromsen och fäll upp tippskydden och avlägsna fotstö- tippa Carony bakåt.
  • Seite 22 Carony 16” Överflytt till bil Vrid ut enheten i bilen. Backa intill Carony. Justera till rätt dockningshöjd med veven. Docka Carony till enheten i bilen. Ett klickljud på vardera sida bekräftar en korrekt dockning. Lås parkeringsbromsen och fäll upp fotstöden.
  • Seite 23 Carony 16” Höjdjustera ner innan frigöring, se kapitel om vikt- kompensering. Släpp parkeringsbromsen. Frigör Carony med hjälp av spakarna på varje sida. Vrid in enheten i bilen igen.
  • Seite 24 Carony 16” Överflytt till Carony Vrid ut enheten i bilen och skjut ut dockningsplattan till sitt yttersta läge. Backa intill Carony. Justera till rätt dockningshöjd med veven. Docka Carony till enheten i bilen. Ett klickljud på vardera sida bekräftar en korrekt dockning.
  • Seite 25 Carony 16” Tryck ner spaken för att frigöra sätet. Skjut över sätet och lås fast det på Carony med ett distinkt tryck. Spärrtapparna bekräftar korrekt låsning, se kapitel om säkerhet. Höjdjustera upp innan frigöring, se kapitel om vikt- kompensering. Släpp parkeringsbromsen.
  • Seite 26 Carony 16” Skötselanvisning Utöver följande skötselanvisning krävs ingen ytterligare service av Carony. Däck ................Bakhjul: 16”x1,75” (2-4,5 bar / 30-65 psi) Framhjul: 7”x1,75” (2,5 bar / 36 psi) Framhjulsaxlar............Rengör vid behov. Chassi ................Rengör vid behov. Använd rengöringsmedel utan slipmedel med ett pH-värde mellan 5 och 9, alternativt 70-procentig desinfektionssprit.
  • Seite 27 Carony 16” Förvaring Förvara Carony ren och torr om den inte ska användas under en längre period. För att förenkla förvaring och/eller transport av Carony kan sätet separeras från chassit, se rubriken ”Demontera säte från chassi”. Livslängd Caronys förväntade livslängd är minst tio år om den används för avsett bruk och sköts enligt rikt- linjerna i brukarmanualen.
  • Seite 28 Carony 16” Justering av bromsar Om bromsarna tar dåligt, lossa låsmuttern och vrid justerskruven moturs för att sträcka vajern. Dra åt låsmuttern igen för att låsa den nya positionen. Låsmutter Vårdarbroms Låsmutter Parkeringsbroms, en på varje bakhjul.
  • Seite 29 Kontrollera att vajern till bromsen är tillräckligt sträckt, se justering av bromsar. Vårdarbromsen tar dåligt ........Kontrollera att vajern till bromsen är tillräckligt sträckt, se justering av bromsar. Säkerhetstapparna låser inte vid Kontakta omedelbart din installatör. Problemet måste åtgärdas innan Carony tas i dockning ............... bruk igen.
  • Seite 30 Carony 16” För vidare hjälp och information kring Carony samt frågor gällande garanti, kontakta din installatör. Som auktoriserad återförsäljare till BraunAbility har din installatör alltid tillgång till aktuell information och kunnig support. Uppgifterna kring Carony nedan finns på silveretiketten som är placerad framtill på...
  • Seite 31: Teknisk Specification

    Carony 16” Teknisk specification Dimensions Product data Min Max A, längd ............71 cm Max brukarvikt ..........120 kg Sittytans vinkel, ° ....... 15° ..22° B, bredd ............64 cm Effektivt sittdjup, cm ..... 41,5 ..49 Produktens vikt.........15.5 kg C, höjd ............. 43-57 cm Effektiv sittbredd, cm ....36,5 ..47,5...
  • Seite 32 Carony 16” Introduktion för användare BraunAbility Europe AB vill att du som användare skall känna dig trygg och bekväm med din nya produkt. Därför har din installatör till uppgift att gå igenom följande med dig / Säkerhet Handhavande Om frågor kring produkten skulle uppstå vid ett senare tillfälle är du givetvis välkommen att kontakta din installatör igen.
  • Seite 33 Carony 16” Reservdelslista Följande reservdelar finns till Carony 16”. Kontakta din återförsäljare för beställning och montering. Kontaktuppgifter till samtliga återförsäljare finns på www.autoadapt.com. Artikel nr Reservdel Artikel nr Reservdel 401360 Anti tip left 401357 Crank mechanism 401362 Anti tip right...
  • Seite 34 Carony 16” Thank you for choosing a Carony from BraunAbility! The following manual is an important part of the product, providing you with information on how to achieve maximum performance and safe operation. Keep the manual in a safe place so that you can refer to it when necessary.
  • Seite 35 Carony 16” Presentation Safety Features Operation Care instructions Troubleshooting Technical specification Introduction for users Spare parts list Manufacturer certificate (Product certificate) at the end of the manual.
  • Seite 36 Carony correctly and safely. Otherwise, no spe- cial knowledge or ability is required. If you can push a wheel- chair with a person in it, you will be able to use a Carony. Please contact us if you would like us to send this user manual to you as a PDF.
  • Seite 37 Carony 16” Product Carony 16” Date 2017-09-01 DOWN Article No. 123456 1234567 Serial No. Åkeriv. 7, 443 61 Stenkullen, Sweden +46 302 254 00 BRAKE MAX 120 KG WARNING DO NOT USE AS WHEELCHAIR DURING TRANSPORT IN VEHICLE On the pillar behind the...
  • Seite 38 Carony 16” Safety One locking pin on each side of the seat. Crank for height adjustment.
  • Seite 39 Carony 16” Anti-tipping device (option) Use the anti-tipping device if necessary. Press the top of the support to fold it down. Press the black catch up or down to fold the support up again.
  • Seite 40: Push Handles

    Carony 16” Features Push handles Pull out the catch in the left handle and angle both handles straight backwards. Pull the handle all the way up and angle out. A click is heard when the handle locks into position. Pull the relevant catch out to fold the handles in again. Fold in the right...
  • Seite 41 Carony 16” Brakes Carer brake Parking brake Press down the red catch to lock the The brakes are applied against both rear brake. wheels when the brake lever is folded forward. Pull the lever backward to release the brakes again.
  • Seite 42: Foot Rests

    Carony 16” Foot rests Press down the locking pin to attach/remove the footrest. Ensure the locking pin secures the footrest when fitting...
  • Seite 43 Carony 16” If necessary, move the position of the foot plates so that they are closer to the user. Height adjustment Angle adjustment Recommendation: Adjust the foot plate so the user’s ankle rests on the plate at a 90° angle.
  • Seite 44: Adjusting The Seat

    Slacken the screws for the backrest. Select between four possible lateral positions. Height of the seat cushion’s front edge Pump the air bladder on the back of the Carony to raise. Lower by pressing the air bladder valve button to release the air.
  • Seite 45 Carony 16” Lumbar support Remove the lumbar support if necessary. Insert a hand between the push handles to grip the lumbar support.
  • Seite 46 Carony 16” Mount the seat on chassis Engage the parking brake. The front part of the seat slides into the back of the chassis. Fit the two wheels and the catch underneath the seat into the rails on the chassis.
  • Seite 47 Carony 16” Press down the release lever. Slide the seat all the way in and secure it on the chassis with a firm press. A protruding locking pin on each side of the seat indicates that the seat is correctly locked.
  • Seite 48 Carony 16” Remove the seat from chassis Engage the parking brake. Press down the release lever and slide the seat back until it stops. Lift up the catch on the back of the seat. Catch on back of seat. Slide out the remaining part of the...
  • Seite 49: Operation

    Compensating for weight (C) When a person is moved to and from the car, the car's sus- For optimum and safe release, Carony must be adjusted for pension is affected and causes Carony to tilt. Releasing Carony height to align with the turntable/seat lift in the car. Follow in this position can cause discomfort for the user and damage the instructions for docking for the relevant combination.
  • Seite 50 Use the carer brakes to control the speed. Fold up the anti-tipping device. Use the rear edge of the chassis as a push bar to tip Carony backwards. Hold the Tip! On inclines, pump up the front edge of the seat cushion handles and footrests when lifting.
  • Seite 51 Parking and transferring Loading and lifting Fold up the anti-tipping device. Use the Reverse Carony so that the front wheels Crank Carony down to its lowest rear edge of the chassis as a push bar to face forwards. Apply the parking brake position, fold up the anti-tipping device tip Carony backwards.
  • Seite 52 Swivel out the unit in the car. Reverse adjacent to Carony. Adjust to the correct docking height using the crank. Dock Carony to the unit in the car. A clicking noise on each side confirms correct docking. Apply the parking brake and fold up the footrests.
  • Seite 53 Carony 16” Adjust the height downwards before releasing, see weight compensation chapter. Disengage the parking brake. Release Carony using the levers on each side. Swivel the unit into the car again. Down...
  • Seite 54 Reverse adjacent to Carony. Adjust to the correct docking height using the crank. Dock Carony to the unit in the car. A clicking noise on each side confirms correct docking. Apply the parking brake and fold up the footrests.
  • Seite 55 Carony 16” Depress the lever to release the seat. Slide the seat over and lock it to Carony with a firm press. The locking pins confirm correct engagement, see safety chapter. Adjust the height upwards before releasing, see weight compensation chapter.
  • Seite 56: Care Instructions

    Carony 16” Care instructions No other service is required on the Carony in addition to the following instructions for care. Tyres ................Rear wheels: 16”x1.75” (2-4.5 bar / 30-65 psi) Front wheels: 7”x1.75” (2.5 bar / 36 psi) Front axles ..............
  • Seite 57: Service Life

    Service life The expected service life of a Carony is at least ten years if used as intended and cared for according to the guidelines in the user manual. The actual service life may vary as it depends on how much and how intensely the product is used.
  • Seite 58: Adjusting The Brakes

    Carony 16” Adjusting the brakes If the brakes are not engaging properly, slacken the locking nut and turn the adjustment screw anticlockwise to tension the cable. Tighten the locking nut again to lock the new position. Locking nut Carer brake...
  • Seite 59: Troubleshooting

    Troubleshooting Carony pulls to one side ........Check that / - the user weight is evenly distributed in Carony. - the tyre pressure is correct. - the wheel brake or carer brake is not applied. Carony is hard to turn .........
  • Seite 60 Carony 16” Get in touch with your installer for further assistance and information concerning Carony plus questions regarding the guarantee. As an authorised dealer of BraunAbility, your installer is always in possession of current information and able support. Information concerning Carony given below can be found on the silver label placed at the front of the Carony chassis.
  • Seite 61: Technical Specification

    Carony 16” Technical specification Dimensions Product data Min Max A, length ............71 cm Max user weight ........120 kg Seat cushion angle, ° ....... 15° ..22° B, width ............64 cm Effective seating depth, cm ..41,5 ..49 Unit weight ..........15.5 kg (excluding footrest and seat) C, height ..........
  • Seite 62 Carony 16” Introduction for users BraunAbility Europe AB would like you, as a user, to feel secure and comfortable with your new product. For that reason, it is your installer’s duty to go through the following with you / Safety...
  • Seite 63: Spare Parts List

    Carony 16” Spare parts list The following spare parts are available for the Carony 16”. Contact your dealer for ordering and assembly. Contact details for all dealers can be found at www.autoadapt.com. Part no. Spare part Part no. Spare part...
  • Seite 64 Bedarf leicht auffindbar ist. Sollten Sie Fragen zu Ihrer Umrüstung haben, dann setzen Sie sich bitte mit Ihrem Fachhändler/Monteur in Verbindung. Wenn Sie mehr über uns und unser Angebot an Fahrzeuganpassungslösungen erfahren möchten, besuchen Sie www.braunability.eu. Nochmals – vielen Dank für Ihr Vertrauen!
  • Seite 65 Carony 16” Präsentation Sicherheit Funktionen Bedienung Pflegeanleitung Fehlersuche Technische Daten Einweisung des Benutzers Ersatzteilliste Herstellersertifikat (Product certificate) hinten im Handbuch.
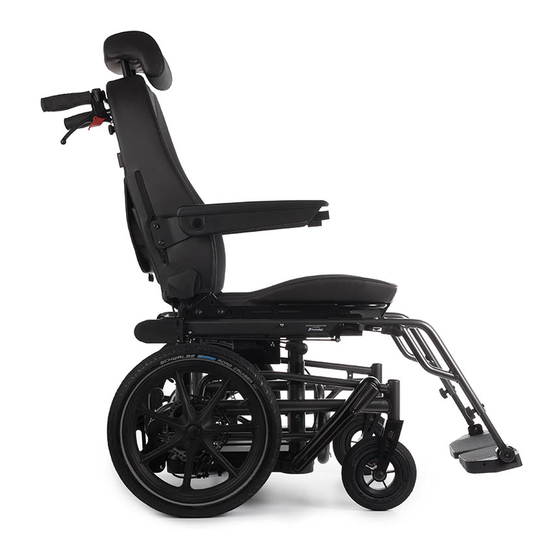
  • Seite 66 Carony 16” Präsentation Der Carony ist eine Lösung für Pfleger, die zur Verwendung im häus- lichen und städtischen Umfeld vorgesehen ist. Anhand dieser Lösung lässt sich eine Person sicher und ohne Heben von einem Rollstuhl auf den Autositz umsetzen. Dadurch werden alle schwierigen, schweren und gefährlichen Schritte, die ein Umsetzen umfasst, beseitigt.
  • Seite 67 Carony 16” Product Carony 16” Date 2017-09-01 DOWN Article No. 123456 1234567 Serial No. Åkeriv. 7, 443 61 Stenkullen, Sweden +46 302 254 00 BRAKE MAX 120 KG WARNING DO NOT USE AS WHEELCHAIR DURING TRANSPORT IN VEHICLE Befindet sich an der Säule hinter dem rech-...
  • Seite 68 Carony 16” Sicherheit Ein Sperrzapfen auf jeder Seite des Sitzes. Kurbel zur Höhen- verstellung.
  • Seite 69 Carony 16” Kippschutz (Zubehör) Verwenden Sie bei Bedarf den Kippschutz. Drücken Sie auf die Oberseite der Stütze, um sie herunterzuklappen. Drücken Sie die schwarze Sperre hinunter oder herauf, um die Stütze wieder hochzuklappen.
  • Seite 70 Carony 16” Funktionen Schiebegriffe Die Sperre am linken Handgriff herausziehen und beide Handgriffe gerade nach hinten neigen. Ziehen Sie die Handgriffe maximal weit hoch und neigen Sie sie nach außen. Wenn der Handgriff in seiner Position verriegelt wird, ist ein Klick zu hören.
  • Seite 71 Carony 16” Bremsen Bremse für die Begleitperson Parkbremse Drücken Sie die rote Sperre nach unten, Beide Hinterräder werden gebremst, um die Bremse zu verriegeln. wenn der Bremshebel nach vorne ge- klappt wird. Ziehen Sie den Hebel nach hinten, um die Bremsen wieder zu lösen.
  • Seite 72 Carony 16” Fußstützen Drücken Sie die Sperrzapfen herunter, um die Fußstütze zu montieren bzw. abzu- montieren. Achten Sie bei der Montage darauf, dass die Sperrzapfen die Fußstütze verriegeln.
  • Seite 73 Carony 16” Kehren Sie bei Bedarf die Platzierung der Fußrasten um, damit diese näher zum Benutzer kommen. Höhenverstellung Winkelverstellung Empfehlung: stellen Sie die Fußplatte so ein, dass das Fußgelenk des Benutzers in einem 90° Winkel zur Fußplatte ruht.
  • Seite 74: Den Sitz Einstellen

    Lösen Sie die Schrauben der Rückenlehne. Wählen Sie zwischen vier möglichen Positionen in der Länge aus. Höhe des Sitzkissens vorne Pumpen Sie mit der Luftblase, die sich im Netz hinter dem Carony befindet, um es zu erhöhen. Drücken Sie auf den Ventilknopf der Luftblase, um Luft herauszulassen und es abzusenken.
  • Seite 75 Carony 16” Lordosenstütze Entfernen Sie bei Bedarf die Lordosenstütze. Greifen Sie mit der Hand zwischen den Schiebegriffen hinein, um die Lordosenstütze zu fassen.
  • Seite 76: Sitzmontage Auf Dem Fahrgestell

    Carony 16” Sitzmontage auf dem Fahrgestell Aktivieren Sie die Parkbremse. Der vordere Teil des Sitzes muss auf dem Fahrgestell nach hinten hineingescho- ben werden. Passen Sie die beiden Räder sowie die Sperre auf der Unterseite des Sitzes in die Schienen auf dem Fahrgestell ein.
  • Seite 77 Carony 16” Drücken Sie den Verriegelungshebel nach unten. Schieben Sie den Sitz ganz hinein und verriegeln Sie ihn mit einem kräftigen Druck auf dem Fahrgestell. Ein herausragender Sperrzapfen auf jeder Seite des Sitzes zeigt an, dass der Sitz korrekt verriegelt ist.
  • Seite 78: Sitz Vom Fahrgestell Abmontieren

    Carony 16” Sitz vom Fahrgestell abmontieren Aktivieren Sie die Parkbremse. Drü- cken Sie den Verriegelungshebel her- unter und schieben Sie den Sitz nach hinten bis es nicht mehr weiter geht. Heben Sie die Sperre hinten am Sitz nach oben. Sperre hinten am Sitz.
  • Seite 79: Bedienung

    Federung des Autos beeinflusst und löst in der Höhe justiert werden, um auf gleicher Höhe zu sein eine Neigung des Carony aus. Wenn der Carony in dieser wie der Schwenk-/Hubsitz im Auto. Folgen Sie zum Ando- Position gelöst wird, kann dies für den Benutzer unangenehm...
  • Seite 80 Die Bremse für die Begleitperson nutzen, um das Tempo zu Klappen Sie den Kippschutz hoch. Nutzen Sie die Hinter- kontrollieren. kante des Untergestells als Tretbügel, um den Carony nach hinten zu kippen. Halten Sie bei einem eventuellen Heben Ein Tipp! Bei Gefälle die Vorderkante des Sitzkissens aufpum- am Handgriff und an den Fußstützen fest.
  • Seite 81 Hindernisse Parken und Umsetzen Einladen und Heben Klappen Sie den Kippschutz hoch. Nut- Fahren Sie den Carony nach hinten, so Kurbeln Sie den Carony in seine nied- zen Sie die Hinterkante des Untergestells dass die Vorderräder sich nach vorne rigste Stellung hinunter, klappen Sie als Tretbügel, um den Carony nach...
  • Seite 82 Schwenken Sie die Einheit im Auto heraus. Fahren Sie nach hinten an den Carony. Stellen Sie mit der Kurbel die richtige Andockhöhe ein. Docken Sie den Carony an die Einheit im Auto an. Ein Klickgeräusch auf jeder Seite bestätigt, dass das Ando- cken korrekt erfolgt ist.
  • Seite 83 Carony 16” Vor dem Lösen die Höhe nach unten justieren, siehe das Kapitel über Gewichtsausgleich. Lösen Sie die Parkbremse. Lösen Sie den Carony mit Hilfe der Hebel auf jeder Seite. Schwenken Sie die Einheit wieder ins Auto. Herunter...
  • Seite 84: Umsetzen Auf Den Carony

    Sie die Andockplatte in ihre äußerste Position. Fahren Sie nach hinten an den Carony. Stellen Sie mit der Kurbel die richtige Andockhöhe ein. Docken Sie den Carony an die Einheit im Auto an. Ein Klickgeräusch auf jeder Seite bestätigt, dass das Ando- cken korrekt erfolgt ist.
  • Seite 85 Verriegelung, siehe das Kapitel über Sicherheit. Vor dem Lösen die Höhe nach oben justieren, siehe das Kapitel über Gewichtsausgleich. Lösen Sie die Parkbremse. Lösen Sie den Carony mit Hilfe der Hebel auf jeder Seite. Schwenken Sie die Einheit wieder ins Auto. Herauf...
  • Seite 86 Carony 16” Pflegeanleitung Über die folgende Pflegeanleitung hinaus ist keine weitere Pflege des Carony erforderlich. Reifen................Hinterräder: 16”x1,75” (2-4,5 bar / 30-65 psi) Vorderräder: 7”x1,75” (2,5 bar / 36 psi) Vorderradachsen ............ Bei Bedarf reinigen. Fahrgestell ..............Bei Bedarf reinigen. Reinigungsmittel ohne Schleifmittel mit einem pH-Wert zwi- schen 5 und 9, oder 70-prozentigen Desinfektionsalkohol verwenden.
  • Seite 87 Carony 16” Lagerung Lagern Sie den Carony an einem sauberen und trockenen Ort, wenn er über längere Zeit nicht ver- wendet wird. Um die Lagerung und/oder den Transport des Carony zu vereinfachen, kann der Sitz vom Fahrgestell getrennt werden, siehe der Abschnittt „Sitz vom Fahrgestell abmontieren“.
  • Seite 88: Einstellung Von Bremsen

    Carony 16” Einstellung von Bremsen Wenn die Bremsen schlecht greifen, die Verschlussmutter lösen und die Verstellschraube im Gegenuhrzeigersinn drehen, um das Drahtseil zu spannen. Die Verschlussmutter wieder anziehen, um die neue Stellung zu fixieren. Bremse für die Begleitperson Kontermutter Kontermutter Parkbremse, eine an jedem Hinterrad.
  • Seite 89: Fehlersuche

    Überprüfen, dass das Drahtseil zur Bremse ausreichend gespannt ist, siehe Einstellung von Bremsen. Beim Andocken verriegeln die Sperrzapfen nicht ........... Nehmen Sie sofort mit Ihrem Monteur Kontakt auf. Das Problem muss behoben werden, bevor der Carony wieder in Gebrauch genommen wird.
  • Seite 90 Garantie Ihren Monteur. Als autorisierter Händler für BraunAbility hat Ihr Monteur immer Zugriff auf aktuelle Informationen und sachkundigen Support. Die unten aufgeführten Daten zum Carony finden Sie auf dem silbernen Schild, das sich vorne am Fahrgestell des Carony befindet. Angaben beim Kontakt mit dem Fachhändler/Monteur /...
  • Seite 91: Technische Daten

    Carony 16” Technische Daten Abmessungen Produktdaten Min Max A, Länge ............71 cm Max. Benutzergewicht ......120 kg Neigung der Sitzfläche, ° ....15° ..22° B, Breite ............64 cm Effektive Sitztiefe, cm ....41,5 ..49 Gewicht des Produktes ......15.5 kg (ohne Fußstütze und Sitz)
  • Seite 92: Einweisung Des Benutzers

    Carony 16” Einweisung des Benutzers Es ist BraunAbility Europe AB ausdrücklicher Wunsch, dass Sie als Benutzer sich sicher und bequem mit Ihrem neuen Produkt fühlen. Deshalb ist Ihr Monteur verp- flichtet, Sie über folgende Punkte zu informieren / Sicherheit Handhabung Sollten zu einem späteren Zeitpunkt Fragen zum Produkt auftauchen, dürfen Sie sich...
  • Seite 93 Carony 16” Ersatzteilliste Die folgenden Ersatzteile sind für den Carony 16” erhältlich. Kontaktieren Sie Ihren Händler zur Bestellung und für die Montage. Die Kontaktadressen sämtlicher Händler finden Sie auf www.autoadapt.com. Artikelnr. Ersatzteil Artikelnr. Ersatzteil 401360 Kippschutz 401357 Kurbel links Mechanismus...
  • Seite 94 Si vous avez des questions concernant votre adaptation, n’hésitez pas à contacter votre installateur. Si vous souhaitez en savoir plus sur nous et notre gamme de solutions d’adaptation automobile, visitez le site www.braunability.eu. Et merci encore pour votre confiance!
  • Seite 95 Carony 16” Présentation Sécurité Fonctions Utilisation Instructions de maintenance Recherche de pannes Fiche technique Introduction pour l’utilisateur Liste des pièces de rechange Certificat du fabriquant (Product certificate) à la fin du manuel.
  • Seite 96 Carony 16” Présentation Le Carony est une solution conçue pour être utilisée au domi- cile et en milieu urbain. Il permet de transférer une personne du fauteuil roulant au siège de la voiture, en toute sécurité et sans levage. Il élimine ainsi les opérations pénibles et dange- reuses liées au transfert.
  • Seite 97 Carony 16” Product Carony 16” Date 2017-09-01 DOWN Article No. 123456 1234567 Serial No. Åkeriv. 7, 443 61 Stenkullen, Sweden +46 302 254 00 BRAKE MAX 120 KG WARNING DO NOT USE AS WHEELCHAIR DURING TRANSPORT IN VEHICLE Situé sur la colonne derrière la roue arrière...
  • Seite 98 Carony 16” Sécurité Une goupille de verrouillage de chaque côté du siège. Manivelle de réglage de la hauteur.
  • Seite 99 Carony 16” Dispositif anti-bascule (option) Utilisez le dispositif anti-bascule si nécessaire. Appuyez sur le dessus de la béquille pour l’abaisser. Enfoncez ou relevez l’élément de blocage noir pour relever la bé- quille.
  • Seite 100 Carony 16” Fonctions Poignées de conduite Sortez l’élément de blocage de la poignée gauche et inclinez les deux poignées tout droit en arrière. Remontez les poignées au maximum et pivotez-les vers l’extérieur. Un clic se fait entendre lorsque la poignée se verrouille. Tirez chacun des éléments...
  • Seite 101 Carony 16” Freins Frein d’accompagnateur Frein de stationnement Enfoncez le blocage rouge pour serrer Les deux roues arrière sont bloquées le frein. lorsque le levier de frein est rabattu en avant. Tirez le levier en arrière pour desserrer les freins.
  • Seite 102 Carony 16” Repose-pieds Appuyez sur la goupille de verrouillage pour mettre en place ou retirer le re- pose-pied. Vérifiez que la goupille de verrouillage bloque le repose-pied lorsqu’il est en place.
  • Seite 103 Carony 16” Au besoin, interchangez les appuis de pied afin de les rapprocher de l’utilisateur. Réglage de la hauteur Réglage de l’angle Recommandation : réglez l’appui en sorte que le pied repose en faisant en angle de 90°.
  • Seite 104: Réglage Du Siège

    Desserrez les vis du dossier. Choisissez entre quatre positions fixes dans le sens longitudinal. Hauteur du bord avant du coussin d'assise Utilisez la poire située dans le filet à l’arrière du Carony pour faire monter. Pour faire descendre, appuyez sur le bouton d’évacuation d’air de la poire.
  • Seite 105 Carony 16” Appui lombaire Au besoin, vous pouvez enlever l’appui lombaire. Enfoncez la main entre les poi- gnées de conduite pour saisir l’appui lombaire.
  • Seite 106 Carony 16” Mettre en place le siège sur le châssis Serrez le frein de stationnement. La partie avant du siège s’insère à l’arrière du châssis. Introduisez les deux galets et le verrou situés en dessous du siège, dans les glissières du châssis.
  • Seite 107 Carony 16” Appuyez sur le levier de libération. Poussez le siège jusqu’au bout et verrouillez-le au châssis d’une pression bien marquée. Les goupilles de verrouillage res- sortent de chaque côté du siège ; ceci indique que le siège correctement verrouillé. Une goupille de verrouil- lage de chaque côté...
  • Seite 108 Carony 16” Détacher le siège du châssis Serrez le frein de stationnement. Appuyez sur le levier de libération et poussez le siège en arrière jusqu’à butée. Soulevez le verrou à l’arrière du siège. Verrou à l’arrière du siège. Dégagez la partie restante du siège.
  • Seite 109 être réglé en hauteur pour être de niveau avec la plaque Carony. Si le Carony est libéré dans cette position, cela peut tournante ou l’élévateur d’assise. Suivez les instructions être inconfortable pour l'utilisateur et endommager certains d’accostage pour la combinaison pertinente.
  • Seite 110: Technique De Conduite

    Rentrez les protections anti-bascule. Servez-vous du bord arrière du châssis comme d’un étrier pour basculer le Astuce En pente, gonflez le bord avant du coussin d’assise Carony en arrière. En soulevant, saisissez les poignées et les pour un meilleur confort. repose-pieds.
  • Seite 111 Obstacles Stationnement et transfert Chargement et levage Rentrez les protections anti-bascule. Reculez le Carony de façon à ce que À l’aide la manivelle, abaissez le Carony Servez-vous du bord arrière du châssis les roues avant soient orientées vers jusqu’à la position la plus basse, rentrez comme d’un étrier pour basculer le...
  • Seite 112 Dépliez le dispositif de la voiture. Reculez le Carony. Réglez la hauteur d’accostage à l’aide de la manivelle. Accostez le Carony au dispositif de la voiture. Si un clic se fait entendre de chaque côté, l’accostage a été correctement réalisé.
  • Seite 113 Carony 16” Ajustez la hauteur vers le bas, voir le chapitre sur la compensation de poids. Desserrez le frein de stationnement. Libérez le Carony à l’aide des leviers de chaque côté. Repliez le dispositif dans la voiture.
  • Seite 114 Dépliez le dispositif de la voiture et sortez la plaque d’accostage jusqu’en fin de course. Reculez le Carony. Réglez la hauteur d’accostage à l’aide de la manivelle. Accostez le Carony au dispositif de la voiture. Si un clic se fait entendre de chaque côté, l’accostage a été correctement réalisé.
  • Seite 115 Ajustez la hauteur vers le haut, voir le chapitre sur la compensation de poids. Desserrez le frein de stationnement. Libérez le Carony à l’aide des leviers de chaque côté. Repliez le dispositif dans la voiture. Haut...
  • Seite 116: Instructions De Maintenance

    Carony 16” Instructions de maintenance L’entretien du Carony se limite aux mesures qui suivent. Pneus ................Roue arrière : 16”x1,75” (2-4,5 bar / 30-65 psi) Roue avant : 7”x1,75” (2,5 bar / 36 psi) Essieux avant ............. Nettoyer si nécessaire Châssis ................
  • Seite 117: Durée De Vie

    Reportez-vous à la section « Détacher le siège du châssis ». Durée de vie La durée de vie attendue du Carony est d’au moins dix ans s’il est utilisé de la manière prévue et entretenu d’après les instructions du manuel d’utilisation. La durée de vie effective peut varier en fonction de la fréquence et de l’intensité...
  • Seite 118: Réglage Des Freins

    Carony 16” Réglage des freins Si les freins sont peu efficaces, desserrez l’écrou de blocage et tournez la vis de réglage dans le sens antihoraire pour tendre le câble. Resserrez l’écrou de blocage pour fixer la nouvelle position. Écrou de blocage Frein d’accompagnateur...
  • Seite 119: Recherche De Pannes

    Le Carony tire sur le côté ........Vérifiez que : - le poids de l’utilisateur est uniformément réparti sur le Carony. - les pneus sont correctement gonflés. - que le frein de stationnement et le frein d’accompagnateur ne sont pas serrés.
  • Seite 120 Carony 16” Pour toute aide et information sur le Carony et toutes questions concernant la garantie, contactez l’installateur. En tant que revendeur agréé BraunAbility, l’installateur a toujours accès aux informa- tions les plus récentes et possède les compétences techniques requises. Les données techniques sur le Carony qui apparaissent ci-dessous sont reprises à...
  • Seite 121: Fiche Technique

    Carony 16” Fiche technique Dimensions Caractéristiques Min Max A, longueur ...........71 cm Poids maximal de l’utilisateur .....120 kg Inclinaison de la surface B, largeur ............64 cm assise, ° ............ 15° ..22° Poids du produit ........15,5 kg (sans repose-pieds ni assise) C, hauteur ..........
  • Seite 122 Carony 16” Introduction pour l’utilisateur BraunAbility Europe AB souhaite que vous vous sentiez, en tant qu’utilisateur, en sécurité et à l’aise avec votre nouveau produit. Votre installateur va donc parcourir les chapitres suivants avec vous / Sécurité Utilisation Si vous deviez ultérieurement avoir des questions sur le produit, n’hésitez pas à...
  • Seite 123: Liste Des Pièces De Rechange

    Carony 16” Liste des pièces de rechange Les pièces de rechange suivantes sont disponibles pour le Carony 16”. Contactez votre revendeur pour passer commande et installer. Vous retrouverez les coordonnées de tous les revendeurs sur www.autoadapt.com. Réf. Pièce de rechange Réf.
  • Seite 124 Si tiene alguna pregunta sobre su adaptación le pedimos que se ponga en contacto con el instalador local. Si desea saber más sobre nosotros y nuestra gama de solu- ciones de adaptación para automóviles, visite www.braunability.eu. Una vez más, ¡muchas gracias por su confianza!
  • Seite 125 Carony 16” Presentación Seguridad Funciones Instrucciones de mantenimiento Localización de fallos Especificaciones técnicas Introducción para usuarios Lista de repuestos Certificato de fabricación (Product certificate) al final del manual.
  • Seite 126 Se eliminan así todos los pasos difíciles, pesados y peligrosos del traslado. Carony es tan segura y cómoda como un asiento del automóvil, e igual de versátil y fácil de usar como una silla de ruedas.
  • Seite 127 Carony 16” Product Carony 16” Date 2017-09-01 DOWN Article No. 123456 1234567 Serial No. Åkeriv. 7, 443 61 Stenkullen, Sweden +46 302 254 00 BRAKE MAX 120 KG WARNING DO NOT USE AS WHEELCHAIR DURING TRANSPORT IN VEHICLE Situado en la columna detrás de la rueda tras-...
  • Seite 128 Carony 16” Seguridad Un pasador de bloqueo a cada lado del asiento. Manivela para reg- ulación de altura.
  • Seite 129 Carony 16” Protección antivuelco (opcional) Utilizar la protección antivuelco si es necesario. Presionar el lado superior del soporte para bajarlo. Presionar hacia abajo (o hacia arriba) el fiador negro para volver a subir el soporte.
  • Seite 130 Carony 16” Funciones Empuñaduras de tracción Extraer el bloqueo de la empuñadura izquierda para doblar las dos empuñaduras de forma recta hacia atrás. Levantar las empuñaduras hasta el máximo y doblarlas hacia fuera. Se oye un clic cuando la empuñadura se bloquea en su posición. Extraer el fiador de cada empuñadura para volver a plegarla.
  • Seite 131 Carony 16” Frenos Freno de mano Freno de estacionamiento Presionar hacia abajo el fiador rojo para Las dos ruedas traseras se frenan al bloquear el freno. desplazar hacia delante la palanca de fre- no. Para liberar nuevamente los frenos, empujar la palanca hacia atrás.
  • Seite 132 Carony 16” Reposapiés Presionar el pasador de bloqueo para montar/desmontar el reposapiés. Asegurarse de que el pasador de bloqueo fije el reposapiés en el montaje.
  • Seite 133 Carony 16” Si es necesario, cambiar las placas de lugar para que queden más cerca del usuario. Regulación de altura Ajuste del ángulo Consejo: ajustar la placa para que el tobillo del usuario se apoye en la placa con un ángulo de 90°.
  • Seite 134: Ajuste Del Asiento

    Altura del borde delantero del cojín del asiento Bombear con la burbuja de aire, situada en la red en la parte trasera del Carony, para subir. Presionar la válvula de la burbuja de aire, para dejar salir el aire y bajar.
  • Seite 135 Carony 16” Soporte lumbar Retirar el soporte lumbar si es necesario. Introducir la mano entre las empuña- duras de tracción para coger el soporte lumbar.
  • Seite 136 Carony 16” Montaje del asiento en el chasis Accionar el freno de estacionamien- to. La parte delantera del asiento se deberá introducir en la parte trasera del chasis. Introducir las dos ruedas, y el fiador, en la parte inferior del asiento en los carriles del chasis.
  • Seite 137 Carony 16” Presionar hacia abajo la palanca de lib- eración. Introducir el asiento comple- tamente y fijarlo en el chasis con una presión perceptible. Un pasador sobresaliente a cada lado del asiento indica que el asiento está correctamente bloqueado. Un pasador de bloqueo a...
  • Seite 138 Carony 16” Desmontaje del asiento del chasis Accionar el freno de estacionamiento. Presionar hacia abajo la palanca de liberación y deslizar el asiento hacia atrás, hasta el tope. Levantar el fiador en la parte trasera del asiento. Fiador en la parte trasera del asiento.
  • Seite 139 Al desplazar a una persona hacia y desde el automóvil, la sus- Para un desacoplamiento óptimo y seguro, es necesario ajus- pensión del automóvil se modifica y esto hace que la Carony se tar la altura de la Carony para nivelarla con la placa giratoria/ incline.
  • Seite 140 Sugerencia Si hay una inclinación pronunciada, bombear el Carony hacia atrás. Si es necesario levantar, sostener de las borde delantero del cojín del asiento para proporcionar empuñaduras y los reposapiés.
  • Seite 141 Carga y elevación Levantar las protecciones antivuelco. Uti- Hacer retroceder la Carony para que Con la manivela, bajar la Carony a la lizar el borde trasero del bastidor como las ruedas giren hacia delante. Bloquear posición más baja, levantar las protec-...
  • Seite 142 Carony 16” Traslado al automóvil Girar la unidad del automóvil hacia fuera. Retroceder con la Carony y colocarla al lado. Con la manivela, ajustar la altura de acoplamiento adecuada. Acoplar la Carony a la unidad del automóvil. Un "clic" a cada lado confirma un acoplamiento correcto.
  • Seite 143 Ajustar la altura hacia abajo antes del desacoplamien- to; véase el capítulo sobre compensación de peso. Liberar el freno de estacionamiento. Desacoplar la Carony con las palancas de cada lado. Girar y volver a introducir la unidad en el automóvil. Bajar...
  • Seite 144 Retroceder con la Carony y colocarla al lado. Con la manivela, ajustar la altura de acoplamiento adecuada. Acoplar la Carony a la unidad del automóvil. Un "clic" a cada lado confirma un acoplamiento correcto. Bloquear el freno de estacionamiento y levantar las protecciones antivuelco.
  • Seite 145 Carony 16” Presionar hacia abajo la palanca para liberar el asiento. Trasladar el asiento y fijarlo en la Carony con una presión perceptible. Los pasadores confirman un blo- queo correcto; véase el capítulo sobre seguridad. Ajustar la altura hacia arriba antes del desacoplamien- to;...
  • Seite 146: Instrucciones De Mantenimiento

    Carony 16” Instrucciones de mantenimiento Además de las siguientes instrucciones de mantenimiento, la Carony no requiere ningún otro mantenimiento. Neumáticos ..............Ruedas traseras: 16”x1,75” (2-4,5 bares / 30-65 psi) Ruedas delanteras: 7”x1,75” (2,5 bares / 36 psi) Ejes de las ruedas delanteras ......
  • Seite 147 «Desmontaje del asiento del chasis». Vida útil La vida útil esperada de la Carony es de diez años como mínimo si se utiliza de la manera prevista y se realiza su mantenimiento de acuerdo con las instrucciones del manual del usuario. La vida útil efectiva puede variar ya que depende de la intensidad y frecuencia de uso del producto.
  • Seite 148: Ajuste De Los Frenos

    Carony 16” Ajuste de los frenos Si los frenos no funcionan correctamente, aflojar la tuerca de seguridad y girar el tornillo de ajuste en sentido antihorario para tensar el cable. Apretar nuevamente la tuerca de seguridad para bloquear la nueva posición.
  • Seite 149: Localización De Fallos

    La Carony se desplaza de forma torcida ... Controlar que / - la carga del usuario esté repartida de manera uniforme en la Carony. - la presión de los neumáticos sea correcta. - no esté activado el freno de las ruedas o de mano.
  • Seite 150 Carony 16” Para recibir más ayuda e información sobre la Carony, y para consultas sobre la garantía, contactar con el técnico. Como distribuidor autorizado de BraunAbility, el técnico tiene siempre acceso a información actualizada y soporte competente. Los siguientes datos sobre la Carony se incluyen en la etiqueta plateada que está...
  • Seite 151: Especificaciones Técnicas

    Carony 16” Especificaciones técnicas Dimensiones Datos del producto Min Max A, longitud .............71 cm Peso máximo del usuario .....120 kg Ángulo de la superficie B, anchura ............. 64 cm del asiento, ° ........15° ..22° Peso del producto ........15.5 kg (sin el reposapiés ni el asiento)
  • Seite 152 Carony 16” Introducción para usuarios BraunAbility Europe AB quiere que usted, como usuario, se sienta seguro y cómodo con su nuevo producto. Por eso, el instalador local debe repasar lo siguiente con el usuario / Seguridad Si en una etapa posterior surgiesen preguntas en cuanto al producto el usuario puede volver a contactarse con el distribuidor local.
  • Seite 153: Lista De Repuestos

    Carony 16” Lista de repuestos Para la Carony 16” existen los siguientes repuestos. Contactar con el distribuidor para el pedido y montaje. Los datos de contacto de todos los distribuidores se incluyen en www.autoadapt.com. Nro. ref. Repuesto Nro. ref. Repuesto 401360 Protección...
  • Seite 154 Conservare quindi il manuale a portata di mano per qualsiasi evenienza. Per qualsiasi domanda sulla vostra soluzione personalizzata, rivolgetevi all’installatore. Se vuoi saperne di più su di noi e sulla nostra gamma di soluzioni di adattamento per auto, visita www.braunability.eu. Di nuovo, grazie per la fiducia accordataci!
  • Seite 155 Carony 16” Presentazione Sicurezza Funzioni Istruzioni di manutenzione Ricerca dei guasti Specifiche tecniche Introduzione per utenti Elenco dei ricambi Certificato di fabbricazione (Product certificate) alla fine del manuale.
  • Seite 156 In tal modo si eliminano le operazioni difficili, pesanti e pericolose connesse al trasferimento. Carony è sicuro e comodo come il normale sedile di un veicolo nonché versatile e facile da usare come una normale carrozzina.
  • Seite 157 Carony 16” Product Carony 16” Date 2017-09-01 DOWN Article No. 123456 1234567 Serial No. Åkeriv. 7, 443 61 Stenkullen, Sweden +46 302 254 00 BRAKE MAX 120 KG WARNING DO NOT USE AS WHEELCHAIR DURING TRANSPORT IN VEHICLE Sul montante dietro la...
  • Seite 158 Carony 16” Sicurezza Un perno di bloccaggio su entrambi i lati del sedile. Manovella di rego- lazione in altezza.
  • Seite 159 Carony 16” Protezione antiribaltamento (opzionale) Utilizzare la protezione antiribaltamento all’occorrenza. Premere il lato superiore del supporto per abbassarlo. Premere verso il basso o verso l’alto il fermo nero per sollevare nuovamente il supporto.
  • Seite 160 Carony 16” Funzioni Impugnature di guida Estrarre il fermo sull’impugnatura sinistra e inclinare entrambe le impugnature all’in- dietro. Sollevare completamente le impugnature e inclinarle verso l’esterno. Quan- do l’impugnatura si blocca in posizione si sente un clic. Estrarre il fermo per ritrarre...
  • Seite 161 Carony 16” Freni Freno dell’assistente Freno di stazionamento Premere il fermo rosso verso il basso Portando in avanti la leva dei freni si per bloccare il freno. frenano entrambe le ruote posteriori. Tirare la leva all’indietro per disinserire i freni.
  • Seite 162 Carony 16” Pedana Premere il perno di bloccaggio verso il basso per montare/smontare la pedana. Verificare che il perno di bloccaggio fissi la pedana in sede di montaggio.
  • Seite 163 Carony 16” All’occorrenza, è possibile invertire la posizione delle pedane per avvicinarle all’utente. Regolazione in altezza Regolazione dell’inclinazione Raccomandazione: regolare la pedana in modo che le caviglie dell’utente formino un angolo di 90° rispetto alla pedana.
  • Seite 164: Regolazione Del Sedile

    Svitare le viti dello schienale. Selezionare una delle quattro posizioni longitudinali disponibili. Altezza del bordo anteriore del cuscino del sedile Per alzare, agire sulla pompetta collocata nella rete sul lato posteriore di Carony. Premere il pulsante sulla valvola della pompetta per sfiatare l’aria e abbassare.
  • Seite 165 Carony 16” Supporto lombare Rimuovere il supporto lombare all’occorrenza. Infilare la mano fra le impugnature di guida per afferrare il supporto lombare.
  • Seite 166 Carony 16” Montaggio del sedile sul telaio Inserire il freno di stazionamento. Premere la parte anteriore del sedile verso la parte posteriore del telaio. Inserire le due ruote e il fermo sul lato inferiore del sedile nelle guide sul telaio.
  • Seite 167 Carony 16” Premere verso il basso la leva di sbloc- caggio. Premere il sedile a fondo verso l’interno e bloccarlo al telaio con una pressione decisa. Un perno di bloccaggio sporgente su entrambi i lati del sedile indica che il sedile è...
  • Seite 168 Carony 16” Smontaggio del sedile dal telaio Inserire il freno di stazionamento. Pre- mere verso il basso la leva di sbloccag- gio, quindi portare il sedile al finecorsa posteriore. Sollevare il perno sul lato posteriore del sedile. Fermo sul lato posteriore del sedile.
  • Seite 169 Carony per allinearlo alla piastra di rotazione/al do inclinare Carony. Se si sblocca Carony in questa posizione, sollevatore sedile del veicolo. Seguire le istruzioni per l’anco- l’operazione potrebbe risultare più scomoda per l’utente e i raggio per la combinazione in questione.
  • Seite 170 Consiglio! In caso di inclinazione, agire sulla pompetta e solle- re Carony all’indietro. Tenere saldamente le impugnature e vare il bordo anteriore del cuscino del sedile per aumentare le pedane in caso di sollevamento.
  • Seite 171 Ostacoli Parcheggio e trasferimento Carico e sollevamento Sollevare le protezioni antiribaltamen- Far arretrare Carony in modo che le Abbassare completamente Carony con to. Utilizzare il bordo posteriore della ruote anteriori siano rivolte in avanti. la manovella, sollevare le protezioni anti-...
  • Seite 172 Ruotare l’unità nel veicolo verso l’esterno. Avvicinare Carony all’indietro. Regolare l’altezza di ancoraggio con la manovella. Ancorare Carony all’unità nel veicolo. Il corretto an- coraggio è confermato da un clic su entrambi i lati. Bloccare il freno di stazionamento e sollevare le pedane.
  • Seite 173 Carony 16” Abbassare prima di sbloccare, vedere il capitolo sulla compensazione del peso. Disinserire il freno di stazionamento. Sbloccare Carony con le leve su ogni lato. Ruotare nuovamente l’unità nel veicolo verso l’interno. Giù...
  • Seite 174 Avvicinare Carony all’indietro. Regolare l’altezza di ancoraggio con la manovella. Ancorare Carony all’unità nel veicolo. Il corretto an- coraggio è confermato da un clic su entrambi i lati. Bloccare il freno di stazionamento e sollevare le pedane.
  • Seite 175 Carony 16” Abbassare la leva per sbloccare il sedile. Spostare il sedile e bloccarlo su Carony con una pressione decisa. I perni di bloccaggio confermano se il bloccaggio è stato effettuato correttamente, vedere il capitolo sulla sicurezza. Sollevare prima di sbloccare, vedere il capitolo sulla compensazione del peso.
  • Seite 176: Istruzioni Di Manutenzione

    Carony 16” Istruzioni di manutenzione Carony non richiede altri interventi di assistenza, oltre alle seguenti istruzioni per la manutenzione. Pneumatici ..............Ruote posteriori: 16”x1,75” (2-4,5 bar / 30-65 psi) Ruote anteriori: 7”x1,75” (2,5 bar / 36 psi) Assali delle ruote anteriori ........
  • Seite 177 ”Smontaggio del sedile dal telaio”. Durata Carony ha una durata minima prevista di dieci anni se utilizzato secondo le istruzioni e sottoposto a manutenzione come indicato nel manuale dell’utente. La durata effettiva può variare a seconda della frequenza e dell’intensità di utilizzo del prodotto. Se Carony viene utilizzato oltre la durata specifi- cata da BraunAbility, spetta al proprietario verificare che la funzionalità...
  • Seite 178: Regolazione Dei Freni

    Carony 16” Regolazione dei freni Se i freni non si inseriscono correttamente, svitare il dado di bloccaggio e girare la vite di regolazione in senso antiorario per tendere il cavo. Riserrare il dado di bloccaggio per bloccare la nuova posizione.
  • Seite 179: Ricerca Dei Guasti

    Ricerca dei guasti Carony tira da una parte ........Controllare che / - il peso dell’utente sia distribuito su Carony in modo uniforme. - la pressione dei pneumatici sia corretta. - i freni delle ruote o dell’assistente non siano inseriti.
  • Seite 180 Carony 16” Per maggiori informazioni su Carony e per qualsiasi domanda relativa alla garanzia, contattare l’instal- latore. In qualità di rivenditore autorizzato BraunAbility, l’installatore può sempre contare su informa- zioni aggiornate e supporto competente. I seguenti dati relativi a Carony sono riportati sull’etichetta argentata sul lato anteriore del telaio di Carony.
  • Seite 181: Specifiche Tecniche

    Carony 16” Specifiche tecniche Dimensioni Dati del prodotto Min Max A, lunghezza ..........71 cm Peso max dell’utente .......120 kg Inclinazione del piano B, larghezza ..........64 cm di seduta, ° ..........15° ..22° Peso del prodotto ........15.5 kg (pedana e sedile esclusi) C, altezza ..........
  • Seite 182 Carony 16” Introduzione per utenti L’obbiettivo di BraunAbility Europe AB è che l’utente si senta sicuro e a suo agio con il prodotto; a questo scopo, l’installatore ha il compito di esaminare i seguenti capitoli con voi / Sicurezza Se sorgessero eventuali domande in futuro, vi preghiamo di contattare nuovamente l’installatore.
  • Seite 183: Elenco Dei Ricambi

    Carony 16” Elenco dei ricambi Per Carony 16” sono disponibili i seguenti ricambi. Per ordinazione e montaggio, rivolgersi al rivendi- tore. I contatti di tutti i rivenditori sono riportati sul sito www.autoadapt.com. Codice Ricambio Codice Ricambio 401360 Protezione 401357 Meccanismo...
  • Seite 186 EN 12183 Sweden ISO 3795 ISO 7176: 1-18 Phone: +46 302 254 00 ISO 1021-1 E-mail: info @braunability.eu ISO 1021-2 www.braunability.eu BraunAbility Europe AB, Stenkullen Declares that the product / 2019-04-02 Carony, model 16” left/right Jan M Jensen Managing Director...
  • Seite 187 Accredited by SWEDAC as testing laboratory in accordance with ISO/IEC 17025:2005 Quality system certified in accordance with ISO 9001:2015 Illustrations, descriptions and specifications in the user manual are based on current product information. BraunAbility Europe AB reserves the right to make alterations without previous notice. © 2019 BraunAbility Europe AB...
  • Seite 188 BraunAbility Europe AB Åkerivägen 7 Phone: +46 302 254 00 443 61 Stenkullen E-mail: info@braunability.eu Sweden www.braunability.eu...

Inhaltsverzeichnis