Brunner Sit2GO 2.0 Aufbauanleitung
Telescopic outdoor stool

Inhaltszusammenfassung für Brunner Sit2GO 2.0
- Seite 1 • Setup Instructions • Aufbauanleitung • Istruzíoni di montaggio • Instructions de montage • Montage-instructies • Instrucciones de montaje Sit2GO 2.0 Telescopic Outdoor Stool Art. 0404101N.C20 brunneroutdoor.com...
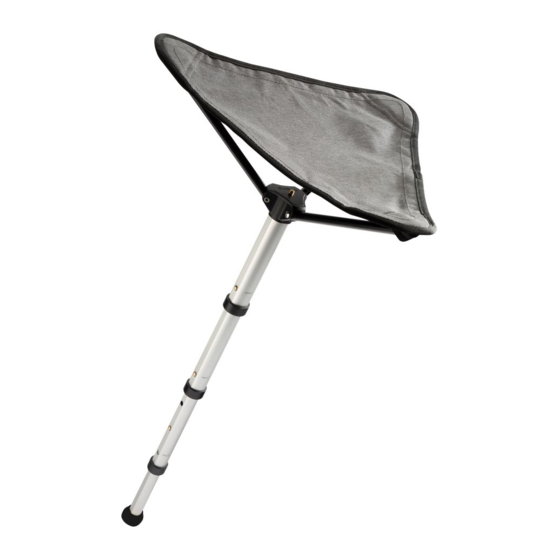
- Seite 2 Sit2Go 2.0 Wir gratulieren zum Kauf Ihres neuen Sit2Go Teleskophockers. Sie verfügen jetzt über einen hochwertigen Alu-Teleskophocker mit sehr kompakten Abmessungen. Für optimale Verwenung – verwenden Sie die Bedienungsanleitung! Vor der Verwendung und für eine optimale Ausnutzung Ihres Sit2Go, ist es wichtig, über dessen Einsatz- und Anwendungsmöglichkeiten Bescheid zu wissen. Wir empfehlen Ihnen deshalb, diese Bedienungsanleitung gründlich durchzulesen. Das Durchlesen dieser Bedienungsanleitung wird Ihnen deshalb sowohl Zeit als auch unnötige Ärgernisse ersparen. Wenn Sie während des Durchlesens auf dieses Warnzeichen stoßen, bitten wir Sie zu bemerken, daß hier Schadensgefahr an Benutzer(in) bzw. Gerät möglich ist. Aufbau: Alugestell und Sitzbezug aus dem Packbeutel entnehmen (Abb. 1) Das teleskopierbare Hocker-Standbein komplett ausziehen (4 Elemente müssen sichtbar sein) (Abb. 2). Wichtig. Immer darauf achten, dass alle Elemente bis zum Anschlag ausgezogen - und eingerastet sind! Sitzbezug montieren: Auflagearme des Gestells nach oben ausrichten und in die entsprechenden Ecktaschen an der Unterseite des Sitzbezuges bis zum Anschlag einführen (Abb. 3). Bitte beachten: Die Ecktasche mit der angenähten Zuglasche muss als letzte mit dem Auflagearm belegt werden. Durch leichtes Ziehen der Zuglasche erhält der Sitzbezug die nötige Vorspannung. Höheneinstellung (2 Varianten): a) Durch Verstellung des letzten Segments (Einrastknopf) - 3 Verstellmöglichkeiten (Abb. 4) b) Durch das Teleskopieren der einzelnen Elemente - 2 Verstellmöglichkeiten (Abb. 5) Bitte beachten: Bei Verstellmöglichkeit b) immer den jeweils oberen Einrastknopf betätigen. Dabei darauf achten, dass die teleskopierbaren Elemente fest eingerastet sind. Ihr Sit2Go Teleskophocker ist nun einsatzbereit. Abbau: Durch Drücken des oberen Einrastknopfes (Abb. 6) bei gleichzeitigem Einschieben aller Elemente wird das teleskopierbare Hockerbein wieder in die Anfangsposition gebracht. Sitzbezug vom Gestell lösen. (Abb. 7) Gestell und Sitzbezug im Packbeutel verstauen. (Abb. 8) D - GB brunneroutdoor.com...
- Seite 4 Sit2Go 2.0 Abb./Fig. 1 Abb./Fig. 2 Abb./Fig. 3 Abb./Fig. 4 Abb./Fig. 5 Abb./Fig. 6 Abbildung 8 Abb./Fig. 7 BITTE BEACHTEN: Maximale Belastbarkeit 120 kg...