Inhaltsverzeichnis
Werbung
Verfügbare Sprachen
Verfügbare Sprachen
Quicklinks
Werbung
Kapitel
Inhaltsverzeichnis

Inhaltszusammenfassung für Rothenberger Industrial RO-DETECTOR
- Seite 1 I N D U S T R I A L anleitung Bitte lesen und aufbewahren Digitales Ortungs- I N D U S T R I A L gerät RO-DETECTOR I N D U S T R I A L Art.-Nr. 1500001135 1500001135_Anleitung_DE,GB,FR.indb 1 03.07.15 09:48...
-
Seite 2: Inhaltsverzeichnis
Einleitung Herzlichen Glückwunsch zum Kauf des RO-DETECTOR. Mit diesem Ortungsgerät lassen sich Metallobjekte, stromführende Leitungen sowie Holzobjekte in Wänden, Decken und Fußböden orten. Durch die präzise Messung wird das Risiko, bei einer möglichen Bohrstelle elektrische Leitungen, Wasserrohre oder Armierungseisen anzubohren, deutlich minimiert. -
Seite 3: Allgemeine Sicherheitshinweise
Allgemeine Sicherheitshinweise - Kontrollieren Sie das Gerät vor jedem Gebrauch auf einwandfreien Zustand. Sollten Sie Zweifel haben, kontaktieren Sie bitte einen Fachmann oder die auf der Rückseite genannte Serviceniederlassung. - Benutzen Sie niemals ein schadhaftes Gerät. - Schützen Sie das Ortungsgerät vor Feuchte und direkter Sonneneinstrahlung. - Im Falle von Beschädigungen lassen Sie das Gerät nur von autorisiertem Fachpersonal und nur mit Originalteilen reparieren. -
Seite 4: Bestimmungsgemäße Verwendung
- Prüfen Sie vor dem Einlegen der Batterien, ob die Kontakte im Gerät und an den Batterien sauber sind und reinigen Sie diese gegebenenfalls. - Vertauschen Sie niemals die Polarität. Achten Sie darauf, dass die Pole Plus (+) und Minus (-) korrekt eingesetzt sind, um Kurzschlüsse zu vermeiden. - Laden Sie niemals Batterien (es sei denn, diese Option ist ausdrücklich angegeben), es besteht Explosionsgefahr! - Schließen Sie die Batterien niemals kurz. -
Seite 5: Technische Information
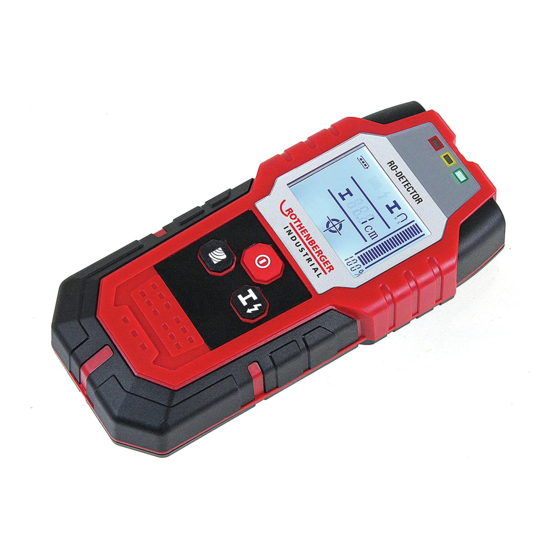
Technische Information Lieferumfang - Ortungsgerät - 9 Volt Blockbatterie - Gürteltasche Teile- und Tastenbezeichnung 1. Status-LEDs (rot, gelb, grün) 2. Display / Anzeige 3. Holzortungstaste 4. Ortungstaste für Metall / stromführende Leitungen 5. Ein/Aus-Taste 6. Sensorbereich 7. Batteriefachdeckel Der Messbereich des Sensors ist durch einen Kreis auf der Unterseite des Ortungsgerätes gekennzeichnet. - Seite 6 Symbole auf der Anzeige a. Anzeige Holzortung b. Anzeige von stromführenden Leitungen c. Anzeige Metallortung d. Anzeige eisenhaltige / nicht eisenhaltige Metalle e. Visier Messanzeige (Signalstärke in %) g. Tiefenanzeige Metall (cm) h. Batterieanzeige Technische Daten Modell MK08 maximale Ortungstiefe:* eisenhaltiges Metall 80 mm nichteisenhaltiges Metall...
-
Seite 7: Funktionsweise
Funktionsweise Das Ortungsgerät erzeugt mithilfe einer Sensorspule ein stabiles elektromagnetisches Feld. Dieses Magnetfeld induziert Wirbelströme in das Prüfobjekt. Da unterschiedliche Materialien elektromagnetische Mikrowellen unterschiedlich absorbieren, ermöglicht dies dem Benutzer nicht nur das geortete Objekt, sondern auch die relative Entfernung und Position des Objekts zu bestimmen. Vorbereitung für die Inbetriebnahme Batterien einsetzen / wechseln Das Ortungsgerät ist batteriebetrieben, eine 9 Volt Blockbatterie ist zu verwenden. -
Seite 8: Betriebsbereitschaft Herstellen / Gerät Kalibrieren
Signalton ein- und ausschalten Der Signalton ist bei Erstbenutzung des Gerätes automatisch eingeschaltet. - Um diesen auszuschalten, drücken Sie die Ortungstaste für Metall / stromführende Leitungen (4) sowie die Holzortungstaste (3) gleichzeitig. Der Ton ist nun ausgeschaltet. - Um diesen wieder einzuschalten, wiederholen Sie den Vorgang. - Seite 9 Ortung von Metallobjekten - Befindet sich das Gerät noch nicht im Metallortungsmodus, drücken Sie bitte die Ortungstaste für Metall / stromführende Leitungen (4). Das Symbol für Metallortung (c) wird angezeigt und die grüne Status-LED zeigt an, dass das Gerät betriebsbereit ist. Falls die grüne LED nicht aufleuchtet, gehen Sie vor, wie oben unter „Betriebsbereitschaft herstellen / Gerät kalibrieren“...
- Seite 10 Wenn das Gerät ein sehr starkes und deutliches Signal empfängt, erscheinen darüber hinaus folgende Symbole auf der Anzeige: - „Visier“-Symbol, wenn sich der Sensorbereich des Gerätes direkt über dem georteten Material befindet (e). - Anzeige in cm, in welcher Tiefe sich das Material befindet (g).
- Seite 11 - Gleiten Sie mit dem Ortungsgerät mehrere Male über die zu untersuchende Oberfläche. Das Ortungsgerät sollte dabei den Kontakt zur Oberfläche nicht verlieren. Je öfter Sie mit dem Ortungsgerät über einen Flächenbereich gleiten, desto genauer kann die Position der stromführenden Leitung lokalisiert werden.
- Seite 12 Ortung von Holzobjekten - Platzieren Sie das Gerät zuerst auf die zu untersuchende Oberfläche. - Drücken Sie die Holzortungstaste (3). Das Symbol für Holzortung (a) wird angezeigt und die grüne Status-LED zeigt an, dass das Gerät betriebsbereit ist. - Gleiten Sie mit dem Ortungsgerät mehrere Male über die zu untersuchende Oberfläche.
-
Seite 13: Absichern Der Messergebnisse
- Wenn das Gerät ein sehr starkes und deutliches Signal empfängt, erscheint darüber hinaus das „Visier“-Symbol (e) auf der Anzeige, wenn sich der Sensorbereich des Gerätes direkt über dem georteten Holzobjekt befindet. Achtung: Falls das Gerät während der Messung plötzlich dauerhaft ein Holzobjekt anzeigt, egal auf welcher Position es sich befindet, muss es evtl. -
Seite 14: Fehlererkennung Und Behebung
Fehlererkennung und Behebung Störung Mögliche Ursache Behebung Gerät zeigt Bild nicht oder Batterie zu schwach oder Batterie wechseln. nur schwach an. leer. Gerät lässt sich nicht Batterie zu schwach oder Prüfen Sie, ob eine Batterie einschalten. nicht eingesetzt. eingesetzt ist bzw. wechseln Sie die Batterie. -
Seite 15: Recycling
Recycling Dieses Symbol weist darauf hin, dass dieses Produkt gemäß Richtlinie über Elektro- und Elektronik-Altgeräte (2002/96/EG) und nationalen Gesetzen nicht über den Hausmüll entsorgt werden darf. Dieses Produkt muss bei einer dafür vorgesehenen Sammelstelle abgegeben werden. Dies kann z.B. durch Rückgabe beim Kauf eines ähnlichen Produkts oder durch Abgabe bei einer autorisierten Sammelstelle für die Wiederaufbereitung von Elektro- und Elektronik-Altgeräte geschehen. -
Seite 16: Ec-Konformitätserklärung
Digitales Ortungsgerät Typen- / Modellbezeichnung: MK08 Seriennummer/Chargennummer: 11-489 – 2015-08 Handelsbezeichnung: ROTHENBERGER INDUSTRIAL Digitales Ortungsgerät RO-DETECTOR Einschlägige EG-Richtlinien: - EG-Richtlinie über elektromagnetische Verträglichkeit (EMV) 2004/108/EG - EU-Richtlinie zur Beschränkung der Verwendung bestimmter gefährlicher Stoffe in Elektronikgeräten (RoHS) 2011/65/EU Angewandte harmonisierte Normen: EN 55022:2010;... - Seite 17 I N D U S T R I A L manual Read carefully and keep safe for future reference Digital Detector I N D U S T R I A L RO-DETECTOR I N D U S T R I A L Art. No. 1500001135 1500001135_Anleitung_DE,GB,FR.indb 17 03.07.15 09:48...
-
Seite 18: Symbols Used In This Manual
Introduction Congratulations on purchasing the RO-DETECTOR. The digital detector is designed to locate metal objects, electrical cables as well as wooden objects in walls, ceilings and floors. The precise measuring capacity of the device minimises the risk of damaging electrical cables, water pipes or reinforcing rods when drilling through surfaces. -
Seite 19: General Safety Instructions
General Safety Instructions - Check that the device is in good condition each time you wish to use it. If in doubt contact a qualified person or the service centre listed on the back cover of this manual. - Never use a damaged device. - Store in a dry place and keep out of direct sunlight - Repairs may only be carried out at an authorised, qualified personnel. -
Seite 20: Scope Of Use
- Never short circuit batteries. - Never disassemble or deform batteries due to the risk of injury to your hands and fingers; fluid could leak from the battery and come into contact with your skin or eyes. If battery fluid does come into contact with your skin or your eyes, rinse the affected area with fresh running water and consult a doctor immediately. -
Seite 21: Technical Specifications
Technical specifications Scope of delivery - Digital detector - 9V block battery - Belt pouch Features 1. Status lights (red, yellow, blue) 2. Display 3. Wood detection mode button 4. Metal / Live wire detection button 5. ON/OFF button 6. Sensor area 7. - Seite 22 Symbols on the display a. Wood symbol b. Live cable symbol c. Metal symbol d. Ferrous / non ferrous metal symbol e. Target aim Measurement display (signal strenght in %) g. Metal depth display (cm) h. Battery status Technical specifications for Model MK08 Maximum detection depth:* ferrous metal: 80 mm...
-
Seite 23: Before Using The Device
Function of the device The detector produces a stable electromagnetic field with the help of a sensor coil. This magnetic field induces eddy currents in the object being tested. As different materials absorb electromagnetic microwaves in different ways, the device makes it possible not only to detect the object but to determine its exact location and range. - Seite 24 Switching the signal tone on/off The signal tone is automatically switched on upon first use. To switch the signal tone off press the metal / live wire button (4) and the wood detection button (3) simultaneously. The signal tone is now switched off. - To turn the signal tone on, repeat the steps above.
- Seite 25 Detecting metal objects Should the device not already be in metal detection mode, press the metal / live wire detection mode button (4). The metal detection symbol (c) will be displayed and the green LED status light indicates the device is ready for use. In case the green LED light is not on proceed as described in the "Preparing for use / calibrating the device"...
- Seite 26 When the device picks up a very strong, clear signal the following symbols will be displayed: - Target symbol: shows when the device is directly over the material being scanned for (e). - Display in cm: the depth at which the scanned material lies beneath the surface (g).
- Seite 27 - Slide the detector several times over the surface area to be examined. Ensure contact with the surface is not lost during this process. Sliding the detector several times over the surface being tested will provide a more precise location of the electric cable.
- Seite 28 Detecting wood Place the device on the surface of the material to be scanned. Press the wood detection button (3). The wood detection symbol (c) will be displayed and the green LED status light indicates the device is ready for use. - Slide the detector several times over the surface area to be examined.
-
Seite 29: Saving Detection Results
When the device picks up a clear, strong signal a crosshairs will appear over the target aim (e) when the detector is directly over the wood. Caution: In the case the device shows a constant positive wood detection result over a large surface area, the device may need to be calibrated. -
Seite 30: Troubleshooting
Troubleshooting Possible cause Fault Solution Blank or faded display. Battery weak or empty. Change the battery. Machine cannot be switched Battery too weak or not Check that the battery is inserted. inserted or change the battery. Results are obviously Calibrate the device Calibrate the device as incorrect (for example the described in the "preparing... - Seite 31 Recycling This symbol indicates that this product may not be disposed of together with domestic waste in compliance with the (2002/96/EC) directive pertaining to waste electrical and electronic devices (WEEE). This product must be handed in at an designated collection point. This can occur, for example, by returning it when a similar product is purchased or by handing it in at an authorised collecting point for the recycling of waste electrical and electronic equipment.
-
Seite 32: Ec - Declaration Of Conformity
Serial number / Lot number: 11-489 – 2015-08 Trade name: ROTHENBERGER INDUSTRIAL Digital Detector RO-DETECTOR Appropriate EC directives: - EC – Directive on electromagnetic compatibility (EMC) 2004/108/EC - Directive 2011/65/EU on the restriction of the use of certain hazardous substances... - Seite 33 I N D U S T R I A L d'utilisation À lire et à conserver Détecteur numérique I N D U S T R I A L RO-DETECTOR I N D U S T R I A L Réf. 1500001135 1500001135_Anleitung_DE,GB,FR.indb 33 03.07.15 09:48...
- Seite 34 Introduction Nous vous félicitons pour l’achat de votre RO-DETECTOR. Ce détecteur vous permet de localiser des objets métalliques, des conduites électriques ainsi que des objets en bois dans les murs, les plafonds et les sols. La mesure précise réduit considérablement le risque de percer des conduites électriques, des canalisations d'eau ou des métaux d'armement.
-
Seite 35: Consignes Générales De Sécurité
Consignes générales de sécurité - Contrôlez que l'appareil est en parfait état avant chaque utilisation. En cas de doute, contactez un spécialiste ou l'antenne de service indiqué au verso. - N'utilisez jamais un appareil endommagé. - Protégez votre détecteur de la chaleur et des rayons directs du soleil. - En cas de dommage, ne faites réparer l'appareil que par des spécialistes agréés et uniquement avec des pièces originales. -
Seite 36: Utilisation Conforme Au But Prévu
- Avant d'introduire les piles, assurez-vous que les contacts dans l'appareil et sur les piles sont propres et nettoyez-les le cas échéant. - Faire attention à la polarité. Veillez à ce que les pôles Plus (+) et Moins (-) sont correctement positionnés afin d'éviter tout court-circuit. -
Seite 37: Information Technique
Information technique Étendue de la livraison - Détecteur - Pile carrée de 9 V - Sac à bandoulière Descriptions des éléments et des touches 1. LED d'état (rouge, jaune, verte) 2. Affichage / écran 3. Touche de localisation 4. Touche de localisation pour les conduites métalliques/électriques 5. - Seite 38 Symbole sur l'afficheur a. indicateur détection du bois b. indicateur des conduites électriques c. indicateur détection du métal d. indicateur des métaux ferreux / non ferreux e. viseur indicateur de mesure (puissance du signal en %) g. indicateur de profondeur du métal (cm) h.
-
Seite 39: Préparation Pour La Mise En Service
Mode de fonctionnement Le détecteur génère à l'aide d'une bobine de capteur un champ électromagnétique stable. Ce champ magnétique induit des courants de Foucault sur l'objet de test. Étant donné que les différents matériaux n'absorbent pas les micro-ondes électromagnétiques de la même façon, cela permet à l'utilisateur de déterminer non seulement l'objet détecté, mais aussi la position et la distance relative de l'objet à... - Seite 40 Marche / arrêt du signal sonore Le signal sonore est automatiquement commuté lors de la première utilisation de l'appareil. - Pour le désactiver, appuyez simultanément sur la touche de détection des métaux/conduites électriques (4) et la touche de détection du bois (3). Le son est maintenant coupé.
- Seite 41 Détection des objets métalliques - Si l'appareil ne se trouve pas encore en mode de détection des métaux, appuyez sur la touche de détection des métaux/ conduites électriques (4). Le symbole de détection des métaux (c) est affiché et la LED d'état verte indique que l'appareil est prêt à...
- Seite 42 Lorsque l'appareil reçoit un signal fort et clair, les symboles suivants s'affichent : - Symbole de « viseur » lorsque le périmètre du capteur est directement au dessus de l'objet localisé (e). - Indication en cm de la profondeur de l'objet (g).
- Seite 43 - Faites glisser à plusieurs reprises le détecteur sur la surface à explorer. Le détecteur ne doit pas perdre le contact avec la surface pendant l'opération. Plus vous ferez glisser votre détecteur sur le périmètre de la surface et plus la position de la conduite électrique sera localisée avec précision.
- Seite 44 Détection des objets en bois - Placez d'abord l’appareil au dessus de la surface à explorer. - Appuyez sur la touche de détection du bois (3). Le symbole de détection du bois (a) est affiché et la LED d'état verte indique que l'appareil est prêt à fonctionner.
-
Seite 45: Sauvegarder Les Résultats De Mesure
- Lorsque l'appareil reçoit un signal fort et clair, le(s) symbole(s) de « viseur » s'affiche(nt) lorsque le périmètre du capteur est directement au dessus de l'objet en bois localisé. Attention : si soudain l'appareil affiche en permanence pendant la mesure un objet en bois, indépendamment de la position dans laquelle il se trouve, celui-ci devra éventuellement être recalibré. -
Seite 46: Identification Et Élimination Des Défauts
Identification et élimination des défauts Défaut Causes possibles Mesures à prendre L'image ne s'affiche pas ou Pile déchargée ou vide Remplacer la pile. faiblement seulement. L'appareil ne se met plus en La pile est déchargée ou non Vérifiez que la pile est bien marche. - Seite 47 Recyclage Ce pictogramme signale que le produit ne doit pas être éliminé dans les ordures ménagères, conformément aux directives relatives aux appareils électriques et électroniques usés (2002/96/CE) et à la réglementation nationale. Ce produit doit être remis à un centre de récupération prévu à cet effet. Ceci peut se faire soit en rendant le produit, lors de l'achat d'un article analogue, soit en le remettant à...
-
Seite 48: Attestation De Conformité Ce
MK08 Numéro de série / de lot : 11-489 – 2015-08 Désignation commerciale : ROTHENBERGER INDUSTRIAL Détecteur numérique RO-DETECTOR Réglementation CE en vigueur : - Réglementation CE concernant la compatibilité électromagnétique (CEM) 2004/108/CE - Directive européenne relative à la limitation de l’utilisation de certaines substances dangereuses dans les équipements électriques et électroniques (RoHS) 2011/65/EU... - Seite 49 1500001135_Anleitung_DE,GB,FR.indb 49 03.07.15 09:48...
- Seite 50 1500001135_Anleitung_DE,GB,FR.indb 50 03.07.15 09:48...
- Seite 51 1500001135_Anleitung_DE,GB,FR.indb 51 03.07.15 09:48...
- Seite 52 © 2014-2015. This publication is subject to copyright and must not be reproduced, copied or otherwise used in any way or for any purpose without the consent in writing of: Rothenberger Industrial GmbH, 65779 Kelkheim, Germany 1500001135_Anleitung_DE,GB,FR.indb 52 03.07.15 09:48...