Inhaltsverzeichnis
Werbung
Verfügbare Sprachen
Verfügbare Sprachen
Quicklinks
NXC5200
Wireless LAN Controller
Firmware v1.00
Edition 1, 04/2010
DEFAULT LOGIN DETAILS
IP Address:
Username:
Password:
CONTENTS
中文
www.zyxel.com
https://192.168.1.1
admin
1234
3
19
37
53
69
87
105
121
Copyright 2010
ZyXEL Communications Corporation
Werbung
Inhaltsverzeichnis

Verwandte Anleitungen für ZyXEL NXC5200


Inhaltszusammenfassung für ZyXEL NXC5200
-
Seite 1: Inhaltsverzeichnis
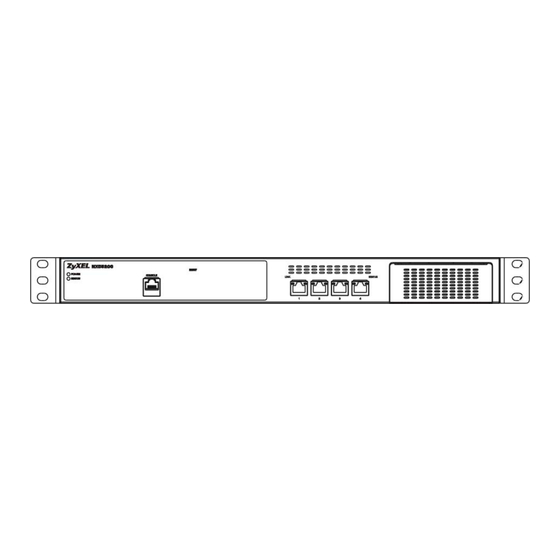
NXC5200 Wireless LAN Controller Firmware v1.00 Edition 1, 04/2010 DEFAULT LOGIN DETAILS IP Address: https://192.168.1.1 Username: admin Password: 1234 CONTENTS ENGLISH DEUTSCH ESPAÑOL FRANÇAIS ITALIANO РУССКИЙ 简体中文 中文 Copyright 2010 ZyXEL Communications Corporation www.zyxel.com... - Seite 2 Device Panels POWER CONSOLE RESET ETHERNET PORTS & PORT 1 ~4 STATUS LEDS RESET POWER POWER FANS SWITCH PLUG SWITCH...
-
Seite 3: How It Works
How It Works The NXC5200 (A) connects to a number of Power over Ethernet (PoE) switches, such as the ES-2024PWR (B). They connect to the NWA5160N Access Points (C), which in turn provide access to the... -
Seite 4: Hardware Connections
1. Connect the NXC5200 to the device that manages your connection to the network (A) using an RJ-45 cable. If you intend for a high number of wireless clients to connect to the NXC5200, you may want to also use a DHCP server to issue IP addresses (B) and an authentication server (C) to handle login requests. - Seite 5 ENGLISH 3. Connect the NWA5160N Access Points to the PoE device using standard 8-wire RJ-45 cables. 4. Finally, plug in the NXC5200 using the provided power cord. NXC5200 Management The NXC5200 Web Configurator allows easy setup and management using an Internet web browser.
- Seite 6 Apply. If you change the password then later forget it, you can use the RESET button on the NXC5200’s front panel to restore the device its default settings, including the administrator password.
- Seite 7 Guide or the Web Configurator’s built-in online help. You can also reference the included CLI Reference Guide, which offers detailed information on managing the NXC5200 through the command line over Telnet or by Console port. Whenever you make any changes in the Web Configurator, always...
-
Seite 8: System Settings
System Settings The NXC5200 Configuration > System screens allow you to configure various device-specific settings, such as Host Name, Domain Name, Language, and DNS, to name a few. - Seite 9 ENGLISH IP Setting By default, the NXC5200 is set up to be connected to an upstream gateway for WAN access and you do not need to make any special configuration changes to it. The upstream device should have a connected DHCP server running to provide all IP addresses for downstream devices, including the connected APs.
- Seite 10 Select Use Fixed IP Address, enter the new IP address and subnet mask of the NXC5200, then click OK to save your changes. 4. Once the NXC5200’s IP has been changed, you must then put the management computer in the same subnet in order to re-connect to...
- Seite 11 Wireless Security Settings It is strongly encouraged that you configure network security for your wireless APs. While traffic entering the NXC5200 from upstream is (presumably) monitored by the upstream device, traffic coming into it from the downstream APs is only as safe and as secure as the settings you configure on the NXC5200.
- Seite 12 3. On the Edit Radio Profile screen, scroll down to the MBSSID Settings, select the first SSID Profile (default) and click OK. 4. Next, click the SSID tab, select the Security List sub-tab. 5. Select the default profile and click Edit.
- Seite 13 ENGLISH 6. In the Edit Security Profile screen, select a Security Mode and then configure it appropriately. (For details on the different security modes, see the included User’s Guide). All wireless clients will then need to use the same security mode and pre-shared key (if any) as the APs on your wireless network.
- Seite 14 8. On the Edit AP screen, select default from the Radio 1 Profile list. The default Security Profile object is linked to the default SSID object, which in turn is linked to the default Radio Profile object. This last step ties all three to the AP.
- Seite 15 ENGLISH Firewall The firewall can block or allow services that use static port numbers. It can also limit the number of user sessions. By default, the NXC5200’s firewall is turned off. To enable and configure it, click Configuration > Firewall.
-
Seite 16: Online Help
You can learn more about the NXC5200 in the included documentation. User’s Guide The User’s Guide contains details on every aspect of the NXC5200, from hardware installation to the Web Configurator screens and fields. It is located as a PDF file on the included product disc. - Seite 17 To view the certifications for your product: 1. Go to www.zyxel.com. 2. Select your product from the drop-down list box on the ZyXEL home page to go to that product's page. 3. Select the certification you wish to view from this page.
-
Seite 19: Einführung
DEUTSCH DEUTSCH Einführung Der ZyXEL NXC5200 Wireless LAN Controller ist für bis zu 240 ZyXEL NWA5160N Access Points vorgesehen und bietet damit Ihrem Unternehmen oder Ihrer Umgebung eine breite LAN-Abdeckung. Mit dem NXC5200 können Sie alle angeschlossenen Access Points über eine zentrale Plattform automatisch verwalten und sichern. -
Seite 20: Anschließen Der Hardware
Anschließen der Hardware So schließen Sie die Hardwareverbindungen an den NXC5200 an: 1. Schließen Sie den NXC5200 mit einem RJ-45-Kabel an das Gerät an, das die Verbindung zum Netzwerk (A) verwaltet. Wenn Sie eine große Anzahl von Wireless Clients an den NXC5200 anschließen möchten, möchten Sie u. - Seite 21 (Informationen zum Einrichten und Konfigurieren des PoE-Geräts finden Sie in der Dokumentation des PoE-Geräts.) 3. Schließen Sie die NWA5160N Access Points mit 8-drähtigen RJ-45- Standardkabeln an das PoE-Gerät an. 4. Schließen Sie das Netzkabel des NXC5200 an das Stromnetz an.
-
Seite 22: Nxc5200 Verwaltung
NXC5200 Verwaltung Der Web-Konfigurator des NXC5200 ermöglicht ein einfaches Einrichten und Verwalten der Geräte über einen Internet-Browser. Wenn Sie den Web-Konfigurator verwenden möchten, • müssen Sie Internet Explorer 7,0 (oder eine neuere Version) oder Firefox 1,5 (oder eine neuere Version) verwenden •... - Seite 23 Änderung, und klicken Sie auf Apply (Übernehmen). Wenn Sie einmal das neue Kennwort vergessen haben sollten, können Sie auf die RESET-Taste an der Vorderseite des NXC5200 drücken, um das Gerät auf die Standardeinstellungen zurückzusetzen. So wird auch das Administrator-Kennwort zurückgesetzt.
- Seite 24 Sie im mitgelieferten Benutzerhandbuch und in der Online-Hilfe des Web-Konfigurators. Sie können auch im mitgelieferten CLI-Referenzhandbuch nachlesen, das ausführliche Beschreibungen zum Verwalten des NXC5200 über die Befehlszeile, über Telnet oder über den Konsolen-Port enthält. Nachdem Sie im Web-Konfigurator Änderungen vorgenommen haben,...
-
Seite 25: Systemeinstellungen
DEUTSCH Systemeinstellungen Im Fenster Configuration > System (Konfiguration > System) des NXC5200 können Sie verschiedene gerätespezifische Einstellungen vornehmen, z. B. den Host-Namen, den Domain-Namen, die Sprache und die DNS festlegen. -
Seite 26: Ip Setting (Ip-Einstellung)
IP Setting (IP-Einstellung) Standardmäßig ist der NXC5200 so eingerichtet, dass er für den WAN- Zugriff an ein Upstream-Gateway angeschlossen werden kann, ohne dass Sie Einstellungen ändern müssen. An das Upstream-Gerät muss ein laufender DHCP-Server angeschlossen sein, um alle IP-Adressen für Downstream-Geräte, einschließlich den angeschlossenen APs, liefern zu können. - Seite 27 Sie zu IP Address Assignment Settings (Einstellungen für die Zuweisung von IP-Adressen). Wählen Sie Use Fixed IP Address (Feste IP-Adresse verwenden), geben Sie die neue IP-Adresse und die Subnetz-Maske des NXC5200 ein, und klicken Sie auf OK, um die Änderungen zu speichern.
-
Seite 28: Einstellungen Für Die Drahtlossicherheit
4. Wenn Sie die IP des NXC5200 geändert haben, müssen Sie den Verwaltungs-Computer in dasselbe Subnetz setzen, um die Verbindung zum Web-Konfigurator wieder herstellen zu können. Einstellungen für die Drahtlossicherheit Es wird dringend empfohlen, die Netzwerksicherheit für Ihre drahtlosen APs zu konfigurieren. Während der Datenverkehr, der von Upstream- Geräten in den NXC5200 gelangt, (wahrscheinlich) von den Upstream-... - Seite 29 DEUTSCH 2. Wählen Sie im Fenster Radio das Objekt default (Standard), und klicken Sie auf Edit (Bearbeiten). 3. Scrollen Sie im Fenster Edit Radio Profile (Radio-Profil bearbeiten) zu MBSSID Settings (MBSSID-Einstellungen), wählen Sie das erste SSID Profile (default) (SSID-Profil (Standard)), und klicken Sie auf 4.
- Seite 30 5. Wählen Sie das Profil default (Standard), und klicken Sie auf Edit (Bearbeiten). 6. Wählen Sie im Fenster Edit Security Profile (Sicherheitsprofil bearbeiten) einen Security Mode (Sicherheitsmodus) aus, und konfigurieren Sie ihn. (Informationen zu den verschiedenen Sicherheitsmodi finden Sie im mitgelieferten Benutzerhandbuch). Alle drahtlosen Clients müssen denselben Sicherheitsmodus und (sofern festgelegt) Pre-shared-Key verwenden wie die APs im Drahtlosnetzwerk.
- Seite 31 DEUTSCH 7. Öffnen Sie das Fenster Configuration > Wireless > AP Management (Konfiguration > Drahtlos > AP-Verwaltung), wählen Sie einen AP, und klicken Sie auf Edit (Bearbeiten). 8. Wählen Sie im Fenster Edit AP (AP bearbeiten) in der Liste Radio 1 Profile (Profil Radio 1) default (Standard).
- Seite 32 Die Firewall kann Dienste blockieren bzw. zulassen, die statische Port- Nummern verwenden. Sie kann auch die Anzahl von Benutzersitzungen beschränken. Standardmäßig ist die Firewall des NXC5200 ausgeschaltet. Um sie zu aktivieren und konfigurieren, klicken Sie auf Configuration > Firewall (Konfiguration > Firewall).
-
Seite 33: Wenn Sie Weitere Informationen Benötigen
Die Anti-Virus-Funktion schützt die an das Netzwerk angeschlossenen Downstream-Clients vor Viren/Spyware. Um sie zu konfigurieren, klicken Sie auf Configuration > Anti-X > Anti-Virus (Konfiguration > Anti-X > Anti-Virus). Wenn Sie weitere Informationen benötigen Weitere Informationen über den NXC5200 finden Sie in der Dokumentation. -
Seite 34: Online-Hilfe
Benutzerhandbuch Das Benutzerhandbuch enthält ausführliche Informationen über jeden Aspekt des NXC5200, von der Hardwareinstallation bis hin zu den Web- Konfigurator-Fenstern und den Eingabefeldern. Es befindet sich als PDF-Datei auf der enthaltenen Disc. Es enthält zudem Lernprogramme und Beispiele für Geräteanwendungen. -
Seite 35: Aufrufen Der Produktzertifikation(En)
So rufen Sie die Zertifikationen Ihres Produkts auf: 1. Zu www.zyxel.com. 2. Wählen Sie Ihr Produkt aus der drop-down Liste in dem Feld auf der ZyXEL Homepage und gehen Sie auf diese Produktseite. 3. Wählen Sie die Zertifizierung, die Sie sehen möchten, auf dieser Seite. -
Seite 37: Cómo Funciona
Cómo funciona El NXC5200 (A) se conecta a hasta un número de switches Power over Ethernet (PoE), como el ES-2024PWR (B). Se conectan a los puntos de acceso NWA5160N (C), los cuales, a su vez, ofrecen acceso a la red a... - Seite 38 Conexiones del hardware Para realizar las conexiones de hardware de su NXC5200: 1. Conecte el NXC5200 al dispositivo que administra su conexión a la red (A) usando un cable RJ-45. Si desea conectar un gran número de clientes inalámbricos al NXC5200, puede que también necesite usar un servidor DHCP para publicar direcciones IP (B) y un servidor de autenticación (C) para administrar las peticiones de inicio de sesión.
- Seite 39 ESPAÑOL 3. Conecte los puntos de acceso NWA5160N al dispositivo PoE con cables estándar RJ-45 de 8 cables. 4. Finalmente, enchufe el NXC5200 con el cable de corriente incluido. NXC5200 Administración El NXC5200 Configurador Web permite una configuración y administración fáciles usando un explorador Web.
- Seite 40 NXC5200, que tiene la dirección IP predeterminada 192.168.1.1. 2. Abra el explorador web y vaya a http://192.168.1.1. Por defecto, el NXC5200 enruta automáticamente esta petición a su servidor HTTPS y se recomienda guardar la configuración. Aparecerá la pantalla Login (Iniciar sesión).
- Seite 41 ESPAÑOL Si ha cambiado la contraseña y la ha olvidado, puede usar el botón RESET del panel frontal del NXC5200 para restaurar el dispositivo a su configuración predeterminada, incluyendo la contraseña del administrador. 5. Se abrirá el Configurador Web, mostrando el Dashboard (Panel).
-
Seite 42: Configuración Del Sistema
Cuando realice cambios en el Configurador Web, recuerde hacer clic en Apply (Aplicar) para guardarlos. Configuración del sistema La pantalla NXC5200 Configuration > System (Configuración > Sistema) le permite ajustar varias configuraciones específicas, como Host Name (Nombre del Host), Domain Name (Nombre del dominio),... - Seite 43 ESPAÑOL Configuración IP Por defecto, el NXC5200 está configurado para ser conectado a una puerta de enlace de subida para acceso WAN y no necesita realizar ningún cambio especial en la configuración. El dispositivo de subida debería tener un servidor DHCP conectado y en ejecución para ofrecer todas las direcciones IP para los dispositivos de bajada, incluyendo los PA conectados.
- Seite 44 IP y máscara de subred para el NXC5200, luego haga clic en OK (Aceptar) para guardar los cambios. 4. Una vez cambiada la IP del NXC5200, deberá poner el ordenador de administración en la misma subred para reconectar con el...
- Seite 45 Se recomienda encarecidamente que configure la seguridad en la red de sus PA inalámbricos. Mientras el tráfico que entra en el NXC5200 desde la subida es (se supone) monitorizado por el dispositivo de subida, el tráfico que entra en él desde los PA de bajada será tan seguro como lo haya configurado en el NXC5200.
- Seite 46 2. En la pantalla Radio, seleccione el objeto default (predeterminado) y haga clic en Edit (Editar). 3. En la pantalla Edit Radio Profile (Editar perfil de radio), desplácese hasta MBSSID Settings (Configuración MBSSID), seleccione el primer SSID Profile (default) y haga clic en OK (Aceptar). 4.
- Seite 47 ESPAÑOL 5. Seleccione el perfil default (predeterminado) y haga clic en Edit (Editar). 6. En la pantalla Edit Security Profile (Editar perfil de seguridad), seleccione un Security Mode (Modo de seguridad) y configúrelo correctamente. (Para detalles sobre los diferentes modos de seguridad, consulte la Guía del usuario incluida).
- Seite 48 7. Abra la pantalla Configuration > Wireless > AP Management (Configuración > Inalámbrico > Administración PA), luego seleccione un PA y haga clic en Edit (Editar). 8. En la pantalla Edit AP (Editar PA), seleccione default (predeterminado) en la lista Radio 1 Profile (perfil Radio 1). El objeto default Security Profile (Perfil de seguridad predeterminado) está...
- Seite 49 El cortafuegos puede bloquear o permitir los servicios que utilizan números de puertos estáticos. También puede limitar el número de sesiones de usuario. Por defecto, el cortafuegos del NXC5200 está apagado. Para habilitarlo y configurarlo, haga clic en Configuration >...
- Seite 50 Puede saber más sobre el NXC5200 en la documentación incluida. Guía del usuario La Guía del usuario contiene detalles sobre cada aspecto del NXC5200, desde la instalación del hardware hasta las pantallas y campos del Configurador Web. Está en formato PDF en el disco incluido con el...
- Seite 51 ESPAÑOL También puede encontrar tutoriales y ejemplos de aplicaciones del dispositivo. Ayuda online Cada pantalla del Configurador Web tiene su propia página de ayuda que ofrece detalles amplios sobre los campos y opciones disponibles. Para verla, simplemente haga clic en el icono de ayuda en la barra de tareas del Configurador Web.
- Seite 52 Para ver las certificaciones de su producto: 1. Vaya a www.zyxel.com. 2. Seleccione su producto de la lista desplegable en la página inicial de ZyXEL para ir a la página de ese producto. 3. Seleccione el certificado que desee visualizar en esta página.
-
Seite 53: Français
Le contrôleur WiFi de ZyXEL NXC5200 fonctionne avec un maximum de 240 points d'accès ZyXEL NWA5160N pour fournir une couverture WiFi dès plus étendu. Le NXC5200 vous permet de fournir et de gérer automatiquement la sécurité de tous les points d'accès connectés à... - Seite 54 Connexions matérielles Pour configurer les connexions de votre NXC5200 : 1. Connectez le NXC5200 à l'appareil qui gère votre connexion au réseau (A) en utilisant un câble RJ-45. Si vous prévoyez qu'un grand nombre de clients WiFi se connecteront au NXC5200, vous pouvez également utiliser un serveur DHCP pour allouer les adresses IP (B)
- Seite 55 4. Enfin, branchez le NXC5200 en utilisant le cordon d'alimentation fourni. NXC5200Gestion Le configurateur Web NXC5200 facilite la configuration et la gestion du contrôleur. Afin d'utiliser le configurateur Web, vous devez: • Utilisez Internet Explorer 7.0 ou Firefox 1.5 (ou supérieur) •...
- Seite 56 192.168.1.3 - 192.168.1.254 avec un masque de sous- réseau 255.255.255.0. Ceci permet de communiquer initialement avec le NXC5200, qui a une adresse IP par défaut de 192.168.1.1. 2. Ouvrez votre navigateur web et allez à l'adresse http://192.168.1.1. Par défaut, le NXC5200 route automatiquement cette requête vers son serveur HTTPS, et il est recommandé...
- Seite 57 Si vous changez le mot de passe, et que vous l'oubliez par la suite, vous pouvez utiliser le bouton RESET (Réinitialiser) sur le panneau avant du NXC5200 pour réinitialiser l'appareil aux valeurs par défaut, y compris le mot de passe de l'administrateur.
-
Seite 58: Paramètres Système
Vous pouvez également vous référer au guide de référence CLI, qui donne des informations détaillées concernant la gestion du NXC5200 avec la ligne de commande de Telnet ou du port de la console. Quand vous modifiez le configurateur Web, rappelez-vous de toujours cliquer sur Apply (Appliquer) pour enregistrer les modifications. - Seite 59 FRANÇAIS Paramètre IP Par défaut, le NXC5200 est configuré pour être connecté à un pare-feu. Vous n'avez pas besoin d'une configuration spéciale pour la modifier. Le pare-feu doit avoir un serveur DHCP connecté pour fournir toutes les adresses IP des appareils en amont, y compris les PA (Points d'Accès) connectés.
- Seite 60 IP et le masque de sous-réseau du NXC5200, puis cliquez sur OK pour enregistrer vos modifications. 4. Une fois que l'IP du NXC5200 a été changée, vous devez alors mettre l'ordinateur de gestion dans le même sous-réseau dans le but...
- Seite 61 Il est fortement recommandé de configurer la sécurité du réseau pour vos PA (Points d'Accès) WiFi. Alors que le trafic entrant dans le NXC5200 est contrôlé par le pare-feu le trafic en provenance du PA est aussi sécurisé que les paramètres que vous configurez sur le NXC5200.
- Seite 62 3. Sur l'écran Edit Radio Profile (Editer le profil radio), faites défiler jusqu'à MBSSID Settings (Paramètres MBSSID), sélectionnez le premier SSID Profile (default) (Profil SSID (défaut)) et cliquez sur 4. Ensuite, cliquez sur l'onglet SSID, et sélectionnez le sous-onglet Security List (Liste de sécurité). 5.
- Seite 63 FRANÇAIS 6. Dans l'écran Edit Security Profile (Editer le profil de sécurité), sélectionnez Security Mode (Mode de sécurité) puis configurez-le de façon appropriée. (Pour plus d'informations concernant les différents modes de sécurité, consultez le manuel de l'utilisateur). Tous les clients WiFi devront alors utilisés le même mode de sécurité et la même clé...
- Seite 64 8. Sur l'écran Edit AP (Editer PA), sélectionnez default (défaut) dans la liste Radio 1 Profile (Profil radio 1). L'objet default Security Profile (Profil de sécurité par défaut) est associé à l'objet default SSID (SSID par défaut), qui en retour est associé...
- Seite 65 Le pare-feu bloque ou autorise les services qui utilisent des ports statiques. Il limite également le nombre de sessions utilisateur. Par défaut, le pare-feu du NXC5200 est désactivé. Pour l'activer et le configurer, cliquez sur Configuration > Firewall (Pare-feu). Anti-virus La fonction d'anti-virus protège les clients en aval connectés au réseau...
-
Seite 66: Pour Plus D'informations
Pour plus d'informations Pour en apprendre plus à propos du NXC5200 , consultez la documentation fournie. Manuel de l'utilisateur Le manuel de l'utilisateur contient des informations concernant tous les aspects du NXC5200, de l'installation du matériel aux écrans/champs du configurateur Web. Il se trouve sous la forme d'un fichier PDF sur le disque fourni avec le produit. - Seite 67 Pour afficher les certifications de votre produit: 1. Allez à www.zyxel.com. 2. Sélectionnez votre produit dans la liste déroulante dans la page d'accueil du ZyXEL pour aller à la page de ce produit. 3. Sélectionnez la certification que vous désirez consulter dans cette page.
-
Seite 69: Come Funziona
ITALIANO ITALIANO Introduzione Il controller LAN wireless ZyXEL NXC5200 opera con fino a 240 Access Point ZyXEL NWA5160N per fornire una copertura LAN wireless completa all'organizzazione o all'area geografica. L'NXC5200 consente di gestire automaticamente e di fornire la sicurezza necessaria per tutti gli Access Point connessi da una piattaforma centrale. - Seite 70 Connessioni hardware Per configurare i collegamenti hardware dell'NXC5200: 1. Collegare l'NXC5200 al dispositivo che gestisce la connessione alla rete (A) utilizzando un cavo RJ-45. Se si prevede l'esistenza di un numero elevato di client wireless che si connettono all'NXC5200, può...
- Seite 71 ITALIANO 3. Collegare gli Access Point NWA5160N al dispositivo PoE utilizzando cavi RJ-45 standard a 8 fili. 4. Infine, collegare l'NXC5200 utilizzando il cavo di alimentazione in dotazione. NXC5200 Gestione Lo Strumento di configurazione Web dell'NXC5200 consente di configurare e gestire semplicemente il sistema utilizzando un browser Internet.
- Seite 72 192.168.1.3 - 192.168.1.254 con una subnet mask uguale a 255.255.255.0. Ciò consente di instaurare la comunicazione iniziale con l'NXC5200, che ha l'indirizzo IP predefinito 192.168.1.1. 2. Aprire il browser e passare alla pagina http://192.168.1.1. Per impostazione predefinita, l'NXC5200 instrada automaticamente questa richiesta al suo server HTTPS (si consiglia di conservare questa impostazione).
- Seite 73 Se si cambia la password e in seguito la si dimentica, sarà possibile utilizzare il tasto RESET che si trova sul pannello anteriore dell'NXC5200 per ripristinare il dispositivo alle sue impostazioni predefinite, inclusa la password dell'amministratore. 5. Si apre lo Strumento di configurazione Web, il quale visualizza la Dashboard (cruscotto delle funzioni).
- Seite 74 È possibile consultare anche la CLI Reference Guide (guida di riferimento CLI) fornita, che contiene informazioni dettagliate sulla gestione dell'NXC5200 da riga di comando via Telnet o tramite la porta Console. Ogni volta che si apporta una qualsiasi modifica nello Strumento di configurazione Web, ricordare sempre di fare clic su Apply (applica) per salvarle.
-
Seite 75: Impostazioni Sistema
ITALIANO Impostazioni sistema Le schermate NXC5200 Configuration > System (configurazione > sistema) consentono di configurare varie impostazioni specifiche del dispositivo, come ad esempio Host Name (nome host), Domain Name (nome dominio), Language (lingua) e DNS. - Seite 76 Impostazioni IP Per impostazione predefinita, l'NXC5200 è configurato per essere connesso a un gateway upstream per l'accesso WAN e non è necessario apportare alcuna modifica di configurazione speciale. Il dispositivo di upstream dovrebbe disporre di un server DHCP connesso e in esecuzione per fornire tutti gli indirizzi IP per i dispositivi downstream, inclusi gli AP connessi.
- Seite 77 IP). Selezionare Use Fixed IP Address (utilizza indirizzo IP fisso), immettere il nuovo indirizzo IP e la nuova subnet mask dell'NXC5200, quindi fare clic su OK per salvare le modifiche. 4. Una volta cambiato l'IP dell'NXC5200, è necessario porre il computer di gestione nella stessa subnet per potersi riconnettere allo Strumento di configurazione Web.
- Seite 78 Anche se è possibile consentire al dispositivo di upstream di gestire tutta la sicurezza del traffico downstream in entrata, ciò non è consigliato. L'NXC5200 dispone di una suite completa di sicurezza per le sue reti wireless ed è consigliabile utilizzarlo per sollevare il dispositivo di upstream di questo carico di lavoro.
- Seite 79 ITALIANO 2. Nella schermata Radio, selezionare l'oggetto default (predefinito) e fare clic su Edit (modifica). 3. Nella schermata Edit Radio Profile (modifica profilo radio), scorrere in basso fino a MBSSID Settings (impostazioni MBSSID), selezionare il primo SSID Profile (default) (profilo SSID predefinito) e fare clic su OK.
- Seite 80 5. Selezionare il profilo default (predefinito) e scegliere Edit (modifica). 6. Nella schermata Edit Security Profile (modifica profilo di sicurezza), selezionare una Security Mode (modalità di sicurezza) e configurarla in modo appropriato (per i dettagli relativi alle diverse modalità di sicurezza, consultare la Guida per l'utente fornita a corredo).
- Seite 81 ITALIANO 7. Aprire la schermata Configuration > Wireless > AP Management (configurazione > Wireless > gestione AP), quindi selezionare un AP e scegliere Edit (modifica). 8. Nella schermata Edit AP (modifica AP), selezionare default (predefinito) dall'elenco Radio 1 Profile (profilo radio 1). L'oggetto default Security Profile (profilo di sicurezza predefiniti) viene collegato all'oggetto default SSID (SSID predefinito), che a sua volta viene collegato all'oggetto default Radio Profile (profilo radio...
- Seite 82 Il firewall può bloccare o autorizzare i servizi che utilizzano numeri di porta statici. Esso può anche limitare il numero di sessioni utente. Per impostazione predefinita, il firewall dell'NXC5200 è disattivato. Per attivarlo e configurarlo, selezionare Configuration (configurazione) > Firewall.
-
Seite 83: Per Ulteriori Informazioni
Nella documentazione fornita in dotazione sono contenute altre informazioni sull'NXC5200. Guida dell'utente La Guida dell'utente contiene i dettagli su ciascun aspetto dell'NXC5200, dall'installazione hardware alle schermate e ai campi dello Strumento di configurazione Web. La guida è disponibile in forma di file PDF memorizzato sul disco fornito a corredo con il prodotto. -
Seite 84: Guida In Linea
Guida in linea In ogni schermata dello Strumento di configurazione Web è presente una pagina di guida corrispondente che contiene dettagli esaurienti sui campi e sulle opzioni disponibili. Per aprirla è sufficiente fare clic sull'icona della guida nella barra delle attività dello Strumento di configurazione Web. - Seite 85 Per visualizzare le certificazione del prodotto: 1. Aprire la pagina www.zyxel.com. 2. Selezionare il prodotto dall'elenco di riepilogo a discesa nella Home Page di ZyXEL per passare alla pagina del prodotto in questione. 3. Selezionare da questa pagina la certificazione che si desidera visualizzare.
-
Seite 87: Русский
РУССКИЙ РУССКИЙ Вступление Контроллер беспроводной ЛВС ZyXEL NXC5200 может работать с 240 точками доступа ZyXEL NWA5160N и обеспечивать полное покрытие беспроводной сетью вашей организации и географической зоны. Контроллер NXC5200 позволяет вам автоматически управлять безопасностью подключения всех точек доступа на базе центральной платформы. -
Seite 88: Подключение Оборудования
сети для беспроводных клиентов (D) в зонах их действия. Подключение оборудования Подключение оборудования к NXC5200: 1. Подключите NXC5200 к устройству, которое управляет вашим подключением к сети (A), с помощью кабеля RJ-45.. Если вы планируете подключение к NXC5200 большого количества беспроводных клиентов, то, возможно, вы захотите также... - Seite 89 портов Ethernet контроллера NXC5200 с помощью стандартного 8-жильного кабеля RJ-45. (Просмотрите документацию для устройства PoE, где описана его установка и настройка.) 3. Подключите точки доступа NWA5160N к устройству PoE с помощью стандартного 8-жильного кабеля RJ-45. 4. В заключение, подключите NXC5200 к сети шнуром из комплекта поставки.
- Seite 90 NXC5200 Управление Web Configurator NXC5200 позволяет легко настраивать и управлять устройством через Интернет-браузер. Для использования Web Configurator вы должны: • Использовать Internet Explorer 7.0 (или более позднюю версию) или Firefox 1.5 (или более позднюю версию) • Разрешить всплывающие окна • Включить JavaScript •...
- Seite 91 4. На появившемся экране Update Admin Info (Обновить данные администратора) измените пароль и подтвердите изменение, нажав на кнопку Apply (Применить). Если вы забыли пароль после его изменения, то можно использовать кнопку RESET (Сброс) на передней панели NXC5200 для сброса настроек устройства до значений по умолчанию, включая пароль администратора.
- Seite 92 можно найти в руководстве пользователя или во встроенной справке Web Configurator. Вы также можете обратиться к включенному в комплект поставки справочному руководству CLI, в котором содержится подробная информация по управлению NXC5200 с помощью командной строки через Telnet или порт консоли.
-
Seite 93: Системные Параметры
При любых изменения в Web Configurator вы всегда должны нажимать на кнопку Apply (Применить), чтобы сохранить сделанные изменения Системные параметры Окно NXC5200 Configuration > System (Конфигурация > Система) позволяет устанавливать специфические для устройства параметры: имя хоста, доменное имя, язык и DNS. - Seite 94 Настройки IP По умолчанию для NXC5200 устанавливается подключение в качестве основного шлюза для доступа к WAN, и вам не нужно вносить изменения в эту конфигурацию. Коммутирующее устройство должно быть подключено к DHCP-серверу для выдачи IP-адресов всем устройствам нижнего уровня, включая точки...
- Seite 95 адреса). Выберите значение Use Fixed IP Address (Использовать фиксированный IP-адрес) и введите новое значение IP-адреса и маски подсети для NXC5200, а затем щелкните на кнопке OK для сохранения изменений. 4. После изменения IP-адреса NXC5200 вы будете обязаны разместить управляющий компьютер в той же подсети для...
- Seite 96 на NXC5200 их безопасностью. Вы можете разрешить вышестоящему в структуре сети устройству контролировать безопасность всех поступающих с нижнего уровня данных, но такой подход не рекомендуется. Контроллер NXC5200 обладает мощными функциями безопасности, которые следует использовать для разгрузки вышестоящего в сети устройства.
- Seite 97 РУССКИЙ 2. В окне Radio (Радио) выберите объект default (по умолчанию) и щелкните на Edit (Правка). 3. В окне Edit Radio Profile (Правка профиля радиосигнала) найдите пункт MBSSID Settings (Настройки MBSSID), выберите первый SSID Profile (default) (Профиль SSID (по умолчанию)) и щелкните...
- Seite 98 5. Выберите профиль default (по умолчанию) и щелкните на кнопке Edit (Правка). 6. В окне Edit Security Profile (Правка безопасности профиля) выберите пункт Security Mode (Режим безопасности) и настройте необходимые параметры. (Подробности настройки различных режимов безопасности смотрите в руководстве пользователя). После этого все беспроводные клиенты должны использовать...
- Seite 99 РУССКИЙ 7. Откройте окно Configuration > Wireless > AP Management (Конфигурация > Беспроводная > Управление АР) и щелкните на кнопке Edit (Правка). 8. В окне Edit AP (Правка АР) выберите значение default (по умолчанию) из списка Radio 1 Profile (Профиль радио 1). Объект...
- Seite 100 Межсетевой экран Брандмауэр может блокировать или разрешать службам использовать статические номера портов. Он также может ограничивать число сессий пользователей. По умолчанию брандмауэр NXC5200 отключен. Для его включения и настройки щелкните на пункте Configuration > Firewall (Конфигурация > Брандмауэр).
-
Seite 101: Дополнительная Информация
инфицирования вирусами и spyware. Для его включения и настройки щелкните на пункте Configuration > Anti-X > Anti-Virus (Конфигурация > Анти-Х > Антивирус). Дополнительная информация Вы можете получить дополнительную информацию о NXC5200 в прилагаемой к нему документации. Руководство пользователя Руководство пользователя содержит подробную информацию обо... - Seite 102 На нем же вы сможете найти обучающие курсы и примеры использования устройства. Виртуальная справка Каждое окно Web Configurator имеет собственную страницу справки, на которой приводится подробная информация о полях и опциях. Для ее просмотра просто щелкните на значке справки на панели задач...
- Seite 103 РУССКИЙ Просмотр сертификатов продукта Для просмотра сертификатов этого продукта: 1. Посетите сайт www.zyxel.com. 2. Выберите ваш продукт из выпадающего списка на домашней странице ZyXEL и перейдите на его страницу. 3. Выберите сертификат, который вы хотите просмотреть.
-
Seite 105: 简体中文
简体中文 简体中文 序言 ZyXEL NXC5200 无线 LAN 控制器可与多达 240 个 ZyXEL NWA5160N 访问 点搭配使用,为您的组织或地区提供全面的无线 LAN 网络覆盖。 NXC5200 可允许您通过一个中央平台自动管理所有连入的访问点,并提供 安全性保护。 工作方式 NXC5200 (A) 连接到多台以太网供电 Ethernet (PoE) 交换机,如 ES- 2024PWR (B)。这些交换机连接到 NWA5160N 访问点 (C),后者为其广播 覆盖半径内的无线客户端 (D) 提供网络接入。... - Seite 106 硬件连接 要设置 NXC5200 的硬件连接: 1. 用 RJ-45 线将 NXC5200 连接到管理您的网络连接的设备 (A)。如果 您要将较多数量的无线客户端连接到 NXC5200,可能需要使用 DHCP 服务器来签发 IP 地址 (B),以及身份验证服务器 (C) 来处理登录请 求。 2. 使用标准 8 芯 RJ-45 线将以太网供电 (PoE) 设备连接到 NXC5200 的一个以太网端口。 (有关如何安装和配置 PoE 设备的信息,请参阅该设备随附的文 档。 )...
- Seite 107 简体中文 3. 使用标准 8 芯 RJ-45 线将 NWA5160N 访问点连接到 PoE 设备。 4. 最后,通过随附的电源线将 NXC5200 接入电源。 NXC5200 管理 通过 NXC5200 Web 配置程序,您可使用 Internet 网络浏览器进行便捷 的设置和管理。 若要使用 Web 配置程序,必须满足以下条件: • 使用 Internet Explorer 7.0(或以上版本)或 Firefox 1.5(或以 上版本) • 允许弹出窗口 • 启用 JavaScript •...
- Seite 108 要连接到 Web 配置程序: 1. 将您的计算机设置为使用 192.168.1.3 - 192.168.1.254 范围内的 静态 IP 地址,子网掩码为 255.255.255.0。这样它就能与 NXC5200 (默认 IP 地址为 192.168.1.1)进行初始通信。 2. 打开您的 Web 浏览器,并前往 http://192.168.1.1。默认情况下, NXC5200 会自动将此请求路由至其 HTTPS 服务器 (建议您保留此设 置) 。此时会显示 Login ( 登录 ) 屏幕。 3. 输入 默认的 User Name ( 用户名 )(即 admin)和 Password ( 密码 )(即...
- Seite 109 简体中文 5. 此时会打开 Web 配置程序,显示 Dashboard ( 控制板 )。 有关使用 Web 配置程序的详细信息,请参阅随附的 《用户指南》或 Web 配置程序的内置联机帮助。 您也可以参阅随附的 《CLI 参考指南》 ,其中提供有关使用命令行通过 Telnet 或控制台端口管理 NXC5200 的详细信息。 您在 Web 配置程序中进行任何更改时,请务必单击 Apply ( 应用 ) 以保 存更改。...
- Seite 110 系统设置 NXC5200 的 Configuration > System ( 配置 > 系统 ) 屏幕可用于配置 各种特定于设备的设置,包括主机名、域名、语言 和 DNS 等。...
- Seite 111 进行任何特别的更改。上游设备应已连接运行中的 DHCP 服务器,为包括 所连 AP 在内的下游设备提供所有的 IP 地址。您所要执行的所有操作就 是按照 硬件连接 (第 页)所述连接设备。 配置 NXC5200 的 IP 地址 NXC5200 的默认 IP 地址为 192.168.1.1。本节说明如何将它更改为符 合您网络拓扑的 IP 地址。 1. 依次单击 Configuration > Network > Interface > VLAN ( 配置 > 网络 > 接口 > VLAN)。...
- Seite 112 2. 选择 vlan0,然后单击 Edit ( 编辑 ) 按钮。 Edit Vlan ( 编辑 Vlan) 窗口打开时,向下滚动至 IP Address Assignment Settings (IP 地址分配设置 )。 选择 Use Fixed IP Address ( 使用固定 IP 地址 ), 输入 NXC5200 的 新 IP 地址和子网掩码,然后单击 OK ( 确定 ) 保存您的更改。 NXC5200 的 IP 更改之后,必须将管理计算机放入相同的子网中,...
- Seite 113 简体中文 无线安全性设置 强烈建议您配置无线 AP 的网络安全性。虽然从上游进入 NXC5200 的流 量会由 (假定)上游设备进行监控,但来自下游 AP 的流量仅能按照您 在 NXC5200 所配置的设置来确保安全。 尽管您可以让上游设备处理所有从下游传入流量的安全性,但这并不推 荐。 NXC5200 具有针对其无线网络的综合安全性方案, 应当用它来分担 上游设备的负荷。 1. 依次单击 Configuration > Object > AP Profile ( 配置 > 对象 > AP 配置文件 )。 2. 在 Radio ( 无线设备 ) 屏幕中,选择 default ( 默认 ) 对象,然后...
- Seite 114 3. 在 Edit Radio Profile ( 编辑无线设备配置文件 ) 屏幕中,向下滚 动至 MBSSID Settings (MBSSID 设置 ),选择第一个 SSID Profile (SSID 配置文件 ) (default ( 默认 )) ,然后单击 OK ( 确定 )。 4. 接下来, 单击 SSID 选项卡, 再选择 Security List ( 安全性列表 ) 子选项卡。...
- Seite 115 简体中文 6. 在 Edit Security Profile ( 编辑安全性配置文件 ) 屏幕中,选择 Security Mode ( 安全性模式 ),然后进行适当的配置。 (有关各种安 全性模式的详细信息,请参阅随附的 《用户指南》 。 ) 所有的无线客 户端都将使用与您网路上 AP 相同的安全性模式和预共享密钥。单击 Apply ( 应用 ) 以保存设置。 7. 打开 Configuration > Wireless > AP Management (配置 > 无线 > AP 管理...
- Seite 116 8. 在 Edit AP ( 编辑 AP) 屏幕中, 从 Radio 1 Profile ( 无线设备 1 配置文件 ) 列表中选择 default ( 默认 )。 此 default Security Profile ( 默认安全性配置文件 ) 对象链接到 default SSID ( 默认 SSID) 对象,后者则链接到 default Radio Profile ( 默认无线设备配置文件 ) 对象。此最后的步骤将所有这三 项绑定到...
- Seite 117 简体中文 防火墙 防火墙可以阻止或允许使用静态端口号的服务。它也可限制用户会话的 数量。默认情况下,NXC5200 的防火墙为关闭状态。要启用和配置防火 墙,请单击 Configuration > Firewall ( 配置 > 防火墙 )。 防病毒 防病毒功能可保护连入网络的下游客户端,免受病毒 / 间谍程序感染。 要启用和配置防病毒功能,请单击 Configuration > Anti-X > Anti- Virus ( 配置 > Anti-X > 防病毒 )。...
- Seite 118 更多信息 您可从随附的文档中了解更多有关 NXC5200 的信息。 用户指南 《用户指南》中详细阐述了硬件安装到 Web 配置程序屏幕和栏位等 NXC5200 各个方面的信息。它以 PDF 文件形式存储在随附的产品光盘 中。 其中也包含了教程和设备应用示例。 联机帮助 每个 Web 配置程序屏幕都有其帮助页面,其中有可用栏位和选项的详细 信息。要查看联机帮助,仅需单击 Web 配置程序任务栏中的帮助按钮即 可。...
- Seite 119 简体中文 查看产品证书 要查看您产品的证书: 1. 先访问 www.zyxel.com。 2. 在 ZyXEL 主页的下拉列表框中选择产品,以进入产品页面。 3. 在该页中选择要查看的证书。...
- Seite 121 中文 中文 簡介 ZyXEL NXC5200 無線區域網路控制器可與最多 240 個 ZyXEL NWA5160N 無線基地站合作,為您的機構或地區提供完整的無線區域網路覆蓋。 NXC5200 讓您由一個中央平台自動管理所有連接的基地站並且提供安全管 理。 運作方式 NXC5200 (A) 連接一些乙太網路供電 (PoE) 交換器,如 ES-2024PWR (B)。這些交換器連接 NWA5160N 基地站 (C),而這些基地站在它們的廣 播範圍內提供無線客戶端 (D) 的網路接取。...
- Seite 122 硬體連接 設定 NXC5200 的硬體連接: 1. 利用一條 RJ-45 纜線將 NXC5200 連接到管理連線到網路 ( A) 的裝 置。若準備將許多無線客戶端連接到 NXC5200,則可以考慮也使用一 個 DHCP 伺服器 (B) 來派發 IP 位址,和一個認證伺服器 (C) 來處 理登入要求。 2. 用一條標準的 8 線 RJ-45 電纜將乙太網路供電 (PoE) 裝置連接到 NXC5200 的一個乙太網路埠。 ( 有關架設與配置的資訊,請參考伴隨 PoE 裝置的文件 )
- Seite 123 中文 3. 利用標準的 8 線 RJ-45 電纜將 NWA5160N 基地站連接到 PoE 裝置 。 4. 最後以所提供的電源線將 NXC5200 插入。 NXC5200 管理 網頁設定介面 NXC5200 允許您使用網際網路瀏覽器簡單設定及管理 。 要使用網頁設定介面,必須: • 使用 Internet Explorer 7.0 ( 或更新版本 ) 或 Firefox 1.5 ( 或更 新版本 ) • 允許跳出視窗...
- Seite 124 要連接到網頁設定介面: 1. 設定電腦使用範圍在 192.168.1.3 - 192.168.1.254 靜態的 IP 位 址,子網路遮罩為 255.255.255.0。如此可以在初始時連接 NXC5200,其預設 IP 位址為 192.168.1.1。 2. 開啟網頁瀏覽器,前往 http://192.168.1.1。預設 NXC5200 會自動 將這個要求傳送到其 HTTPS 伺服器,建議要保留這個設定。出現 Login ( 登入 ) 畫面。 3. 輸入 預設的 使用者名稱 (admin) 與 密碼 (1234) ,然後點 Login 按鈕。 4. 在以下的 Update Admin Info ( 更新管理資訊 ) 畫面,按照您的需...
- Seite 125 中文 5. 網頁設定介面開啟,顯示 Dashboard ( 儀表板 ) 。 有關網頁設定介面的細節,請見所附的使用手冊或網頁設定介面的線上 輔助說明。 所附的 CLI 參考手冊提供經由 Telnet 或主控台埠利用命令列管理 NXC5200 的詳細資訊。 在網頁設置器作任何更改時,不要忘記按一下 Apply ( 施用 ) 加以儲 存。...
- Seite 126 系統設定 NXC5200 的 Configuration > System ( 設置 > 系統 ) 畫面可讓您設定 各種裝置專屬的設定,例如 Host Name ( 主機名稱 ) 、Domain Name ( 領域名稱 ) 、語言、 DNS 等。...
- Seite 127 接的 DHCP 伺服器在執行以提供所有下游裝置的 IP 位址,包含連接的基 地站。唯一所需要做的是將裝置連接,如在 硬體連接 的 頁中所說 明。 設定 NXC5200 的 IP 位址 NXC5200 的預設 IP 位址為 192.168.1.1。本節將說明如何將其變更, 以使用一個符合自己網路配置的 IP 位址。 1. 點選 Configuration > Network > Interface > VLAN (設置 > 網路 > 介面 > VLAN) ..
- Seite 128 2. 選擇 vlan0 然後點選 Edit ( 編輯 ) 按鈕。 3. 在 Edit Vlan ( 編輯 Vlan) 視窗開啟後,向下捲動到 IP Address Assignment Settings (IP 位址配置設定 ) 。 選擇 Use Fixed IP Address ( 使用固定 IP 位址 ) , 輸入 NXC5200 的 位址與子網路遮罩,然後按一下 OK 以儲存變更。 4. 在 NXC5200 的 IP 變更後,必須將管理的電腦放在同一個子網路中...
- Seite 129 中文 無線網路安全設定 在此強烈建議您要設定無線基地站的網路安全功能 。 由上游進入 NXC5200 的資料流是由上游的裝置所監控 ( 假如有的話 ),而由下游基地站進入 NXC5200 的資料流的安全性則只能由您在這個裝置的設定來決定。 即使您可以允許上游裝置為進來的下游資料流處理安全問題,我們也不 建議如此做。 NXC5200 在無線網路有一組完備的安全功能組合,這些功 能應該充分利用來解除上游裝置的負擔。 1. 點 Configuration > Object > AP Profile ( 設置 > 物件 > 基地站 組合 ) 2. 在 Radio ( 無線電 ) 畫面,選擇 default ( 預設 ) 物件,然後按...
- Seite 130 3. 在 Edit Radio Profile ( 編輯無線電組合 ) 畫面上,向下捲動到 MBSSID Settings (MBSSID 設定 ) ,選擇第一個 SSID Profile (default) ,然後按一下 OK。 4. 接下來按一下 SSID 頁籤,選擇 Security List ( 安全清單 ) 子頁 籤。 5. 選擇 default 組合然後按一下 Edit ( 編輯 ) 。...
- Seite 131 中文 6. 在 Edit Security Profile ( 編輯安全組合 ) 畫面中,選擇一個 Security Mode ( 安全模式 ) ,然後作適當的設定。 ( 有關不同安全 模式的細節,請見所附的使用手冊 ) 。所有無線客戶端必須使用與您 的無線網路中的基地站相同的安全模式與預設定的共享金鑰 ( 如有的 話 ) 。按一下 OK ( 確定 ) 儲存設定。 7. 開啟 Configuration > Wireless > AP Management ( 設置 > 無線網 路...
- Seite 132 8. 在 Edit AP ( 編輯基地站 ) 畫面上,由 Radio 1 Profile ( 無線電 1 組合 ) 清單上選取 default 。 default Security Profile ( 預設安全組合 ) 物件連結到 default SSID ( 預設 SSID) 物件 , 這個物件再連結到 default Radio Profile ( 預設無線電組合 ) 物件。最後一個步驟將這三個項目連結到無線基 地站。...
- Seite 133 中文 防火牆 防火牆可以阻斷或放行使用固定埠編號的服務。也可以限制使用者會話 (session) 的個數。預設 NXC5200 的防火牆是關閉的。要啟用並加以設 定,請點選 Configuration > Firewall ( 設置 > 防火牆 ) 。 防毒 防毒功能可保護連接在網路上的下游客戶端免受病毒或間諜程式的感染。 要啟用並加以設定,請點選 Configuration > Anti-X > Anti-Virus ( 設置 > Anti-X > 防毒 )。...
- Seite 134 詳細資訊 您可由包含的文件中學習更多有關 NXC5200 的資訊。 使用手冊 使用手冊包含 NXC5200 各種層面的詳細資訊,由硬體安裝到網頁設置器 的畫面與欄位。這個文件是在所附的產品碟片上的一個 PDF 檔案。 裏面也包含指導文件與裝置應用的範例。 線上輔助 每一個網頁設置器的畫面都有自己的輔助頁,提供所有欄位與選項的詳 細說明。要檢視這些說明,只要在網頁設置器的工作列上點下輔助小圖 像即可。...
- Seite 135 中文 檢視產品認證。 若要檢視您的產品的認證資料: 1. 前往 www.zyxel.com。 2. 在 ZyXEL 首頁的下拉式清單方塊選取您的產品,進入該產品的網 頁。 3. 在此頁選取您想查看的認證資料。...