Herunterladen Inhalt Inhalt Diese Seite drucken

Werbung

Verfügbare Sprachen

Verfügbare Sprachen

DataCart
Gebrauchsanleitung DataCart
User Manual DataCart
Mode d´emploi DataCart
Seite 1
Page 6
Page 11

Werbung

Inhaltsverzeichnis
loading

Inhaltszusammenfassung für Dicota DataCart

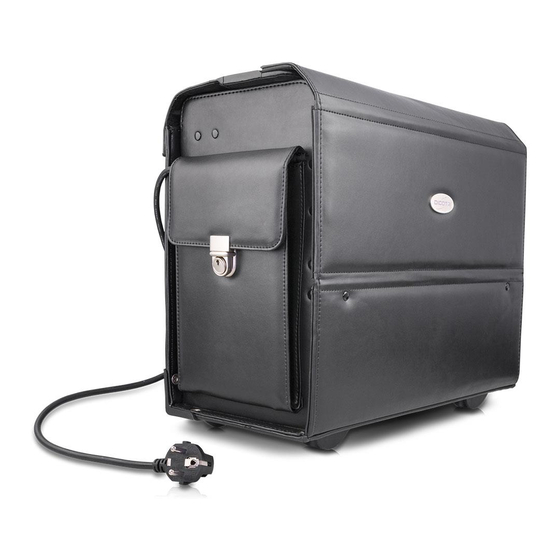
  • Seite 1 DataCart Gebrauchsanleitung DataCart Seite 1 User Manual DataCart Page 6 Mode d´emploi DataCart Page 11...
  • Seite 2: Inhaltsverzeichnis

    Sehr geehrte Kundin, sehr geehrter Kunde, wir danken Ihnen, dass Sie sich für ein DICOTA - Produkt entschieden haben. Bevor Sie Ihre DataCart zum ersten Mal benutzen, lesen Sie bitte die folgende Gebrauchsanleitung sorgfältig durch. Die DataCart ist für die momentan handelsüblichen Drucker HP DJ 450, HP DJ 460, Canon Serie i70/i80 und iP90 mit oder ohne Unterstützung des Canon Portable Kits geeignet (andere Drucker auf Anfrage!).
  • Seite 3: Betriebsspannung

    → Bitte beachten Sie beim Anschluss an die Betriebsspannung (Netz), dass Sie Ihr Netzkabel zuerst mit dem Koffer und anschließend mit der Spannungsquelle verbinden! → Der Ladevorgang Ihrer Geräte sollte grundsätzlich bei geöffnetem Zustand Ihrer DataCart passieren! Lieferumfang – DataCart Lieferumfang –...
  • Seite 4: Installation Ihres Mobilen Druckers

    Installation Ihres mobilen Druckers Installation Ihres mobilen Druckers Öffnen Sie die DataCart. Falls Sie die „QuickFix“ Druckerhalterung für Ihren Druckertyp nicht bestellt haben, gehen Sie wie folgt vor: Nehmen Sie vier Velcro® Streifen (zwei Hakenstreifen und zwei Schlaufenstreifen) und bilden Sie damit zwei entsprechende Paare (Abb.1 zeigt ein Paar das zusammengedrückt wird).
  • Seite 5: Installation Der Steckdose

    Sie müssen zuerst das Kabel mit dem Schukostecker in die runde Durchführung (1) zur Seitentasche einführen. Ist bei Ihrer DataCart bereits werkseitig ein Klettbandstück an der linken Innenseite befestigt, so brauchen Sie nur den Schutzfilm des Gegenstücks abzuziehen und dieses an die Unterseite der Kunststoffbox kleben. (Abb. 5) Abb.
  • Seite 6: Verbindung: Notebook - Drucker

    Datenverbindung z.B. über ein Compact Flash-Modul geschehen. ACHTUNG! Stellen Sie Ihr Notebook immer in das mittlere Fach der DataCart zwischen die Abteiler und mit der Vorderseite nach unten, Bsp.: Bluetooth da sonst Kabel und Stecker des Notebooks beschädigt werden können.
  • Seite 7: User Manual (English)

    Work Environment In general, please take care to operate your DataCart on a stable and skid-fast surface. Especially avoid work surroundings which are dusty or humid! When opening your DataCart, please make sure that the case stands with the case handle upwards! →...
  • Seite 8: Operational Current

    → When connecting to a power socket, please ensure that the power cable is first connected to the case and then to the power socket! → The charging procedure should generally be done while the case is open! Scope of supply – DataCart Scope of supply – DataCart...
  • Seite 9: Installation Of Mobile Printer

    Insert the printer into the holder (Fig. 3, slide in arrow direction), mount the printer with the attached holder (depending on printer model). The DataCart has two slides on the front lid with which „QuickFix“ is connected (Fig. 4). For more information please contact us at info@dicota.com.
  • Seite 10: Installation Of Power Socket

    Remove the film on one side of each pad pair and press this side to the bottom of the synthetic box. Press the divider pads to the back side of the DataCart. Now you can attach the synthetic box to the left inner side of the DataCart by removing the remaining protective films.
  • Seite 11: Connection Notebook - Printer

    Before connecting the multi-plug cable to a power socket, read the manual of your Notebook and/or printer carefully. Never close the DataCart’s lid while the printer or Notebook is being operated or the Notebook is being charged. Closing the lid can cause overheating. The DataCart should always be placed on an even surface to prevent it...
  • Seite 12: Mode D'emploi (Français)

    Avant d’ouvrir la mallette DataCart, vérifiez toujours qu’elle est posée, poignée du couvercle vers le haut! → Evitez d’installer la mallette DataCart à proximité d’une source de chaleur extrême (par exemple, un radiateur). Tenez la mallette DataCart à l’abri de la lumière directe du soleil! →...
  • Seite 13: Tension D'alimentation

    → Lors du raccordement à la source d’alimentation (au réseau), connectez le câble de raccordement d’abord à la mallette, puis à la source d’alimentation! → La recharge de vos appareils doit absolument être effectuée avec la mallette ouverte! Contenu de la boîte – DataCart Contenu de la boîte – DataCart 1 fiche femelle pour connexion au 220 V, 2 ensembles de câbles (8 EUROS) et 2 IBM...
  • Seite 14: Installation De L'imprimante Portable

    Positionnez l‘imprimante dans les fixations (Figure 3, suivre le sens des flêches), fixer l‘imprimante à l‘aide de l‘anneau de fixation sans faire appel à aucun outil extérieur (en fonction du modèle). La mallette DataCart est dotée de deux rails de coulissage se trouvant sur le rabat frontal. Le système «QuickFix» est installé à l‘aide de Fig.
  • Seite 15: Installation De La Prise

    Fixez les compartiments sur la partie arrière de la DataCart. Vous pouvez à présent fixer la boîte en matière plastique sur la partie intérieure gauche de la DataCart en retirant les films de protection restants.
  • Seite 16: Raccordement De L'ordinateur Portable Et De L'imprimante

    Lisez les manuels d‘utilisation de votre ordinateur portable et de votre imprimante, avant de brancher le câble de la prise multiple dans une prise murale. Ne fermez jamais le rabat de votre DataCart lorsque l‘imprimante est en fonction, ou pendant le chargement de votre ordinateur ou de votre impprimante.

Inhaltsverzeichnis