
Inhaltszusammenfassung für Brød & Taylor FP-201
- Seite 1 Folding Proofer Instructions Model FP-201 www.brodandtaylor.com For your safety, read this instruction manual before using product.
-
Seite 2: Important Safeguards
IMPORTANT 15. Do not store any materials, other than manufacturer’s recommended SAFEGUARDS accessories, in the Proofer when not in use. 16. This appliance is not intended for When using electrical appliances, basic use by persons (including children) with safety precautions should always be reduced physical, sensory or mental followed including the following: capabilities, or lack of experience and... - Seite 3 NOTICE This appliance is for household use only. Use on Alternate Current (50 Hertz) only with voltage as indicated on the manufacturer type plate. Do not attempt to modify the plug in any way. USE WITH AC INVERTERS Exercise caution when using this appliance with DC to AC inverters.
-
Seite 4: Control Panel
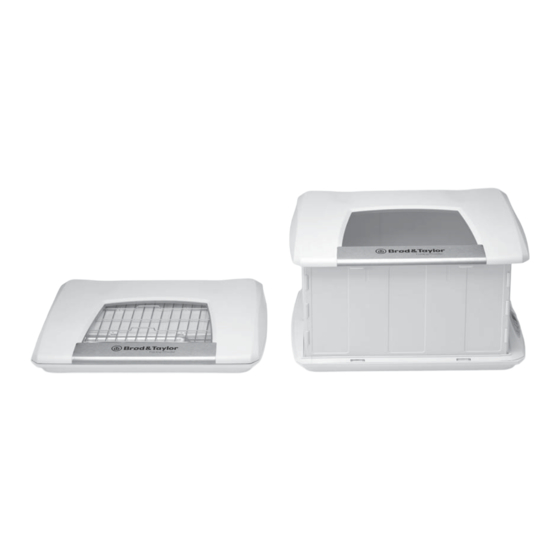
NOTE: The display may be confi gured to display in °F or °C. To switch between modes, press and hold both the “UP” button and the “DOWN” button for two seconds. Features 1. Lid 2. Expanding box section 3. Base Control Panel 4. -
Seite 5: Operation
GENERAL OPERATING INSTRUCTIONS Set Up Open the lid by lifting the front edge of the Proofer. Allow the lid to rest in a vertical position. Remove the wire rack and water tray. Lift the expanding box section from the front edge, allowing it to remain attached to the base at the back so it can pivot open. -
Seite 6: Cleaning And User Maintenance
The HEATING light will illuminate indicating that the heat plate is warming up. When the Proofer reaches its temperature set point the HEATING light will go off. It is normal for the HEATING light to fl ash on and off as the Proofer maintains its temperature during use. Select Celsius or Fahrenheit The display on the control panel indicates the temperature set point. - Seite 7 FP-201 Dimensions: Inside box (open): 37.5 cm x 32 cm x 20 cm high Outside body (open): 46 cm x 37 cm x 27 cm high Outside body (closed): 46 cm x 37 cm x 6.5 cm high Temperature Range: 21 - 49C Maximum capacity: Two “large”...
- Seite 8 FAQ (Frequently Asked Questions) Can I run my Proofer for more than a few hours at a time? Yes, the Proofer is durable and may be run continuously. It uses very little electricity, only about 30 watts per hour when set at 24C. Is there one temperature that works well for rising all types of bread? The temperature we fi...
- Seite 9 small metal cup (about 250ml or less) half full with room temperature water and place on the wire rack in the center of the Proofer. Set the Proofer to 29C. Wait 60 minutes and then measure the temperature of the water. The water temperature should be within 1-2 degrees of the set point.
-
Seite 10: Wichtige Sicherheitshinweise
Wichtige Sicherheitshinweise Beim Verwenden elektrischer Geräte, sollten folgende grundlegende Sicherheitshinweise beachtet werden: 1. Lesen Sie alle Anweisungen. 2. Berühren Sie keine heißen Oberfl ächen. Benutzen Sie die Griffe. 3. Halten Sie Kabel, Anschlüsse oder Hauptgehäuse von Wasser oder anderen Flüssigkeiten fern. 4. -
Seite 11: Spezielle Anweisungen Für Den Kabelsatz
Bewahren Sie diese Anweisungen auf Bitte lesen Sie diese Anweisungen sorgfältig und bewahren sie auf, um die besten Ergebnisse mit Ihrem Gärautomaten zu erhalten. Spezielle Anweisungen für den Kabelsatz Um Risiken zu vermeiden, welche durch Verheddern oder Stolpern über ein langes Kabel verursacht werden, ist dieses Gerät mit einem kurzen Kabel zur Stromversorgung ausgestattet. - Seite 12 HINWEIS: Die Anzeige kann so konfi guriert sein, dass sie die Temperatur in °F oder °C anzeigt. Um zwischen diesen Einheiten zu wechseln, halten sie den „UP“-Knopf (12) und den „DOWN“-Knopf (10) gleichzeitig für zwei Sekunden gedrückt. Eigenschaften: 1. Deckel 2.
-
Seite 13: Bedienung
Allgemeine Gebrauchsanweisungen Aufbau: Öffnen Sie den Deckel, indem Sie den vorderen Teil des Gärautomaten anheben. Bringen sie den Deckel in eine vertikale Position. Entfernen Sie den Gitterrost, das Stromkabel und die Wasserschale. Heben Sie die Box vom vorderen Teil, klappen Sie diese auf und befestigen sie an der Bodenplatte. -
Seite 14: Feuchtigkeitskontrolle
Das HEATING-Licht leuchtet, um Ihnen anzuzeigen, dass sich die Heizplatte erhitzt. Sobald der Gärautomat die eingestellte Temperatur erreicht hat, schaltet sich das HEATING-Licht aus. Es ist normal, dass das HEATING-Licht während des Gebrauchs an- und ausgeht, während der Gärautomat die Temperatur beibehält. Wählen Sie Celsius oder Fahrenheit: Die Anzeigetafel auf dem Kontrollfeld zeigt den Temperaturwert. - Seite 15 6. Warten Sie nach der Reinigung, bis alles komplett trocken und abgekühlt ist, bevor Sie das Gerät zum Verstauen zusammenlegen. Der Gitterrost, die Wasserschüssel und das abnehmbare Stromkabel können im Gärautomaten verstaut werden. FP-201 Abmessungen Innenabmessungen: (offen): 37.5 cm x 32 cm x 20 cm Außenabmessungen: (offen) : 46 cm x 37 cm x 27 cm...
-
Seite 16: Häufi G Gestellte Fragen
Enzymaktivität sehr hoch ist und der Gärprozess deshalb verkürzt werden muss. • Kalter Teig, der im Kühlschrank aufbewahrt wurde, muss mindestens 1 Stunde pro 500 Gramm länger gehen um die für den Gärprozess ideale Temperatur zu erreichen. Es empfi ehlt sich gefrorenen Teig im Kühlschrank vor der Verwendung aufzutauen. - Seite 17 den Gärautomat zu testen oder um den Teig schnell gehen zu lassen, stellen sie das Gerät auf 32-35 °C und achten Sie darauf ob Sie eine angenehme Wärme in der Mitte der Heizplatte fühlen können. Wenn Sie zuvor den Teig im Ofen oder in einer ähnlich warmen Umgebung gehen lassen haben, müssen Sie gegebenenfalls die Temperatur erhöhen um ähnliche Resultate zu erzielen.
- Seite 18 2. Stellen Sie den Wasserbehälter in den vorderen Bereich. 3. Legen Sie den Gitterrost mit der Oberseite nach unten auf die Wände und den Wasserbehälter, sodass die Erhöhungen nach oben zeigen, wie es auf dem Foto A gezeigt wird. 4. Positionieren Sie das Gitter zur Befestigung zwischen die zwei kreuzförmigen Klammern, wie es auf dem Foto B gezeigt wird.
- Seite 19 Page 19...
-
Seite 20: Précautions Importantes
PRÉCAUTIONS IMPORTANTES Lorsque vous utilisez des appareils électriques, des précautions de base doivent toujours être prises, y compris celles qui suivent : 1. Veuillez lire toutes les instructions 2. Evitez de toucher aux surfaces chaudes. Utilisez des poignées ou des boutons 3. - Seite 21 INSTRUCTIONS SPÉCIALES RELATIVES AU CORDON D’ALIMENTATION Un cordon d’alimentation court est fourni dans le but de réduire les risques d’enchevêtrement ou de trébuchement. Des rallonges sont disponibles et peuvent être utilisées si toutes les précautions nécessaires sont prises pendant leur utilisation. En cas d’utilisation d’une rallonge, la puissance électrique indiquée sur la rallonge doit être au moins aussi élevée que la puissance de l’appareil et la rallonge doit être disposée de manière à...
-
Seite 22: Caractéristiques
NOTE: L’affi chage peut être confi guré en °F ou °C. Pour changer de mode, maintenez appuyer les deux boutons « Temperature up » et « Temperature down » pendant deux secondes. Caractéristiques 1. Couvercle 2. Expansion caisson 3. Base Panneau de Commande 4. -
Seite 23: Installation
INSTRUCTIONS GENERALES D’OPERATION Installation Ouvrir le couvercle en soulevant le bord avant de l’étuve. Faîtes en sorte que le couvercle garde une position verticale. Retirez la grille et le bac à eau. Soulevez la section expansion du caisson depuis le bord avant, dépliez-le et rentrez-le dans la base. - Seite 24 La touche HEATING s’éclairera pour indiquer que la plaque chauffe. Lorsque l’étuve atteint la température demandée, la touche HEATING s’éteint. Il est normal que la touche HEATING s’allume ou s’éteigne alors que l’étuve maintient sa température pendant l’utilisation. Sélectionner Celsius ou Fahrenheit L’affi...
- Seite 25 6. Après le nettoyage, attendez que tout soit complètement sec et refroidi avant de plier l’appareil pour le rangement. La grille peut être rangée dedans. FP-201 Dimensions: Intérieur du caisson (ouvert) : 37.5 cm x 32 cm x 20 cm de haut Corps extérieur (ouvert) : 46 cm x 37 cm x 27 cm de haut...
- Seite 26 Couvrir la pâte. La plupart des pâtes et des pains moulés n’ont pas besoin d’être couverts dans l’étuve étant donné que le bac à eau fournit une température idéale pour éviter à la pâte de former une croûte. Cependant si vous utilisez l’étuve pour une plus longue fermentation, comme par exemple une nuit pour un biga ou une pré- fermentation, il est recommandé...
- Seite 27 l’évaporation, la perte de chaleur et la contamination par l’environnement. Il est rapide et simple de tester l’étuve. Placez simplement un petit pot d’eau fermé d’un couvercle dans l’étuve, réglez la température à 40°C et vérifi ez la température de l’eau après 1 heure ou 2 heures.
-
Seite 28: Importantes Medidas De Seguridad
IMPORTANTES MEDIDAS DE SEGURIDAD Cuando se utilizan aparatos electrónicos han de seguirse ciertas precauciones de seguridad detalladas a continuación: 1. Lea todas las instrucciones. 2. No toque las superfi cies calientes. Utilice agarraderas. 3. Protéjase contra descargas eléctricas no sumerja los cables, enchufes u otras piezas en agua u otros líquidos. - Seite 29 GUARDE LAS INSTRUCCIONES. Por favor, lea y guarde estas instrucciones para obtener los mejores resultados de su Fermentador Plegable para pan. INSTRUCCIONES ESPECIALES PARA EL CABLEADO Se incluye un cable corto para reducir los riesgos de enredarse o tropezar con un cable largo.
-
Seite 30: Panel De Control
NOTA: El visualizador en el panel de control, que indica la temperatura, puede estar confi gurado en °F or °C. Para cambiar de un modo a otro, mantenga presionado el botón “Temperatura UP” conjuntamente con el botón “Temperatura DOWN” por tres segundos. Características: 1. -
Seite 31: Instrucciones Generales De Uso
INSTRUCCIONES GENERALES DE USO Montaje Abra la tapa levantando el borde frontal del fermentador. Deje que la tapa repose en posición vertical. Retire la rejilla, el cableado y la bandeja de agua. Levante la caja plegable por el borde frontal y desplegándola colóquela sobre la base. Sitúe la bandeja de agua en el centro de la placa de calor. -
Seite 32: Limpieza Y Mantenimiento
Confi guración en grados Celsius o Fahrenheit El visualizador en el panel de control indica la temperatura establecida. El visualizador puede confi gurarse para que muestre la temperatura en grados Fahrenheit o Celsius. Para cambiar de un modo a otro, mantenga presionado el comando de “Temperatura UP”... - Seite 33 6. Después de la limpieza, espere a que el aparato esté totalmente seco y fresco antes de doblarlo para guardarlo. La rejilla y el cable extraíble pueden guardarse aparte. FP-201 Dimensiones: Caja interior (abierta): 37.5 cm x 32 cm x 20 cm de altura Cuerpo externo (abierto): 37.5 cm x 32 cm x 20 cm de altura...
-
Seite 34: Preguntas Frecuentes
Preguntas frecuentes ¿Puedo utilizar el fermentador por un período prolongado de tiempo? Sí, el fermentador puede ser utilizado por varias horas ya que no consume mucha electricidad: apenas 30 watts por hora cuando se lo utiliza a una temperatura no mayor a 24C ¿Hay una temperatura específi... - Seite 35 programe la temperatura en 40C. Una o dos horas más tarde corrobore la temperatura del agua. ¿Tiene el fermentador un termostato? Sí, hay un termostato colocado en la base del fermentador. La resistencia se enciende o se apaga de acuerdo a la temperatura de la placa de aluminio. Este ciclo intermitente de “ON and OFF”...
-
Seite 36: Precauzioni Importanti
PRECAUZIONI IMPORTANTI Per utilizzare con sicurezza gli apparecchi elettrici, seguire le seguenti istruzioni: 1. Leggere tutte le istruzioni. 2. Non toccare superfi ci calde. Usare sempre maniglie e pomelli. 3. Per evitare corti circuiti, non immergere mai il cavo di alimentazione, le spine o l’apparecchio in liquidi. - Seite 37 CONSERVARE QUESTE INSTRUZIONI Per ottenere risultati migliori dal vostro Fornetto di Pane Pieghevole, leggere e conservare queste istruzioni. ISTRUZIONI SPECIALI SUL CAVO DI ALIMENTAZIONE Al fi ne di ridurre il rischio di inciampare, il Fornetto è provvisto di un cavo di alimentazione corto invece di lungo.
- Seite 38 NOTARE: Si può visualizzare la temperatura in gradi Centigradi o Fahrenheit. Per cambiare la modalità, premere i pulsanti «UP» e «DOWN» per la durata di due secondi. Caratteristiche 1. Coperchio 2. Scatola Regolabile 3. Base Panello di Controllo 4. Panello di Controllo 7.
-
Seite 39: Istruzioni Generali Per L'uso
ISTRUZIONI GENERALI PER L’USO Installazione Per aprire il coperchio, sollevare il bordo anteriore del Fornetto. Mantenere il coperchio a riposo in posizione verticale. Rimuovere la griglia e la bacinella dell’acqua. Sollevare la scatola regolabile dal bordo anteriore in modo che il bordo posteriore rimanga attaccato alla base. -
Seite 40: Pulizia E Manutenzione
Scegliere Gradi Centigradi o Fahrenheit Il display del pannello di controllo mostra la temperatura scelta. Si può scegliere di visualizzare la temperatura in gradi Centigradi o Fahrenheit. Per cambiare la modalità, premere i pulsanti «UP» e «DOWN» insieme per la durata di due secondi. Controllo di Umidità... - Seite 41 Il Fornetto di Pane Pieghevole 201 Dimensioni: L’interno della scatola (aperta): 37,5 cm x 32 cm x 20 cm L’esterno della scatola (aperta): 46 cm x 37 cm x 27 cm L’esterno della scatola (chiusa): 46 cm x 37 cm x 6.5 cm Gamma di temperature: 21 –...
- Seite 42 FAQ (Domande Frequenti) Posso utilizzare il Fornetto per alcune ore consecutive? Sì, il Fornetto è un apparecchio resistente e può essere utilizzato per molte ore consecutive. Questo apparecchio consuma poca elettricità. Quando si seleziona una temperatura di 24°C il consumo si aggira intorno ai 30 watt. C’è...
- Seite 43 Perché la temperatura dell’aria all’interno del Fornetto non corrisponde a quella selezionata? Il Fornetto è calibrato per mantenere la temperatura selezionata solo all’interno del vasetto o della ciotola ma non all’esterno. Per controllare la temperatura del Fornetto, riempire a metà un piccolo bicchiere di metallo (circa 250ml) con acqua a temperatura ambiente e porre il bicchiere sulla griglia al centro del Fornetto.
-
Seite 44: Меры Предосторожности
МЕРЫ ПРЕДОСТОРОЖНОСТИ 1. При использовании электрических приборов необходимо соблюдать технику безопасности: 2. Прочтите данную инструкцию. 3. Не прикасайтесь к горячим поверхностям. Используйте рукоятки. 4. Во избежание удара электрическим током не окунайте провод, розетку или само устройство в воду или иную жидкость. 5. - Seite 45 СОХРАНИТЕ ДАННЫЕ ИНСТРУКЦИИ Пожалуйста, прочтите и сохраните данные инструкции для получения наилучших результатов с Вашим Складным Пруфером. ИНСТРУКЦИЯ ПО ИСПОЛЬЗОВАНИЮ СПЕЦИАЛЬНОГО ШНУРА Короткий шнур электропитания предназначен для снижения риска запутывания или переплетения с длинным шнуром. Удлинительные шнуры также доступны и могут быть использованы с аккуратностью.
-
Seite 46: Общий Вид
ОБРАТИТЕ ВНИМАНИЕ: Дисплей может быть настроен на отображение градусов по Фаренгейту или Цельсию. Для переключения между режимами, нажмите и удерживайте кнопки “UP” и “DOWN” одновременно в течение 2 секунд. Общий вид 1. Крышка 2. Увеличивающаяся секция – Панель управления коробка 7. -
Seite 47: Начало Работы
Общая инструкция по пользованию Установка Откройте крышку, приподняв передний край Пруфера. Оставьте крышку в вертикальной позиции. Вытащите металлическую подставку и поднос для воды. Приподнимите увеличивающуюся секцию – коробку с переднего края, оставляя её присоединённой к основе с задней части так, чтобы она могла поворачиваться... -
Seite 48: Очистка И Уход
Лампочка HEATING загорится, показывая, что нагревательная основа подогревается. Когда температура Пруфера достигнет заданной, лампочка HEATING погаснет. Мигание лампочки HEATING во время того, как Пруфер достигает заданной температуры, является нормальным. Выберите формат температуры – Цельсий или Фаренгейт Дисплей на панели управления показывает заданную температуру. Дисплей может... - Seite 49 6. После чистки дайте устройству полностью высохнуть и охладиться до комнатной температуры перед тем, как его сложить и убрать. Металлическая подставка и поднос для воды могут храниться внутри самого устройства. FP-201 Размеры: Внутренняя поверхность (открытая) 37,5 см х 32 см х20 см в высоту Внешняя поверхность (открытая) 46х37х27 см...
- Seite 50 Нужно ли накрывать тесто. Большинство видов теста и батонов не нуждаются в накрытии при приготовлении в Пруфере, так как поднос с водой создает идеальные условия влажности, помогая тесту не превратиться в сухари. Однако, при использовании Пруфера для долгого брожения, например на ночь (12 часов) для...
- Seite 51 Обладает ли Пруфер термостатом? Да, термостат расположен в основе Пруфера. Нагревающий элемент нагревается и охлаждается в зависимости от температуры металлической подставки. Данная цикличность происходит в очень узком диапазоне, делая Пруфер очень точным и надёжным при использовании постоянных температур. Разве температура воздуха внутри Пруфера не такая же, как установленная? Пруфер...
- Seite 52 www.brodandtaylor.com Berkshire Innovations, LLC P.O. Box 712 Williamstown, MA 01267 (413) 458-9933 Copyright 2010-14 All Rights Reserved. Rev.0314.1...