Herunterladen Inhalt Inhalt Diese Seite drucken

Werbung

Verfügbare Sprachen
  • DE

Verfügbare Sprachen

  • DEUTSCH, seite 8
USER MANUAL
WIRED CONTROLLER
RCW8

Werbung

Inhaltsverzeichnis
loading

Inhaltszusammenfassung für Airwell RCW8

  • Seite 1 USER MANUAL WIRED CONTROLLER RCW8...
  • Seite 2 User Notice Please carefully read these instructions before installation and use of this product. Ensure an even power supply for each indoor unit. Never install a wired controller in a wet place or under direct sunlight. A shielded twisted pair line must be adopted as a signal line or wiring (communication) of a wired controller when the unit is installed where there is electromagnetic interference.
  • Seite 3 WIRED CONTROLLER RCW8 Contents Displaying Part Ⅰ Ⅰ Displaying Part …… … … … …… … … … … … … … …… … … … …… … 1.1 LCD Display of Wired Controller … … … … … … … … …… … … … ……...
  • Seite 4 WIRED CONTROLLER RCW8 WIRED CONTROLLER RCW8 3.3 Temperature Setting Buttons Ⅱ Press button to increase or decrease of set temperature when the unit is on. Pressing either button continuously will increase or decrease the temperature by 1℃ 2.1 Silk Screen of Buttons every 0.5 seconds.
  • Seite 5 WIRED CONTROLLER RCW8 WIRED CONTROLLER RCW8 Installation of Wired Controller 3.7 SLEEP Function Press SLEEP Button to activate the SLEEP operation Press this button again, the function stops. 4.1 Installation of Wired Controller 3.8 I-Feel Function Under Cool, Heat and Auto mode, press the I-Feel button , the function is activated.
  • Seite 6 WIRED CONTROLLER RCW8 Brief instructions: 1- Pull out the 5 core signal line from the mounting hole and pass this line through the round hole located at the bottom of wired controller. 2- Use M4x20 scres to fix the foleplate of the wired controller on the wall.
  • Seite 7 BEDIENUNGSANLEITUNG KABELSTEUERUNG RCW8...
  • Seite 8 Benutzerhinweis Bitte lesen Sie diese Anleitung sorgfältig durch, bevor Sie mit der Installation und Bedienung beginnen. Achten Sie auf eine gleichmäßige Stromversorgung für jede Inneneinheit. Installieren Sie niemals die Kabelsteuerung an einem feuchten Ort und von direktem Sonnenlicht entfernt. Eine abgeschirmte Twisted-Pair-Leitung muss als Signalleitung (Kommunikation) einer Kabelsteuerung dienen, wenn die Einheit installiert wird, damit es keine elektromagnetischen Interferenzen gibt.
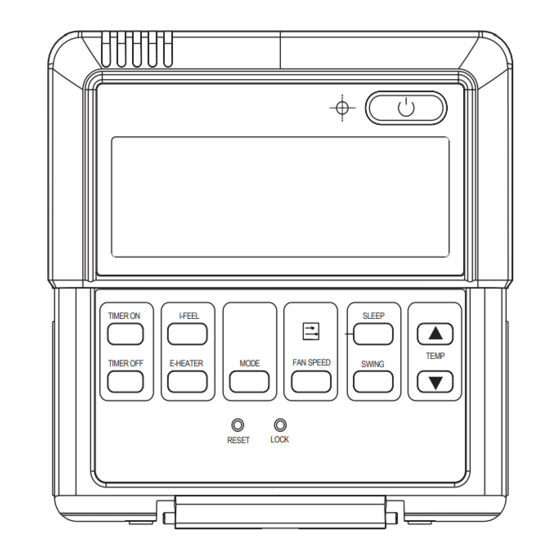
  • Seite 9 KABELSTEUERUNG RCW8 Inhaltsverzeichnis Anzeigetafel Ⅰ Ⅰ Anzeigetafel 1.1 LCD-Anzeige der Kabelsteuerung.............1 Tasten Ⅱ 2.1 Darstellung der Tasten..............2 Bedienungsanleitung 3.1 Ein/Aus....................2 3.2 Betriebseinstellung................2 3.3 Temperatureinstellung...............3 TIMER ON I-FEEL SLEEP 3.4 Einstellung der Gebläsegeschwindigkeit (FAN)........3 TEMP TIMER OFF E-HEATER MODE FAN SPEED SWING 3.5 Steuerfunktion der schwenkbaren Luftschlitze (SWING)....
  • Seite 10: Betriebseinstellung

    KABELSTEUERUNG RCW8 KABELSTEUERUNG RCW8 3.3 Temperatureinstellung Tasten Ⅱ Drücken Sie die oder Taste, um die Einstelltemperatur zu erhöhen oder zu vermindern, wenn die Einheit eingeschaltet ist. Permanenter Tastendruck erhöht oder verringert die Temperatur um 1°C alle 0,5 Sekunden. 2.1 Darstellung der Tasten Temperatureinstellbereich zwischen 17°C~30°C.
  • Seite 11: Installation Der Kabelsteuerung

    KABELSTEUERUNG RCW8 KABELSTEUERUNG RCW8 Installation der Kabelsteuerung 3.7 SLEEP Funktion Drücken Sie die SLEEP TASTE, um die SLEEP funktion zu aktivieren. Drücken Sie diese Taste erneut, um die Funktion abzuschalten. 4.1 Installation der Kabelsteuerung 3.8 I-Feel Funktion Wenn Sie im Modus Kühlen, Heizen und Auto die I-Feel Taste drücken, wird die Funktion aktiviert.
  • Seite 12 KABELSTEUERUNG RCW8 Kurzanleitung: (1)- Ziehen Sie die zweiadrige Signalleitung aus dem Befestigungsloch heraus, und ziehen Sie diese Leitung durch das runde Loch, das sich am unteren Ende des kabelgebundenen Controllers befindet. (2)- Verwenden Sie zum Befestigen der Sohle des kabelgebundenen Controllers an der Wand die M4×25 Schrauben.
  • Seite 13: Commande Filaire

    CONSIGNES D'UTILISATION COMMANDE FILAIRE RCW8...
  • Seite 14: A L'attention De L'utilisateur

    A l'attention de l'utilisateur Veuillez lire attentivement les présentes instructions avant l'installation et l'utilisation du produit. Ensure an even power supply for each indoor unit. Prévoyez une alimentation stable pour chaque unité intérieure. N'installez jamais une commande filaire dans un endroit mouillé ou en contact direct avec des radiations solaires.
  • Seite 15: Zone D'affichage

    COMMANDE FILAIRE RCW8 Table des matières Zone d'affichage Ⅰ Ⅰ Zone d'affichage 1.1 Affichage LCD de la commande filaire.............1 Buttons Ⅱ 2.1 Ecrans de soie des boutons..............2 Consignes d'exploitation 3.1 Mise en marche/Arrêt................2 3.2 Réglage des modes.................2 3.3 Réglage de la température...............3...
  • Seite 16 COMMANDE FILAIRE RCW8 COMMANDE FILAIRE RCW8 3.3 Réglage de la température Buttons Ⅱ Appuyez sur le bouton pour augmenter ou réduire la température définie lorsque l'unité est en marche. Le fait d'appuyer sur l'un de ces boutons de manière continue va augmenter ou réduire la température à 1°C après 0,5 secondes.
  • Seite 17: Installation De La Commande Filaire

    COMMANDE FILAIRE RCW8 COMMANDE FILAIRE RCW8 Installation de la commande filaire 3.7 Configuration de la mise en veille Appuyez sur le bouton SLEEP pour activer le fonctionnement en mode SLEEP. Réappuyez sur le bouton pour désactiver la fonction. 4.1 Installation de la commande filaire 3.8 I-Feel fonction...
  • Seite 18 COMMANDE FILAIRE RCW8 Indications en bref : (1)- Extrayez la ligne de communication à 2 conducteurs du trou de montage, et passez cette ligne par le trou rond situé au fond de la commande câblée. (2) Utilisez des vis M4×25 pour fixer la plaque d'assise de la commande câblée au mur.
  • Seite 19 INSTRUCCIONES DE USO CONTROLADOR CABLEADO RCW8...
  • Seite 20 Aviso al Usuario Favor de leer cuidadosamente estas instrucciones antes de la instalación y uso de este producto. Asegure una alimentación de energía uniforme para cada unidad de interior. Nunca instale un controlador cableado en un lugar mojado o bajo luz solar directa.
  • Seite 21 CONTROLADOR CABLEADO RCW 8 Contenido Pantalla Ⅰ Ⅰ Pantalla 1.1 Pantalla LCD del Controlador Cableado Botones Ⅱ 2.1 Marcado de botones Instrucciones de Operación 3.1 Encendido/Apagado 3.2 Configuración de Modo 3.3 Configuración de Temperatura TIMER ON I-FEEL SLEEP 3.4 Configuración de Velocidad de Abanico TEMP TIMER OFF E-HEATER...
  • Seite 22: Instrucciones De Operación

    CONTROLADOR CABLEADO RCW 8 CONTROLADOR CABLEADO RCW 8 3.3 Configuración de Temperatura Botones Ⅱ Presione el botón para aumentar o disminuir la temperatura establecida cuando la unidad está encendida. Al presionar cualquiera de estos botones continuamente aumentará o disminuirá la temperatura en 1°C cada 0.5 segundos. 2.1 Marcado de Botones El rango de configuración de temperatura es17°C~30°C.
  • Seite 23 CONTROLADOR CABLEADO RCW 8 CONTROLADOR CABLEADO RCW 8 Instalación del Controlador Cableado 3.7 Configuración de Apagado Automático Presione el Botón SLEEP para activar la función de apagado automático Presione nuevamente este botón, para desactivar la función. 4.1 Instalación del Controlador Cableado 3.8 Función de I-Feel En modo Frío, Calor o Auto, presione el botón I-Feel, para activar la función.
  • Seite 24 CONTROLADOR CABLEADO RCW 8 Instrucciones: (1)- Retirar la línea de señal de 2 núcleos del orificio de montaje y pasar esta línea por el orificio redondo ubicado en la parte inferior del controlador alámbrico. (2)- Usar tornillos M4×25 para fijar la placa inferior del controlador alámbrico a la pared.
  • Seite 25: Istruzioni Per L'uso

    ISTRUZIONI PER L'USO COMANDO A FILO RCW8...
  • Seite 26 Nota all'utente VOGLIATE PROCEDERE ALLA LETTURA DELLE SEGUENTI ISTRUZIONI PRIMA DI METTERE IN FUNZIONE QUESTO PRODOTTO. Assicurare un'alimentazione omogenea per ciascuna unità interna. Non installare mai un comando a fili in luogo umido o sotto i raggi diretti del sole. Deve essere adottata una treccia schermata di fili quale cavo di comando a filo (comunicazione) quando l'unità...
  • Seite 27 COMANDO A FILO RCW8 Sommario Presentazione delle parti Ⅰ Ⅰ Presentazione delle parti 1.1 Quadrante LCD del comando a filo Pulsanti Ⅱ 2.1 Panello di pulsanti Istruzioni per l'uso 3.1 On/Off 3.2 Impostazione della modalità 3.3 Impostazione della temperatura TIMER ON...
  • Seite 28 COMANDO A FILO RCW8 COMANDO A FILO RCW8 3.3 Impostazione temperatura Pulsanti Ⅱ Premere i pulsanti per aumentare o diminuire la temperatura impostata quando l'unità è accesa. Premendo in continuazione uno dei due pulsanti si aumenta o si diminuisce la temperatura di 1°C ogni 0,5 secondi.
  • Seite 29 COMANDO A FILO RCW8 COMANDO A FILO RCW8 Installazione Del Comando A Filo 3.7 Impostazione Sleep Premere il pulsante SLEEP per attivare il funzionamento in SLEEP. Premere una seconda volta questo pulsante per interrompere la funzione. 4.1 Installazione del comando a filo 3.8 Funzione I-Feel...
  • Seite 30 COMANDO A FILO RCW8 Istruzioni rapide: 1) - Estrarre il cavo di segnale a 2 vie dal foro di montaggio e farlo passare attraverso il foro circolare che si trova nella parte inferiore del telecomando con cavo. 2) - Utilizzare 25 viti M4 per fissare la piastra del telecomando con cavo al muro.
  • Seite 31: Руководство Пользователя

    РУКОВОДСТВО ПОЛЬЗОВАТЕЛЯ ПРОВОДНОЙ ПУЛЬТ УПРАВЛЕНИЯ RCW8...
  • Seite 32: Важная Информация

    Важная информация Прежде чем приступить к установке или эксплуатации этого изделия, внимательно прочтите данное руководство. Необходимо обеспечить одинаковое электроснабжение для всех внутренних блоков. Запрещено устанавливать проводной пульт управления в помещениях с высокой влажностью или под воздействием прямых солнечных лучей. В местах с электромагнитными помехами в качестве сигнальной линии (или...
  • Seite 33 Проводной пульт управления RCW 8 Содержание Дисплейная часть Ⅰ Ⅰ Дисплейная часть 1.1 ЖК-индикатор проводного пульта управления Кнопки Ⅱ 2.1 Сетчатый трафарет кнопок Инструкция по эксплуатации 3.1 Включение/выключение 3.2 Установка режима 3.3 Установка температуры TIMER ON I-FEEL SLEEP 3.4 Установка скорости вентилятора TEMP TIMER OFF E-HEATER...
  • Seite 34 Проводной пульт управления RCW 8 Проводной пульт управления RCW 8 3.3 Установка температуры Кнопки Ⅱ Используйте кнопку или для повышения или понижения заданной температуры, когда блок включен. Удерживание кнопки нажатой повышает или понижает температуру на 1°C каждые 0.5 секунд. 2.1 Сетчатый трафарет кнопокs В...
  • Seite 35 Проводной пульт управления RCW 8 Проводной пульт управления RCW 8 Установка проводного пульта управления Установка режима «Сон» При нажатии кнопки SLEEP кондиционер переходит в экономичный режим работы. 4.1 Установка проводного пульта При повторном нажатии этой кнопки функция отменяется. 3.8 Функция I-Feel В...
  • Seite 36 Проводной пульт управления RCW 8 Instrucciones: (1)- Вытянуть 2-жильный сигнальный провод измонтажного отверстия и провести этот провод через круглое отверстие, расположенноев нижней части регулятора температуры. (2)- При помощи винтовM4×25 закрепитьзаднюю панель проводного регулятора на стене. (3)- Зафиксировать сигнальную линию на контактных выводах A,B,C,D и E. Убедитесь, что...

Inhaltsverzeichnis