Herunterladen Inhalt Inhalt Diese Seite drucken

Werbung

Verfügbare Sprachen
  • DE

Verfügbare Sprachen

  • DEUTSCH, seite 10
P2 Electric Inflator
Operation Manual
Operation Manual
Operation Manual
Please read the instruction carefully before using

Werbung

Inhaltsverzeichnis
loading

Inhaltszusammenfassung für Oasser P2

  • Seite 1 P2 Electric Inflator Operation Manual Operation Manual Operation Manual Please read the instruction carefully before using...
  • Seite 2: Inhaltsverzeichnis

    Contents English - - - - - - - - - - - - - - - - - - - - - - - - - - - - - - - - - - - - - - - - - - - - - - - - - - - - - - - 1.
  • Seite 3 Français - - - - - - - - - - - - - - - - - - - - - - - - - - - - - - - - - - - - - - - - - - - - - - - - - - - - 1.
  • Seite 4: Note

    P2 Operation Manual Thank you for choosing Oasser P2 smart electric inflator! Please read this opera- tion manual carefully before using it for the first time. P2 electric inflator is portable, which comes with two optional dedicated lithium battery and cigaratte lighter 12V DC. There are the functions of tire pressure metering and digital LCD screen display, and you can preset the tire pressure.
  • Seite 5: Product Illustration

    Product Illustration 8. The Cover of Placed Accessories 1. Case 9. Battery Pack 2. Tyre Inflator Switch 10. LCD Display System 3. Switch Lock 11. Air Hose/Trachea 4. LED Light 12. Lamplighter power 5. Air Hose Port 13. Ball needle 6.
  • Seite 6: Installation

    Installation 1. Please connect the air hose/trachea to the electric inflator. 2. Please connect the trachea to the car tire or the adapter. 3. Please fasten the buckle or tighten the screw tube.
  • Seite 7: Instructions

    If you want to pause or terminate inflating, you can press the Power button to switch off. Automatic power off: Oasser inflator has automatic power off setting, it will automatically shut down in 90 seconds without any operation. Air hose/Trachea can be inserted to the trachea groove of the inflator when you don’t need it.
  • Seite 8: Specification

    Specification Dedicated battery Lithium battery Battery capacity 2200mAh Push both side slots of the battery Disassemble pack and remove the battery pack Please use the dedicated charger Charging to charge Battery Charging time 3 -5hours Please keep it away from fire. If the inflator is placed for a long time, Precautions it is recommended to recharge it...
  • Seite 9: After Sales Service

    Warranty definition: Our company is responsible for repairing and replacing the product when our directly sold products are damaged. Contact us: US: support-us@oasser.net IT: support-it@oasser.net CA: support-ca@oasser.net ES: support-es@oasser.net UK: support-uk@oasser.net...
  • Seite 10: Anmerkungen

    P2 Bedienungsanleitung Vielen Dank, dass Sie sich für die P2 elektronische Luftpumpe entschieden haben! Bitte lesen Sie diese Bedienungsanleitung sorgfältig durch, bevor Sie sie zum ersten Mal benutzen. Die P2 elektronische Luftpumpe kann wahlweise mit der Lithiumbatterie verwendet werden oder an den 12V DC Zigarettenanschluss betrieben werden. Es gibt die Funktionen den Reifendruck zu messen.
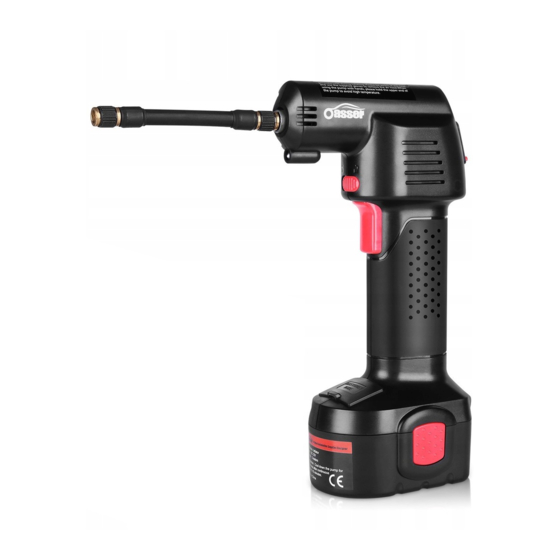
  • Seite 11: Produktabbildung

    Falls das Gerät nicht ordnungsgemäß arbeitet, setzen Sie sich bitte mit unserem Kundendienst in Verbindung. Wir versprechen 100% Kundenzufriedenheit Anmerkung: Diese elektrische Pumpe kann nicht für LKW, Lieferwagen und Busse benutzt werden. Product Illustration 8. Abdeckung für das Zubehör 1. Gehäuse 9.
  • Seite 12: Einrichtung

    Einrichtung 1. Bitte verbinden Sie den Luftschlauch / die Luftröhre mit der elektrischen Pumpe. 2. Bitte verbinden Sie die Trachea mit dem PKW-Reifen oder verwenden Sie einen der beiliegenden Adapter. 3. Bitte befestigen Sie die Schnalle oder ziehen Sie das Schraubenrohr an...
  • Seite 13: Anleitung

    Anleitung Verbinden Sie die elektrische Pumpe mit dem Akku oder der 12V DC Stromver- sorgung Wählen Sie die passende Trachea und drehen Sie diese auf die Aufblasvorrich- tung, Verbinden Sie die Trachea mit dem Ventil Ihres PKW Reifens. Zum Aufblasen von Bällen etc., verwenden Sie einen der mitgelieferten Adapter. Drücken Sie die Taste "...
  • Seite 14: Spezifikationen

    Spezifikationen Batterietyp Lithiumbatterie Batteriekapazität 2200mAh Drücken Sie beide Seitenschlitze des Akku einlegen Akkupacks und entfernen Sie den Akku Bitte nutzen Sie das beiliegende Ladung Netzteil Batterie Ladezeit 3 -5 Stunden Bitte halten Sie es fern vom Feuer. Wenn die Pumpe für eine lange Zeit Vorsichtsmaßnahmen gelagert wird, wird empfohlen, sie alle sechs Monate aufzuladen.
  • Seite 15: Kundenbetreuung

    Das Produkt ist durch Naturkatastrophen oder andere Unfälle beschädigt; Das Warnschild ist abgerissen. Gewährleistungsdefinition: Unsere Firma ist verantwortlich für die Reparatur und das Ersetzen des Produktes, wenn unsere direkt verkauften Produkte beschädigt sind. Kontaktieren Sie uns: US: support-us@oasser.net IT: support-it@oasser.net CA: support-ca@oasser.net ES: support-es@oasser.net UK: support-uk@oasser.net FR: support-fr@oasser.net...
  • Seite 16: Español

    El inflador eléctrico P2 es portátil, que viene con dos baterías dedicadas de litio y un adaptador para la toma del encendedor de cigarrillos de 12V DC. Tiene las funciones de medición de la presión y un monitor LCD y puede fijar los valores de...
  • Seite 17: Ilustración Del Producto

    Ilustración del producto: 8. Envoltorio de accesorios 1. Estuche/Caja 9. Baterías 2. Interruptor del inflador 3. Seguro del interruptor 10. Monitor LCD 4. Luz LED 11. Tubo aire comprimido 12. Cigarrillos encendedor 5. Puerto aire comprimido 13. Aguja para pelotas 6.
  • Seite 18: Instalación

    Instalación: Por favor conecte la boquilla de la tráquea al inflador eléctrico. 2. Por favor conecte la tráquea al neumático del coche o el adaptador. 3. Por favor ajuste la hebilla o apriete el tornillo del tubo.
  • Seite 19: Instrucciones

    Si desea pausar o terminar la inflación puede presionar el botón de encendido para apagarlo. Detención automática: El inflador Oasser tiene una opción de apagado automático. Si no se usa durante 90 segundos el dispositivo se detendrá. La tráquea puede insertarse en la ranura del inflador si ya no se va a utilizar.
  • Seite 20: Especificaciones

    Especificaciones: Batería dedicada Batería de litio Capacidad de la batería 2200mAh Presione ambas ranuras en la cámara Desmontaje de la batería y quite la batería. Para la carga Use el cargador proporcionado Batería Tiempo de carga 3 -5 horas Manténgalo fuera del alcance del fuego.
  • Seite 21: Después Del Servicio De Venta

    Si la señal de aviso se ha desplegado. Definición de la garantía: Nuestra empresa es responsable de reparar y reemplazar el producto, cuando dicho producto se ha vendido de manera directa por nosotros dañado. Contacte con nosotros: US: support-us@oasser.net IT: support-it@oasser.net CA: support-ca@oasser.net ES: support-es@oasser.net UK: support-uk@oasser.net FR: support-fr@oasser.net...
  • Seite 22: Italia

    Grazie per aver scelto Oasser P2 compressore elettrico intelligente! Si prega di leggere queste istruzioni con attenzione prima dell’uso. Il compressore elettrico P2 è portatile e la confezione è provvista di 2 batterie al litio opzionali ed un’entrata per collegarlo all’accendisigari 12V DC. Può misurare la pressione dei pneumatici ed è...
  • Seite 23: Illustrazione Prodotto

    Illustrazione prodotto: 1. Contenitore 8. Copri accessori 2. Interruttore di gonfiaggio 9. Batteria del pneumatico 10. Sistema display LCD 3. Blocco interruttore 11. Tubo dell’aria 4. Luce LED 12. Alimentazione accendisigari 5. Porta tubo dell’aria 13. Ago per palloni 6. Fessura del tubo dell’aria 14.
  • Seite 24: Installazione

    Installazione 1. Si prega di collegare il tubo dell’aria 2. Si prega di collegare il tubo dell’aria al pneumatico della macchina o all’adattatore. 3. Si prega di fissare la fibbia...
  • Seite 25: Istruzioni

    Se si vuole fare una pausa o terminare il gonfiaggio basterà premere l’interruttore. Spegnimento automatico: il compressore Oasser ha le impostazioni di spegni- mento automatico , si spegnerà automaticamente dopo 90 secondi di non utilizzo.
  • Seite 26: Specifiche

    Specifiche Batteria Batteria a litio Capacità batteria 2200mAh Spingere su entrambi i lati e rimuovere Disassemblaggio la batteria Si prega di usare il caricatore in Ricarica dotazione Batteria Tempo di ricarica 3 -5 ore Si prega di tenere lontano dal fuoco.
  • Seite 27: Servizi Post Vendita

    è danneggiato a causa di eventi naturali o di altri incidenti; la garanzia è scaduta. La nostra società è responsabile della riparazione e della sostituzione del prodotto nel caso in cui i prodotti venduti sono danneggiati. Contattaci: US: support-us@oasser.net IT: support-it@oasser.net CA: support-ca@oasser.net ES: support-es@oasser.net UK: support-uk@oasser.net FR: support-fr@oasser.net...
  • Seite 28: Français

    Le gonfleur électrique P2 est portable, il a 2 options dédiées, une batterie lithium et un chargeur allume cigare 12V DC. Il mesure la pression du pneu, a un écran digital et vous pouvez programmer la pression désirée.
  • Seite 29: Product Illustration

    Product Illustration: 1. Boîte 8. Couvercle de l’emplacement des accessoires 2. Interrupteur de gonflage 9. Batterie 3. Verrouillage de l’interrupteur 10. Écran LCD 4. Témoin Led 11. Tuyau à air 5. Port du tuyau à air 12. puissance allume-cigare 6. Emplacement du tuyau à air 13.
  • Seite 30: Installation

    Installation 1. Connectez le tuyau à air au gonfleur électrique. 2. Connectez le tuyau à air à la valve de la voiture ou à l’adaptateur. 3. Fermez la boucle ou serrez la vis du tube.
  • Seite 31: Instructions

    Si vous voulez mettre en pause ou terminer le gonflage, vous pouvez appuyer sur le bouton power pour éteindre. Extinction automatique : Le gonfleur OASSER a une fonction d’arrêt automa- tique, il s’éteindra automatiquement après 90 secondes d’inactivité. Le tuyau à air peut être ranger dans son emplacement lorsque vous ne l’utilisez pas.
  • Seite 32: Spécifications

    Spécifications Batterie dédiée Batterie lithium capacité de la batterie 2200mAh Appuyez sur les emplacements des Démontable 2 côtés de la batterie pour l’enlever Utilisez le chargeur dédié pour la chargement charge Batterie temps de chargement 3 à 5 heures Conserver à l’abri du feu. Si le gonfleur est stocké...
  • Seite 33: Service Après-Vente

    Définition de le garantie : Notre compagnie est responsable de la réparation et du remplacement du produit lorsque celui-ci a un défaut de fabrication. Contactez-nous : US: support-us@oasser.net IT: support-it@oasser.net CA: support-ca@oasser.net ES: support-es@oasser.net UK: support-uk@oasser.net...
  • Seite 34 Original Automotive Supplies Designer Made in China...

Inhaltsverzeichnis