oneConcept 10027881 Bedienungsanleitung
Inhaltsverzeichnis
Verfügbare Sprachen
Verfügbare Sprachen
Kapitel
Inhaltsverzeichnis

Verwandte Anleitungen für oneConcept 10027881

Inhaltszusammenfassung für oneConcept 10027881
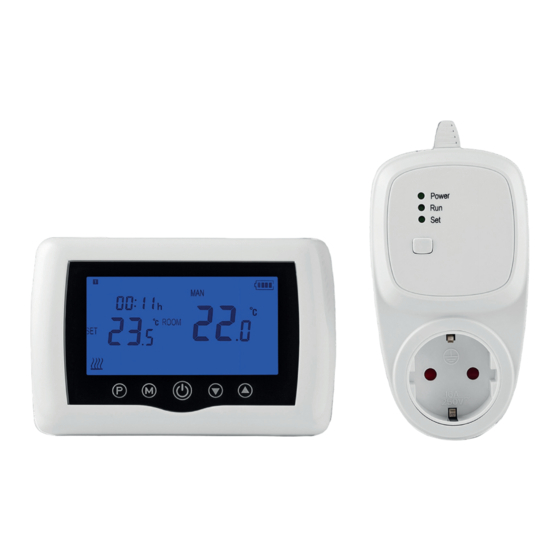
- Seite 1 Funk-Heizkörperthermostat 10027881...
-
Seite 2: Inhaltsverzeichnis
5+1+1 Programm einstellen 5 5+1+1 Programmierbeispiel 6 Sensor kalibrieren 6 Hinweise zur Entsorgung 6 Konformitätserklärung 6 Technische Daten Artikelnummer 10027881 Controller Stromversorgung 2 x 1.5 V AAA Batterien (nicht im Lieferumfang enthalten) Schaltdifferenz 0.5°C Einstellbarer Temperaturbereich 5°C – 30 °C Schrittweite 0.5°C... -
Seite 3: Sicherheitshinweise
Sicherheitshinweise • Bewahren Sie die Bedienungsanleitung gut auf, für den Fall, dass Sie sie noch einmal benötigen. • Verwenden Sie zusammen mit dem Thermostat kein Verlängerungskabel. • Stecken Sie keine Geräte in die Steckdose, die mechanische Bewegungen ausführen. • Lassen Sie Ventilatoren oder andere Gerät mit freiliegenden Teilen nicht unbeaufsichtigt. Wir emp- fehlen Ihnen derartige Geräte nicht an den Thermostat anzuschließen. -
Seite 4: Monatageanleitung
Montageanleitung • Installieren Sie den Controller an ei- nem Ort, an dem er die Raumtempe- ratur möglichst genau messen kann. Setzen Sie ihn nicht direkter Sonnen- einstrahlung, Hitze oder kalter Zugluft aus. • Falls sich Thermostatventile im Raum befi nden, drehen Sie diese voll auf. •... -
Seite 5: Wochentag Und Uhrzeit Einstellen
Wochentag und Uhrzeit einstellen 1 Drücken Sie 2-3 Sekunden lang auf die Programmtaste 2 Die Uhr zeigt 00:00 an. Stellen Sie die Minuten mit den Pfeiltasten ein. 3 Drücken Sie erneut auf die Programmtaste und stellen Sie die Stunde mit den Pfeiltasten ein. 4 Drücken Sie wieder auf die Programmtaste und stellen Sie mit den Pfeiltasten den Wochentag ein. -
Seite 6: 5+1+1 Programmierbeispiel
5+1+1 Programmierbeispiel Montag - Freitag Samstag Sonntag Heizperiode Uhrzeit 6:30 8:00 18:00 20:00 8:00 10:00 18:00 23:00 9:00 12:00 19:00 0:00 Temperatur 21°C 18°C 21°C 16°C 21°C 21°C 21°C 16°C 23°C 21°C 16°C 21°C Sensor kalibrieren Falls die angezeigte Raumtemperatur auf dem Display nicht mit tatsächlichen Raumtemperatur über- einstimmt können Sie den Sensor neu kalibrieren.