Herunterladen Inhalt Inhalt Diese Seite drucken

Werbung

Verfügbare Sprachen
  • DE

Verfügbare Sprachen

  • DEUTSCH, seite 1

Werbung

Inhaltsverzeichnis
loading

Inhaltszusammenfassung für auna Clubmaster 8000

  • Seite 3: Inhaltsverzeichnis

    Sehr geehrter Kunde, wir gratulieren Ihnen zum Erwerb Ihres Gerätes. Lesen Sie die folgenden  Hinweise sorgfältig durch und befolgen Sie diese, um möglichen Schäden  vorzubeugen. Für Schäden, die durch Missachtung der Hinweise und unsachgemäßen Gebrauch entstehen, übernehmen wir keine Haftung. INHALT Technische Daten 4 Sicherheitshinweise 5 Geräteübersicht 7 Betrieb 12 Sound-Effekte 12 Licht-Farbeffekte 13 Radio 13 Karaoke- und Gitarrenfunktion 13 BT-Kopplung und Verbindung 14 USB-Anschlüsse 14 Akku 15 Hinweise zur Entsorgung 16...
  • Seite 4: Technische Daten

    TECHNISCHE DATEN Artikelnummer 10032821 100-240 V~ 50/60 Hz Stromversorgung Aufnahmeleistung 33 W UKW-Frequenzbereich 87,5 - 108 MHz Anschlüsse AUX-IN-Eingang 3,5 mm Mikrofoneingang 6,3 mm Betriebstemperaturbereich 5 °C bis 40 °C BT-Übertragungsstandard Version 2.1+EDR Reichweite bis zu 10 Meter Kompatible BT-Profil A2DP...
  • Seite 5: Sicherheitshinweise

    SICHERHEITSHINWEISE • Um einen einwandfreien Betrieb zu gewährleisten, lesen Sie bitte diese  Bedienungsanleitung sorgfältig durch. Bewahren Sie sie an einem  sicheren Ort zum späteren Nachschlagen auf. • Installieren Sie dieses Soundsystem an einem gut belüfteten,  kühlen, trockenen, sauberen Ort - weg von direktem Sonnenlicht,  Wärmequellen, Vibrationen, Staub, Feuchtigkeit und/oder Kälte. Für  eine gute Luftzufuhr sind nach allen Seiten  um das Gerät herum 10 cm  einzuhalten. • Stellen Sie dieses Gerät nicht in der Nähe von anderen elektrischen  Geräten, Motoren oder Transformatoren auf, um Brummgeräusche zu  vermeiden. • Setzen Sie das Gerät keinen plötzlichen Temperaturschwankungen von  kalt nach heiß aus und stellen Sie es nicht in einer Umgebung mit hoher  Luftfeuchtigkeit auf (z. B. in einem Raum mit einem Luftbefeuchter),  um Kondensation im Inneren des Geräts zu vermeiden, die einen elektrischen Schlag, Feuer, Schäden an diesem Gerät und/oder  Verletzungen verursachen kann. • Vermeiden Sie die Aufstellung dieses Geräts, wo Fremdkörper auf  dieses Gerät fallen können und/oder dieses Gerät Flüssigkeiten tropfen  oder spritzen kann. Stellen Sie nie folgende Gegenstände auf das Gerät:  Andere Komponenten, da sie Schäden und/oder Verfärbungen  an der Oberfläche dieses Gerätes verursachen können. Brennende Gegenstände (z. B. Kerzen), da sie Feuer, Schäden  an diesem Gerät und/oder Personenschäden verursachen können.
  • Seite 6 angegebenen Spannung ist gefährlich und kann zu Bränden, Schäden  an diesem Gerät und/oder Verletzungen führen. Wir haften nicht für  Schäden, die durch die Verwendung dieses Geräts mit einer anderen als der angegebenen Spannung entstehen. • Um Schäden durch Blitzschlag zu vermeiden, halten Sie das Netzkabel  und die Außenantennen während eines Gewitters von einer Steckdose  oder diesem Gerät getrennt. • Versuchen Sie nicht, dieses Gerät zu modifizieren oder zu reparieren.  Wenden Sie sich an qualifiziertes Servicepersonal, wenn eine Wartung  erforderlich ist. Das Gehäuse sollte niemals aus irgendwelchen Gründen  geöffnet werden. • Wenn Sie das Gerät über einen längeren Zeitraum (z. B. Urlaub) nicht  verwenden möchten, ziehen Sie den Netzstecker aus der Steckdose. • Bevor Sie dieses Gerät bewegen, schließen Sie den Netzstecker an. aus  der Steckdose. • Wenn sich die Umgebungstemperatur plötzlich ändert, kann sich  Kondenswasser bilden. Trennen Sie die Stromzufuhr, indem Sie das  Netzkabel aus der Steckdose ziehen. Lassen Sie das Gerät einige Zeit  stehen. •...
  • Seite 7: Geräteübersicht

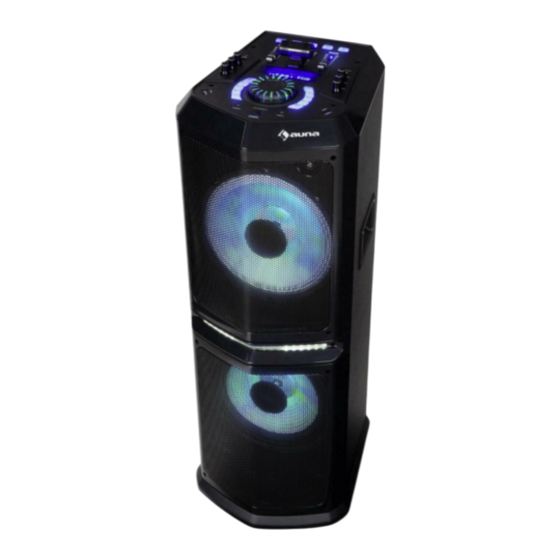
    GERÄTEÜBERSICHT Rückansicht Netzschalter Drei Stellungen: AC (Netzspannung), AUS, DC (Akkubetrieb) In der Stellung AC und bei eingeschaltetem AC-Input ist der Lautsprecher aktiv und der Akku wird geladen. Der Akku wird ebenso im  Standby-Betrieb geladen. In der Stellung OFF, sind sowohl der Netzbetrieb als auch der Akkubetrieb ausgeschaltet.  In der Stellung DC erfolgt die Stromzufuhr der Anlage über den  12-V-Akku. 2 12-V-Gleichstrom-Anschluss Wenn Sie die Anlage im Freien verwenden und der interne Akku leer  läuft, können Sie eine 12-V-Gleichstromquelle (z. B. eine Autobatterie) an  die Anlage anschließen, um mit dem Betrieb fortzufahren. 3 Netzanschluss (AC): 230 V~, 50 Hz 4 UKW-Antenne 5 AUX-Eingang...
  • Seite 8: Vorderseite

    Vorderseite EFFECT PARTY EFFECT 23 22 21 2019 18 17 16...
  • Seite 9 Akku laden, Standby oder  Partyeffekte Zur Wahl verschiedener  Normalbetrieb zu gehen. Partyeffekte: Schub, Alarm,  20 Lautstärke / Multi Vektor, Feuerwerk, Regen Knopf drehen, um die  Gerätelautstärke, die  2 Pro-Modus Kopfhörerlautstärke, die Höhen  3 Club-Modus und Bässe einzustellen. 4 Laser 21 Kopfhöreranschluss 5 DJ-Effekt 22 Menü Kurz drücken, um verschiedene  Auswahl von Laustärke, Bass,  Musikeffekte zu wählen:  Höhen und dem Lichtmodus Scratch, Reverb, Beat box, Yeah, Bring it, Geya, Come on 23 Titel zurück Eingang A Wahl des vorigen Titels 6 LED-Anzeige...
  • Seite 10: Fernbedienung

    Fernbedienung BT.A BT.B DISCONNECT.A DISCONNECT.B MENU...
  • Seite 11 19 Titel vor USB Licht 20 Titel zurück Eingang B 2 Standby 3 Zahlentasten 21 Wiedergabe Pause Eingang B 4 BT Eingang A 22 Wiederholen Eingang B 5 Quelle A trennen 23 Titel vor Eingang A 6 Lautstärke + 24 Titel vor Eingang A 7 Menüeinstellung - 25 Titel zurück Eingang A 8 Sendersuche +...
  • Seite 12: Betrieb

    BETRIEB 1.   A chten Sie darauf, die Stromversorgung abzuschalten, wenn Sie die  entsprechenden Eingangsbuchsen belegen. 2.   S chalten Sie das Gerät ein und warten Sie 3-4 Sekunden, bis die  Lautsprecherfunktionen bereit sind. 3.   W ählen Sie eine Audioquelle, indem Sie die Taste INPUT A auf der  Bedienkonsole drücken, um AUX A, BT-A, USB A anzuzeigen. Drücken  Sie die Taste INPUT B auf der Bedienkonsole, um LINE, USB B, BT-B  anzuzeigen. 4. Stellen Sie den VOLUME/MULTI-Regler auf der Bedienkonsole oder  die VOL+/--Taste auf der Fernbedienung ein, um die Lautstärke, Höhen  und Bässe einzustellen. Drehen Sie dann den linken Lautstärkerelger,  um die Lautstärke von Eingang A einzustellen, drehen Sie den rechten  Lautstärkerelger, um die Lautstärke von Eingang B zu ändern. 5.   D rücken Sie die MENU-Taste auf dem Bedienfeld, um BASS, TREBLE,  AUTO, MAIN anzuzeigen, und stellen Sie dann den Lautstärke-Regler ein,  um die Höhen, Bässe, den Lichtmodus und den Soundeffekt zu ändern. 6.   A uswahl der Quelle: Drücken Sie die Taste PHONES MODEL auf der  Bedienkosole, um INPUT A, INPUT B oder INPUT AB anzuzeigen.  PHONES VOLUME Einstellung. Drücken Sie die Taste PHONES MODEL  auf der Bedienkonsole, um INPUT A oder INPUT B oder INPUT AB  anzuzeigen, und drehen Sie dann den VOLUME/MULTI-Regler, um die PHONES VOLUME von INPUT A oder INPUT B oder INPUT AB einzustellen.
  • Seite 13: Licht-Farbeffekte

    den entsprechenden Partyeffekt erzielen, wenn der Schieber MAX  erreicht hat. LICHT-FARBEFFEKTE Einstellung der Lautsprecherbeleuchtung R  rotes Blinken G  grünes Blinken B  blaues Blinken RG  rotes und grünes Blinken GB  grünes und blaues Blinken RGB  rotes, grünes und blaues Blinken Auto  verschiedene Farbkombinationen werden durchgegangen Demo  Lichter blinken und ändern die Farbe nach dem Rhytmus der Musik RADIO 1. Bevor Sie die Radiofunktionen nutzen können, müssen Sie die  mitgelieferte Antenne anbringen. Stellen Sie die Antenne auf optimalen  Empfang ein. Drücken Sie die Taste INPUT A auf der Vorderseite  (Verstärker) oder die Taste FM auf der Fernbedienung, um die FM- Funktion auszuwählen. 2. Drücken Sie die Taste CH+/CH- auf der Fernbedienung, um die zuvor  gespeicherten Sender zu finden. 3. Drücken oder halten Sie die Taste TU+/TU- auf der Fernbedienung, um  die Funkfrequenz manuell einzustellen. 4. Drücken Sie die Taste AUTO auf der Fernbedienung, das Gerät scannt  selbstständig Funkkanäle von Niederfrequenz bis Hochfrequenz und  speichert die Kanäle einzeln ab. KARAOKE- UND GITARRENFUNKTION 1.
  • Seite 14: Bt-Kopplung Und Verbindung

    Schalten Sie das Gerät ein und stellen Sie es in den BT-Modus. Das blinkende blaue Licht BT auf der LED-Anzeige zeigt an, dass es sich im  Pairing-Modus befindet. • Stellen Sie Ihr Handy oder Ihren Musik-Player auf die Suche nach BT- Geräten ein. • Wählen Sie "Clubmaster 8000" aus den Suchergebnissen Ihres Handys oder Musik-Players. • Wählen Sie OK oder JA, um dieses Gerät mit Ihrem Telefon oder Musik- Player zu verbinden. • Wenn durch ein Passwort geschützt, geben Sie "0000" als Passwort ein.
  • Seite 16: Hinweise Zur Entsorgung

    HINWEISE ZUR ENTSORGUNG Befindet sich die linke Abbildung (durchgestrichene  Mülltonne auf Rädern) auf dem Produkt, gilt die  Europäische Richtlinie 2012/19/EU. Diese Produkte dürfen  nicht mit dem normalen Hausmüll entsorgt werden. Informieren Sie sich über die örtlichen Regelungen zur  getrennten Sammlung elektrischer und elektronischer  Gerätschaften. Richten Sie sich nach den örtlichen  Regelungen und entsorgen Sie Altgeräte nicht über den Hausmüll. Durch die regelkonforme Entsorgung  der Altgeräte werden Umwelt und die Gesundheit Ihrer Mitmenschen vor möglichen negativen Konsequenzen  geschützt. Materialrecycling hilft, den Verbrauch von  Rohstoffen zu verringern. Das Produkt enthält Batterien, die der Europäischen  Richtlinie 2006/66/EG unterliegen und nicht mit dem normalen Hausmüll entsorgt werden dürfen. Bitte ...
  • Seite 17 Dear Customer, Congratulations on purchasing this equipment. Please read this manual carefully and take care of the following hints to avoid damages. Any failure  caused by ignoring the items and cautions mentioned in the instruction manual are not covered by our warranty and any liability. Scan the QR code to get access to the latest user manual and other information about the  product. CONTENTS Technical Data 18 Safety Instructions 19 Device Description 21...
  • Seite 18: Technical Data

    TECHNICAL DATA Item number 10032821 100-240 V~ 50/60 Hz Power supply Input power 33 W FM frequency range  87, 5 - 108 MHz Connections AUX-IN input 3.5 mm Microphone input 6.3 mm Operating temperature range 5 °C bis 40 °C BT transmission standard Version 2.1+EDR Range bis zu 10 Meter...
  • Seite 19: Safety Instructions

    SAFETY INSTRUCTIONS • Read this before operating your unit. • To assure the finest performance, please read this manual carefully.  Keep it in a safe place for future reference. • Install this sound system in a well ventilated, cool, dry, clean place - away from direct sunlight, heat sources, vibration, dust, moisture, and/ or cold. For proper ventilation, allow a minimum clearance of 10 cm  around the unit. • Place the unit away from other electrical appliances, motors, or  transformers to avoid humming sounds. • To prevent condensation inside the unit, which may cause an electrical shock, fire, damage to the unit, and/or personal injury, do not expose it ...
  • Seite 20 • When you are not planning to use the unit for long periods of time (e.g.  vacation), disconnect the AC power plug from the wall outlet. • Before moving the unit, disconnect the AC power plug from the wall  outlet. • Condensation will form when the surrounding temperature changes  suddenly. Disconnect the power cable from the outlet, then leave the  unit alone. • When using the unit for a long period of time, the unit may become  warm. Turn the power off, then leave the unit alone to cool. • Install the unit near the AC outlet and where the AC power plug can be reached easily. • The batteries shall not be exposed to excessive heat such as sunshine, fire or the like. When you dispose of batteries, follow your regional ...
  • Seite 21: Device Description

    DEVICE DESCRIPTION Rear panel Power Three switches: AC , OFF, DC. If switched to "AC," the AC INPUT is ON, the speaker is working and the  battery can be charged. If in standby mode, the battery can be charged also. When switched to "OFF," both the AC and DC power are off, and the  speaker will not operate. When switched to "DC," the battery is ON/DC 12V ON mode, and the speaker will operate from the battery supply. 2 DC 12V INPUT When the speaker is being used outdoors, and the internal battery  runs out, a 12V car battery may be connected to the DC 12V input on the speaker, to resume operation. ...
  • Seite 22: Front Panel

    Front panel EFFECT PARTY EFFECT 23 22 21 2019 18 17 16...
  • Seite 23 PARTY EFFECT mode: 18 LlNE IN AUDIO INPUT JACK Press this key to choose different  Connect to LINE IN signal input PARTY effects, THRUST, ALARM,  jack. VECTOR, FIREWORK, RAINING 19 AC: CHARGE/STANDBY/NORMAL A long press of this key turns the  2 PRO unit on or puts it in standby. 3 CLUB A short press of this key switches  4 LASER the unit to CHARGE, STANDBY, 5 DJ EFFECT mode: Short press this NORMAL mode.
  • Seite 24: Remote Control

    Remote Control BT.A BT.B DISCONNECT.A DISCONNECT.B MENU...
  • Seite 25 19 INPUT-B NEXT LIGHT 20 INPUT-B PREVIOUS 2 STANDBY 3 NUMBER BUTTON 21 INPUT-B PAUSE 4 BT-A 22 INPUT-B REPEAT 5 DISCONNECT-A 23 INPUT-A NEXT 6 VOLUME+ 24 INPUT-A PREVIOUS 7 MENU ADJUST- 25 INPUT-A PAUSE 8 TUNING+ 26 INPUT-A REPEAT 9 VOLUME- 27 CHANNEL- 10 TUNING-...
  • Seite 26: Operation

    OPERATION 1.  Be sure to switch off the power and to connect to corresponding input  jacks. 2. Turn on the power and wait 3-4 seconds until the speaker functions are  connected. 3. Select an audio source by pressing the INPUT A key on the front panel to  display AUX A, BT-A, USB A. Press the INPUT B key on the front panel to  display LINE, USB B, BT-B. 4. Adjust the VOLUME/MULTI knob on the front panel or the VOL+/-  key on the remote control to adjust the setting of the main volume,  treble, bass. Then turn the left push shot to adjust the volume of INPUT                                                    A, turn the right push shot to change the volume of the INPUT B.
  • Seite 27: Light Colour Control Function

    will be turned off. The complete process is OFF--->PARTY EFFECT--->  PARTY MAX. LIGHT COLOUR CONTROL FUNCTION To control the light mode coming from the speaker panels by "Speaker"  menu or "light model" button on remote control. R  red lights flash G  green lights flash B  blue lights flash RG  red and green lights flash RB  red and blue lights flash GB  green and blue lights flash RGB  red, green, and blue lights flash Auto  the various color combinations cycle through and flash. Demo  lights flash and change colour as if they were responding to the  beat of the music RADIO TUNER 1. Before using the radio functions, you must attach the supplied antenna.  Adjust the antenna to obtain optimum reception. Press the INPUT A  key  on the front panel(amplifier)or the FM key on the remote control, to ...
  • Seite 28: Bt Pairing And Connection

    VOLUME. Note: In order to avoid howling effect, do not touch the top of the  microphone when singing . Adjust the microphone volume gradually to  avoid howling effect. BT PAIRING AND CONNECTION • Turn on the BT feature on your phone or music player. • Turn on and set the unit to BT mode. The flashing blue light BT on LED  display indicates it is in pairing mode. • Set your phone or music player to search for BT devices. • Select "Clubmaster8000" from search results on your phone or music  player. • Select OK or YES to pair the unit with your phone or music player. • If protected, enter 0000 for passkey. A steady blue light indicates ...
  • Seite 30: Disposal Considerations

    DISPOSAL CONSIDERATIONS According to the European waste regulation 2012/19/EU this symbol on the product or on its packaging indicates  that this product may not be treated as household waste. Instead it should be taken to the appropriate collection  point for the recycling of electrical and electronic  equipment. By ensuring this product is disposed of  correctly, you will help prevent potential negative consequences for the environment and human health,  which could otherwise be caused by inappropriate waste handling of this product. For more detailed information  about recycling of this product, please contact your local ...
  • Seite 31 Chère cliente, cher client, Toutes nos félicitations pour l’acquisition de ce nouvel appareil. Veuillez  lire attentivement et respecter les instructions de ce mode d’emploi  afin d’éviter d’éventuels dommages. Nous ne saurions être tenus pour  responsables des dommages dus au non-respect des consignes et à la mauvaise utilisation de l’appareil SOMMAIRE Fiche Technique 32 Consignes de sécurité 33 Aperçu de l'appareil 35 Fonctionnement 40 Effect Sonores 40 Jeux de lumière en couleur 41 Radi 41 Fonction Karaoké et guitarre 41 Appairage BT et connection 42...
  • Seite 32: Fiche Technique

    FICHE TECHNIQUE Numéro d'article 10032821 100-240 V~ 50/60 Hz Alimentation Puissance consommée 33 W Plage de fréquences FM  87, 5 - 108 MHz Connexions Entrée AUX-IN 3,5 mm Entrée de micro 6,3 mm Températures de fonctionnement  5 °C à 40 °C Standard de retransmission BT Version 2.1+EDR Portée Jusqu'à...
  • Seite 33: Consignes De Sécurité

    CONSIGNES DE SÉCURITÉ • Pour assurer le bon fonctionnement, veuillez lire attentivement ce mode  d'emploi. Conservez-le en lieu sûr pour vous y référer ultérieurement. • Installez ce système de sonorisation dans un endroit bien aéré, frais,  sec et propre - à l'abri des rayons du soleil, des sources de chaleur, des vibrations, de la poussière, de l'humidité et/ou du froid. Pour assurer  une bonne ventilation de l'appareil, conservez 10 cm d'espace tout autour. • N'installez pas cet appareil à proximité d'autres appareils électriques, de moteurs ou transformateurs, pour éviter les bruits parasites.
  • Seite 34 antennes extérieures. • Ne tentez pas de modifier l'appareil ou de le réparer. Contactez le  personnel qualifié lorsque l'entretien est nécessaire. N'ouvrez jamais le  boîtier pour quelque raison que ce soit. • Si vous ne souhaitez pas utiliser l'appareil pendant une période prolongée (par exemple pendant les vacances), débranchez le câble  d'alimentation de la prise. • Avant de déplacer cet appareil, débranchez le câble d'alimentation de la prise. •...
  • Seite 35: Aperçu De L'appareil

    APERÇU DE L'APPAREIL Vue arrière Interrupteur d'alimentation Trois positions : AC (secteur), arrêt, DC (sur batterie). En position AC et  avec l'entrée AC activée, l'enceinte est active et la batterie se recharge. La batterie se recharge également en mode veille. En position OFF, le mode secteur ainsi que le mode batterie sont désactivés.
  • Seite 36: Face Avant

    Face avant EFFECT PARTY EFFECT 23 22 21 2019 18 17 16...
  • Seite 37 Effets spéciaux normal. pour choisir parmi différents 20 Volume / Multi effets sonores : Poussée, alarme, Tournez le bouton pour régler le vecteur, feux d'artifice, pluie volume de l'appareil, le volume 2 Mode Pro du casque, les aigus et les basses.
  • Seite 38 Remote Control BT.A BT.B DISCONNECT.A DISCONNECT.B MENU...
  • Seite 39 19 Titre suivant USB Éclairage 20 Titre précédent entrée B 2 Veille 3 Touches numériques 21 Lecture Pause entrée B 4 Entrée BT A 22 Répétition entrée B 5 Déconnecter A 23 Titre suivant entrée A 6 Volume + 24 Titre précédent entrée A 7 Réglage du menu - 25 Lecture Pause entrée A 8 Recherche de station +...
  • Seite 40: Fonctionnement

    FONCTIONNEMENT 1. Veillez à mettre l'appareil hors tension avant d'utiliser les prises d'entrée appropriées. 2. Allumez l'appareil et attendez 3-4 secondes jusqu'à ce que les fonctions  de haut-parleurs soient prêtes. 3. Sélectionnez une source audio par le bouton INPUT A sur la console de commande pour afficher AUX A, BT-A, USB A. Appuyez sur INPUT B sur la  console de commande pour afficher LINE, USB B, BT-B. 4. Utilisez la commande volume/MULTI sur le panneau de commande ou la touche VOL +/- de la télécommande pour régler le volume, les aigus et les basses.
  • Seite 41: Jeux De Lumière En Couleur

    JEUX DE LUMIÈRE EN COULEUR Réglage de l'éclairage des enceintes rouge clignotant vert clignotant bleu clignotant rouge et vert clignotant vert et bleu clignotant rouge vert et bleu clignotant Auto cycles de combinaisons de couleurs clignotantes Demo les lumières clignotent et changent de couleur au rythme de la musique.
  • Seite 42: Appairage Bt Et Connection

    • Configurez votre téléphone ou votre lecteur de musique pour rechercher  des appareils BT. • Sélectionnez "Clubmaster 8000" dans les résultats de recherche de votre téléphone ou de votre lecteur de musique. • Sélectionnez OK ou YES pour connecter cet appareil à votre téléphone ou à votre lecteur de musique.
  • Seite 44: Informations Sur Le Recyclage

    INFORMATIONS SUR LE RECYCLAGE Vous trouverez sur le produit l’image ci-contre (une  poubelle sur roues, barrée d‘une croix), ce qui indique  que le produit se trouve soumis à la directive européenne 2012/19/UE. Renseignez-vous sur les dispositions en vigueur dans votre région concernant la collecte séparée des appareils électriques et électroniques. Respectez- les et ne jetez pas les appareils usagés avec les ordures  ménagères. La mise en rebut correcte du produit usagé permet de préserver l’environnement et la santé. Le ...
  • Seite 45 Estimado cliente: Le felicitamos por la adquisición de este producto. Lea atentamente el  siguiente manual y siga cuidadosamente las instrucciones de uso con el fin de evitar posibles daños. La empresa no se responsabiliza de los daños  ocasionados por un uso indebido del producto o por haber desatendido las indicaciones de seguridad. ÍNDICE Datós Técnicos 46 Indicationes de seguridad 47 Vista general del aparato 49 Puesta en funcionamento 54 Efectos de sonido 54 Control de la iluminación 55...
  • Seite 46: Datós Técnicos

    DATÓS TÉCNICOS Número de artículo 10032821 100-240 V~ 50/60 Hz Fuente de alimentación Consumo 33 W Respuesta de frecuencia 87,5 - 108 MHz Conexiones Entrada auxiliar 3,5 mm Entrada para micrófono 6,3 mm Rango de temperatura de 5 °C hasta 40 °C funcionamiento Estándar de transmisión BT Version 2.1+EDR Rango de alcance Hasta 10 metros...
  • Seite 47: Indicationes De Seguridad

    INDICATIONES DE SEGURIDAD • • Lea atentamente este manual de instrucciones para garantizar un funcionamiento correcto del aparato. Conserve este manual de  instrucciones en un lugar seguro para consultas posteriores. • •  I nstale este sistema de sonido en un lugar bien ventilado, fresco y  seco, lejos de la exposición directa a los rayos del sol, fuentes de calor,  vibraciones, polvo, humedad o/y frío. Para garantizar una suficiente  circulación del aire, deje un espacio de al menos 10 cm alrededor del  aparato. • No coloque el aparato cerca de otros dispositivos eléctricos, motores o transformadores para evitar interferencias.
  • Seite 48 daño. • Nunca modifique o repare el aparato usted mismo. Póngase en contacto  con personal cualificado si necesita realizar cualquier reparación. Nunca  abra el aparato. • Si no va a utilizar el aparato durante un periodo de tiempo prolongado (p. ej. se va de vacaciones), desconecte el enchufe de la toma de  corriente. • Antes de mover el aparato, desconéctelo de la toma de corriente. • Si la temperatura ambiente desciende repentinamente, es posible que se forme agua condensada en el aparato. Desconecte el enchufe de la ...
  • Seite 49: Vista General Del Aparato

    VISTA GENERAL DEL APARATO Parte posterior Interruptor de alimentación Tres opciones: AC (red eléctrica), OFF, DC (funcionamiento mediante  batería) Cuando el interruptor está en posición AC, el aparato está encendido y la batería se carga. La batería también se carga en modo Standby. Cuando el interruptor está en posición OFF, tanto el funcionamiento  mediante la red eléctrica como mediante la batería están desactivados. Cuando el interruptor está en posición DC, el aparato funciona ...
  • Seite 50: Parte Frontal

    Parte frontal EFFECT PARTY EFFECT 23 22 21 2019 18 17 16...
  • Seite 51 Modo PARTY EFFECT elegir entre los modos Carga de Puede elegir diferentes efectos  batería, Standby o Normal. festivos: empujones, alarma,  20 Volumen/Multi vector, fuegos artificiales, lluvia Gire la perilla para ajustar el  volumen del aparato, el volumen 2 Modo Pro de los auriculares, los altos y los 3 Modo Club bajos. 4 Láser 21 Entrada para auriculares 5 DJ Effect 22 Menú...
  • Seite 52 Mando a distancia BT.A BT.B DISCONNECT.A DISCONNECT.B MENU...
  • Seite 53 19 Siguiente pista de USB 20 Pista anterior de la entrada B 2 Standby 3 Teclado numérico 21 Reproducir/Pausar la entrada B 4 Bluetooth de la entrada A 22 Repetir entrada B 5 Desconectar fuente A 23 Siguiente pista de la entrada A 6 Volumen + 24 Pista anterior de la entrada A 7 Ajustes de menú -...
  • Seite 54: Puesta En Funcionamento

    PUESTA EN FUNCIONAMENTO 1. Asegúrese de desconectar el suministro de energía antes de conectar  cualquier conector. 2.   E ncienda el aparato y espere 3-4 segundos hasta que la función e  altavoces esté lista. 3.   S eleccione una fuente de audio. Para ello, pulse el botón INPUT A en el  panel de control para visualizar en el display AUX A, BT-A, USB A. Pulse el botón INPUT B en el panel de control para visualizar en el display LINE, USB B, BT-B.
  • Seite 55: Control De La Iluminación

    CONTROL DE LA ILUMINACIÓN Configuración de la iluminación del altavoz R  luz roja luz verde luz azul RG  luces roja y verde luces verde y azul GB  luces roja, verde y azul Auto  diferentes combinaciones de luz Demo  las luces parpadean y cambian de color al ritmo de la música RADIO 1. Antes de utilizar la radio, debe instalar la antena suministrada. Instale la antena para garantizar una óptima recepción. Pulse el botón INPUT A en la parte frontal (amplificador) o el botón FM en el mando a distancia ...
  • Seite 56: Conexión Bt

    CONEXIÓN BT • Desconecte todos los dispositivos Bluetooth que han estado previamente conectados a este aparato. •   A ctive la función Bluetooth en su teléfono móvil o reproductor de  música. •   E ncienda el aparato y active la función Bluetooth. Cuando parpadea la  luz azul de BT en el display LED, significa que el aparato se encuentra en  modo Pairing. •   I nicie la búsqueda de dispositivos BT en su teléfono móvil o reproductor  de música. •   E lija «Clubmaster 8000» en la lista de resultados de su teléfono móvil o  reproductor de música. •   S eleccione OK o SÍ para conectar el aparato a su teléfono móvil o  reproductor de música.
  • Seite 58: Indicaciones Sobre La Retirada Del Aparato

    INDICACIONES SOBRE LA RETIRADA DEL APARATO Si el aparato lleva adherida la ilustración de la izquierda (el contenedor de basura tachado) entonces rige la  normativa europea, directiva 2002/96/CE. Este producto no debe arrojarse a un contenedor de basura común.  Infórmese sobre las leyes territoriales que regulan la  recogida separada de aparatos eléctricos y electrónicos. Respete las leyes territoriales y no arroje aparatos viejos  al cubo de la basura doméstica. Una retirada de aparatos conforme a las leyes contribuye a proteger el medio ...
  • Seite 59 Gentile Cliente, La ringraziamo per aver acquistato il dispositivo. La preghiamo di leggere attentamente le seguenti istruzioni per l’uso e di seguirle per evitare  possibili danni tecnici. Non ci assumiamo alcuna responsabilità per danni scaturiti da una mancata osservazione delle avvertenze di sicurezza e da un uso improprio del dispositivo. INDICE Dati tecnici 60 Avvertenzi di sicurezza 61...
  • Seite 60: Dati Tecnici

    DATI TECNICI Numero articolo 10032821 100-240 V~ 50/60 Hz Power supply Alimentazione 33 W Intervallo di frequenza FM  87, 5 - 108 MHz Connessioni Ingresso AUX IN 3,5 mm Ingresso microfono  6,3 mm Intervallo di temperatura di 5 °C a 40 °C funzionamento    BT transmission standard Version 2.1+EDR Range...
  • Seite 61: Avvertenzi Di Sicurezza

    AVVERTENZI DI SICUREZZA •   P er garantire un funzionamento privo di problemi, leggere  attentamente il presente manuale e conservarlo in un luogo sicuro per future consultazioni. •   I nstallare questo sound system in un luogo ben ventilato, fresco,  asciutto, pulito e al riparo dalla luce del sole diretta, da fonti di calore,  vibrazioni, polvere, umidità e/o freddo.  Per un buon flusso d’aria  devono essere mantenuti 10 cm di spazio su tutti i lati del dispositivo. • Non posizionare il dispositivo vicino ad altri dispositivi elettrici, motori o trasformatori, in modo da evitare ronzii.
  • Seite 62 • Non cercare di modificare o riparare il dispositivo. Rivolgersi a  personale tecnico qualificato se è necessaria manutenzione. Non aprire  mai, in nessun caso, l’alloggiamento del dispositivo. • Se il dispositivo non viene utilizzato per periodi prolungati (ad es.  durante le ferie), staccare la spina. • Prima di spostare il dispositivo, staccare la spina. • Se la temperatura ambiente cambia improvvisamente, può formarsi  acqua di condensa. Scollegare l’alimentazione elettrica staccando la  spina. Lasciare il dispositivo scollegato per un po’ di tempo. • Se si utilizza il dispositivo per tempi prolungati, questo può diventare  caldo. Spegnere il dispositivo e lasciarlo raffreddare. • Posizionare il dispositivo vicino a una presa elettrica. La spina deve essere facilmente raggiungibile. • Le batterie non devono essere esposte a calore eccessivo, come raggi solari, fuoco o similari. Rispettare le normative regionali per lo ...
  • Seite 63: Descrizione Del Dispositivo

    DESCRIZIONE DEL DISPOSITIVO Retro 1. Interruttore di alimentazione Tre posizioni: AC (tensione di alimentazione), OFF, DC (funzionamento a  batteria) In posizione AC e con input AC acceso, l’altoparlante è attivo e la batteria  viene caricata. La batteria viene caricata anche in modalità standby. In posizione OFF, sia il funzionamento a corrente che quello a batteria  sono spenti. In posizione DC il dispositivo viene alimentato dalla batteria da 12 V. 2. Connessione corrente continua 12 V Se si utilizza l’impianto all’aperto e la batteria si scarica, è possibile ...
  • Seite 64 Fronte EFFECT PARTY EFFECT 23 22 21 2019 18 17 16...
  • Seite 65 Effetti per party 20 Volume/Multi Scelta tra diversi effetti: Spinta,  Ruotare la manopola per regolare Allarme, Vettore, Fuoco d’artificio,  il volume del dispositivo, delle Pioggia. cuffie, gli alti e i bassi. Modalità professionale 21 Connessione cuffie 22 Menu Modalità club Selezionare volume, bassi, alti e Laser modalità d’illuminazione. 5 Effetti per DJ 23 Titolo precedente ingresso A Premere brevemente per Selezionare il titolo precedente.
  • Seite 66 TELECOMANDO BT.A BT.B DISCONNECT.A DISCONNECT.B MENU...
  • Seite 67 19 Titolo successivo USB Luce 20 Titolo precedente ingresso B 2 Standby 3 Tasti numerici 21 Play/pausa ingresso B 4 Ingresso BT A 22 Ripetere ingresso B 5 Scollegare fonte A 23 Titolo successivo ingresso A 6 Volume + 24 Titolo successivo ingresso B 7 Impostazione menu –...
  • Seite 68: Utilizzo

    UTILIZZO 1.   A ssicurarsi di scollegare l’alimentazione quando si effettuano  collegamenti agli ingressi. 2. Accendere il dispositivo e attendere 2-3 secondi in modo che le funzioni  dell’altoparlante siano attive. 3. Selezionare una fonte audio premendo INPUT A sul pannello di controllo  per visualizzare AUX A, BT-A, USB A. Premere INPUT B sul pannello di controllo per visualizzare AUX B, BT-B, USB B. 4. Regolare la manopola VOLUME/MULTI sul pannello di controllo o il tasto VOL+/- sul telecomando per impostare volume, alti e bassi.
  • Seite 69: Effetti Cromatici Luminosi

    EFFETTI CROMATICI LUMINOSI Impostazione dell’illuminazione dell’altoparlante. lampeggia in rosso lampeggia in verde lampeggia in blu lampeggia in rosso e verde lampeggia in verde e blu RGB lampeggia in rosso, verde e blu Auto passaggio tra diverse combinazioni cromatiche Demo le luci lampeggiano e cambiano colore seguendo il ritmo della musica RADIO 1.
  • Seite 70: Accoppiamento Bt E Connessione

    BT indica che si trova in modalità di accoppiamento. • Cercare i dispositivi BT con smartphone o lettore musicale. • Selezionare “Clubmaster 8000” dai risultati della ricerca dello smartphone o lettore musicale. • Selezionare OK o Sì per collegare questo dispositivo con smartphone o lettore musicale.
  • Seite 72: Smaltimento

    SMALTIMENTO Se sul prodotto è presente la figura a sinistra (il bidone dei  rifiuti con le ruote), si applica la direttiva europea 2012/19/ UE. Questi prodotti non possono essere smaltiti con i rifiuti normali. Informarsi sulle disposizioni vigenti per la  raccolta di dispositivi elettrici ed elettronici. Attenersi alle disposizioni vigenti e non smaltire i vecchi dispositivi con i rifiuti domestici. Grazie al corretto smaltimento dei vecchi  dispositivi si tutela il pianeta e la salute delle persone da possibili conseguenze negative.

Inhaltsverzeichnis