Inhaltsverzeichnis
Werbung
Verfügbare Sprachen
Verfügbare Sprachen
Quicklinks
OM 10 0646
WISI Micro Headend
OM 10 0648
WISI Micro Headend
Transmodulator von 6 DVB-S/S2 Transpondern in 6 DVB-T Kanäle (OM 10 0646)
Transmodulator von 6 DVB-S/S2 Transpondern in 8 DVB-T oder 8 DVB-C Kanäle (OM 10 0648)
Eingebaute 4 in 6 Verteilmatrix minimiert den Montageaufwand und DiSEqC 1.0 erhöht die
Flexibilität
4 CI Slots für die zentrale Entschlüsselung von Pay-TV
PID Remapping (Hotel Mode) ermöglicht am Ausgang eine statische Service ID. Bei
Programmänderungen am Eingang entfällt somit ein neuer Suchlauf am TV-Gerät bzw. Receiver
LCN / NIT Bearbeitung
Multiplex-Funktionalität am Eingang sowie am Ausgang
Einspeisung von Videos z.B.: Hotelinformationen oder Werbefilme
Programmierung über Weboberfläche
Integrierter DHCP-Server, automatische Verbindungsaufnahme mit dem PC
Bluetooth-Zugang für Smartphone und Tablet
Mehrkanal Transmodulator mit CI
Mehrkanal Transmodulator mit CI
Betriebsanleitung
Operating instructions
Werbung
Inhaltsverzeichnis

Inhaltszusammenfassung für Wisi OM 10 0646
- Seite 1 WISI Micro Headend Mehrkanal Transmodulator mit CI Transmodulator von 6 DVB-S/S2 Transpondern in 6 DVB-T Kanäle (OM 10 0646) Transmodulator von 6 DVB-S/S2 Transpondern in 8 DVB-T oder 8 DVB-C Kanäle (OM 10 0648) Eingebaute 4 in 6 Verteilmatrix minimiert den Montageaufwand und DiSEqC 1.0 erhöht die Flexibilität...
-
Seite 2: Inhaltsverzeichnis
Inhaltsverzeichnis: 1. Gefahren- und Aufstellhinweise ………………………………………………………………………………………………….……………4 2. Anschlüsse.…………………………………………………………………………………………………..…………………………………………..5 3. Wandmontage/Bohrlochabstände.……………………………………………………………………………………………….…………..6 4. Web Benutzeroberfläche………………….……………………………………………………………….………………………………..7 4.1 Systemeinstellungen..…………………………………………………………………………………………………………………..8 4.2 Eingangseinstellungen.……………………………………………………………..…………………………………………………………9 4.2 LNB Überlast.……………………………………………………………..………………………………………………………………………10 4.3 Remuxeinstellungen…………………………………………………………………………………………………………………………..11 4.3 Remux Netzwerkeinstellungen…………………………………………………………………………………………………………..12 4.3 Remux Informationen………………………………………………………………………………………………………………………..13 4.3 Remux OMTS …………………………………………………………………………………………………………………………………….14 4.3 Erstellung der OMTS Videodatei…………………………….………………………………………………………………………….14 4.4 CAM Informationen.…………………………………………………………………………………………………………………………..16 4.5 Ausgangeinstellungen DVB-T….………………………………………………………………………………………………………….17 4.6 Ausgangseinstellungen DVB-C.………………………………………………………………………………………………………….18 4.7 File Browser.……………………………………………………………………………………………. - Seite 3 Index 7. Safety instructions……………………………………………………………………………………………………..……………………………26 8. Connectors…………………………………………………………………………………………………..………………………………………….27 9. Wall mounting / Hole distances……………………………………………………………………………………………………………….28 10. Programming via web interface…..…………………………………………………………………………………………………………..29 10.1 System settings………………………………………………………………………………………………………………………………..30 10.2 Input settings…………………………………………………………………………………………………………………………………..31 10.2 LNB overload……………………………………………………………………………………………………………………………………32 10.3 Remux settings………………………………………………………………………………………………………………………………..33 10.3 Remux network settings………………………………………………………………………………………………………………….34 10.3 Remux OMTS…………………………………………………………………………………………………………………………………..35 10.3 Generation of the OMTS video file…………………………………………………………………………………………………..35 10.3 Remux information………………………………………………………………………………………………………………………….37 10.4 CAM information……………………………………………………………………………………………………………………………..38 10.5 Output settings DVB-T……………………………………………………………………………………………………………………..39...
-
Seite 4: Gefahren- Und Aufstellhinweise
Unser gesamtes Verpackungsmaterial (Kartonagen, Einlegezettel, Kunststoff-Folien und -beutel) ist vollständig recyclingfähig. Hiermit erklärt die WISI COMMUNICATIONS GMBH & CO. KG, dass sich dieses Produkt in Übereinstimmung mit den grundlegenden Anforderungen und geltenden Vorschriften der RED Richtlinie 2014/53/EU und der RoHS-Richtlinie 2011/65/EU befindet. -
Seite 5: Anschlüsse
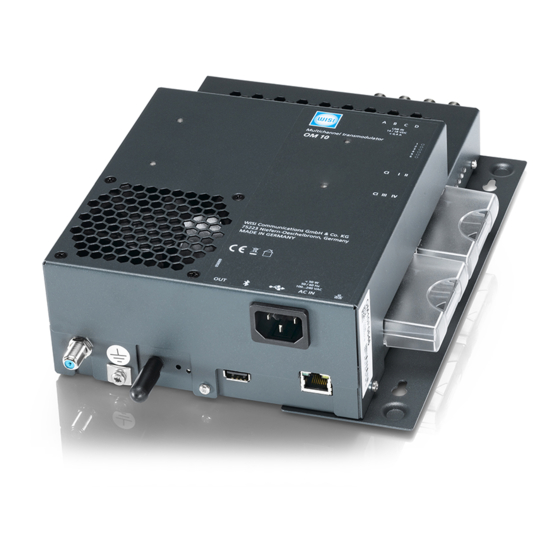
2. Anschlüsse: Beschreibung der Anschlüsse: IN (A,B,C,D) DVB-S/S2 Eingänge der Verteilmatrix LED 1 – 6 Kontrollleuchten der Tuner CI (I & II) (III & IV) Common Interface Schnittstellen Out: HF – Ausgang Potentialausgleich Bluetooth-Antenne LED & Taster Bluetooth LED und Taster für die Aktivierung USB - Schnittstelle AC IN Anschlussbuchse für Betriebsspannung... -
Seite 6: Wandmontage/Bohrlochabstände
3. Wandmontage/Bohrlochabstände: Für die breite Wandmontage wurde die Montageschiene bereits am Gehäuse vormontiert. Geeignetes Installationmaterial ist im Lieferumfang enthalten. Wichtig: Das Gerät während der Montage vor Staub schützen! Für eine platzsparende seitliche Wandmontage kann die Montageschiene an dem schmalen Gehäuse-Seitenteil angebracht werden. -
Seite 7: Web Benutzeroberfläche
4. Im Adressfeld des Internetbrowsers "http://OM10" oder die IP-Adresse des OM 10 eingeben. oder 5. Kompletter Zugriff auf alle Einstellungen: Login Benutzername: admin Login Passwort: wisi 6. Begrenzter Zugriff auf File Browser: (Zugang für die Auswahl von Videodateien, z.B.: für Hotelmitarbeiter) Login Benutzername: user Login Passwort:... -
Seite 8: Systemeinstellungen
4.1 Systemeinstellungen: In den System-Einstellungen sind die voreingestellten IP-Parameter und allgemeine Gerätinformationen aufgelistet. Wichtig: Bei paralleler Nutzung mehrere OM 10 muss der DHCP Server deaktiviert sein, andernfalls kommt es zu einer Überschneidung bei den IP-Adressen da allen Anlagen die IP-Adresse: 192.168.000.20 zugeordnet wird. Ausgangs-Typ: Auswahl der Ausgangsmodulation DVB-C <->... -
Seite 9: Eingangseinstellungen
4.2 Eingangseinstellungen: Einstellungen der Empfangstuner: LNB off: LNB-Spannungsversorgung ausgeschaltet. 14V / 18V (22 kHz): Schaltspannung der einzelnen Polarisationsebenen. 14V: Vertikal Low 14V/22 kHz: Vertikal High 18V: Horizontal Low 18V/22 kHz: Horizontal High SAT 1 (xx): DiSEqC-Protokoll für die Signalverteilung über einen Multischalter. Aktivierung des ersten Systemeinganges des Multischalters. -
Seite 10: Lnb Überlast
4.2 LNB Überlast: Im Falle einer Überlast oder einem Kurzschluss am Eingang wird der betroffene Anschluss rot markiert. Abhängig von dem betroffenen Eingang blinkt zusätzlich eine der seitlich am Gerät angebrachten LEDs. LED 1 für Eingangstuner A LED 2 für Eingangstuner B LED 3 für Eingangstuner C LED 4 für Eingangstuner D Wichtig:... - Seite 11 4.3 Remux: Tun. 1 – Tun. 6: Auswahl des Eingangstuners. Verwendung der transparenten Umsetzung (Nur bei DVB-C Ausgangsmodulation): Transparent (gelb): Der eingehende Datenstrom wird nicht bearbeitet und alle Programme/Zusatzdienste stehen im ausgewälten Ausgangskanal zur Verfügung. Der komplette Datenstrom wird über das ausgewählte Common Interface und Smartcard entschlüsselt.
-
Seite 12: Remux Omts
4.3 Remux OMTS: Über diesen Menüpunkt werden Einstellungen zur Einspeisung einer Videodatei z.B.: Hotel-Informationskanal vorgenommen. Die Videodatei kann jedem Ausgangskanal frei hinzugefügt werden und steht, parallel zu den umgesetzten TV Programmen, an allen Endgeräten zur Verfügung. Hierfür wird zuerst in der Datei-Bibliothek das gewünschte Video gestartet (Seite 13) und anschließend der Ausgangskanal im Dropdown-Menü... - Seite 13 5. Insert Service Name: Hierüber kann der Programmname eingegeben werden. Dieser erscheint beim Suchlauf des Endgerätes und beim Umschaltvorgang. 6. Start: Die Videoumwandlung wird gestartet. Die Quelldatei wird in eine Transportstrom-Datei (TS-File) mit den eingestellten Parametern umgewandelt. Nach erfolgreicher Wandlung ist „Process done“ unterhalb der Start- Schaltfläche sichtbar.
-
Seite 14: Remux Netzwerkeinstellungen
4.3 Remux Netzwerkeinstellungen: Netzwerk ID: Vergabe einer Netzwerk ID für alle Ausgangskanäle. Name: Eingabe des Netzwerknamen. NIT-Version: Die NIT Version sollte bei jeder nachträglich durchgeführten Parameterveränderung um „1“ erhöht werden. Wird diese Funktion von den TV Geräten unterstützt, so kann ein automatischer Suchlauf erfolgen. - Seite 15 4.3 Remux info: Gesamtübersicht der vorgenommenen Remux-Einstellungen. Für jeden Ausgangskanal wird die genutzte Datenrate in Prozent angezeigt, sowie die darin übertragenen Programme. Zusätzlich wird dargestellt über welchen Tuner das Programm empfangen und über welchen CI-Slot dieses entschlüsselt wird. Wurden LCN Einstellungen vorgenommen so sind diese ebenfalls hier ersichtlich.
- Seite 16 4.4 CAM: Verschiedene Informationen können aus den CAMs ausgelesen werden, z.B.: Gültigkeit SW-Version CAM-Typ Clock / Datenrate: Auswahl der CI- Datenrate. Je nach CAM- Typ können unterschiedlich hohe Datenmengen (Anzahl an Programmen) entschlüsselt werden. Bei einer zu hohen Selektion wird das CAM übersteuert und die Entschlüsselung fällt bei allen Programmen aus.
-
Seite 17: Ausgangeinstellungen Dvb-T
Kanalbandbreite auswählen (5, 6, 7 oder 8 MHz). Für höchste Datenrate 8 MHz auswählen. Signalstärke: Ausgangsleistung zwischen 85 dBµV und 100 dBµV einstellen. (OM 10 0646) Ausgangsleistung zwischen 90 dBµV und 105 dBµV einstellen. (OM 10 0648) Code rate (FEC): Auswahl der Fehlerkorrektur: Für höchste Datenrate 7/8 auswählen. -
Seite 18: Ausgangseinstellungen Dvb-C
8 MHz: 6.900 kSym/s 7 MHz: 6.085 kSym/s Signalstärke: Ausgangsleistung zwischen 85 dBµV und 100 dBµV einstellen. (OM 10 0646) Ausgangsleistung zwischen 90 dBµV und 105 dBµV einstellen. (OM 10 0648). Konstellation: Auswahl der QAM Modulation zwischen 64 QAM, 128 QAM und 256 QAM. Die höchste QAM Modulation ermöglicht die höchste Ausgangsdatenrate. - Seite 19 4.7 Datei-Bibliothek: In der Datei-Bibliothek können verschiedene Konfigurationsdateien (CFG) oder Videodateien (OMTS) abgespeichert werden. Diese Dateien können sowohl über das WebUI als auch über die Bluetooth-Applikation in die Kopfstelle geladen werden. Im Auslieferzustand ist eine Vorprogrammierung mit SD-Programmen und eine mit HD- Programmen abgelegt.
-
Seite 20: Update
Start des Updatevorganges durch betätigen des Button „Update“ Die neuste Gerätesoftware kann unter folgendem Link heruntergeladen werden: https://wisiconnect.tv/ Ein Klick auf das WISI Logo innerhalb der Programmieroberfläche öffnet ebenfalls die Website https://wisiconnect.tv/ Wichtig: Das Gerät darf während einem Softwareupdate nicht von der Spannungsversorgung getrennt werden! -
Seite 21: Hotel Mode
4.9 Hotel Mode: In den Systemeinstellungen wird unter „Remux mode“ der Hotel Mode aktiviert: Der Hotel Mode bietet folgende Vorteile: Statische Service ID pro Programm Festlegung einer Audiospur pro Programm Mehrfachübertagung eines Programmes mit unterschiedlichen Audiospuren Mit der Umstellung auf den Hotel Mode ändert sich die Vorgehensweise bei der Programmierung. Im Remux Menü sind nun die verfügbaren Ausgangskanäle aufgeführt und nicht mehr die Eingangstuner. -
Seite 22: Hotel Mode Remux
4.9 Hotel Mode Remux: Neuer Slot: Ein weiterer Container mit einer einzigartigen Service ID wird erzeugt. Dieser kann nun mit einem frei wählbaren Programm befüllt werden. Slot löschen: Der unterste bzw. zuletzt hinzugefügte Container wird gelöscht. Aktualisieren: Aktualisiert die Container-Tabelle Tuner: Auswahl des Tuners über welchen das gewünschte Programm empfangen wird. - Seite 23 (Seite 8). 2. Die LED wechselt von rot auf grün und das OM 10 ist zur Verbindungsaufnahme bereit. 3. Starten der Android Bluetooth Applikation „WISI OM Manager“ auf dem Smartphone bzw. Tablet. 4. Auswahl des angezeigten WISI Micro Headends.
- Seite 24 6. Technische Daten Eingang Eingangsfrequenzbereich 950...2150 MHz Eingangsfrequenzschritte 1 MHz Rückflussdämpfung IN >8 dB Eingangspegelbereich 50...90 dBμV Modulation QPSK / 8PSK / 16APSK / 32 APSK Symbolrate DVB-S 1...53 MSps Symbolrate DVB-S2 1...53 MSps (QPSK) / 1...35 MSps (16APSK) 1...45 MSps (8PSK) / 1...28 MSps (32APSK) CI-Verarbeitung Anzahl der PCMCIA-Steckplätze QAM Verarbeitung...
- Seite 25 OM 10 0648 WISI Micro Headend Multichannel Transmodulator with CI Transmodulator of 6 DVB-S/S2 transponders to 6 DVB-T packages (OM 10 0646) Transmodulator of 6 DVB-S/S2 transponders to 6 DVB-T or 8 DVB-C channels (OM 10 0648) The integrated 4-in-6 switch matrix reduces the installation effort and DiSEqC 1.0 increases the flexibility ...
- Seite 26 All of our packing materials (cardboard boxes, packing notes, plastic films and plastic bags) can be recycled. Hereby WISI COMMUNICATIONS GMBH & CO. KG confirms that this product is in conformity with the elementary requirements and valid regulations of the RED directive 2014/53/EU and the RoHS-directive 2011/65/EU.
- Seite 27 2. Connectors: Description of connectors: IN (A,B,C,D) DVB-S/S2 input of switch matrix LED 1 – 6 Tuner control LED CI (I II) & (III IV) Common Interface slots Out: RF – output Potential equalisation terminal Bluetooth antenna LED & Button Bluetooth LED and button for activation USB interface AC IN...
- Seite 28 3. Wall mounting / Hole distances: For the wide wall mounting the mounting rail has been pre-assembled to the housing. Suitable installation material is included. Important: During installation, the device must be protected from dust. For a space-saving side wall installation, the mounting rail can be mounted on the small housing side part.
- Seite 29 4. Enter in the address field of the Internet browser: “http://OM10” or the manually assigned IP address of the OM 10 (192.168.0.20). 5. Full access to all settings: Login user name: admin Login password: wisi 6. Limited access to File Browser: (Access for the selection of video files, e.g. for hotel staff) Login user name: user Login password:...
-
Seite 30: System Settings
4.1 System settings: All pre-adjusted IP parameters and general information are visible in the system menu. Important: If there are several OM 10s in use, the DHCP server has to be disabled, otherwise there will be a collision of the IP addresses, as all devices automatically have the IP address 192.168.000.20 Output Type: Selection of output modulation: DVB-C <->... -
Seite 31: Input Settings
4.2 Input settings: Settings for the switching matrix: LNB off: Deactivate the LNB power supply 14V or 18V (22 kHz): Switching voltage of the satellite polarisations. 14V: Vertical Low 14V/22kHz: Vertical High 18V: Horizontal Low 18V/22kHz: Horizontal High SAT 1 (xx): DiSEqC-protocol for use with a 5, 9, 13 or 17 input multiswitch. - Seite 32 4.2 LNB overload: In case of an overload or short circuit at the input, the affected input connector will be marked in red. The tuner LED alongside will blink as well. LED 1 for Input tuner A LED 2 for Input tuner B LED 3 for Input tuner C LED 4 for Input tuner D Important:...
- Seite 33 4.6 Remux: Tuner 1 – 6: Select the input tuner. Use of transparent transmodulation (only at DVB-C output modulation): Transparent (yellow): The incoming data stream will not be modified and the complete content is available at the selected output channel. The complete data stream will be encrypted by the selected Common Interface and smartcard.
-
Seite 34: Generation Of An Omts Video File
4.3 Remux OMTS: In this menu settings for the insertion of video content are possible, e.g. hotel information channeld. The video file can be added to any output channel and is parallel to the regular TV services available at each reception device. Therefore, the playout of the video has to be started in the file browser (page 35) and the output channel has to be selected in the drop down menu. - Seite 35 5. Insert Service Name: Insert the name of the video file and service. The name is shown at the TV scan or changeover at the TV set. 6. Start: The video conversion will be started. The source file gets converted into a transport stream file (TS-file) with the selected parameters.
- Seite 36 4.3 Remux NET: Network ID: The Network ID which will be used for this transmodulator. Name: Insertion of the network name. NIT Version: The NIT Version should be increased (+1) after each parameter change. If this feature is supported by the TV set, a new service scan can be activated automatically. Possible value: 1…31.
- Seite 37 Remux info: Main overview of the remux settings. The used data rate per cent for each output channel as well as all multiplexed services are displayed. Additionally, this overview shows from which tuner the service is received and by which CI-slot the service is descrambled.
- Seite 38 4.5 CAM: Different information is available from the CAMs, for example: Validity Software-Version Type of CAM Clock / Data rate: Selection of the CI- data rate. Depending on the CAM is the encryption of different data rates (number of services) possible. If the selection is too high, the CAM can be overdriven and the encryption of all services will drop out.
- Seite 39 Enable or disable the channel (a gap of the selected bandwidth occurs). Frequency: OM 10 0646: Set the start output frequency at channel 1. All further channels will be set automatically, depending on the selected bandwidth, 7 MHz or 8 MHz. All output channels are bonded in one block.
- Seite 40 8 MHz: 6.900 kSym/s 7 MHz: 6.085 kSym/s Level: Output level between 85 dBµV and 100 dBµV, adjustable per channel block. (OM 10 0646) Output level between 90 dBµV and 105 dBµV, adjustable per channel block. (OM 10 0648) Constellation: Select the QAM modulation between 64 QAM, 128 QAM und 256 QAM.
-
Seite 41: File Browser
4.7 File Browser: The file browser allows storing of different configuration settings (CFG) or video files (OMTS). This files can be uploaded into the headend using the WebUI or Bluetooth application. A pre-programming of SD and HD services is available at delivery. CFG: All configuration files (CFG) are visible. - Seite 42 Choose the latest software version by clicking “Select File“ Start the update procedure by clicking “Update” The latest device software is available at: https://wisiconnect.tv/ Clicking on the WISI logo inside the WebUI opens the website https://wisiconnect.tv/, as well. Important: Do not disconnect the main during the update procedure!
- Seite 43 4.9 Hotel Mode: The Hotel mode can be activated under „Remux mode“ in the system settings: Hotel mode offers the following advantages: Static service ID per service Define one audio line per service Multiple transmission of one service with different audio lines By using Hotel mode, the programming process changes compared to Normal mode.
- Seite 44 4.9 Hotel Mode Remux: Create Slot: A further container with a unique service ID will be created. It can be programmed with a freely selectable service. Remove Slot: Deletes the lowest and the last added container respectively. Refresh Table: Refreshes the container table. Tuner: Select the tuner about the desired service is receipted.
-
Seite 45: Bluetooth Connection
Administration of configurations and video files Save device settings Update of the Micro Headend Required is a smartphone or tablet with Android OS (Bluetooth smart ready – min. Android 4.3) and the WISI Application: WISI OM Manager https://play.google.com/store/apps/details?id=de.wisi.om10_app&hl=de Establishing a connection: 1. - Seite 46 Technical specifications Input Input frequency range 950...2150 MHz Input frequency steps 1 MHz Return loss IN >8 dB Input level range 50...90 dBμV Modulation QPSK / 8PSK / 16APSK / 32APSK Symbol rate DVB-S 1...53 MSps Symbol rate DVB-S2 1...53 MSps (QPSK) / 1…35 MSps (16APSK) 1...45 MSps (8PSK) / 1…28 MSps (32APSK) CI-Processing Number of PCMCIA slots...
- Seite 48 WISI Communications GmbH & Co. KG Empfangs- und Verteiltechnik Wilhelm-Sihn-Straße 5-7 75223 Niefern-Oeschelbronn, Germany Tel.: +49 7233 - 66-292, Fax: 66-320, E-mail: info@wisi.de, http://www.wisi.de excellence in digital ... Technische Änderungen und Druckfehler vorbehalten! Technical Modifications reserved. WISI cannot be heldliable for any printing error.