Amann Girrbach ARTEX Gebrauchsanweisung
Uk-einrichtsschlüssel
Quicklinks
Manufacturer | Hersteller
Distribution | Vertrieb
Amann Girrbach AG
Herrschaftswiesen 1
6842 Koblach | Austria
Fon +43 5523 62333-0
Fax +43 5523 55990
austria@amanngirrbach.com
www.amanngirrbach.com
1
2
3
4
5
6
7
8
M O D E L M A N A G E M E N T
D
GEBRAUCHSANWEISUNG
_ Gebrauchsanweisung
ARTEX ® UK-EINRICHTSCHLÜSSEL
_ Instructions for use
_ Mode d'emploi
Original-Gebrauchsanweisung
_ Istruzioni per l'uso
_ Instrucciones de
empleo
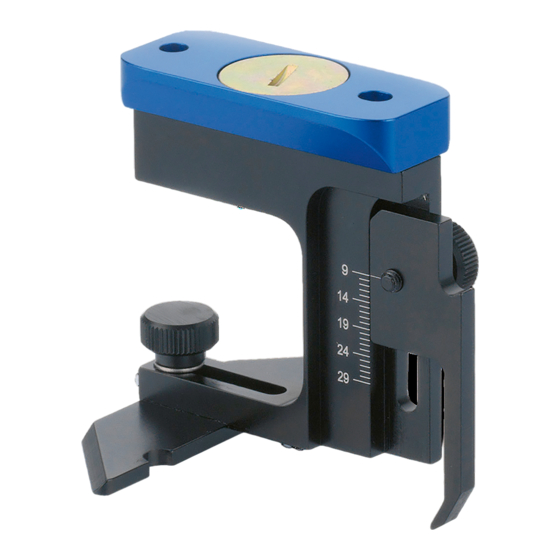
Fundamentwaage zur mittelwertigen Ausrichtung des
unbezahnten UK-Modells am Symphysen- und retro-
molaren Höckerpunkt.
BEDIENUNG/HANDHABUNG
Zentrik des Artikulators schließen. Frontzahnführungsstift
in Nullposition. Auswerten der Patienteninformation und
Übertragen derselben in den Einrichtschlüssel.
Einstellen der frontalen Höhe
Ausmessen des Abstandes von Symphysenpunkt zur am
Wachswall angezeichneten Lippenschlußlinie (am Fallbei-
spiel 18 mm). (Abb. 1)
Sagittale Ausrichtung
Den Querbalken in sagittaler Richtung (mit beiden Abschrä-
gungen nach dorsal) so einstellen, dass die Kante des
Made in the European Union
Querbalkens in der Mitte der retromolaren Dreiecke aufliegt
(Modellanalyse). UK-Modell anhand dieser Daten mit
Gummiband am Einrichtschlüssel befestigen und im Artiku-
latoren-Oberteil einsetzen. (Abb. 2)
Artikulator auf den Kopf stellen. Auf die angefeuchtete
Basalfläche des UK-Modells und auf die Sockelplatte Gips
(cremig-sahnig) aufbringen. Artikulator schließen. Durch
Klopfen den Gips entspannen. (Abb. 3)
OK-Modell anhand der Wachsbißnahme zuordnen. Eingipsen
wie zuvor beschrieben. (Abb. 4)
Ersatzteile und Zubehör:
217700
217700C
216250
216250C
GEBRAUCHSANWEISUNG
ARTEX ® AUFSTELLKALOTTEN
Original-Gebrauchsanweisung
Orientierungshilfen zur Aufstellung totaler Prothesen
nach der Okklusionskurve (Spee/Wilson).
Horizontal, vertikal und neigungsverstellbarer Träger
mit OE-Markierung nimmt die unterschiedlichen
Kalotten auf.
BEDIENUNG/HANDHABUNG
Aufstellung der Front
OK- und UK-Modell sind in Artikulator eingestellt. Die Zähne
41 und 31 aufstellen. Die Höhe der Inzisal- kanten wird der
Bißschablone entnommen (aus-messen). Die Frontzähne
31 und 41 sind protrusiv geneigt, die Inzisalkanten zur OK-
Umschlagfalte orientiert! Basalfläche der Zähne auf Kiefe-
kamm-Mitte ausrichten.
Danach OK-Modell entnehmen. Kalottenträger mit Einricht-
blech einsetzen. Einrichtblech frontal auf den Inzisalkanten
von 31 und 41, dorsal auf oberes Drittel des retromolaren
Dreiecks aurichten (Modellanalyse). Einrichtblech feststellen.
UK- Font von 33 bis 43 aufstellen. Die Inzisalkanten der
Zähne berühren das Einrichtblech. Unterschiedliche
Neigungen der Zähne beachten. (Abb. 5 + 6)
Aufstellung der Seitenzähne
Einrichtblech entfernen. Kalottenblech entsprechend Zahn-
typ (siehe Tabelle) auswählen und in Kalottenträger einset-
zen. Das Kalottenblech berührt frontal die Inzisalkanten von
33 und 43 und wird dorsal am oberen Drittel des retromolaren
Dreiecks ausgerichtet. Kalottenblech feststellen.
Seitenzähne entsprechend der Modellanalyse oder Ästhetik-
sitzung aufstellen. Alle Höckerspitzen, ausgenommen die
lingualen Höcker von 34 und 44, berühren das Kalotten-
blech. (Abb. 7 + 8)
Ersatzteile und Zubehör:
217730C
217740
217741
217742
217744
217746
217749C
216260C
216269C
Art.-Nr.
Radius
217746
160 mm
217744
140 mm
217742
125 mm
217741
100 mm
mit Gewinde
dito, jedoch 126 mm C-Version
mit Splitex-Adaptionsplatte
dito, jedoch 126 mm C-Version
Kalottenträger, 126 mm für Carbon-Version
Einrichtplatte plan
Kalotten R 100
Kalotten R 125
Kalotten R 140
Kalotten R 160
Aufstellkalotten-Set, 6-teilig, 126 mm
für Carbon-Version
Kalottenträger mit Splitex-Profilplatte,
126 mm für Carbon-Version
dito, mit Kalottenset 5-teilig, 126 mm
für Carbon-Version
Kal.
Zahn-
Zahntyp
höcker
hersteller
30-35°
Creapearl
Poly-Star
Merz Dental
25-28°
Lux HK
Biodent,
Lindauer
Articron
Orthognat
Weithaas
15-16°
n, t, k, Odilux
Lindauer
0°
Orthocal
GB
INSTRUCTIONS FOR USE
ARTEX ® MANDIBULAR
SET-UP INDEX KEY
Translation of the original instructions for use
Fundament scale for average-value alignment of the
edentulous mandible model at the symphysis and
retromolar pads.
OPERATION/HANDLING
Close articulator centric. Set the anterior guidance pin out
of contact. Evaluate the patient information and enter the
same in the Mandibular Set-Up Index Key.
Adjusting the frontal height
Measure the distance of the symphysis pad to the lip
closure line marked on the wax wall (18 mm in the example).
(Fig. 1)
Sagittal alignment
The transverse crosspieces must be adjusted in a sagittal
direction (with both slopes positioned dorsally) so that the
upper edge of the crosspiece lies in the middle of the
retromolar triangle (model analysis). Mandibular model
connected with an elastic band to the Set-Up Index Key and
placed in the upper portion of the articulator. (Fig. 2)
Turn the articulator upside down. Then place this on the
moistened surface of the mandibular model and onto the
cast plaster of the base plate (creamy). Close articulator.
Remove the plaster by tapping with a hammer. (Fig. 3)
Maxillary model based on the wax impression made. Make a
plaster cast as previously described. (Fig. 4)
Spare parts and optional accessories:
217700
with thread
217700C
as above, although in a 126 mm
Carbon version
216250
with Splitex template
216250C
as above, although in a 126 mm
Carbon version
INSTRUCTIONS FOR USE
ARTEX ® SET-UP TEMPLATES
Translation of the original instructions for use
Guide for set-up of full dentures according to the Spee/
Wilson occlusion curve. The horizontally and vertically
adjustable device with occlusal plane indicator supports
the different templates.
OPERATION/HANDLING
Anterior guidance
Maxillary and mandibular models are placed in the articulator.
Set-up teeth 41 and 31. The heights of the incisal edges are
taken using the bite fork (measure). Anterior teeth 31 and 41
are tilted protrusively, with the incisal edges oriented to the
maxillary gingivobuccal fold! Adjust the base surface of the
teeth to the middle ridge of the jaw.
Then remove the maxillary model. Insert the set-up template
with the adjustment plate. Insert template frontally on the
incisal edges of teeth 31 and 41, adjust to align the upper
third of the retromolar triangle (model analysis). Attach
template.
Adjust the maxillary form to teeth 33 and 43. The incisal
edges of the teeth are in contact with the template. Take
care to note the varying tilt of the individual teeth.
(Figs. 5 + 6)
Adjustment of the lateral teeth.
Remove template. Select a bite plate to suit the type of
teeth (see Table) and insert it into the bite fork. The bite
plate is in contact with the frontal and incisal edges of
teeth 33 and 43, and is positioned dorsally along the upper
third of the retromolar triangle. Attach template. Set up
the lateral teeth according to the model analysis or adjust
aesthetically. All retromolar pads, aside from the lingual
pads of teeth 34 and 44, are in contact with the template.
(Figs. 7 + 8)
Spare parts and optional accessories:
217730C
Template holder, 126 mm for
Carbon version
217740
Template flat
217741
Template R 100
217742
Template R 125
217744
Template R 140
217746
Template R 160
217749C
Set-up templates kit, 6 parts, 126 mm
for Carbon version
216260C
Template holder with Splitex profile
plate, 126 mm for Carbon-Version
Zahn-
216269C
as above, although in 5 parts, 126 mm
for Carbon version
Cal.
Item no.
Radius
217746
160 mm
30-35°
De Trey
Zähne
Ivoclar,
217744
140 mm
25-28°
Vita
Zähne
217742
125 mm
15-16°
217741
100 mm
Tooth
Tooth
Tooth type
pad
manufacture
Creapearl
Poly-Star
Merz Dental
Lux HK
De Trey
Biodent,
Lindauer
Articron
Zähne
Orthognat
Ivoclar,
Weithaas
n, t, k, Odilux
Vita
Lindauer
0°
Orthocal
Zähne

Inhaltszusammenfassung für Amann Girrbach ARTEX
- Seite 1 Carbon version GEBRAUCHSANWEISUNG ARTEX ® AUFSTELLKALOTTEN INSTRUCTIONS FOR USE Original-Gebrauchsanweisung ARTEX ® SET-UP TEMPLATES Translation of the original instructions for use Orientierungshilfen zur Aufstellung totaler Prothesen nach der Okklusionskurve (Spee/Wilson). Horizontal, vertikal und neigungsverstellbarer Träger Guide for set-up of full dentures according to the Spee/ mit OE-Markierung nimmt die unterschiedlichen Wilson occlusion curve.
- Seite 2 MODE D’EMPLOI ISTRUZIONI PER L‘USO INSTRUCCIONES DE EMPLEO CLÉ ARTEX ® DE CONFIGURATION CHIAVE DI FISSAGGIO LLAVE DE AJUSTE MAXILAR INFERIORE ARTEX ® INFERIOR ARTEX ® DU MAXILLAIRE INFÉRIEUR Traduction de l’original du mode d’emploi Traduzione delle istruzioni per l‘uso originali Traducción de las instrucciones de empleo originales...