Inverto SatPal Schnellanleitung
Inhaltsverzeichnis
Verfügbare Sprachen
Verfügbare Sprachen
Kapitel
Inhaltsverzeichnis

Inhaltszusammenfassung für Inverto SatPal
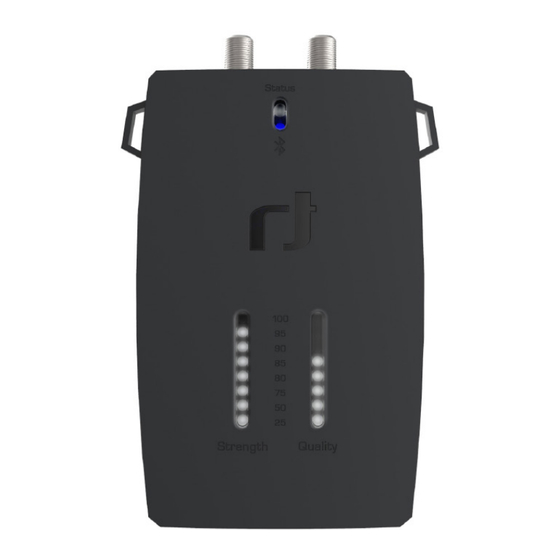
- Seite 1 Quick Guide SatPal Controller IDLU-SPAL03-OOOBT-OPP Item: 5415...
- Seite 43 Notes ........................................................................................................................................................................................................................................................................................................................................................................................................................................................................................................................................................................................................................................................................................................................................................................................................
- Seite 45 Deutsch Mitteilung ............................46 Kurzanleitung ..........................48 SatPal™ Controller anschließen .....................50 Starten der SatPal™ Applikation ....................50 Applikation mit dem SatPal™ Controller verbinden ................51 Startbildschirm (Home) ........................51 Sat Finder ............................52 Sat Meter ............................53 Einrichtung eines LNB für Sat Meter ....................53 Benutzerdefinierter Satellit für Sat Meter ..................54 TP Liste von existierenden Satelliten bearbeiten ................56...
-
Seite 46: Mitteilung
übersetzt werden. CE-Konformitätserklärung Hiermit erklärt FTA Communication Technologies S.à r.l., dass der SatPal™ Controller den grundlegenden Anforderungen der Richtlinien 2014/30 / EU (EMV), 2014/35 / EU (LVD), Eco-Design, Richtlinie (2009/125 / EG), Funkgeräterichtlinie (2014/53 / EU) und Funk- und Telekommunikationsendeinrichtungen (R &... -
Seite 47: Gewährleistung
Stromversorgung: Jede Verwendung mit Spannungspegel außerhalb des angegebenen Spannungsbereichs erfolgt auf eigene Gefahr. Wenn Sie eine Power-Bank oder einen AC/DC-Adapter verwenden, um den SatPal™ Controller mit Strom zu versorgen, lesen und befolgen Sie sorgfältig die Sicherheitshinweise der jeweiligen Lieferanten. ▪... -
Seite 48: Kurzanleitung
Downloaden und installieren Sie die Applikation auf Ihrem Smartphone aus dem Apple iTunes Store, oder dem Android Google Play Store, indem Sie nach SatPal™ von Inverto Digital Labs suchen. Hinweis: Die Layouts und die Nutzung der SatPal™ Applikation unterscheiden sich zwischen iOS und Android Betriebssystem etwas, wobei auch das Erscheinungsbild von der Bildschirmgröße abhängt. - Seite 49 Funktion der Benutzertaste kann mit der SatPal™ Applikation programmiert werden. 7. PC (nur Daten) – Micro-USB Um den SatPal™ Controller mit der PC-Applikation zu programmieren (nicht vorgesehen um den SatPal™ Controller mit Strom zu versorgen). 8. DC in – Micro-USB Stromversorgung (5 V ~ 6 V/13 W max.) von einer Power-Bank oder AC/DC Adapter.
-
Seite 50: Satpal™ Controller Anschließen
Stecken Sie den Micro-USB-Stecker in die Buchse dass noch kein SatPal™ Controller angeschlossen “ DC in ” am SatPal™ Controller und den USB-Typ ist, siehe Abbildung 6 SatPal Controller nicht A-Stecker in die Buchse “ 5V ” der Power-Bank wie verbunden. -
Seite 51: Applikation Mit Dem Satpal™ Controller Verbinden
Tippen Sie auf “ Verbinden ”, um die Applikation wird jedoch nicht mit ausreichender Leistung versorgt. Außerdem kann die Power-LED am mit dem SatPal™ Controller zu verbinden. Siehe SatPal™ Controller gelb leuchten. In diesem Fall Abbildung 6 SatPal Controller nicht verbunden. -
Seite 52: Sat Finder
Sat Finder Wenn Sie auf das Menüsymbol tippen, wie in Abbildung 8: Menü Symbol gezeigt, wird Home » Sat Meter eine Liste mit allen verfügbaren Optionen wie in Abbildung 9: Startmenü angezeigt. Die Sat Finder-Funktion ermöglicht es, eine Satellitenschüssel mit Hilfe von GPS und einer Karte des aktuellen Standorts leicht auf eine gewünschte Satellitenposition auszurichten, siehe Abbildung 10: Sat Finder. -
Seite 53: Sat Meter
Sat Meter Einrichtung eines LNB für Sat Meter Home » Sat Meter Home » Sat Meter » LNB Konfiguration Die Sat Meter Funktion ermöglicht die Messung Tippen Sie auf “ LNB Konfiguration ”, um den von Satellitensignalen sowie die Optimierung und richtigen LNB Typ auszuwählen und die Parameter Analyse der Empfangsqualität. -
Seite 54: Benutzerdefinierter Satellit Für Sat Meter
Benutzerdefinierter Für dCSS können Sie die Parameter für die Position Satellit für Sat Meter der Satellitenantenne (A, B, C, D), die Frequenz des UB, die UB-Nummer, den Protokolltyp (SatCR / Home » Sat Meter » Satellitenauswahl » EN50494, dCSS / EN50607), sowie Low- und High- ״wähle... - Seite 55 Tippen Sie auf das Symbol mit dem Stift, Tippen Sie auf einen TP-Eintrag, um die TP-Daten um eine TP-Liste für einen Satelliten mit der für TP-Frequenz, Polarisation, Symbolrate und Bezeichnung “ * Benutzerdefiniert ” zu erstellen DVB-System zu bearbeiten, siehe Abbildung 16: oder zu bearbeiten.
-
Seite 56: Tp Liste Von Existierenden Satelliten Bearbeiten
TP Liste von Tippen Sie auf “ Speichern ”, um die Daten zu existierenden Satelliten speichern und einen Bildschirm zurück zu gehen. bearbeiten Durch Tippen auf das weiße Kreuz “ + ” (oben Home » Sat Meter rechts) wird Transpondereintrag zufälligen Daten erzeugt und kann entsprechend Wählen Sie unter “... -
Seite 57: Benutzerdefinierte Tp Listen
Benutzerdefinierte Tippen Sie auf das “ + ” - Zeichen, um eine TP Listen neue TP-Liste zu erstellen. Ein Bildschirm, wie in Abbildung 19: Neue TP-Liste erscheint. Home » Sat Meter » TP Listen Um maximale Flexibilität für verschiedene Mess- und Berichtsszenarien zu haben, können Sie TP- Listen entsprechend Ihren Anforderungen und Installationseinstellungen... - Seite 58 Ein ausgewählter TP wird mit einem Häkchen Durch Tippen “Entfernen” eines gekennzeichnet und im unteren Feld aufgeführt, ausgewählten Transponders wird der betroffene siehe Abbildung 20: Erstellte TP-Liste. TP aus der TP-Liste entfernt, siehe Abbildung 21: Neu erstellte TP-Liste. Abbildung 20: Erstellte TP-Liste Abbildung 21: Neu erstellte TP-Liste Hinweis: Eine...
-
Seite 59: Sat Meter Messungen
Sat Meter Messungen Home » Sat Meter » Signalanzeigen Tippen Sie auf die “Signalanzeigen” jeweils rechts Transponderdaten, siehe Abbildung 11: Sat Meter Menü. Danach werden die Signalanzeigen wie in Abbildung 22: Signalmeter angezeigt. Oben befindet sich eine Schiebeleiste mit den jeweiligen Transpondern ausgewählten... -
Seite 60: Satellite - Empfangsbereich-Muster
Home » Sat Meter » ״Signalanzeigen״ des ausgewählten Transponders zu sehen. » Spektrum Wenn Ihr SatPal™ Controller an ein Universal- Die Frequenz sowie Polarisation des ausgewählten LNB- oder Multischaltersystem oder an einen auf Transponders wird in der Mitte des Diagramms Legacyausgang konfigurierten dCSS Multiswitch angezeigt. -
Seite 61: Iq Konstellation
IQ Konstellation Installation und Berichtswesen Home » Sat Meter » ״Signalanzeigen » ״IQ Home » Installation & Reports Dieser Bildschirm zeigt das Konstellationsdiagramm Mit der Funktion Installation & Reports können des gewählten TP an damit Sie die Signalqualität Sie die Signalqualität Ihrer Anlage aufzeichnen analysieren und Ihre Installation weiter optimieren und einen Installationsreport mit dem Namen können. - Seite 62 “ Wischen “ Sie den Bildschirm nach links, Nachdem der gewünschte Satellit oder eine TP- Liste ausgewählt wurde, tippen Sie auf “Start”, danach sehen Sie den Eingabebildschirm für die Equipmentliste, wie in Abbildung 28: um die TPs zu scannen damit die Signalwerte für Pegel und Qualität für den Report erfasst werden.
- Seite 63 Tippen Sie auf “+”, um ein neues Gerät hinzuzufügen. Abbildung 29: Neues Equipment wird angezeigt. Abbildung 30: nach erfolgreichem Scan Achtung! Sie müssen der SatPal™ Applikation erlauben, Smartphone-Kamera Abbildung 29: Neues Equipment zuzugreifen. Wenn die Applikation keinen Zugriff auf die Smartphone-Kamera hat, lesen Sie bitte Geben sie den Modell-Kode, die Seriennummer im Smartphone-Benutzer¬handbuch nach wie...
- Seite 64 Wenn Sie ein Inverto LNB oder Multiswitch haben, Tippen Sie dann auf “Speichern” um die tippen Sie auf “>” für Modell. Ein Bildschirm wie Geräteinformationen zu speichern. Abbildung in Abbildung 31: Neuer Equipment Artikel 32: Equipmentliste mit Artikel zeigt ein Beispiel erscheint.
- Seite 65 Wenn Sie einen Artikel löschen möchten, “Wischen“ Sie den Bildschirm nach links für “schieben“ einfach Balken die Fotodokumentation und nehmen Sie ein jeweiligen Elements nach rechts und tippen Sie oder mehrere Bilder auf indem Sie auf “Foto auf “Löschen”. Siehe Abbildung 33: Löschen aufnehmen”...
- Seite 66 “Wischen“ Sie danach den Bildschirm nach links, Tippen Sie auf “Senden”, um den Bericht zu siehe Abbildung 35: Installationsübersicht. senden. Bildschirm wie in Abbildung 36: Report senden wird angezeigt. Abbildung 35: Installationsübersicht Abbildung 36: Report senden können Signalqualität ausgewählten TPs und die Standortkoordinaten die für den Report verwendet werden sehen.
- Seite 67 Der Bericht wird als pdf, xml und csv Format an die “Empfänger E-Mail” gesendet, eingestellt unter “Einstellungen”. (“Home » Einstellungen” oder wie auf Seite 39: unter Einstellungen beschrieben). Der Bericht, als Beispiel im pdf-Format, wird beigefügt und enthält alle zuvor eingefügten Daten. Siehe Abbildung 37: Installationsreport.
-
Seite 68: Reporthistorie
Reporthistorie Durch Antippen eines Eintrages in der Liste werden Informationen zu diesem Report angezeigt. Siehe Home » Reporthistorie Abbildung 39: Reports gesendet als Beispiel. In diesem Abschnitt finden Sie eine Liste der gesendeten Berichte mit Datum, Uhrzeit und Ort. Siehe Abbildung 38: Reporthistorie. Abbildung 39: Reports gesendet Abbildung 38: Reporthistorie Durch das Antippen von “... -
Seite 69: Unicable Ii™ Toolbox
Unicable II™ toolbox Als Beispiel Abbildung 41: Unicable II™ verbundenes Gerät, LNB. Home » Unicable II™ toolbox diesem Abschnitt wird gezeigt Konfigurationen angeschlossener Unicable II™ LNB‘s oder Multiswitches gelesen und bearbeiten werden, oder diagnostiziert werden können. Umfang und mögliche Änderungen hängen vom angeschlossenen Gerät ab. - Seite 70 Tippen Sie auf “ Modus ”, um die Betriebsart Die Konfigurationsdaten werden, z.B. wie in Abbildung 42: Konfiguration, LNB, angezeigt. des LNB zu ändern. Für einen Unicable II™ LNB entweder “ Dynamisch ” oder “Statisch”. Siehe Abbildung 43: Modus LNB. Abbildung 42: Konfiguration, LNB Gezeigt wird der Betriebsmodus, darunter eine Abbildung 43: Modus LNB...
- Seite 71 Um eine UB zu deaktivieren, “ wischen “ Sie die Tippen Sie auf eine UB-Zeile unterhalb des Abschnitts Ausgang, um die jeweilige UB- Zeile des benötigten UB nach rechts und tippen Konfiguration zu ändern. Siehe Abbildung 44: auf “ Deaktivieren ”, siehe Abbildung 45: UB Konfiguration User Band, LNB.
-
Seite 72: Unicable Ii™ Konfiguration Mit Multiswitch
Multiswitch Unicable II™ verbundenes Gerät, MSW wird Home » Unicable II™ toolbox gezeigt. Wenn ein Unicable II™ Multiswitch an den SatPal™ Controller angeschlossen ist, wird ein Bildschirm, wie z. B. in Abbildung 46: Unicable II™ Konfiguration, MSW angezeigt. Abbildung 47: Unicable II™ verbundenes Gerät, MSW... - Seite 73 Tippen Sie auf “ Konfiguration speichern ”, um Die Konfigurationsdaten werden, wie z.B. in Abbildung 48: Konfiguration, MSW, angezeigt. die Änderungen zu speichern. Durch Tippen auf “ Änderungen übertragen “ wird die Konfiguration auf das angeschlossene Gerät hochgeladen. Abbildung 48: Konfiguration, MSW Hier können Sie den Typ des LNB‘s einstellen der mit dem Multiswitch verbunden ist (z.
-
Seite 74: Unicable Ii™ Diagnose
Unicable II™ Diagnose Um ein UB zu deaktivieren, “ wischen “ Sie die Zeile des benötigten UB nach rechts und tippen Home » Unicable II™ toolbox » oberes Rechteck » Diagnose auf “Deaktivieren”, siehe Abbildung 50: UB aktivieren, deaktivieren, MSW. Tippen Sie auf “Unicable II™... -
Seite 75: Unicable Ii™ Spektrumdiagnose
Unicable II™ Spektrumdiagnose Home » Unicable II™ toolbox » ״oberes Rechteck » ״Diagnose » Spektrum Tippen Sie auf “ Spektrum ” um in Echtzeit das Spektrum am Ausgang bzw. Eingang des angeschlossenen LNB oder Multiswitch anzuzeigen. Beispiel Anzeige eines Spektrums siehe Abbildung 52: Spektrumdiagnose. -
Seite 76: Unicable Ii™ Odu Betriebsinformationen
Konfigurationsdateien können lokal oder in der eine Zeitachse anzeigen zu lassen. Cloud auf Dropbox gespeichert werden, können auf den SatPal™ Controller oder auf ein Unicable II™ Gerät hochgeladen werden. Zur reinen Erstellung oder Änderung von Konfigurationsdateien ist weder eine Verbindung zum SatPal™... -
Seite 77: Unicable Ii™ Konfigurationseditor
Ist kein LNB oder Multiswitch angeschlossen und Sie tippen auf den Bildschirm “Home » Unicable II™ Konfiguration”, erscheint Abbildung 55 Unicable II™ Konfigurationseditor. Abbildung 56: Lokales Filesystem Um eine neue Konfigurationsdatei zu erstellen, tippen Sie auf “ + ” und ein Bildschirm, wie in Abbildung 57: Neue Konfiguration wird Abbildung 55: Unicable II™... - Seite 78 “ Löschen ”, siehe werden soll. Diese kann später auch geändert werden. Scrollen Sie das “ Wahlrad “ unter “ Gerät :”, bis die gewünschte 4-stellige Inverto-Artikelnummer angezeigt wird. Unter Feld “ Dateiname :” geben Sie einen Dateinamen ein.
-
Seite 79: Hinweise Zum Konfigurationseditor
Sie auf “Hochladen zur ODU”. Konfigurationsdatei SatPal™ Controller hochzuladen, tippen Abbildung 59: Mit Verbindung zu Dropbox “ Hochladen zum SatPal Controller ”. Wenn Sie eine Konfiguration auf den SatPal™ Hinweise zum Controller oder eine angeschlossene Konfigurationseditor hochladen möchten, “... -
Seite 80: Einstellungen
Einstellungen Home » Einstellungen In diesem Abschnitt können Sie sehen welcher SatPal™ Controller Applikation verbunden ist, können Daten des Monteurs hinterlegt werden, legen Sie die E-Mail-Adresse an die Reports gesendet werden sollen fest, kann ein Dropbox-Account mit der Applikation verknüpft werden. -
Seite 81: Satpal™ Controller Einstellungen
Firmware Update Home » “SatPal Controller” » “Firmware Update” Tippen Sie auf “ Firmware-Upgrade ” unter “ Home » SatPal Controller ”. Ein Fenster zur Bestätigung wird geöffnet. Um das Firmware Ugrade zu starten, tippen Sie auf “ Bestätigen ”. -
Seite 82: Tp Konfiguration Für Standalone-Betrieb
Jeder der vier konfigurierbaren TPs kann entweder einem LNB, oder vier separaten LNBs zugeordnet werden (dCSS oder Universal LNB). Tippen Sie auf “ TP-Konfiguration ” unter “ Home » “SatPal Controller “ der Bildschirm wie in Abbildung: 65 TP Konfiguration wird angezeigt. Abbildung 64: Funktion Benutzertaste Wählen Sie “... - Seite 83 Eingabe des Frequenzwertes), die UB-Nummer (1 Hinweis: Satellitendaten zugehörige bis max. 32), LO-Frequenzen und den Unicable- Transponderdaten werden von der SatPal™ Protokolltyp (I oder II) zuordnen. Applikation zur Verfügung gestellt. Achtung! Das Erstellen / Bearbeiten einer Konfiguration erfordert eine ordnungsgemäße...
-
Seite 84: Satpal™ Controller Auf Werkseinstellungen Zurücksetzen
Sie auf “ Zum Controller senden ” tippen, siehe Abbildung 65 TP Konfiguration um die Konfiguration an den SatPal™ Controller zu senden und um die TPs wie auf Seite 40: Funktion Benutzertaste erwähnt umschalten zu können. SatPal™ Controller auf Werkseinstellungen zurücksetzen... -
Seite 85: Spezifikationen
Zum Zwecke der Kürze bleiben einige Produktbeschreibungen in diesem Dokument auf Plattformebene und dürfen nicht als detaillierte Datenblätter oder Beschreibung der Produkte bezeichnet werden. Inverto Digital Labs behält sich das Recht vor, Produkte, Produktlinien und / oder Funktionen zu ändern, wegzulassen oder hinzuzufügen ohne angezeigt zu werden. Da sich die Produktspezifikationen ohne... - Seite 86 Notizen ........................................................................................................................................................................................................................................................................................................................................................................................................................................................................................................................................................................................................................................................................................................................................................................................................