Herunterladen Diese Seite drucken
Marmitek LK15 Bedienungsanleitung

Marmitek LK15 Bedienungsanleitung

Haus-kontroll-set; 3-teiliges drahtloses schalterset

Werbung

Verfügbare Sprachen
  • DE

Verfügbare Sprachen

  • DEUTSCH, seite 6
Home Control Kit
OWNER'S MANUAL
BETRIEBSANLEITUNG
MODE D'EMPLOI
GEBRUIKSAANWIJZING
MANUAL DE USARIO
LK15-230401
LK15
3
6
9
13
16

Werbung

loading

Inhaltszusammenfassung für Marmitek LK15

  • Seite 1 LK15 Home Control Kit OWNER’S MANUAL BETRIEBSANLEITUNG MODE D’EMPLOI GEBRUIKSAANWIJZING MANUAL DE USARIO LK15-230401...
  • Seite 2 LK15...
  • Seite 3 LK15 Home Control Kit OWNERS’ MANUAL The 3 piece Wireless Control Kit includes: • Key Chain Radio Remote KR22 (4 ch + dim) • Radio Transceiver TM13 (1.000W on/off) • Bayonet or Screw-In Lamp Socket LM15 (100W on/off) 1. Installation and set up of the LM15 Lamp Socket A.
  • Seite 4 4. Release the On button. To change the Unit Code of the KR22 Key Chain Remote: To program a new Unit Code, you will only have to program the keys. The other buttons will then automatically be one LK15...
  • Seite 5 (for instance by using your finger nails in the groove on the side). Exchange the batteries for the same type (2 x CR2016, 3V lithium). Please take care in observing the polarity. WWW.MARMITEK.COM MARMITEK...
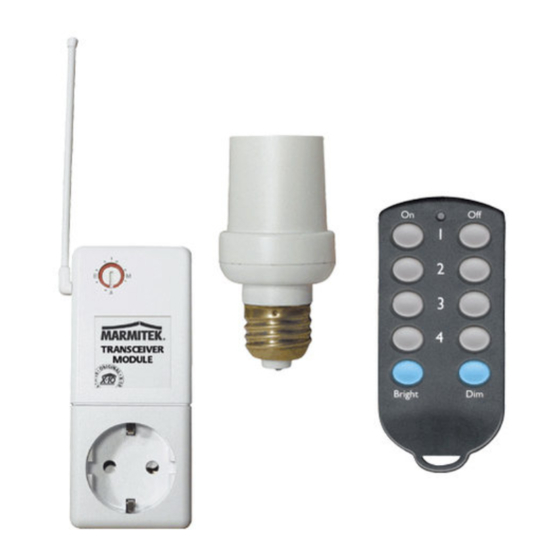
  • Seite 6 Mit den Knöpfen links und rechts neben der Nummer 2 der Fernbedienung können Sie den Fassungsschalter LM15 Ein- oder Ausschalten (2-An/Aus). Wie funktioniert Marmitek X-10? Ganz einfach. Den Befehl, den Sie mit der Fernbedienung geben, wird durch das Transceivermodul empfangen. Der LK15...
  • Seite 7 Taste fest, nach 3 Sekunden zeigt die Leuchte den eingestellten Hauscode an. 4. Lassen Sie die Taste los. Ändern des Unitcode der KR22 Schlüsselanhänger- Fernbedienung: Beim Einstellen des Unitcode wird die oberste Taste auf den gewünschten Unitcode eingestellt. Die nächste Taste ist MARMITEK...
  • Seite 8 Das Wechseln der Batterie: Entfernen Sie die Rückseite des Gehäuses der Fernbedienung. Schieben Sie die Batterien aus dem Halter und ersetzen diese mit zwei identischen 3V Lithium-Batterien (Typ CR2016). Achten Sie hierbei auf die Polarität (Oberseite ist +). WWW.MARMITEK.COM LK15...
  • Seite 9 LK15 Home Control Kit MODE D’EMPLOI Le Pack contient trois éléments • Une télécommande porte clé KR22 (jusqu’à 4 Marche/ Arrêt de modules + variation) • Une Prise Appareil et interface pour télécommande avec fonction Marche/Arrêt (1000W) TM13 • Une douille à vis télécommandable (100W max. dans un boîtier ouvert, 60W max.
  • Seite 10 Principe de fonctionnement Marmitek X-10 C’est très simple, les commandes envoyées par la télécommande sont réceptionnées par la Prise Appareil TM13, celle-ci faisant interface de commande avec les différents modules domotique . L’ensemble des ordres de commande, transitant par la Prise Appareil TM13, seront véhiculés à...
  • Seite 11 à vis télécommandable LM15: F. Réglez la télécommande sur le Code Maison et le Code Unité désiré comme décrit ci-dessus. G. Coupez le courant au disjoncteur principal pendant au moins 5 secondes. H. Ré-enclanchez le disjoncteur. MARMITEK...
  • Seite 12 4. Touche gauche : On (mise en service), touche droite : Off (mis hors service). Changement des piles de la télécommande KR22: Enlever le fond de la télécommande. Remplacer les piles par un modèle équivalent (2 x CR2016, 3V lithium). Attention au sens d’installation (polarité). WWW.MARMITEK.COM LK15...
  • Seite 13 LK15 Home Control Kit HANDLEIDING 3-delige draadloze schakelset Inhoud: • HF Sleutelhanger afstandsbediening KR22 (4 kanalen + dim) • Transceiver TM13 (1000W Aan/ Uit) • Fittingschakelaar LM15 (100W Aan/ Uit) 1. Installeren van de LM15 Fittingschakelaar A. Schakel de spanning van de lamp af.
  • Seite 14 UnitCode. De volgende toets is altijd automatisch één UnitCode hoger dan de eerste (bijv. wanneer u toets 1 instelt op UnitCode 6, dan is de volgende toets (toets 2) automatisch UnitCode 7). 1. Druk op de bovenste Uit (Off) toets en houd deze LK15...
  • Seite 15 Het verwisselen van de batterij: Verwijder de achterzijde van de behuizing van de afstandsbediening. Schuif de batterijen uit de houder en vervang de batterijen met twee identieke 3 V lithium batterijen (type CR2016). Let hierbij op de polariteit (bovenzijde is +). WWW.MARMITEK.COM MARMITEK...
  • Seite 16 On del nº 2 del mando a distancia. Podrá apagar presionando la tecla Off del nº 2 del mando a distancia. ¿Como funciona el sistema Marmitek X-10? ¡Muy sencillo! Las ordenes que usted está enviando desde su mando a distancia, son recogidas por el Radio Transceptor...
  • Seite 17 On de la parte superior ( Una vez para A, dos veces para B, etc.). IMPORTANTE: La última vez que pulse el botón, mantengalo pulsado durante 3 segundos y entonces el piloto rojo parpadeará confirmando la nueva configuración. 4. Suelte el botón On. MARMITEK...
  • Seite 18 3 veces el botón (On) situado a la izquierda del número que haya elegido. Cuando por ejemplo quiera que el LM15 responda al botón número 4, pulse 3 veces el botón situado a la izquierda del número 4 del mando a distancia. LK15...
  • Seite 19 Para cambiar las baterías del mando a distancia tipo llavero KR22E, retire la tapa posterior del mando (Por ejemplo introduciendo las uñas en la ranura lateral) reemplace las baterías por unas del mismo tipo (2 x CR2016, 3V Litio). Preste atención a la polaridad de las baterías. WWW.MARMITEK.COM MARMITEK...
  • Seite 20: Ce Declaration Of Conformity

    CE Declaration of Conformity We, Marmitek bv Netherlands, herewith declare that the following designated product: KeyFob Remote Control KR22E Complies with the essential protection requirements of the R&TTE directive 1999/5/EC on the approximation of the laws of the Member States relating to Radio Spectrum Matters, EMC and Electrical Safety.