Seagate NAS 2BAY Kurzanleitung
EN
How to use this Quick Start Guide
Seagate NAS are available with hard drives or as diskless
enclosures. Seagate NAS with hard drives are preconfigured for
use out of the box. If your NAS was delivered with hard drives,
skip Step 2 (Diskless: Install hard drives).
FR
Mode d'utilisation de ce guide de
démarrage rapide
Les serveurs NAS Seagate sont disponibles avec des disques
durs ou sous forme de boîtier sans disque. Préconfigurés, les
serveurs NAS Seagate avec disques durs sont prêts à l'emploi.
Si votre serveur NAS est livré avec des disques durs, ignorez
l'Étape 2 (Sans disque : installation de disques durs).
IT
Come utilizzare questa guida di avvio rapido
I Seagate NAS sono disponibili con o senza dischi rigidi. I Seagate
NAS provvisti di dischi rigidi preinstallati sono preconfigurati per
un utilizzo immediato. Se l'unità NAS è stata consegnata completa
di dischi preinstallati saltare il passaggio 2 (Unità senza dischi
preinstallati: installazione dei dischi rigidi).
DE
Hinweise zur Verwendung dieser
Schnellstartanleitung
Seagate NAS sind mit Festplatten oder als Gehäuse ohne
Laufwerk erhältlich. Seagate NAS mit Festplatten sind auf den
sofortigen Einsatz vorkonfiguriert. Wenn Ihr NAS mit Festplatten
geliefert wurde, überspringen Sie Schritt 2 (Ohne Laufwerk:
Festplatten installieren).
1
8
7
6
LAN
5
4
3
2
1
WAN
Con sole
USB 2
USB 1
2
b
a
3
4
ES
Cómo usar esta Guía de inicio rápido
Seagate NAS se encuentra disponible con unidades de disco
duro o como una caja sin discos. La versión Seagate NAS con
unidades de disco duro se encuentra preconfigurada para
poderse utilizar directamente, tal como viene de serie. Si ha
recibido su NAS con unidades de disco duro, ignore el paso 2
(Sin discos: Instalación de las unidades de disco duro).
NL
Deze Snelstarthandleiding gebruiken
Seagate NAS zijn verkrijgbaar met harde schijven of als schijfloze
kasten. Seagate NAS met harde schijven zijn direct klaar voor
gebruik. Indien uw NAS met harde schijven is geleverd, kunt u
Stap 2 (Schijfloos: harde schijven installeren) overslaan.
Como utilizar este Guia de Início Rápido
PT
Os Seagate NAS estão disponíveis com discos rígidos ou
como estruturas sem disco. Os Seagate NAS com discos
rígidos estão pré-configurados para utilização imediata.
O seu NAS foi fornecido com discos rígidos, ignore o
Passo 2 (Sem disco: Instalar discos rígidos).
Как работать с этим
RU
«Кратким руководством пользователя»
Устройства Seagate NAS поставляются с установленными
жесткими дисками или в виде пустого корпуса. Seagate NAS с
жесткими дисками предварительно настроен для использования
сразу после покупки. Если ваше устройство NAS поставляется
с жесткими дисками, пропустите шаг 2 (корпус без дисков:
установка дисков).
EN
1. Connect the Ethernet cable to the NAS and the router.
2. Connect the power cable to the NAS and the outlet.
The NAS turns on automatically when connected to an active
power source.
FR
1. Connectez le câble Ethernet au serveur NAS et au routeur.
2. Raccordez le câble d'alimentation au serveur NAS et à la prise.
Le NAS s'allume automatiquement lorsqu'il est raccordé à une
source d'alimentation en fonctionnement.
IT
1. Connettere il cavo Ethernet al NAS e al router.
2. Connettere il cavo di alimentazione al NAS e alla presa.
Il NAS si accende automaticamente quando viene collegato a una
fonte di alimentazione.
DE
1. Schließen Sie das Ethernet-Kabel an das NAS und den Router an.
2. Schließen Sie das Ethernet-Kabel an das NAS und die
Steckdose an.
Der NAS wird automatisch aktiviert, wenn er mit einer aktiven
Stromquelle verbunden ist.
ES
1. Conecte el cable Ethernet al servidor NAS y al enrutador.
2. Conecte el cable de alimentación al servidor NAS y al enchufe.
El servidor NAS se enciende automáticamente cuando se
conecta a una fuente de alimentación activa.
NL
1. Sluit de Ethernet-kabel aan op de NAS en de router.
2. Sluit de stroomkabel aan op de NAS en het stopcontact.
De NAS wordt automatisch ingeschakeld wanneer deze wordt
aangesloten op een actieve voedingsbron.
EN
Diskless: Install hard drives
IMPORTANT:
• Seagate recommends installing the hard drives into the diskless
enclosure from left to right.
• Empty trays must stay in the bays for proper airflow.
• Make certain that you are properly grounded before touching the
hard drives.
• Before inserting the hard drive, make certain that its SATA connection
is at the rear and the circuit board touches the bottom of the tray.
• The hard drive is fastened to the tray with pins.
1. Remove empty hard drive trays from the NAS.
2. Gently bend the left side of the tray and connect the hard drive
to the two pins on the right.
3. Release the left side of the tray and connect the remaining two
pins to the hard drive.
4. Insert the hard drives into the NAS bays. Push each hard drive
into the bay as far as it will go before closing the tray handle.
FR
Sans disque : installation de disques durs
IMPORTANT :
• Seagate recommande d'installer les disques durs dans le boîtier sans
disque de gauche à droite.
• Les tiroirs vides doivent rester dans les baies afin d'assurer une
parfaite circulation de l'air.
• Assurez-vous d'être correctement relié à la masse avant de manipuler
les disques durs.
• Avant d'insérer le disque dur, vérifiez que sa connexion SATA est située
à l'arrière et que le circuit imprimé touche le fond du tiroir.
• Le disque dur est fixé au tiroir à l'aide de broches.
Jak tuto příručku rychlého spuštění používat
CS
Úložiště Seagate NAS jsou dostupná s pevnými disky nebo jako skříně
bez disků. Úložiště Seagate NAS s pevnými disky jsou přednastavena
tak, aby je bylo možné používat ihned po vybalení. Pokud bylo úložiště
NAS dodáno s pevnými disky, vynechejte krok 2 (Zařízení bez disků:
instalace pevných disků).
如何使用此 《快速入门指南》
ZH
CN
Seagate NAS 既可以配备硬盘驱动器, 也可以作为无盘外壳加以提
供。 NAS 经过预先配置, 可开箱即用。 如您的 NAS设备交付时已配
备硬盘驱动器, 请跳过步骤 2 (无盘: 安装硬盘驱动器)。
이 퀵 스타트 가이드 사용 방법
KO
Seagate NAS는 하드 드라이브와 함께 또는 디스크가 없는
인클로저로 사용할 수 있습니다. 하드 드라이브가 있는 Seagate NAS
는 상자를 개봉하면 바로 사용할 수 있도록 사전 구성되어 있습니다.
NAS와 함께 하드 드라이브가 제공된 경우는 단계 2(디스크 없음:
하드 드라이브 설치)을 건너뛰십시오.
PT
1. Ligue o cabo Ethernet ao NAS e ao router.
2. Ligue o cabo de alimentação ao NAS e à tomada.
O NAS liga-se automaticamente quando é conectado a uma
fonte de alimentação activa.
RU
1. Подсоедините кабель Ethernet к NAS и к маршрутизатору.
2. Подсоедините кабель питания к NAS и к розетке.
При подключении к активному источнику питания NAS включится
автоматически.
CS
1. K úložišti NAS a ke směrovači připojte ethernetový kabel.
2. K úložišti NAS připojte napájecí kabel a zapojte jej do elektrické
zásuvky.
Úložiště NAS se po připojení k aktivnímu zdroji napájení zapne
automaticky.
1. 将以太网电缆连接到NAS和路由器上。
ZH
CN
2. 将电源线连接到NAS和电源插座上。
NAS 会在连接到电源时自动打开。
KO
1. 이더넷 케이블을 NAS와 라우터에 연결합니다.
2. 전원 케이블을 NAS와 콘센트에 연결합니다.
NAS는 활성 전원에 연결되면 자동으로 켜집니다.
1. Déposez les tiroirs de disque dur vides du serveur NAS.
2. Écartez légèrement le côté gauche du tiroir, puis raccordez le
disque dur aux deux broches situées sur le côté droit.
3. Libérez le côté gauche du tiroir, puis connectez les deux autres
broches au disque dur.
4. Insérez les disques durs dans les baies du NAS. Poussez
chaque disque aussi loin que possible dans la baie avant de
refermer la poignée du tiroir.
IT
Unità senza dischi preinstallati: installazione dei dischi rigidi.
IMPORTANTE:
• Seagate raccomanda di installare i dischi rigidi nel case da sinistra
a destra.
• I supporti vuoti devono restare negli alloggiamenti per una corretta
ventilazione.
• Accertarsi di seguire le procedure per impedire possibili scariche
elettrostatiche prima di toccare i dischi rigidi.
• Prima di inserire i dischi rigidi, accertarsi che le connessioni SATA
siano rivolte verso la parte posteriore e che il circuito sia a contatto
con il fondo del cassetto.
• Il disco rigido è fissato al cassetto mediante appositi perni.
1. Rimuovere i cassetti vuoti dal NAS.
2. Inclinare delicatamente il lato sinistro del cassetto e collegare
il disco rigido tramite i due perni sulla destra.
3. Rilasciare il lato sinistro del cassetto e collegare i due perni
rimanenti al disco rigido.
4. Inserire i dischi rigidi negli alloggiamenti del NAS. Spingere
i dischi rigidi nei rispettivi alloggiamenti di quanto consentito
dallo spazio disponibile prima di chiudere il supporto.
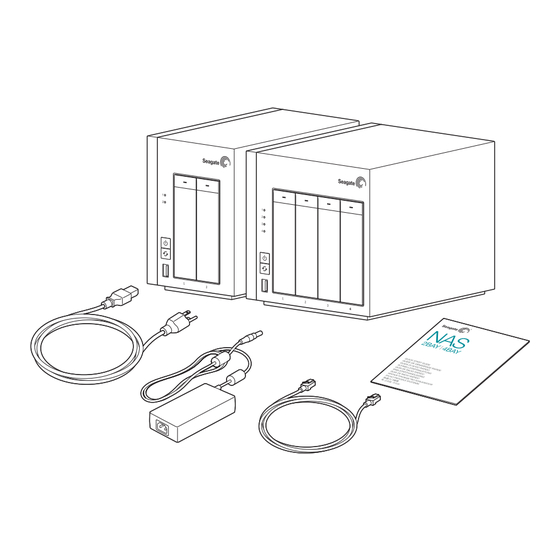
Box contents
Inhoud van het pakket
EN
NL
PT
FR
Contenu du coffret
Conteúdo da embalagem
IT
Contenuto della
RU
Содержимое коробки
confezione
CS
Obsah balení
DE
Inhalt des Pakets
ZH
盒内物品
CN
ES
Contenido de la caja
KO
박스 내용물
2
Diskless: Install hard drives |
Sans disque : installation de disques durs |
Unità senza dischi preinstallati:
installazione dei dischi rigidi |
Ohne Laufwerk: Festplatten installieren |
Sin discos: Instalación de las unidades
de disco duro |
Schijfloos: harde schijven installeren |
Sem disco: Instalar discos rígidos |
Корпус без дисков: установка дисков |
Zařízení bez disků: instalace pevných disků |
无盘: 安装硬盘驱动器 |
디스크 없음: 하드 드라이브 설치
1
DE
Ohne Laufwerk: Festplatten installieren
WICHTIG:
• Seagate empfiehlt, die Festplatten von links nach rechts im Gehäuse
ohne Laufwerk zu montieren.
• Leere Fächer müssen in den Geräteschächten bleiben, damit eine
optimale Belüftung gewährleistet ist.
• Achten Sie darauf, dass Sie richtig geerdet sind, bevor Sie die
Festplatten berühren.
• Achten Sie vor dem Einschieben der Festplatte darauf, dass sich der
SATA-Anschluss auf der Rückseite befindet und die Leiterplatte den
Boden des Einschubs berührt.
• Die Festplatte ist mit Stiften am Einschub befestigt.
1. Nehmen Sie leere Festplatteneinschübe aus dem NAS heraus.
2. Biegen Sie vorsichtig die linke Seite des Einschubs und
verbinden Sie die Festplatte mit den beiden Stiften auf der
rechten Seite.
3. Geben Sie die linke Seite des Einschubs frei und verbinden Sie
die beiden übrigen Stifte mit der Festplatte.
4. Legen Sie die Festplatten in die NAS-Schächte ein. Schieben
Sie vor dem Schließen des Einschubgriffs die Festplatte bis
zum Anschlag in den Schacht.
ES
Sin discos: Instalación de las unidades de disco duro
IMPORTANTE:
• Seagate recomienda instalar las unidades de disco duro en la caja sin
discos de izquierda a derecha.
• Las bandejas vacías deben mantenerse en las bahías para que el flujo
de aire sea el apropiado.
• Asegúrese de que la conexión a tierra sea la apropiada antes de tocar
las unidades de disco duro.

Verwandte Anleitungen für Seagate NAS 2BAY


Inhaltszusammenfassung für Seagate NAS 2BAY
- Seite 1 4. Inserire i dischi rigidi negli alloggiamenti del NAS. Spingere • Seagate recomienda instalar las unidades de disco duro en la caja sin • Assurez-vous d’être correctement relié à la masse avant de manipuler i dischi rigidi nei rispettivi alloggiamenti di quanto consentito discos de izquierda a derecha.
- Seite 2 Lead Mercury Cadmium Hexavalent Polybrominated Polybrominated operativo siempre que desconecte el producto. trademarks or registered trademarks of Seagate Technology LLC or one of its affiliated companies in the United (Pb) (Hg) (Cd) Chromium (Cr6 Diphenyl (PBB) Diphenyl Ether (PBDE) Nous contacter.