Will Burt 185 Bedienungsanleitung
Quicklinks
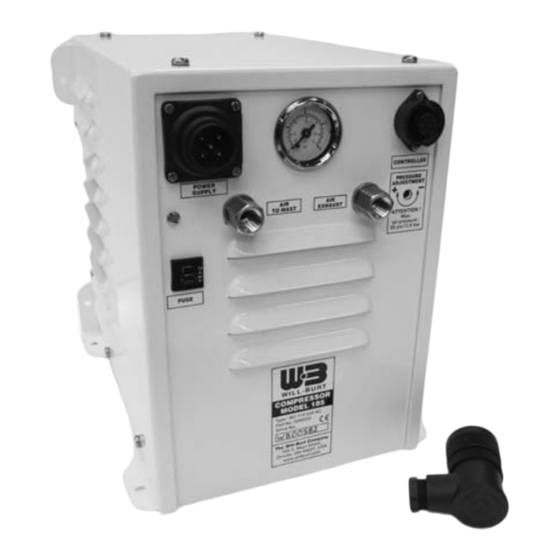
COMPRESSOR MODEL 185
Type : NO 110 Volt AC Part No. 5044202
Type :
with Internal Fuse
CONTROLLER
Type : NO 24 Volt DC with toggle switch +
Type :
deadman function Part No. 5057002
INSTRUCTIONS
GEBRUIKSAANWIJZING
MOUNTING
Mount the compressor always inside a vehicle, shelter or container.
Mark the fixing points and drill holes of Ø 7 mm. Fit the compressor
with minimum 4 screws M6. Mount the compressor always in
vertical position. Leave ventilation openings unobstructed.
AC POWER SUPPLY
A power supply cable (minimum 3 x 1,5 mm²) has to be used to avoid
voltage drop and should be connected to the 5-pin plug as following :
1 = "L"
2 = "N"
FUSE
The compressor is equipped with a fuse, which protects the motor,
which breaks the electrical power supply automatically in case of
overload. In such case disconnect the current by unscrewing the
5-pin plug from the compressor. Wait a few minutes before pressing
manually the push button "FUSE". Subsequently start the compressor
again. If the compressor will be interrupted once again by the motor
protection, disconnect the current and contact our after sales service.
AIR CONNECTIONS
The compressor is equipped with 2 couplings with a NPT ¼" female
thread. The "AIR TO MAST" connector is used to connect the
compressor with the mast, while the "AIR EXHAUST" connector is
only used to lead away air, moisture and/or water, running to the
outside of the vehicle.
OPERATION
Connect the controller to the compressor by screwing in the 7-pin
plug into the socket on the front panel of the compressor.
Push the toggle switch into position "UP". The switch should be
kept in "UP" position till the mast has been fully extended or has
reached the desired height. The moment the toggle switch will be
released, the switch will jump automatically into position "HOLD"
and the compressor will stop running (= deadman function).
To retract the mast, push the toggle switch into position
"DOWN/OFF".
ADJUSTMENT OF PRESSURE SWITCH
The maximum operating pressure is 58 psi (4 bar).
The pressure switch is factory-set at approximately 35 psi (2,4 bar).
The pressure switch can be adjusted with a screwdriver through the
hole "PRESSURE ADJUSTMENT" on the front panel.
Turn the screwdriver anti-clockwise, to have less pressure or turn it
clockwise for more pressure. You can read the pressure to the
mast on the manometer.
MAINTENANCE
Before performing any maintenance operation,
make sure the power is disconnected !
1. For good general maintenance, keep unit clean
and check connections regularly.
2. The compressor is oil-free and does not require
any lubricant.
3. Cleaning the air filter :
- Remove the compressor casing and unscrew
air filter anti-clockwise.
- Rinse the filtering component with water and
soap and make sure that it is totally dry before
replacing it again.
Do not operate the compressor without the air filter
fitted, as foreign bodies or dust could seriously damage the
inside components !
= earth link
MONTAGE
Plaats de compressor altijd in een voertuig, shelter of container. Duid
de bevestigingspunten aan en boor gaten van Ø 7 mm. Monteer de
compressor altijd in verticale positie met minimaal 4 schroeven M6.
Houd de ventilatieopeningen vrij.
AC ELEKTRISCHE AANSLUITING
Gebruik een kabel (van minimum 3 x 1,5 mm²) om spanningsverlies
te vermijden en sluit als volgt aan op de 5-polige stekker :
1 = "L"
2 = "N"
ZEKERING
De compressor is uitgerust met een motorbeveiliging die de elektrische
voeding bij overbelasting automatisch uitschakelt. In dergelijk geval
moet de stroom worden uitgeschakeld door de 5-polige stekker van de
compressor los te koppelen. Wacht enkele minuten alvorens de druk-
schakelaar "FUSE" manueel terug in te drukken, waarna de compressor
weer mag worden gestart. Als de motorbeveiliging opnieuw ingrijpt,
moet de stroom worden afgekoppeld en dient u contact met onze
dienst na verkoop op te nemen.
AANSLUITING LUCHTSLANGEN
De compressor is uitgerust met 2 koppelingen met een NPT
binnendraad. De "AIR TO MAST" aansluiting wordt gebruikt om de
compressor met de mast te verbinden, terwijl de "AIR EXHAUST"
aansluiting dient om eventueel lucht, condens en/of water af te voeren,
die tot buiten het voertuig loopt.
WERKING
Schroef de 7-polige stekker van de afstandsbediening in het
stopcontact op het voorpaneel van de compressor.
Duw de tuimelschakelaar in stand "UP". De schakelaar moet ingedrukt
blijven in "UP" stand totdat de mast volledig is uitgeschoven of de
gewenste hoogte heeft bereikt. Vanaf het moment dat de tuimel-
schakelaar losgelaten wordt, springt de schakelaar automatisch over
op stand "HOLD", waarbij de compressor stopt (= dodeman functie).
Om de mast in te schuiven, duw de tuimelschakelaar op stand
"DOWN/OFF".
AFSTELLING DRUKSCHAKELAAR
De maximale druk is 58 psi (4 bar). In de fabriek wordt de schakelaar
op ca. 35 psi (2,4 bar) afgesteld.
De druk kan met een schroevendraaier geregeld worden via de
opening "PRESSURE ADJUSTMENT" op het voorpaneel van de
compressor. Draai de schroevendraaier in tegenwijzerzin voor
minder druk, in wijzerzin voor meer druk. De druk naar de mast
kan op de manometer afgelezen worden.
ONDERHOUD
Alvorens om het even welke onderhoudshandeling uit
te voeren, zorg ervoor dat de voeding ontkoppeld is !
1. Voor een goed algemeen onderhoud, dient U de
compressor zuiver te houden en regelmatig de
aansluitingen te controleren.
2. De compressor is olievrij en vereist geen smeermiddel.
3. Het schoonmaken van de luchtfilter :
- Verwijder de behuizing van de compressor en draai
de luchtfilter in tegenwijzerzin los.
- Spoel het filtrerend element met water en zeep en zorg dat het
filtrerend element volledig droog is vooraleer het terug te plaatsen.
Gebruik de compressor nooit zonder luchtfilter.
De ingang van vreemde lichamen of stof kan ernstige schade aan
de interne componenten berokkenen !
= aarding
1
/
"
4

Inhaltszusammenfassung für Will Burt 185
- Seite 1 COMPRESSOR MODEL 185 Type : NO 110 Volt AC Part No. 5044202 Type : with Internal Fuse CONTROLLER Type : NO 24 Volt DC with toggle switch + Type : deadman function Part No. 5057002 INSTRUCTIONS GEBRUIKSAANWIJZING MOUNTING MONTAGE Mount the compressor always inside a vehicle, shelter or container.
- Seite 2 35 psi (2,4 bar) / 58 psi (4 bar) 9,5 amps / 10 amps Courant avec 35 psi (2,4 bar) / 58 psi (4 bar) Strom bei 35 psi (2,4 bar) / 58 psi (4 bar) Output Opbrengst 185 l/min. Rendement Luftliefermenge Weight Gewicht 11,5 kg Poids Gewicht Min./Max.
- Seite 3 PNEUMATIC DIAGRAM PNEUMATISCH SCHEMA DIAGRAMME PNEUMATIQUE PNEUMATISCHES DIAGRAMM ELECTRICAL DIAGRAM ELEKTRISCH SCHEMA DIAGRAMME ELECTRIQUE ELEKTRISCHES DIAGRAMM...
- Seite 4 EXPLODED VIEW ZICHT VAN DE ONDERDELEN VUE ECLATEE EXPLOSIONSZEICHNUNG DER TEILEN...
- Seite 5 SPARE PARTS LIST ONDERDELENLIJST LISTE DES COMPOSANTS TEILLISTE...
- Seite 6 ELECTRICAL WIRING CONTROLLER - NO VALVE ELEKTRISCH SCHEMA VAN AFSTANDSBEDIENING - NO VENTIEL DIAGRAMME ELECTRIQUE DE LA COMMANDE A DISTANCE - VALVE NO ELEKTRISCHES DIAGRAMM DER FERNBEDIENUNG - NO VENTIL CONTROLLER 24V DC with toggle switch + deadman function : Part No.
- Seite 8 MODE D'EMPLOI / GEBRAUCHSANWEISUNG MONTAGE EINBAU Positionnez le compresseur toujours à l'intérieur d’un véhicule, Bauen Sie den Kompressor immer innerhalb eines Fahrzeugs, shelter ou container. Indiquez la position des boulons et percez des Shelters oder Containers ein. Kennzeichnen Sie die Befestigungs- trous de Ø...