Werbung
Verfügbare Sprachen
Verfügbare Sprachen
Quicklinks
We are pleased that you have chosen a mantona product from WALSER.
With the mantona Fortress ball head series, you have purchased an exceptionally high-quality
product, which also meets the highest demands of hobby and professional photographers.The-
se ball-heads offer an excellent level of equipment features, load capacity, haptics, processing
quality and functionality.
We hope you enjoy using our product.
Your team from Walser!
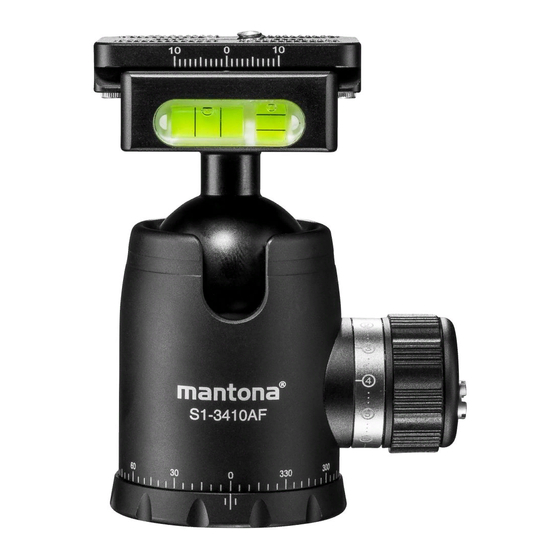
A Components Ballhead
1. Quick release plate
2. Camera mounting screw 1/4 inch
Wir freuen uns, dass Sie sich für ein
3. vertical bubble leve
mantona Produkt aus dem Hause
4. Spirit levels
WALSER entschieden haben und
5. Anti-slip groove
wünschen Ihnen viel Freude mit un-
6. Base platform quick release plate
serem Produkt.
7. Base platform locking knob for quick release plate
8. Ball
Walser bietet seinen Kunden mit den
9. Ball housing
Marken walimex pro und mantona
10. Main locking knob
preiswerte, ausgewählte und exklu-
11. calibration ring locking knob
12. Panorama scale
sive Produkte für kreative Foto- und
13. Locking knob for panorama function
Videografie direkt vom Hersteller an.
14. fastening thread on ballhead bottom (3/8 inch)
Dabei profitieren sowohl ambitionier-
15. Anti-Slip screw quick release plate
te Anfänger wie auch Profis von un-
16. Friction control screw
serem Produkt Know-how und einem
B Fixation on the tripod
ausgezeichneten Service. Ob Fragen
1.
zu technischen Details oder zu Ein-
2.
satzgebieten unserer Produkte – mit
3.
einer
individuellen
Fachberatung
4.
durch ausgebildete Fotografen un-
5.
terstützen wir unsere Kunden auch
6.
nach dem Kauf in allen Aspekten
rund um unser Portfolio.
7.
8.
Teilen Sie unsere Begeisterung für
9.
professionelle Foto- und Videografie
und lassen auch Sie sich von unse-
ren Produkten inspirieren!
Ihr Team von Walser.
C Adjusting the ball head
Loosen the main locking knob by turning it anti-clockwise. The ball can be moved freely. Adjust
the desired position / angle of the ball head. Screw the friction and locking head tight again. By
partially loosening the lock, the resistance can be increased or reduced. After turning the main
locking knob (10), turn the main locking knob clockwise again and then check the ball head for
a firm stop.
WALSER GmbH & Co. KG
Gewerbering 26
86666 Burgheim
D Friction control
Rotate the locking head by approx. 1/4 to 1/2 a turn so that it can move freely. Now turn the
Tel: +49 8432 9489-0
friction control screw (15) clockwise or anti-clockwise to adjust the friction. To do this, you can,
Fax: +49 8432 9489-8333
for example, use the thumb or the tool provided.
•
Germany
•
Move the ball head slightly to check the adjusted level of friction (with or without equipment) until
www.foto-walser.de
the desired resistance is reached. The final locking / unlocking of the ball head is done via the
main locking button of the head. After turning the main locking knob (10), turn the main locking
knob clockwise again and then check the ball head for a firm stop.
Made in China
EN
E Using the calibration ring
Fabricado en China
ES
On the main locking knob, there is a grey, rotatable calibration ring. With this ring, by using the
Fabbricato in China
IT
scale, you can mark the zero point when fully locked for example.
Tighten the panorama locking knob.
Screw the ball head in place with the 3/8 thread.
Maybe it is necessary to purchase the included 3/8-inch to 1/4-inch thread adapter, if you tripod
have only a 1/4-inch connector.
Use a suitable screwdriver or the enhanced tool to do this.
Secure the ball head by turning it on the ballhead fixation plate of the tripod.
Screw the ball head until it is securely in place. It may be necessary to hold the middle
column, including the ballhead fixation plate tightly while doing so.
If the fixation plate of your tripod has so-called headless screws, screw them tightly.
Untighten the panorama locking knob if you want to use the panorama swivel function.
Please check again save fixation of the ballhead before usage.
Tipp: Many tripods have a connection screw with 1/4 and 3/8 inch connector. In case of
doubt, please check whether the corresponding thread is located at the other end of the
adapter screw by unscrewing the adapter.
Note: When equipment is screwed on the ballhead, please hold your device tightly with
one hand while adjusting the ball head to avoid any damage to your equipment.
Clockwise: Short friction way
Anti-clockwise: Longer friction way
F Using the panorama swivel function
The ball heads of the Onyx series have a 360° panorama scale at the lower end of the ball head.
Thanks to the integrated shock absorber, a smooth panorama movement can be achieved. To
carry out a panoramic movement, loosen the panorama locking button. To block the panorama
rotation function, tighten the panorama locking knob.
Tip: Block the panorama function for easy handling when tightening or loosening the
ball head!
G Removing and inserting the quick release plate
Loosen the lock of the quick-release plate by turning the base platform locking knob for quick
release plate. Remove the quick-release plate by angling it upwards. Proceed in reverse order
to insert the quick-release plate and lock the quick-release plate (15) once more by screwing the
base platform locking knob (13).
Note: Ensure that the quick-release plate is correctly inserted and is not cross-threa-
ded, and that the lock head is sufficiently tight.
H Mounting the quick-release plate to your equipment
The Arca-Swiss compatible quick-release plate very comfortably attaches your equipment with
the ballhead. In general, the quick-release plate can be screwed on to the device to be attached
with a 1/4-inch thread and then inserted into the ball head. Two safety pins (15) on the underside
of the quick release plate prevent slipping out sideways if the quick-release plate has not been
fully locked into place.
The quick-release plate can remain permanently on your camera. Additional, compatible
quick-release plates in many variations can be found in our web shop at www.foto-walser.de.
Operating and maintenance instructions
Please respect the maximum load capacity of the individual ball head models (see manual).
Please note, that the indicated values for the maximum load capacity are only valid, when
complying a centrally placement of your equipment on the ball head.
Depending on the equipment used (and the corresponding leverage effect) or in case of large
angle setting from over approx. 45°, the maximum load capacity may differ from that stated.
Dirt or greasy residues on the ball can also lead to reduced stability.
Under normal conditions of use, this ball head is maintenance-free. Avoid dirt, sand and salt
water or other impurities entering the ball head and clean the ball head if necessary.
If, after soiling, a scratching sound is heard, or function is reduced, cleaning it with a soft,
damp cloth should help.
When cleaning the ballhead, do NOT use any solvents, or cleaning products/lubricants that
contain silicone or oil. This may, in certain conditions, destroy the inner plastics, seize up the
mechanics or reduce the maximum load capacity.
The working conditions of this product are approx. -20° C to +70°C.
Avoid high temperatures or exposure to direct sunlight over extended periods.
Fortress 34 S1-3410AF
Fortress 40 S1-4015AF
Fortress 46 S1-4625AF
Werbung

Verwandte Anleitungen für mantona Fortress 34 S1-3410AF


Inhaltszusammenfassung für mantona Fortress 34 S1-3410AF
- Seite 1 The ball heads of the Onyx series have a 360° panorama scale at the lower end of the ball head. With the mantona Fortress ball head series, you have purchased an exceptionally high-quality Thanks to the integrated shock absorber, a smooth panorama movement can be achieved. To product, which also meets the highest demands of hobby and professional photographers.The-...
- Seite 2 Wir freuen uns, dass Sie sich für ein mantona Produkt aus dem Hause WALSER entschieden haben. Entriegelung des Kugelkopfes erfolgt über den Hauptverriegelungsknopf der Kugel. Drehen Sie Technische Daten / Technical specifications: den Haupt-Verriegelungsknopf (10) nach der finalen Justeriung wieder im Uhrzeigersinn fest an Durch den Kauf eines Kugelkopfes der mantona Fortress Serie haben Sie ein außergewöhn-...