Dolle Barcelona Montageanleitung
Barcelona
Mögliche Geschosshöhe von Boden bis Boden in mm.
Floor to floor height maximum in mm.
Mulig loftshøjde fra gulv til gulv i mm.
Hauteurs sol à sol possibles (en mm).
10
(p)
X
0
2288
1
2296
2
2304
3
2312
4
2320
5
2328
6
2336
7
2344
8
2352
9
2360
10
2368
11
2376
12
2384
13
2392
14
2400
15
2408
16
2416
17
2424
18
2432
19
2440
20
2448
21
2456
22
2464
23
2472
2480
24
25
2488
26
2496
Steigung pro Stufe
Rise per tread
marche
R1-99675 / 24-08-2007 / Rev. 15-05-2014
11
12
X
X
2496
2704
2504
2712
2512
2720
2520
2728
2528
2736
2536
2744
2544
2752
2552
2760
2560
2768
2568
2776
2576
2784
2584
2792
2592
2800
2600
2808
2608
2816
2616
2824
2624
2832
2632
2840
2640
2848
2648
2856
2656
2864
2664
2872
2672
2880
2680
2888
2688
2896
2696
2904
2704
2912
Stigning pr. trin
Élévation par
D • GB • DK • F
1
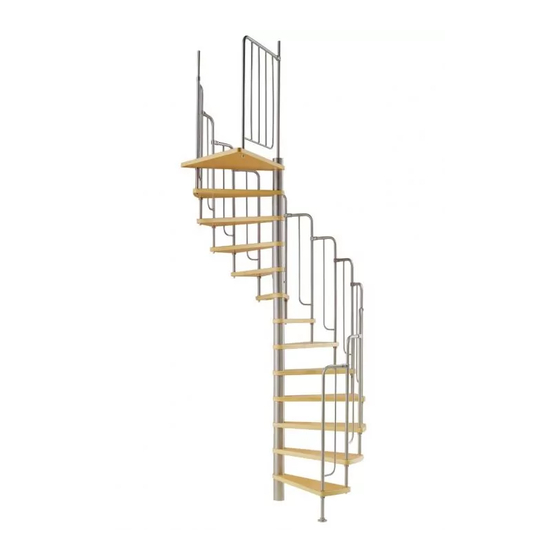
Startpunkte für 10 Stufen + Podest
Starting points for 10 treads + landing
Startpunkter for 10 trins + repos
Point de départ pour 10 marches + marche palière
1
2
Startpunkte für 11 Stufen + Podest
Starting points for 11 treads + landing
Startpunkter for 11 trins + repos
Point de départ pour 11 marches + marche palière
1
2
3
Startpunkte für 12 Stufen + Podest
Starting points for 12 treads + landing
Startpunkter for 12 trins + repos
Point de départ pour 12 marches + marche palière
10
9
2
3
11
10
3
12
11
8
9
10
1

Verwandte Anleitungen für Dolle Barcelona


Inhaltszusammenfassung für Dolle Barcelona
- Seite 1 D • GB • DK • F Barcelona Startpunkte für 10 Stufen + Podest Starting points for 10 treads + landing Startpunkter for 10 trins + repos Point de départ pour 10 marches + marche palière Mögliche Geschosshöhe von Boden bis Boden in mm.
- Seite 2 ×1 ×1 ×10 ×2 K1-13160 K1-13130 K1-13140 K1-13150 ×1 K3-10016 ×2 K3-03023 ×2 ×1 K1-13180 K1-13010 M20×60 ×3 ×3 ×3 K3-03024 K3-04056 ×3 K3-04096 Ø20-Ø64×5 ×1 ×4 K1-13190 K1-13200 ×1 ×1 ×1 ×14 ×27 K1-13120 K3-07012 K1-13110 K1-08310 K1-13170 ×6 ×12 ×4 ×6...
- Seite 3 Achtung Das Startgeländer erst im Boden befesti- gen, wenn das Podest befestigt worden ist, da es sonst nicht möglich ist, die Treppe zu drehen, so dass das Podest parallel zu der Wand sitzt. Warning Do not fasten the starting banister to the floor until the landing has been put on, as it will otherwise not be possible to turn the staircase so that the landing is parallel to...
- Seite 5 R1-99662-020 / 01-10-2013 R1-99662-020 / 01-10-2013 R1-99662-020 / 01-10-2013 R1-99662-020 / 01-10-2013 R1-99662-020 / 01-10-2013 Wenn die Gewindestäbe mittels der Doppelmut- ter (g) verbunden werden, ist es wichtig, dass die Gewindestäbe so verschraubt werden, dass beide mit 20 mm in der Mutter befestigt sind. When the tread bars are assembled with the high nut (g), it is important that the thread bars are as- sembled with 20 mm each into the high nut.
- Seite 6 Wenn das Podest in einer runden Deckenöffnung montiert werden soll, muss das Podest dazu angepasst werden. Si la marche palière doit reposer sur un chevêtre circulaire, If the landing has to fit into a round hole, it will have to be adjusted. la redécouper pour l’adapter à...
- Seite 7 Den obersten Gewindestab (f) so kürzen, dass rd. 40 mm Gewinde überstehen. The top thread bar (f) has to be shortened so that there is app. 40 mm thread left. Den øverste gevindstang (f) afkortes således der står ca. 40 mm gevind tilbage. Écourter la tige supérieure (f) pour ne laisser que ±...
- Seite 9 Barcelona PL • RUS • RO Punkty początkowe przy 10 stopniach + podest Начальные точки при 10 ступенях + лестничная площадка. Punct de pornire pentru 10 trepte + palier Wysokość kondygnacji od podłogi do podłogi w mm Высота от пола к полу в мм...
- Seite 10 ×1 ×1 ×10 ×2 K1-13160 K1-13130 K1-13140 K1-13150 ×1 K3-10016 ×2 K3-03023 ×2 ×1 K1-13180 K1-13010 M20×60 ×3 ×3 ×3 K3-03024 K3-04056 ×3 K3-04096 Ø20-Ø64×5 ×1 ×4 K1-13190 K1-13200 ×1 ×1 ×1 ×14 ×27 K1-13120 K3-07012 K1-13110 K1-08310 K1-13170 ×6 ×12 ×6 ×4...
- Seite 11 Uwaga: Słupek poręczy należy przymocować do podłogi dopiero po montażu podestu. W przeciwnym razie niemożliwe będzie us- tawienie podestu równolegle do ściany. Внимание: Столбик поручней должен быть прикрепен к полу после монтажа. В противном случае установка лестничной площадки параллельно стене будет невозможной.
- Seite 13 R1-99662-020 / 01-10-2013 R1-99662-020 / 01-10-2013 R1-99662-020 / 01-10-2013 R1-99662-020 / 01-10-2013 R1-99662-020 / 01-10-2013 Przy przykręcaniu prętów gwintowanych za pomocą dwustronnej nakrętki g, ważne jest aby każdy z nich został przymo- cowany na 20 mm w nakrętce. При привинчивании нарезных стержней с...
- Seite 14 W przypadku montażu podestu w okrągłym otworze, Dacă palierul trebuie să intre într-o deschidere należy w nim dopasować rownież podest. rotundă, acesta va trebui ajustat corespunzător. В случае монтажа лестничной площадки в круглом отверстии, надо приладить к нему также лестничную площадку. R1-99662-020 / 01-10-2013 R1-99662-020 / 01-10-2013 R1-99662-020 / 01-10-2013...
- Seite 15 Ostatni pręt gwintowy należy tak skrócić, aby zostało ok. 40 mm gwintu. Последний нарезной стержень надо сократить таким способом, чтобы осталось ок. 40 мм нарезки Bara filetantă superioară (f) trebuie scurtată astfel încât să rămînă 40 mm de filet. R1-99662-020 / 01-10-2013 Aby zwiększyć...
- Seite 17 Barcelona H • LV • HR Kezdő pontok 10 lépcsőfok és fellépő esetén. Sākotnējie punkti: 10 pakapieni + kāpņu podests Početne točke pri 10 stuba + podest Belmagasság a padló és a mennyezet között miliméterben. Augstums no grīdas līdz grīdai (mm) Visina etaže od podloge do podloge u mm...
- Seite 18 ×1 ×1 ×10 ×2 K1-13160 K1-13130 K1-13140 K1-13150 ×1 K3-10016 ×2 K3-03023 ×2 ×1 K1-13180 K1-13010 M20×60 ×3 ×3 ×3 K3-03024 K3-04056 ×3 K3-04096 Ø20-Ø64×5 ×1 ×4 K1-13190 K1-13200 ×1 ×1 ×1 ×14 ×27 K1-13120 K3-07012 K1-13110 K1-08310 K1-13170 ×6 ×12 ×6 ×4...
- Seite 19 Figyelem : A korlátoszlopot csak a fellépő beszerlése után lehet rögzíteni a padlóhoz. Ennek betartásával építhető be a lépcső függőlegesen. Uzmanību: Margu stabiņu vajag piestiprināt pie grīdas pēc montāžas. Pretēja gadījumā nebūs iespējams uzstādīt kāpņu podesti paralēli sienai. Pozor: Stub rukohvata treba pričvrstiti na podlogu tek nakon montaže podesta.
- Seite 21 R1-99662-020 / 01-10-2013 R1-99662-020 / 01-10-2013 R1-99662-020 / 01-10-2013 R1-99662-020 / 01-10-2013 R1-99662-020 / 01-10-2013 A korlát elemeket úgy kell rögzíteni, hogy a menetesszárból 20 mm rögzítünk a kétoldalas anyacsavarral ( g pont ). Pieskrūvējot rievotus stieņus ar divpūsēja ugriežņa (g) palīdzību, ir svarīgi, lai katrs no tām būtu piestiprināts uz 20 mm uzgriezni.
- Seite 22 Ha a beépítési nyílás kerek, akkor a nyílás méretének meg kell egyeznie a fellépővel. Ja montējat kāpņu podesti apaļā atvārsnē, ir japiestiprinā pie tā arī kāpņu podests U slučaju montaže u okruglom otvoru, u njega treba podesiti također podest. R1-99662-020 / 01-10-2013 R1-99662-020 / 01-10-2013 R1-99662-020 / 01-10-2013 R1-99662-020 / 01-10-2013...
- Seite 23 Az utolsó szárat úgy kell rövidíteni, hogy maradjon kb. 40 mm szár. Pēdējo rievotu stieni ir jāsamazinā tādā veida, lai paliek apmēram 40 mm iegriešanās. Posljednju navojnu šipku (f) treba tako skratiti da ostane oko 40mm navoja. R1-99662-020 / 01-10-2013 A lépcső...