Werbung
Quicklinks
D 45
Detector
Notice de fonctionnement
User's manual
Bedienungsanleitung
Libreto d'istruzioni
Manual de instruciones
Deutschland - Straßburger Str. 34 - 77694 KEHL /RHEIN
Tél : (07851) 99 26-0 Fax : (07851) 99 26-60
España - C/ Roger de Flor N°293 - Planta 1 - 08025 BARCELONA
Tél : (93) 459 08 11 - Fax : (93) 459 14 43
Italia - Via Sant' Ambrogio, 23/25 - 20050 BAREGGIA DI
MACHERIO (MI) Tél : (039) 245 75 45 - Fax : (039) 481 561
Österreich - Slamastrasse 29 / 3 - 1230 WIEN
Tél : (1) 61 61 9 61
Fax : (1) 61 61 9 61 61
Schweiz - Einsiedlerstrasse 535 - 8810 HORGEN
Tél : (01) 727 75 55 - Fax : (01) 727 75 56
UK - Waldeck House - Waldeck Road - MAIDENHEAD SL6 8BR
Tél : 01628 788 888 - Fax : 01628 628 099
Liban - P.O BOX 60-154 - 1241 2020 Jal el dib- BEYROUT
Tél : +961 1 890 425 - Fax : +961 1 890 424
190, rue Championnet
China - Shanghai Pujiang Enerdis Inst. CO. LTD - 5 F, 3 Rd buildind,
F - 75018 - PARIS
n°381
Xiang
De
Road
200081
-
SHANGHAI
Tél. 33 (0)1.44.85.44.85
Tél : (021) 65 08 15 43 - Fax : (021) 65 21 61 07
Fax 33 (0)1.46.27.73.89
USA - d.b.a AEMC Instruments - 200 Foxborough Blvd, Foxborough,
http://www.chauvin-arnoux.com
MA 02035 Tél : (508) 698-2115 - Fax : (508) 698-2118
691345A00 - Ed. 01 - 03/04
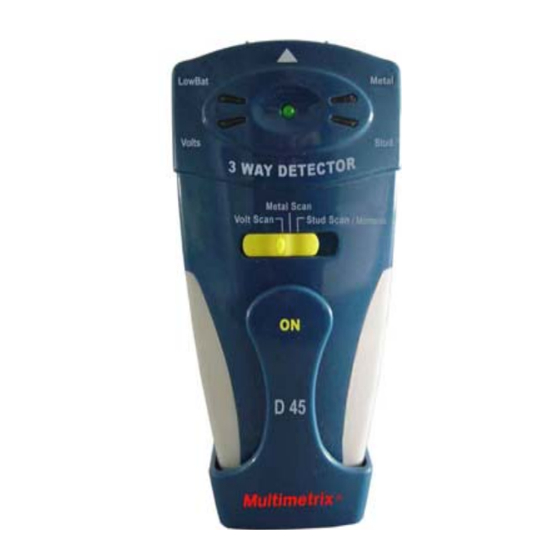
2. FUNCTIONAL DESCRIPTION
English
(See fig. below).
Caption :
Thank you for purchasing a detector for live
Battery compartment lid
electrical wiring, piping and metal and wood studs
«ON» key
in wood and plywood walls.
Metallic/wood studs indicator (red)
Metal indicator (red)
«ON» indicator
1. GENERAL INSTRUCTIONS
Low battery indicator
Please read the following safety instructions before
Voltage indicator (blinks green, then red)
using this device. To avoid electrical shocks, burns
Function switch
or accident to the body, you must read the safety
warning messages.
2.1 Commissioning the tester
It is imperative to follow the instructions preceded
1. Open the battery compartment (see §.1.5).
by the following symbol
.
2. Remove the plastic from the compartment battery
This device operates on plywood and wood walls
3. Keep this plastic for when you do not use the
by plaster and reinforced concrete walls.
instrumentfor more than one week. This plastic
insulates the battery's and protects its charge life.
1.1 Precautions during use
It is recommended to check each measurement with
2.2 Seeking out live wires (V
a second test measurement.
The device detetcs elements that are located less
: applies to the whole of this section.
than 30 cm deep in the wall.
1. Set the switch to «Voltage» position.
Do not dismantle the casing ; only the battery
2. Apply the device to the wall perpendicularly in
compartment can be opened.
an area free of live electrical conductors.
3. Press the «ON» button to calibrate the instru-
1.2 To work safely
ment. The LowBat, Volts, LEDs as well as the center
: applies to the whole of this section.
green LED lights up. The «Volts» and «LowBat»
Never bring this device in direct contact with live
LEDs go off once the instrument is calibrated.
electrical conductor parts.
4. Move the instrument horizontally and then from
This device is not a voltage selector. Be particularly
top to bottom. The buzzer sounds and the «Volts»
careful with electrical wires and apply the Safety
LED lights up green when approaching a live wire.
Reguation measures (wear insulated glove, etc.).
The closer the instrument gets to the live cable,
the faster the buzzer sounds and the LED flashes.
1.3 Guarantee
5. When the instrument is on the top of a live wire,
This equipment is guaranteed against any material
the LED lights up red and the buzzer sounds
defect or manufacturing faults, in conformity with
continuously.
the general conditions of sale. During this period,
the manufacturer only may repair this instrument.
6. Validate the measurement by repeating the
He reserves the right to carry out repair or repla-
operation.
cement of all or part of the equipment. If the
equipment is returned to the manufacturer, forward
Note 1 : During calibration, only the «Volts» and
transport is at the expense of the customer.
«ON» LEDs light up.
Note 2 : Calibration can last a few seconds to about
1.4 Low battey indication
30 seconds.
Replace the battery when the «LowBat» LED stays
lit during measurement.
1.5 Changing the batteries
The instrument is supplied with a 12 V battery (or
the equivalent). To replace it, remove the battery
compartment lid, replace battery and then put the
lid back into place.
1.5 Remplacement de la pile
Francais
L'appareil est équipé d'une pile 12 V. Pour la rem-
Vous venez d'acquérir un détecteur de câbles élec-
placer, retirez le couvercle, insérez la pile, puis
triques sous tension, de tuyaux et de montants mé-
remettez le couvercle.
talliques ou bois dans des murs en contreplaqué
ou en bois. Nous vous remercions de votre con-
2. DESCRIPTION FONCTIONNELLE
fiance.
(Voir illustartion).
Légende :
1. INSTRUCTIONS GENERALES
Couvercle boîtier pile
Lisez les instructions de sécurité suivantes avant
Touche «ON»
d'utiliser l'appareil et reportez-vous aux messages
Indicateur montants métalliques/bois (rouge)
de sécurité, afin d'éviter les accidents corporels
Indicateur métal (rouge)
tels que les brûlures et chocs électriques.
Indicateur «ON»
Suivez impérativement les indications précédées
Indicateur pile faible
du symbole
.
Indicateur tension (vert clignotant, puis rouge)
Cet appareil fonctionne sur des murs en contre-
Commutateur de fonction
plaqué ou en bois. Le fonctionnement de l'instru-
ment est altéré sur des murs en béton armé ou en
2.1 Mise en service du détecteur
plâtre.
1. Ouvrez le compartiment pile (voir §.1.5).
2. Retirez le film plastique du compartiment pile.
1.1 Précautions d'emploi
3. Conservez ce film plastique pour le réinstaller
Il est recommandé de valider toute mesure par une
en fin d'utilisation, si vous n'utilisez pas le détec-
seconde mesure de contrôle.
teur pendant plus d'une semaine. Ce film permet
L'appareil ne détecte la tension que sur les câbles
d'isoler la pile afin d'assurer son autonomie.
non blindés et que sur les éléments qui sont à
moins de 30 cm de profondeur dans le mur.
2.2 Recherche de câbles sous tension (V
Ne démontez pas le boîtier, seule la trappe à pile
peut être ouverte.
Ce pictogramme est applicable à tout le §.
1. Mettez le commutateur sur la position «Voltage».
1.2 Pour travailler en sécurité
2. Appliquez le détecteur perpendiculairement au
Ce pictogramme est applicable à tout le §.
mur dans une zone sans conducteurs électriques
sous tension.
Ne portez jamais cet appareil au contact direct de
parties électriques conductrices sous tension.
3. Appuyez sur le bouton «ON» pour calibrer l'ap-
pareil. Les LEDs «LowBat», «Volts» ainsi que la
Cet appareil n'est pas un détecteur de tension.
LED «ON» s'allument. Les LEDs «Volts» et
Soyez particulièrement vigilant en présence de câ-
bles électriques et appliquez les consignes régle-
«LowBat» s'éteignent une fois l'appareil calibré.
mentaires de sécurité (port de gants isolants...).
4. Déplacez l'appareil horizontalement, puis de
haut en bas. Le buzzer sonne et la LED «Voltage»
1.3 Garantie
clignote en vert à l'approche d'un câble sous ten-
sion. Plus l'appareil est prêt du câble sous ten-
Ce matériel est garanti contre tout défaut de ma-
tière ou vice de fabrication, conformément aux
sion, plus la LED clignote et le buzzer sonne.
conditions générales de vente. Durant la période
5. Lorsque l'appareil est en regard du câble sous
de garantie, l'appareil ne peut être réparé que par
tension, la LED s'allume en rouge de manière fixe
le constructeur, celui-ci se réservant la décision
et le buzzer sonne de façon continue.
de procéder soit à la réparation, soit à l'échange
6. Validez la mesure en renouvelant l'opération.
de tout ou partie de l'appareil.
En cas de retour du matériel au constructeur, le
Note 1 : Lors de la calibration, seules les LEDs
transport aller est à la charge du client.
«Volts» et «ON» peuvent s'allumer.
Note 2 : La calibration peut durer de quelques se-
1.4 Indications d'usure de la pile
condes à environ 30 s.
Remplacez la pile lorsque la LED «LowBat» reste
allumée durant la mesure.
2.3 Seeking out metal pipes
: applies to the whole of this section.
1. Set the switch to «Metal» position.
2. Apply the device to the wall in an area free of
metallic elements or wood beams.
3. Press the «ON» button to calibrate the instru-
ment. The «Stud» LED goes off once the ins-
trument is calibrated. Release the «ON» button.
4. Displace the instrument horizontally, then
from top to bottom. The buzzer sounds and the
«Stud» LED lights up red when approaching a
wooden or metallic stud.
5. Validate the measurement by repeating the
operation.
2.4 Seeking out studs (wood or metal)
1. Set the switch to the «Stud» position.
2. Apply the base of the device to the wall in an
> 70 V
)
area free of metallic elements or wood beams.
AC
AC
3. Press the «ON» button to calibrate the instru-
ment. The «Stud» LED goes off once the instru-
ment is calibrated. Release the «ON» button.
4. Displace the instrument horizontally, then from
top to bottom. The buzzer sounds and the «Stud»
LED lights up red when approaching a wooden
or metallic stud.
5. Validate the measurement by repeating the
operation.
2.3 Recherche de tuyaux métalliques
Ce pictogramme est applicable à tout le §.
1. Mettez le commutateur sur la position «Metal».
2. Appliquez le détecteur perpendiculairement au
mur dans une zone sans éléments métalliques.
3. Appuyez sur le bouton «ON» pour calibrer l'ap-
pareil. La LED «Metal» s'éteint une fois l'appareil
calibré. Vous pouvez relâcher le bouton «ON».
4. Déplacez l'appareil horizontalement, puis de
haut en bas. Le buzzer sonne et la LED «Metal»
s'allume en rouge à l'approche d'un tuyau métalli-
que.
5. Validez la mesure en renouvelant l'opération.
2.4 Recherche de montants (bois ou métal)
1. Mettez le commutateur sur la position «Stud».
2. Appliquez la base du détecteur sur le mur sans
éléments métalliques ou poutres en bois.
3. Appuyez sur le bouton «ON» pour calibrer l'ap-
pareil. La LED «Stud» s'éteint une fois l'appareil
calibré. Vous pouvez relâcher le bouton «ON».
4. Déplacez l'appareil horizontalement, puis de
haut en bas. Le buzzer sonne et la LED «Stud»
s'allume en rouge à l'approche d'un montant en
>70V
)
bois ou métallique.
AC
AC
5. Validez la mesure en renouvelant l'opération.
Wir bedanken uns für den Kauf dieses Such-
gerätes, mit dem Sie versteckte, Spannung
führende Leitungen, Metallrohre oder Streben
aus Metall oder Holz in Wänden aus Holz oder
Sperrholz auffinden können.
1. ALLGEMEINE HINWEISE
Lesen Sie bitte aufmerksam die Sicherheits-
hinweise vor Benutzung des Geräts und halten
Sie sich daran, um Verletzungen wie z.B.
Verbrennungen oder Stromschläge zu
vermeiden.
: Hinweise unbedingt befolgen !
Dieses Gerät ist für die Benutzung an Wänden
aus Holz vorgesehen. Bei Wänden aus
Stahlbeton, Mauerwerk oder Gips ist die Funktion
des Suchgeräts nicht zuverlässig.
1.1 Empfehlungen für die Benutzung
Jede Messung sollte durch eine zweite Messung
kontrolliert werden.
Spannung führende Leitungen können nur
gefunden werden, wenn sie nicht geschirmt sind.
Versteckte Leitungen und Rohre usw.. werden
nur gefunden, wenn sie weniger als 30 cm tief in
der Wand liegen.
Versuchen Sie niemals das Gehäuse zu öffnen.
Nur das Batteriefach ist für den Benutzer
zugänglich.
1.2 Sicherheitshinweise
Dieses Symbol gilt für den gesamten Absatz.
Berühren Sie mit diesem Gerät niemals elektrisch
leitende Teile, die unter Spannung stehen.
Das Gerät ist kein Spannungsprüfer. Seien Sie
besonders vorsichtig, wenn Sie in der Nähe von
elektrischen Leitungen arbeiten und halten Sie
die entsprechenden Sicherheitsvorschriften ein
(z.B. Tragen von isolierenden Handschuhen,
usw...).
1.3 Garantie
Wir gewähren für das Gerät eine Garantie gegen
Herstellungs- oder Werkstoffmängel entsprech.
unseren allgemeinen Verkaufsbedingungen
Während der Garantiezeit darf das Gerät
ausschließlich vom Hersteller instandgesetzt
werden. Dabei behält sich dieser das Recht vor,
es zu reparieren oder ganz oder teilweise
auszuwechseln.
Für die Rücksendung des Geräts an den
Hersteller trägt der Käufer die Versandkosten.
1.4 Ersetzen der Batterie
Deutsch
Das Gerät ist mit einer 12 V-Batterie ausgerüstet.
Zum Ersetzen der Batterie das Batteriefach öffnen,
die Batterie einsetzen und den Fachdeckel wieder
schließen.
1.5 Anzeige des Batteriezustands
Wenn die LED «LowBat» während einer Messung
ständig aufleuchtet, muss die Batterie ersetzt
werden.
2. FUNKTIONSBESCHREIBUNG
(Siehe Abb.).
Beschreibung :
Batterie Fachdeckel
Taste «ON»
LED für Streben-Anzeige (rot)
LED für Metallanzeige (rot)
Anzeige «ON»
Batterie schwach
Led für Spannungsanzeige (blinkt grün,
dannach rot)
Funktions-Umschalter
2.1 Inbetriebnahme des Suchgeräts
1. Öffnen Sie das Batteriefach (siehe §. 1.5).
2. Entfernen Sie die Plastikfolie von den Kontakten.
3. Bewahren Sie die Plastikfolie auf, um sie wieder
einsetzen zu können, wenn Sie das Gerät für mehr
als 1 Woche nicht benutzen. Sie verlängern so die
Betriebsdauer der Batterie.
2.2 Aufsuchen von Wechselspannung
führenden Leitungen (Spannung > 70 V
AC
)
Dieses Symbol gilt für den gesamten Absatz.
1. Bringen Sie den Umschalter in Stellung «Vol-
tage».
2. Setzen Sie das Suchgerät senkrecht auf die
Wand an einer Stelle, wo mit Sicherheit keine
Stromkabel verlaufen.
3. Drücken Sie die Taste «ON», um das Gerät zu
kalibrieren. Die LEDs «LowBat», «Volts» sowie
die LED «On» leuchten auf. Wenn sich das Gerät
für die betreffende Wand kalibriert hat, verlöschen
die LEDs «Volts» und «LowBat».
4. Fahren Sie nun mit dem Suchgerät die Wand
ab, zuerst waagerecht, dann senkrecht. Wenn ein
Spannung führendes Kabel gefunden wird, ertönt
der Summer und die LED «Volts» blinkt grün. Je
näher Sie dem Kabel kommen, umso schneller
blinkt die LED und umso häufiger ertönt der
Summton.
5. Wenn das Gerät direkt über dem Spannung
führenden Kabel steht, leuchtet die LED ständig
rot und der Summton ertönt ständig.
6. Markieren Sie die Stelle und führen sie zur
Kontrolle eine zweite Messung durch.
Hinweis 1: Bei der Kalibrierung können auch nur
die beiden LEDs «Volts» und «On» aufleuchten.
Hinweis 2: Die Kalibrierung auf den Wandtyp kann
von wenigen Sekunden bis zu 30 s dauern.
2.3 Aufsuchen von Metallrohren
Dieses Symbol gilt für den gesamten Absatz.
1. Bringen Sie den Umschalter in Stellung «Metal».
2. Setzen Sie das Suchgerät senkrecht auf die
Wand an einer Stelle, wo mit Sicherheit keine
Metallrohre verlaufen.
3. Drücken Sie die Taste «ON», um das Gerät zu
kalibrieren. Nachdem sich das Gerät für die
betreffende Wand kalibriert hat, verlöscht die LED
«Metal». Sie können nun die Taste «ON» loslassen.
4. Fahren Sie zuerst waagerecht dann senkrecht
über die Wand, um das Rohr zu suchen. Beim
Auffinden eines Metallrohrs leuchtet die LED
«Metal» rot und der Summer ertönt.
5. Markieren Sie die Stelle und führen sie zur
Kontrolle eine zweite Messung durch.
2.4 Aufsuchen von Holz- oder Metall-Streben
1. Bringen Sie den Umschalter in Stellung «Stud»
(= Streben).
2. Setzen Sie das Suchgerät senkrecht auf die
Wand an einer Stelle, wo mit Sicherheit keine
Streben oder Balken aus Metall oder Holz
verlaufen.
3. Drücken Sie die Taste «ON», um das Gerät zu
kalibrieren. Nachdem sich das Gerät für die
betreffende Wand kalibriert hat, verlöscht die LED
«Stud». Sie können nun die Taste «ON» loslassen.
4. Fahren Sie zuerst waagerecht dann senkrecht
über die Wand, um die Strebe zu suchen. Beim
Auffinden einer Strebe aus Holz oder Metall
leuchtet die LED «Stud» rot und der Summer ertönt.
5. Markieren Sie die Stelle und führen sie zur
Kontrolle eine zweite Messung durch.
Werbung

Inhaltszusammenfassung für Multimetrix D 45
- Seite 1 1. Mettez le commutateur sur la position «Metal». triques sous tension, de tuyaux et de montants mé- remettez le couvercle. D 45 2. Appliquez le détecteur perpendiculairement au talliques ou bois dans des murs en contreplaqué mur dans une zone sans éléments métalliques.
- Seite 2 1.5 Reemplazo de la pila 2.3 Búsqueda de tubos metálicos Español El aparato consta de una pila de 12 V. Para Este pictograma se aplica a todo el §. reemplazarla, retire la tapa, inserte la pila y vuelva 1. Coloque el interruptor en la posición «Metal» a colocar la tapa.