JUNO JDK9582E Bedienungsanleitung
Inhaltsverzeichnis
Verfügbare Sprachen
Verfügbare Sprachen
Quicklinks
Inhaltsverzeichnis

Verwandte Anleitungen für JUNO JDK9582E


Inhaltszusammenfassung für JUNO JDK9582E
- Seite 1 Instructions Manual Bedienungsanleitung...
-
Seite 13: Empfehlungen Und Hinweise
EMPFEHLUNGEN UND HINWEISE Diese Gebrauchsanleitung gilt für mehrere Geräte-Ausführungen. Es ist mög- lich, dass einzelne Ausstattungsmerkmale beschrieben sind, die nicht auf Ihr Gerät zutreffen. MONTAGE • Der Hersteller haftet nicht für Schäden, die auf eine fehlerhafte und unsach- gemäße Montage zurückzuführen sind. •... -
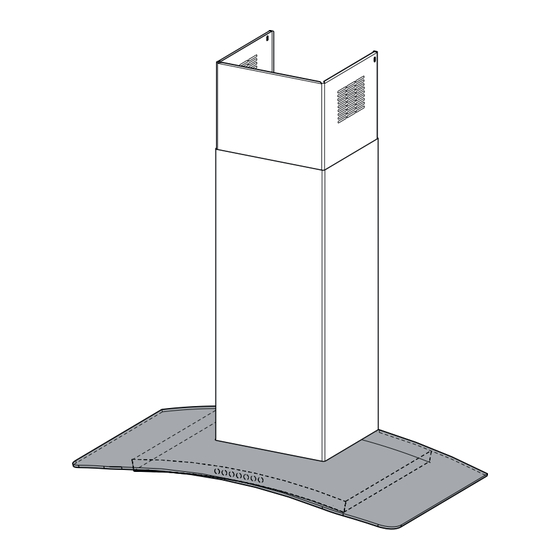
Seite 14: Charakteristiken
CHARAKTERISTIKEN Platzbedarf Komponenten 14.1 Pos. Produktkomponenten Haubenkörper mit Schaltern, Beleuchtung, Gebläse- 12a 7.2.1 gruppe, Filter Teleskopkamin bestehend aus: oberer Kaminteil unterer Kaminteil Reduzierflansch ø 150-120 mm 14.1 Verlängerung Luftaustritt-Anschlussstück Luftaustritt-Anschlussstück Pos. Montagekomponenten 7.2.1 Befestigungsbügel oberer Kaminteil Bügel für Anschlusshalter Dübel Schrauben 4,2 x 44,4 Schrauben 2,9 x 9,5 Dokumentation... -
Seite 15: Montage
MONTAGE Bohren der Befestigungslöcher und Fixieren der Befestigungsbügel 7.2.1 Nachstehende Linien an die Wand zeichnen: • Eine vertikale Linie bis zur Decke oder oberen Begrenzung, und zwar in der Mitte des Bereiches, in dem die Haube montiert werden soll; • Eine horizontale Linie: mit einem minimalen Abstand von 650 mm zur Kochfläche. •... - Seite 16 Montage des Haubenkörpers • Bevor der Haubenkörper eingehakt wird, die 2 Schrauben Vr bei den Haubenkörper-Anhakpunkten festziehen. • Den Haubenkörper bei den Schrauben 12a einhängen. • Die Halteschrauben 12a definitiv festziehen. • Den Haubenkörper mit Hilfe der Schrauben Vr ausrichten. Anschlüss in abluftversion Bei Abluftbetrieb kann die Haube vom Installateur wahlweise ø...
-
Seite 17: Elektroanschluss
ELEKTROANSCHLUSS • Bei Anschluss der Haube an das Stromnetz muss ein zweipoli- ger Schalter mit einem Öffnungsweg von mindestens 3 mm zwischengeschaltet werden. • Entfernen Sie die Fettfilter (s. Abschnitt „Wartung“) und versi- chern Sie sich, daß die Kabelverbindung in die Steckdose des Gebläses einwandfrei eingesteckt wird. -
Seite 18: Bedienung
BEDIENUNG L T1 T2 T3 T4 T5 F Die Haube kann direkt auf die gewünschte Stufe eingeschaltet werden ohne daß man vorher auf die Gebläsetaste 0/1 drückt. Grundfunktion Taste Leuchtsignale Doppelfunktion Ein kurzer Tastendruck schaltet die Beleuchtungsanlage Taste erlo- Beleuchtung abgeschaltet ein und aus. - Seite 19 Taste Grundfunktion Leuchtsignale Aktiviert den Motor mit der 5 Minuten dauernden Intensiv- stufe. Nach Ablauf der 5 Minuten läuft das Gerät wieder mit der zuvor eingestellten Sauggeschwindigkeit. Wird Taste leuchtet auf diese Funktion bei abgeschaltetem Gerät aktiviert, wird nach Ablauf der 5 Minuten auf die erste Gebläsestufe übergegangen.
-
Seite 20: Wartung
WARTUNG Fettfilter REINIGUNG DER SELBSTTRAGENDEN METALLFETTFILTER Rückstellen der Sättigungsanzeige • Den Gebläsemotor abschalten. • Die Taste F mindestens 4 Sekunden lang drücken, bis die Taste T1 als Bestätigung zu blinken beginnt. Filterreinigung • Die Filter können auch im Geschirrspüler gereinigt werden und sollten cirka alle 2 Monate - bzw. -
Seite 21: Austauschen Des Aktivkohle-Geruchsfilter
Geruchsfilter (Umluftbetrieb) Dieser Filter ist weder wasch- noch wiederverwendbar und ist auszutauschen, wenn die Taste F blinkt oder zumindest alle 4 Monate. Die Sättigungsanzeige erfolgt nur, wenn der Gebläse- motor eingeschaltet ist. Aktivierung/Deaktivierungder Sättigungsanzeige • Bei Hauben mit Umluftbetrieb erfolgt die Aktivierung der Sättigungsanzeige bei der Instal- lation oder später. - Seite 24 The symbol on the product or on its packaging indicates that this product may not be treated as household waste. Instead it shall be handed over to the applicable collection point for the recycling of electrical and electronic equipment. By ensuring this product is disposed of correctly, you will help prevent potential negative consequences for the environment and human health, which could oth- erwise be caused by inappropriate waste handling of this product.