Digittrade HS256 S3 Benutzerhandbuch

Verwandte Anleitungen für Digittrade HS256 S3

Inhaltszusammenfassung für Digittrade HS256 S3
- Seite 1 Version 1.8 24.04.2017 DIGITTRADE High Security HS256 S3 external encrypted HDD/SSD für Unternehmen und Behörden for enterprise and government use Benutzerhandbuch User Manual...
- Seite 2 DABEI BESONDERS SICHERHEITSSCHRIFTZUG DIGITTRADE SECURITY” AN DEN SEITEN „ DER SICHERHEITSVERPACKUNG (SIEHE KAPITEL 1.8). Die digitale Fassung des Handbuchs kann auf www.digittrade.de im Download-Center heruntergeladen werden. Produktversion: DIGITTRADE High Security HS256 S3 (encrypted HDD/SSD) Version 1.0 Benutzerhandbuch Version: 1.8 (24.04.2017)
-
Seite 3: Inhaltsverzeichnis
11. Technische Spezifikationen 12. Fehlersuche 13. Datensicherheit und Haftungsausschluss 14. Datenschutzgerechter Umgang mit der HS256 S3 15. Sicheres Beenden nach Benutzung der HS256 S3 16. Aufbewahrung der Smartcard 17. Lieferumfang 18. Hinweis zum Schutz und Erhalt der Umwelt 19. Schematische Funktionsübersicht... -
Seite 4: Über Die Digittrade Hs256 S3
Transport der Geschäfts- und Privatdaten. Sie ist aufgrund ihrer Sicherheitsfunktionen eine der sichersten Möglichkeiten Daten mobil zu speichern. Die auf der HS256 S3 gespeicherten Daten sind in Hinblick auf die Vertraulichkeit der Informationen vor unbefugten Zugriffen geschützt, etwa wenn die HS256 S3 verloren, verlegt oder entwendet wird sowie auch bei logischen oder physikalischen Angriffen auf diese. -
Seite 5: Verschlüsselung
Auf der Rückseite der Festplatte befinden sich der Typ, die Version sowie die Seriennummer der jeweiligen Festplatte. Da die Festplatte nicht updatefähig ist, sind diese Angaben für die Feststellung der Festplattenversion ausreichend. Die DIGITTRADE HS256 S3 gewährleistet die Vertraulichkeit der Daten durch folgende Sicherheitsmechanismen: Verschlüsselung Zugriffskontrolle Verwaltung der kryptografischen Schlüssel... -
Seite 6: Verwaltung Der Kryptografischen Schlüssel
(siehe Kapitel 4). Die Geräte-PIN ermöglicht die kryptografischen Schlüssel auf eine andere Smartcard zu kopieren, neue Smartcards auf der HS256 S3 zu initialisieren und den Lock-Out Modus zu verwalten. Hinweise dazu finden Sie in Kapitel 5. -
Seite 7: Weitere Features
„ERROR“-LED drei mal kurz und leuchtet dann dauerhaft rot. Sollte dieses Problem auftreten bzw. die Smartcard während der einzelnen Vorgänge sich un- gewöhnlich verhalten oder Defekte aufzeigen, wenden Sie sich bitte an DIGITTRADE. 1.5 Weitere Features Dank des eingebauten Datenträgers im 2,5”-Format ist der mobile Datentresor klein und handlich. -
Seite 8: Vorteile Der Digittrade Hs256 S3
Integrationsmöglichkeit in bereits bestehende Smartcard-Infrastrukturen in Unternehmen 1.8 Sicherheitsverpackung und Versiegelungen Um Manipulationen zu verhindern, wird für die Lieferung der Festplatte HS256 S3 und der Smartcards sowie für Nachlieferungen einzelner Smartcards eine spezielle Sicherheitsverpackung verwendet. Der Inhalt wird auf der Verpackung beschrieben. - Seite 9 Stellen Sie nach Erhalt sicher, dass diese Idikatoren nicht ausgelöst wurden. Kontaktieren Sie Ihren Verkäufer, wenn Sie Manipulationen oder Beschädigungen an der Sicherheitsverpackung feststellen, da die Sicherheit der HS256 S3 in diesem Fall nicht gewährleistet werden kann. Die Komponenten der HS256 S3 sind mit Epoxidharz versiegelt. Desweiteren ist an der Öffnungsstelle des Gehäuses der HS256 S3, wie unten abgebildet, ein...
-
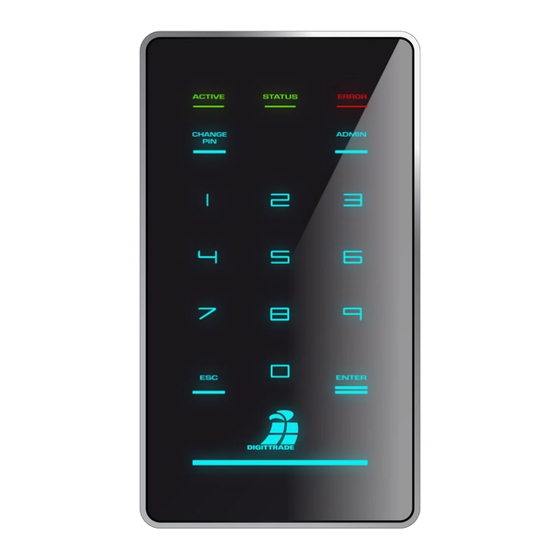
Seite 10: Eingabeoberfläche Und Usb-Anschluss
2. Eingabeoberfläche und USB-Anschluss Die DIGITTRADE HS256 S3 kann per USB-Schnittstelle mit dem Computer verbunden werden. USB 3.0 Anschluss „STATUS”- LEDs „CHANGE PIN”- „ADMIN”-Taste Taste Keypad „ESC”-Taste „ENTER”-Taste „ „ „ERROR“. Die HS256 S3 hat drei Status-LEDs: ACTIVE“, STATUS“ und Mögliche Farben:... -
Seite 11: Inbetriebnahme Der Hs256 S3
3. Inbetriebnahme der HS256 S3 Die notwendige Stromversorgung der HS256 S3 erfolgt über den USB-Anschluss. Nach dem korrekten Anschluss der DIGITTRADE HS256 S3 an den Computer leuchten zunächst die Status-LED „ACTIVE”, „STATUS” und „ERROR” kurz gleichzeitig auf. Danach ist Ihre DIGITTRADE HS256 S3 einsatzbereit, muss jedoch noch entsperrt werden. -
Seite 12: Eingabe Der Smartcard-Pin
Smartcard aus dem Gehäuse wird der Datenträger gesperrt (Lock-Out Modus). Bei Bedarf kann diese Funktion deaktiviert werden, sodass die Smartcard nach dem Freischalten der HS256 S3 entfernt werden kann und weiterhin ein Zugriff auf den Datenträger besteht. In diesem Fall leuchtet die „STATUS”-LED nach der Authentifizierung grün. Bei Entnahme der Smartcard erlischt die “STATUS”-LED und die “ACTIVE”-LED leuchtet... -
Seite 13: Ändern Der Smartcard-Pin
Hinweis: Im freigeschalteten Zustand darf die HS256 S3 nicht unbeaufsichtigt verbleiben, um unbefugte Zugriffe zu vermeiden. Bitte beachten Sie, dass Sie beim Verlas- sen des Arbeitsplatzes oder bei der Nichtnutzung die DIGITTRADE HS256 S3 ordnungs- gemäß abgemeldet sind. Dabei müssen jegliche Datenübertragungen abgeschlossen sein und die HS256 S3 vom USB-Anschluss getrennt werden. - Seite 14 Für die Änderung der Smartcard-PIN haben Sie acht Versuche. Danach wird die eingelegte Smartcard gesperrt und ist nicht mehr verwendbar. Hinweis: 1. Die DIGITTRADE HS256 S3 akzeptiert nur 8-stellige PIN. Diese sollte zufällig gewählt werden. Verwenden Sie keine Trivial-PIN wie z.B. aufsteigende bzw. absteigen- de Ziffernreihen oder benutzerbezogene Zahlenfolgen wie Ihr Geburtsdatum oder Ihre Telefonnummer.
-
Seite 15: Verwaltung Der Kryptografischen Schlüssel Mit Hilfe Der Smartcard
Schlüssel auf der Smartcard erstellt, geändert oder bei Bedarf vernichtet werden. Die Funktionen zur Verwaltung der kryptografischen Schlüssel (Erstellen, Zerstören und Kopieren) sind nur mit Smartcards möglich, die über das DIGITTRADE HS256 S3 Java Card Applet verfügen. Standardmäßig wird die HS256 S3 mit zwei Kartenexemplaren des Typs NXP J2E081_M64 R3, CC EAL 5 ausgeliefert. -
Seite 16: Zerstören Kryptografischer Schlüssel
Sicherungskopie Ihrer Daten. Wenn Sie diese kryptografischen Schlüssel für die HS256 S3 verwenden wollen, müssen diese für die HS256 S3 initialisiert werden. Folgen Sie dazu der Anleitung in Kapitel 5.4. Hinweis: Bitte entfernen Sie die Smartcard nicht während der Erstellung der krypto- grafischen Schlüssel (Schritt 6, „STATUS“-LED blinkt mehrmals grün), da die Smartcard... - Seite 17 Kryptoschlüssel vollständig zu zerstören. Führen Sie dazu folgende Schritte durch: 1) Nehmen Sie die DIGITTRADE HS256 S3 in Betrieb (siehe Seite 11-12). 2) Sichern Sie alle benötigten Daten von der HS256 S3 auf einen anderen Datenträger. 3) Nach Abschluss dieser Prozedur trennen Sie die USB-Verbindung der HS256 S3 und verbinden Sie diese erneut.
-
Seite 18: Geräte-Pin-Funktionen
Die Anzahl der Versuche für die Eingabe der Geräte-PIN ist nicht begrenzt. Hinweis: Merken Sie sich Ihre Geräte-PIN. Ohne diese Zahlenfolge ist die Initialisierung neuer Smartcards und somit weitere Benutzung der HS256 S3 nicht möglich. 5.1 Ändern der Geräte-PIN Um die Geräte-PIN zu ändern, gehen Sie wie folgt vor: 1) Stecken Sie eine funktionierende Smartcard in den entsprechenden Steckplatz (siehe Kapitel 1.4 und 3.1). -
Seite 19: Aktivieren/Deaktivieren Des Lock-Out Modus
Bei der Auslieferung der HS256 S3 ist der Lock-Out Modus aktiviert. Die „STATUS“-LED leuchtet rot im authentifizierten Zustand. Für eine sichere Benutzung der HS256 S3 muss der Lock-Out Modus aktiviert sein. Ein Betrieb der HS256 S3 mit ausgeschaltetem Lock-Out Modus befindet sich außerhalb des Geltungsbereiches der BSI-Zertifizierung. - Seite 20 Zustand rot, wenn die Funktion aktiviert ist. Im Falle der deaktivierten Funktion leuchtet die „STATUS“-LED grün. 6) Trennen Sie die USB-Verbindung der HS256 S3 und verbinden Sie diese erneut, um diese Funktion zu verlassen. Hinweis: Der Lock-Out Modus ist voreingestellt aktiviert. Entfernen Sie in diesem Modus die Smartcard nicht während auf die DIGITTRADE HS256 S3 zugegriffen wird, da dies...
-
Seite 21: Kopieren Von Kryptografischen Schlüsseln
Steckplatz (siehe Seite 12). Ist die Smartcard bereits initialisiert, leuchtet das Keypad. Enthält die Smartcard bereits zwei kryptografische Schlüssel, die nicht für die HS256 S3 initialisiert sind, blinkt die rote „ERROR“-LED und das Keypad leuchtet. Danach leuchtet die „ERROR“-LED. -
Seite 22: (Geräte-Pin Erforderlich)
Smartcards). Beim Initialisieren einer neuen Smartcard ändern sich die kryptografischen Schlüssel des Krypto-Systems. Die HS256 S3 muss dadurch im Anschluss mit dem Anwenderbetriebssystem neu initialisiert und formatiert werden. Ein Zugriff auf die zuvor gespeicherten Daten ist mit den neuen Krypto-Schlüsseln nicht möglich. -
Seite 23: Initialisierung/Partitionierung/Formatierung Unter Windows
6. Initialisierung/Partitionierung und Formatierung unter Windows Um die HS256 S3 unter Windows zu initialisieren, gehen Sie wie folgt vor: Nehmen Sie die DIGITTRADE HS256 S3 in Betrieb (siehe Seite 11-12). Gehen Sie in die Systemsteuerung und unter der Rubrik Verwaltung wählen Sie anschließend “Computerverwaltung”... - Seite 24 Die HS256 S3 wird nach erfolgreicher Anmeldung im unteren Teil der Datenträgerverwaltung angezeigt: Wird die Datenträgerverwaltung zum ersten Mal seit dem Anschließen der HS256 S3 gestartet, erscheint folgendes Fenster: Hier können Sie mit einem Klick auf „OK“ das neue Laufwerk initialisieren.
- Seite 25 Anschließend wechselt der Status des Datenträgers von „Nicht initialisiert“ zu „Online“: Klicken Sie mit der rechten Maustaste auf den „Nicht zugeordneten“ Bereich und wählen Sie im Kontextmenü den Eintrag „Neues einfaches Volume…“ aus. Im startenden Assistenten können Sie alle erforderlichen Einstellungen bis zur Formatierung vornehmen.
- Seite 26 Tragen Sie die gewünschte Größe der Partition in MB ein und klicken Sie dann auf „Weiter“: Sie können der Partition einen Laufwerksbuchstaben zuweisen. Klicken Sie anschließend auf „Weiter“: Wählen Sie das gewünschte Dateisystem, die Art der Formatierung und klicken Sie auf „Weiter“:...
- Seite 27 Möglichkeit, über „Datenträgerverwaltung“, DIGITTRADE HS256 S3 in mehrere Partitionen einzuteilen. Um die HS256 S3 zu partitionieren, gehen Sie wie folgt vor: Wählen Sie mit der Maus die HS256 S3 aus und öffnen Sie mit der rechten Maustaste das Kontextmenü.
- Seite 28 Wählen Sie den Punkt „Volumen verkleinern“ aus. Tragen Sie den gewünschten Speicherplatz in MB ein, auf den die Partition verkleinert werden soll: Es wird jetzt ein nicht zugeordneter Bereich im Verwaltungsbildschirm angezeigt: Markieren Sie den nicht zugeordneten Bereich mit der Maus, öffnen Sie das Kontextmenü...
- Seite 29 dann auf „Weiter“: Sie können der Partition einen Laufwerksbuchstaben zuweisen. Klicken Sie anschließend auf „Weiter“: Wählen Sie das gewünschte Dateisystem, die Art der Formatierung und klicken Sie auf „Weiter“: Partitionierung wird abgeschlossen. Bestätigen diesen Vorgang indem Sie auf „Fertig stellen“ klicken: Hinweis: Der neu partitionierte Bereich wird formatiert.
-
Seite 30: Initialisierung/Partitionierung/Formatierung Unter Mac Os X
Wählen Sie aus der Laufwerksübersicht auf der linken Seite die HS256 S3 Festplatte aus. Im Menü lässt sich mit dem Menüpunkt „Löschen“ die HS256 S3 komplett initialisieren und formatieren. Neben dem Namen lässt sich auch das Dateisystem angeben, mit dem die HS256 S3... - Seite 31 Schaltfläche „Löschen“. Das Partitionieren der HS256 S3 Festplatte erfolgt ebenfalls über das „Festplatten- Dienstprogramm“. Nach Auswahl der HS256 S3 in der Laufwerksübersicht lassen sich im Menüpunkt „Partitionieren“ einzelne eigenständige Partitionen und die jeweilige gewünschte Partitionsgröße einstellen. In der Mitte sehen Sie die aktuelle Partitionierung der Festplatte. Klicken Sie auf das Pulldown-Menü...
-
Seite 32: Initialisierung/Partitionierung/Formatierung Unter Linux
Linux Nehmen Sie die DIGITTRADE HS256 S3 in Betrieb (siehe Seite 11-12). Es besteht die Möglichkeit, die HS256 S3 Festplatte unter Linux in mehrere Partitionen einzuteilen. Dabei muss zunächst die HS256 S3 für das korrekte Dateisystem initialisiert werden. Die Vorgehensweise wird hier auf der Basis von YaST von Suse Linux beschrieben. - Seite 33 bereits vorhandene Partionen bearbeiten bzw. löschen. Zum Löschen der standardmäßig vorhandenen NTFS-Partition wählen Sie diese mit dem Cursor aus und klicken anschließend auf „Löschen”. Sie werden vom System gefragt, ob Sie die Partition wirklich löschen wollen. Vergewissern Sie sich, dass Sie die richtige Partition ausgewählt haben und bestätigen Sie, indem Sie auf „Ja”...
- Seite 34 bei Bedarf sogar den Einhängepunkt in Ihr Linux-System festlegen. Bestätigen Sie abschließend alle Ihre Angaben mit „OK”. Die Formatierung erfolgt ähnlich. Wählen Sie hierzu die gewünschte Partition aus und klicken Sie auf „Bearbeiten”. Setzen Sie anschließend den Haken bei „Formatieren” und wählen Sie ein passendes Dateisystem aus.
-
Seite 35: Das Richtige Dateisystem
Dateisysteme geschrieben werden, bei denen dies sonst nicht möglich ist. Die DIGITTRADE HS256 S3 ist zum Zeitpunkt der Auslieferung bereits für Sie im NTFS- Dateisystem vorformatiert. In der vorherigen Tabelle sehen Sie die Kompatibilität von NTFS mit Ihrem Betriebssystem. Sollte NTFS nicht zu Ihrem Betriebssystem passen, so müssen Sie die Festplatte erneut formatieren (siehe ab Kapitel 6). -
Seite 36: Anwendungsmöglichkeiten Der Digittrade Hs256 S3
Kurier zugestellt werden. Der Sender und der Empfänger müssen bei jedem Datentransport sicherstellen, dass sie eine Manipulation an der HS256 S3 erkennen können. Hierzu empfiehlt sich, wie in Kapitel 1.8 beschrieben, die Verwendung von versiegelten Sicherheitstaschen. Dies gilt auch für alle anderen Datentransportmöglichkeiten mittels HS256 S3. - Seite 37 Datenzentrale von Großunternehmen oder Behörden) in ständigem Datenaustausch mit vielen Datenempfängern, so kann dieses mit Hilfe der HS256 S3-Festplatten Daten mit wenigen Speichermedien sowie kostengünstigen Aufwendungen sicher transportieren. Jeder Datenempfänger erhält eine Smartcard mit seinen eigenen Krypto-Schlüsseln. Bei dem Datenversender werden Zweitexemplare der Smartcards mit den Krypto-Schlüsseln...
- Seite 38 Mitarbeiter initialisiert wurde. Der Außendienstler speichert die Daten mit seinen eigenen kryptografischen Schlüsseln. Nach der Benutzung gibt der Mitarbeiter die HS256 S3 zurück. Diese wird anschließend einer Schnellkonfiguration unterzogen. Innerhalb weniger Minuten ist die HS256 S3 für den nächsten Kollegen einsatzbereit. Es wird daher nicht für jeden Mitarbeiter eine eigene HS256 S3 benötigt und die Anzahl der erforderlichen Datenträger im Unternehmen kann...
- Seite 39 HS256 S3 initialisiert. Von besonderem Interesse ist das Betreiben von mehreren Datenträgern mit nur einer Smartcard für die Arbeit mit Datenvolumen, die die Kapazität einer HS256 S3 übersteigen. Hier können die Daten auf mehrere HS256 S3-Geräte verteilt werden. Auch wenn Daten sehr häufig, z.B. täglich verschickt werden, bietet es sich an, mehrere Speichermedien mit den gleichen kryptografischen Schlüsseln zu...
- Seite 40 Auf der DIGITTRADE HS256 S3 können Betriebssysteme, Programme und Daten gespeichert werden. Diese Anwendung ist sowohl für stationäre als auch mobile Computer geeignet. Mit dem Trennen der HS256 S3 vom PC bleiben die Daten, Programme und Betriebssysteme, inkl. temporärer Dateien ausschließlich auf der HS256 S3 verschlüsselt gespeichert und sind für Unbefugte unzugänglich.
-
Seite 41: Technische Spezifikationen
USB 3.0 max. 5 GBit/s USB 2.0 max 480 MBit/s Smartcard: NXP J2E081_M64 R3, CC EAL 5, JCOP v2.4.2 R3, (NSCIB-CC-13-37761-CR2) mit installiertem DIGITTRADE HS256 S3 Java Card Applet v1.1.0 Verschlüsselung: 256-Bit AES Hardwareverschlüsselung, XTS-Modus, mit 2 x 256-Bit Krypto-Schlüssel Interne Datenträger: Die verschlüsselten Daten werden auf internen 2,5 Zoll SATA HDD- oder SSD-Datenträger... -
Seite 42: Fehlersuche
12. Fehlersuche Sollte die DIGITTRADE High Security HS256 S3 HDD/SSD einmal Fehler aufweisen, gehen Sie bitte folgende Checkliste durch. Bestehen die Probleme weiterhin, können Sie gern den technischen Support von DIGITTRADE kontaktieren. Problem Merkmale Lösung Das Eingabefeld ist das Keypad ist nicht Prüfen Sie, ob die USB-... - Seite 43 Sie den USB-Stecker mit Ihrem System. Das Laufwerk Anschluss über USB Bitte prüfen Sie, ob die arbeitet langsam HS256 S3 mit einer USB Schnittstelle verbunden ist. ein anderes USB-Kabel Verwenden Sie bitte wird verwendet das im Lieferumfang enthaltene USB-Kabel...
-
Seite 44: Datensicherheit Und Haftungsausschluss
13. Datensicherheit und Haftungsausschluss Wir empfehlen, die auf der DIGITTRADE High Security HS256 S3 HDD/SSD befindlichen Daten regelmäßig auf anderen Speichermedien zusätzlich zu sichern. Dies schützt Sie vor einem vollständigen Datenverlust. Die DIGITTRADE GmbH haftet nicht für den Verlust von Daten sowie dadurch entstehende Kosten und Schäden. Zudem trägt das genannte Unternehmen keine datenschutzrechtliche Verantwortlichkeit der gespeicherten Daten. - Seite 45 2) Datenvermeidung und Datensparsamkeit (§3a BDSG): Die Erhebung, Verarbeitung und Nutzung der personenbezogenen Daten bei öffentlichen und nichtöffentlichen Stellen ist nach §3a BDSG an dem Ziel auszurichten, so wenig personenbezogene Daten wie möglich zu erheben, zu verarbeiten oder zu nutzen. Insbesondere sind dabei Daten – soweit möglich – zu anonymisieren und zu pseudonymisieren.
-
Seite 46: Sicheres Beenden Nach Benutzung Der Hs256 S3
Festplattengehäuse erreicht. Diese Funktion steht im aktivierten Lock-Out Modus zur Verfügung, welcher vom Hersteller bei der Auslieferung voreingestellt ist und als Standard-Modus für die sichere Benutzung der DIGITTRADE HS256 S3 gilt. Für die sichere physkialische Trennung müssen alle Verbindungen von der HS256 S3 entfernt werden. -
Seite 47: Aufbewahrung Der Smartcard
Smartcards und somit die weitere Benutzung der HS256 S3 nicht möglich. Merken Sie sich den Aufbewahrungsort Ihrer Smartcards und die dazugehörigen PINs, da ohne diese kein Zugriff auf die Daten möglich ist. Um die HS256 S3 mit den neuen Smartcards ebenfalls innerhalb des Geltungsbereichs der BSI-Zertifizierung zu verwenden,... -
Seite 48: Lieferumfang
Benutzerhandbuch “DIGITTRADE High Security HS256 S3“ USB-Kabel Slimcase Hinweis: Zur exakten Identifizierung sind die Bestandteile HS256 S3 (Gerät), Smartcards und das Benutzerhandbuch jeweils mit der eindeutigen Produktbezeichnung und Produktversion “DIGITTRADE High Security HS256 S3 Version 1.0” gekennzeichnet. Die zertifizierten Speicherkonfigurationen der DIGITTRADE HS256 S3 finden Sie in Kapitel 11. -
Seite 49: Schematische Funktionsübersicht
19. Schematische Funktionsübersicht... - Seite 52 Verbinden Sie die HS256 S3 Drücken Sie die Taste „ENTER“ ENTER mit Ihrem PC Trennen Sie die HS256 S3 von Drücken Sie die Taste „ESC“ Ihrem PC Konnektor Das Keypad leuchtet Stecken Sie die Smartcard in den Smartcard-Steckplatz Stecken Sie die Smartcard A in den Smartcard-Steckplatz Die „STATUS“-LED...
- Seite 103 © 2017 DIGITTRADE GmbH Deutsch Dieses Handbuch ist urheberrechtlich geschützt und darf nicht (auch nicht teilweise) ohne schriftliche Zustimmung der DIGITTRADE GmbH kopiert werden. English This user manual is protected by copyright. No part of this material may be reproduced, transcribed, used or disclosed to any third party in any form or by any means, without the written permission of the DIGITTRADE GmbH.