Werbung
Verfügbare Sprachen
Verfügbare Sprachen
Quicklinks
Werbung

Inhaltszusammenfassung für Genua genuscreen XS
- Seite 1 XS Hardware Revision 2.0 genuscreen, genubox Kurzanleitung / Hardware Quick Start Guide...
- Seite 3 Sprachen / Languages 1 Deutsche Kurzanleitung....................4 2 English Hardware Quick Start Guide................13...
- Seite 4 Deutsche Kurzanleitung Inhaltsverzeichnis 1 Lieferumfang 2 Übersicht XS Hardware 3 Einbau in 19'' Schrank 4 Zugriffsmöglichkeiten und Grundkonfiguration 5 Verwendung einer Smartcard 6 Boot-Menü und BIOS 7 PXE-Boot 8 Übersicht LED-Anzeigen 9 Hardware-Spezifikationen 10 Gewährleistungsregelungen 11 So erreichen Sie uns:...
- Seite 5 XS Hardware • Stromkabel • Serielles Nullmodem-Kabel • XS Hardware Kurzanleitung • 2 x Winkel zum Einbau in 19'' Schrank (optional) •...
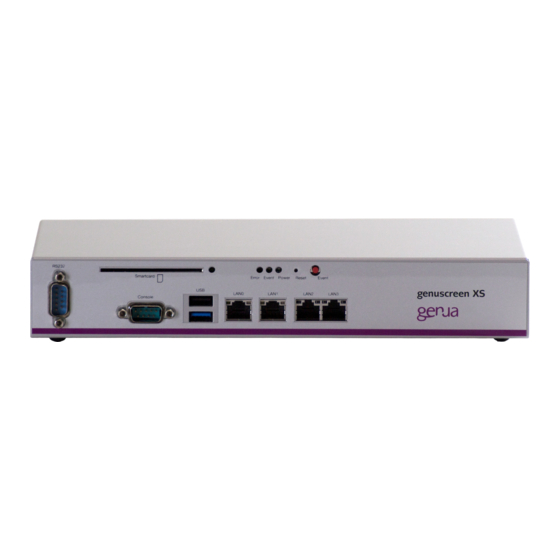
- Seite 6 Auf dem Gehäuse befindet sich ein Label mit drei Barcodes sowie der Angabe, um welche Hardware es sich handelt. Ein Barcode enthält die MAC-Adresse, der zweite Barcode enthält die genua Maschinen ID und der letzte die Seriennummer der Hardware.
- Seite 7 Die XS Hardware kann mit den optional mitgelieferten Winkeln in einen 19'' Schrank eingebaut werden. Befestigen Sie dazu die Winkel mit den mitgelieferten Schrauben an der XS Hardware. Nun können Sie die Winkel in Ihren 19'' Schrank schrauben.
- Seite 8 8 bit • Keine Parity (None) • 1 Stopbit • Hardware Flow Control • Bitte nutzen Sie zur weiteren Installation die Handbücher auf unserer • Website: https://www.genua.de/support/downloads/handbuecher.html Bitte beachten Sie bei Neuinstallation, welche Software-Version • durch die Hardware unterstützt wird: https://www.genua.de/support/downloads/hardwareinformationen...
- Seite 9 Sie können die XS Hardware mit einer Smartcard benutzen. Stecken Sie dazu die Smartcard mit dem Chip nach unten, wie auf folgendem Bild, in den Smartcard-Schacht auf der Frontseite der Hardware ein. Die grüne LED neben dem Smartcard-Slot zeigt die Betriebsbereitschaft durch durchgehendes Leuchten an.
- Seite 10 Sie gelangen ins BIOS, indem Sie während des Bootvorgangs die Taste "Entf" drücken. Sie verlassen das BIOS indem Sie unter dem Reiter „Save & Exit“ den Menüpunkt „Save Changes and Reset“ wählen. Die Appliance fragt Sie dann, ob Sie die Änderungen sichern oder verwerfen möchten. Wenn Sie Ihre Appliance über genucenter verwalten, wählen Sie im BIOS die Netzwerkschnittstelle aus mit der das genucenter erreicht werden kann.
- Seite 11 Ereignis Power Error Event Smartcard Strom an leuchtet Boot-Vorgang leuchtet kurz leuchtet kurz Boot-Vorgang beendet USB-Install blinkt USB-Install beendet genucenter blinkt Update Aktion mit blinkt, Smart-card leuchtet danach durchgehend Smartcard leuchtet einstecken/ abziehen CPU: 2 Cores, 1GHz • RAM: 2 GB •...
- Seite 12 • Softwarefunktionalität / Kompatibilität zueinander haben Achtung: klären Sie im Zweifelsfall eigenmächtige Reparaturen mit uns ab. Nutzen Sie hierfür die Mailadresse support@genua.de oder rufen Sie unsere Servicenummer unter +49 (0)89 991950-900 an. genua Gmbh, Domagkstraße 7, 85551 Kirchheim bei München tel +49 89 991950-0, fax +49 89 991950-999, info@genua.de,...
- Seite 13 English Hardware Quick Start Guide Table of Contents 12 Scope of Delivery 13 Overview XS Hardware 14 19" Rack Mount 15 Methods of Access and Basic Configuration 16 Using a Smartcard 17 Boot Menu and BIOS 18 PXE Boot 19 Overview LED Display 20 Hardware Specification 21 Warranty Conditions 22 Contact us at:...
- Seite 14 XS Hardware • Power Cable • Serial null modem cable • XS Hardware Quick Start Guide • 2 x metal brackets for installation in 19'' rack (optional) •...
- Seite 15 A label with three barcodes and hardware information is attached to the chassis. One barcode contains the MAC address, the second contains the genua machine ID. The last one contains the hardware serial number.
- Seite 16 The optional brackets can be used to mount the XS hardware in a 19“ rack. Attach the brackets with the screws supplied with the chassis to the XS hardware. Now fasten the brackets to the 19“ rack.
- Seite 17 No parity (None) • 1 stop bit • Hardware Flow Control • For further information regarding the installation, please use the • manualson our website: https://www.genua.de/en/support/downloads/manuals.html Please note when reinstalling the software which version is • supported by the hardware: https://www.genua.de/support/downloads/hardwareinformation...
- Seite 18 The XS hardware can be used with a Smartcard. Therefor insert the Smartcard (chip down) in the Smartcard slot, as illustrated below. Operational availability is shown by continous glow of the green LED next to the Smartcardslot. During an action (reinitialization, PIN reset, PIN reset by PUK, initialization of a VPN tunnel), the LED blinks and then glows continously.
- Seite 19 Press „del“ during memory testing to enter the BIOS. Leave the BIOS by selecting „Save Changes and Reset“. The system will prompt you to save or discard the new configuration. If you want to use the genucenter Management Station, you need to boot via PXE.
- Seite 20 Event Power Error Event Smartcard Power on Boot in progress short flash short flash Boot complete USB install in blinking progress USB install complete genucenter blinking update in progress Smartcard blinking, action then continuously on Insert/Pull out Smartcard CPU: 2 Cores, 1GHz •...
- Seite 21 • functionality / mutual compatibility Important: In doubt check with us any unauthorized repairs. Therefor contact the email address support@genua.de or our service number: +49 (0)89 991950-900. genua Gmbh, Domagkstraße 7, 85551 Kirchheim/Munich tel +49 89 991950-0, fax +49 89 991950-999, info@genua.de,...