Herunterladen Inhalt Inhalt Diese Seite drucken

Werbung

Verfügbare Sprachen
  • DE

Verfügbare Sprachen

  • DEUTSCH, seite 21
DRAIN-UNIT
GRUPO HIDRÁULICO CON SISTEMA DRAIN-BACK
PUMP STATION WITH DRAIN-BACK SYSTEM
GROUPE HYDRAULIQUE AVEC SYSTE ` ME DRAIN-BACK
HYDRAULIKAGGREGAT MIT DRAIN-BACK-SYSTEM
AGREGAT WODNY Z SYSTEMEM DRAIN-BACK
HYDRAULICKÁ JEDNOTKA SE SYSTÉMEM DRAIN-BACK
DICIEMBRE 2011

Werbung

Inhaltsverzeichnis
loading

Inhaltszusammenfassung für Orkli DRAIN-UNIT

  • Seite 1 DRAIN-UNIT GRUPO HIDRÁULICO CON SISTEMA DRAIN-BACK PUMP STATION WITH DRAIN-BACK SYSTEM GROUPE HYDRAULIQUE AVEC SYSTE ` ME DRAIN-BACK HYDRAULIKAGGREGAT MIT DRAIN-BACK-SYSTEM AGREGAT WODNY Z SYSTEMEM DRAIN-BACK HYDRAULICKÁ JEDNOTKA SE SYSTÉMEM DRAIN-BACK DICIEMBRE 2011...
  • Seite 2: Inhaltsverzeichnis

    1. Función 1. Function 2. Selección de referencia a emplear 2. Selection of model to be used 3. Cálculo de volumen de separación 3. Calculation of separation volume 4. Componentes y funciones 4. Components and functions 5. Características técnicas 5. Technical Specifications 6.
  • Seite 3: Función

    Drain-Unit. Nota: menor potencia de bomba necesaria en caso de instalar el Drain-Unit a poca altura del campo de colectores. Guía de selección ALTURA DE INSTALACIÓN*...
  • Seite 4: Componentes Y Funciones

    • Posicionamiento y fijación a pared. El Drain-Unit se puede instalar a cualquier altura debajo de los colectores solares dentro de los rangos establecidos para los distintos modelos. Cuanta menor altura tengamos entre los colectores y el Drain-Unit menos potencia se necesitará en las bombas y por tanto mejor será el rendimiento del sistema.
  • Seite 5 Se debe instalar siempre por encima del intercambiador de calor del circuito primario; tanto en instalaciones con interacumulador como en las que se instala un intercambiador de colectores externo. La ubicación seleccionada deberá estar en la parte interior del edificio y en un lugar seco. Fijación a pared: 1.
  • Seite 6 Nota: en las referencias con regulación integrada vuelva a conectar el cable que conecta el regulador con las bombas. • Requerimientos de instalación. La estación Drain-Unit completará junto con el campo de colectores y un interacumulador un sistema solar drain-back. Al tratarse, por tanto, de un sistema de autovaciado de los colectores la linea de tuberías debe cumplir ciertos requisitos.
  • Seite 7: Puesta En Marcha

    Antes de llenar la instalación con el fluido de trabajo se deberá realizar la limpieza del circuito así como la prueba de presión (evitar hacerlo con el Drain-Unit a más de 3bar). Asegurarse de que el Drain-Unit no está conectado para evitar que las bombas trabajen en vacío. 1. Una vez finalizadas las operaciones previas se procederá...
  • Seite 8: Mantenimiento

    GARANTÍA El Drain-Unit está garantizado contra todo defecto de material durante 3 años a partir de la fecha de fabricación marcada sobre la misma. Esta garantía no se aplica si el conjunto ha sido manipulado, modificado o deteriorado por una utilización o instalación no conforme a las instrucciones facilitadas...
  • Seite 9: Function

    FUNCTION The SolarOrkli Drain-Unit is a solar pump station with a built-in drain-back system. It can be installed with virtually any brand of collector on the market as well as with any storage tank. By draining the solar collectors problems with over-temperature and freezing on the panel will be avoided.
  • Seite 10: Components And Functions

    • Positioning and fixing to the wall. The Drain-Unit can be installed at any height on the solar collectors within the ranges established for the different models. At lower heights between the collectors and the Drain-Unit, less power will be...
  • Seite 11 Installation must always be above the primary circuit heat exchanger. The selected location must be on the inside of the building and in a dry place. Fixing to the wall: 1. Insert the fixing bolts to attach the metal tank bracket. 2.
  • Seite 12 N.b.: In systems with built-in regulation reconnect the cable which connects the controller to the pumps. • Installation requirements. The Drain-Unit station together with the collector field and an storage tank make up the drain- back solar system. As this is a self-draining collector system the pipe-line must meet certain requirements.
  • Seite 13: Start-Up

    Before filling the installation with the working fluid the circuit should be cleaned as well as pressure tested (not to be done over 3bar when the Drain-Unit is connected). Ensure that the Drain-Unit is not connected to stop the pumps running on empty. 1. Once the pre-fill operations has been carried out the circuit will be filled again from the filling tap (2).
  • Seite 14: Maintenance

    GUARANTEE The Drain-Unit is guaranteed against material defects for 3 years from the date of manufacture marked on it. This warranty does not apply if the unit has been manipulated, altered or damaged by use or...
  • Seite 15: Fonction

    Drain-Unit. Note: la puissance de pompage nécessaire est inférieure si le Drain-Unit est installé à une différence de hauteur réduite par rapport au champ de panneaux.
  • Seite 16: Composants Et Fonctions

    • Positionnement et fixation au mur. Il est possible d'installer le Drain-Unit à une hauteur variable par rapport aux plaques solaires, dans les limites établies pour les différents modèles. Plus la hauteur entre les panneaux et le Drain-Unit sera réduite,...
  • Seite 17 Le Drain-Unit devra toujours être installé au dessus de l'échangeur de chaleur du circuit primaire ; aussi bien pour les installations à interaccumulateur que pour celles qui incluent dans leur installation un échangeur à plaques externe. Le Drain-Unit devra être placé à un endroit sec, à l'intérieur de la construction.
  • Seite 18 Note : pour les références possédant une régulation intégrée rebranchez le câble reliant le régulateur aux pompes. • Exigences d'installation. La station Drain-Unit complètera, avec le champ de panneaux et un échangeur, un système solaire drain-back. S'agissant d'un système d'auto-vidange des panneaux la tuyauterie, il devra respecter certaines exigences.
  • Seite 19: Mise En Fonctionnement

    Avant le remplir l'installation avec le fluide de travail, un nettoyage du circuit et un test de pression devront être effectués. Assurez-vous que le Drain-Unit n'est pas branché afin d'éviter que les pompes ne tournent à vide. 1. Une fois les opérations préalables réalisées, procédez au remplissage du circuit par la...
  • Seite 20: Entretien

    GARANTIE Le Drain-Unit est garanti contre tout défaut de matériel pour une durée de 3 ans à compter de la date de fabrication indiquée sur ce dernier. Cette garantie n'est pas applicable si l'unité a été manipulée, modifiée ou détériorée par une utilisation ou une installation non conforme aux instructions fournies par...
  • Seite 21: Funktion

    Pumpe ab. Beachten Sie bei der Positionierung der Drain-Unit immer den Höhenunterschied zwischen dem oberen Teil der Kollektorenreihe und der Pumpe. Hinweis: Eine geringere Pumpenleistung wird benötigt, wenn die Drain-Unit genau unter der Kollektorenreihe installiert wird. Leitfaden zur Auswahl INSTALLATIONSHÖHE*...
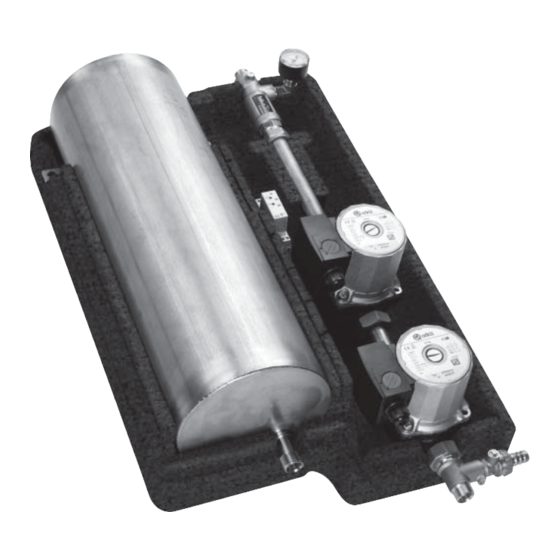
  • Seite 22: Komponenten Und Funktionen

    Die Drain-Unit kann beliebig (unterhalb der Kollektoren) installiert werden, solange der max. Höhenunterschied (Druckdifferenz) der Pumpe beachtet wird. Je geringer der Höhenunterschied zwischen den Kollektoren und der Drain-Unit, umso weniger Leistung wird benötigt, umso besser wird der Wirkungsgrad des Systems sein.
  • Seite 23 Der ausgewählte Standort sollte immer im Inneren eines Gebäudes (frostsicher) und an einem trockenen Ort sein. Befestigung an der Wand: 1. Setzen Sie die Befestigungsstifte zur Befestigung des Montageblechs des Tanks ein. 2. Bringen Sie die Befestigungsplatten an der Wand an. 3.
  • Seite 24 7. Bringen Sie den Deckel der Gehäuseisolation an, die die ganze Drain-Unit abdeckt. Hinweis: Bei Systemen mit eingebautem Regler schließen Sie das Kabel wieder an, das den Regler mit der Pumpe verbindet. • Voraussetzungen für die Installation. Die Drain-Unit bildet zusammen mit den Kollektoren und einem Speicher ein Drain-Back- Solarsystem.
  • Seite 25: In Betrieb Setzen

    Bevor das System mit Flüssigkeit gefüllt wird, muss der Kreislauf gesäubert sowie ein Dichtheitstest (System abdrücken) durchgeführt werden. Achten Sie darauf, dass die Drain-Unit elektrisch nicht angeschlossen ist, um zu verhindern, dass die Pumpe „leer“ läuft. 1. Sobald die Vorbereitungen abgeschlossen sind, kann der Kreislauf gefüllt werden.
  • Seite 26: Wartung

    System, keine Zirkulation mehr). GARANTIE Auf die Drain-Unit wird 3 Jahre lang eine Garantie auf alle Materialdefekte gegeben. Dies gilt ab dem Herstellungsdatum, das auf der Drain-Unit angebracht wurde. Diese Garantie erlischt, wenn die Anlage manipuliert, abgeändert oder durch eine Handhabung oder Installation beschädigt wurde, die nicht den...
  • Seite 27: Funkcja Urządzenia

    Przy wyborze grupy Drain Unit decydującym kryterium jest wysokość instalacji. Należy przy tym uwzględnić odległość między górną częścią pola kolektorów i dolną krawędzią grupy Drain-Unit. Uwaga: w przypadku montażu grupy Drain-Unit na niższej wysokości, możliwe jest zastosowanie pompy o mniejszej mocy. Wybór modelu WYSOKOŚĆ...
  • Seite 28: Części Składowe I Ich Funkcje

    INSTALACJA • Umiejscowienie i montaż naścienny Grupa Drain-Unit może zostać zainstalowana na dowolnej wysokości w zakresach przewidzianych dla poszczególnych modeli kolektorów słonecznych. Należy pamiętać, że mniejsza odległość dzieląca kolektory od grupy pompowej oznacza możliwość zastosowania pomp o odpowiednio mniejszej mocy i tym samym osiągnięcia większej wydajności systemu.
  • Seite 29 Urządzenie powinno być zawsze usytuowane powyżej wymiennika ciepła obwodu pierwotnego. Odnosi się to zarówno do instalacji z podgrzewaczem solarnym, jak i wyposażonych w zewnętrzny wymiennik płytowy. Miejsce wybrane do montażu powinno być suche i znajdować się wewnątrz budynku. Montaż naścienny: 1.
  • Seite 30 Uwaga: w modelach ze zintegrowanym sterownikiem należy ponownie podłączyć przewód łączący regulator z pompami. • Wymagania instalacyjne. Grupa Drain-Unit tworzy wraz z polem kolektorów i podgrzewaczem - solarny system drain-back. Jako układ samoczynnego opróżniania kolektorów, linia rurociągów musi spełniać określone wymagania.
  • Seite 31: Uruchomienie

    Napełnienie układu Przed napełnieniem układu cieczą roboczą niezbędne jest przepłukanie obiegu i wykonanie próby ciśnieniowej. Należy przy tym upewnić się, że grupa Drain-Unit pozostaje wyłączona, co pozwala na uniknięcie pracy pomp w trybie jałowym. 1. Po zakończeniu powyższych czynności przystępujemy do napełnienia obiegu przez króciec (2).
  • Seite 32: Konserwacja

    GWARANCJA Drain-Unit objęty jest 3-letnią gwarancją na wady materiałowe obowiązującą od daty produkcji, która figuruje na każdym urządzeniu. Gwarancja ta nie zostanie uwzględniona w przypadku stwierdzenia, że urządzenie było obsługiwane lub modyfikowane w sposób niezgodny z instrukcją dostarczoną przez producenta oraz w przypadku uszkodzeń, które powstały w trakcie jego instalacji lub użytkowania na...
  • Seite 33: Funkce

    VÝBĚR ČERPADLOVÉ JEDNOTKY Hlavním parametrem pro výběr jednotky je výška instalace. Je třeba brát zřetel na rozdíl výšek mezi nejvyšším bodem kolektorového pole a nejnižším bodem umístění čerpadlové jednotky Drain-Unit. Poznámka: nejnižší výkon čerpadla musí odpovídat minimálně výšce instalace kolektorového pole.
  • Seite 34: Popis Čerpadlové Jednotky Afunkce

    Drain-Unit lze instalovat v jakékoli výšce vzhledem ke kolektorovému poli, ale je nutné respektovat hydrauliká omezení jednotlivých typů solárních jednotek. Čím menší je rozdíl výšek mezi kolektory a Drain-Unit, tím menší je potřebný výkon čerpadla a tím vyšší bude efektivita (účinnost) celého systému.
  • Seite 35 Drain-Unit je třeba instalovat nad výměníkem tepla primárního okruhu a to i u instalací s integrovaným zásobníkem tak i u zařízení, kde je externí zásobník vody, z pohledu kolektorového pole. Umístění je třeba volit v interiéru budovy na suchém místě.
  • Seite 36 Poznámka: U typů s integrovaným programátorem znovu připojte kabel, který spojuje regulátor s čerpadlem(y). • Doporučení k instalaci. Stanice Drain-Unit tvoří spolu s kolektory a akumulátorem solární systém Drain-Back. Vzhledem k tomu, že se jedná o samovypouštěcí systém kolektorů v linii s trubkami, musí splňovat určité...
  • Seite 37: Zapnutí (Uvedení Do Chodu)

    Drain-Back systém zamezuje zamrznutí kapaliny v případě, že systém je proveden v souladu s návodem. Ujistěte se, že Drain-Unit není zapojen, aby jste zabránili tomu, že čerpadla budou pracovat naprázdno. 1. Po dokončení předchozích operací můžeme přistoupit k napuštění okruhu pomocí...
  • Seite 38: Mantenimiento

    ZÁRUKA Drain-Unit má záruku na všechny materiálové vady po dobu dvou let od data prodeje. Tato záruka se však nevztahuje na přístroje které byly poškozeny následkem nesprávné manipulace, modifikace nebo při použití či zapojení které neodpovídá instrukcím výrobce.
  • Seite 40 ORKLI, S. Coop. Ctra. Zaldibia, s/n E - 20240 Ordizia (Gipuzkoa) Tel.: + 34 943 80 51 80 Fax: + 34 943 80 52 41 E-mail: solarorkli@orkli.es www.orkli.com...

Inhaltsverzeichnis