Werbung
Quicklinks
Be Seen!
Thank you for Purchasing the Flea 2.0 USB from Blackburn, the
leader in bicycle lighting systems. The Flea 2.0 USB combines
four super-bright LED's and a rechargeable Li-Ion battery in an
ultra compact design.
!!! Before Initial Use !!!
Before shipping, the Flea 2.0 USB is charged enough to check
the light. Be sure to fully charge and calibrate prior to rst use,
according to the "Charging" and "Calibration" instructions.
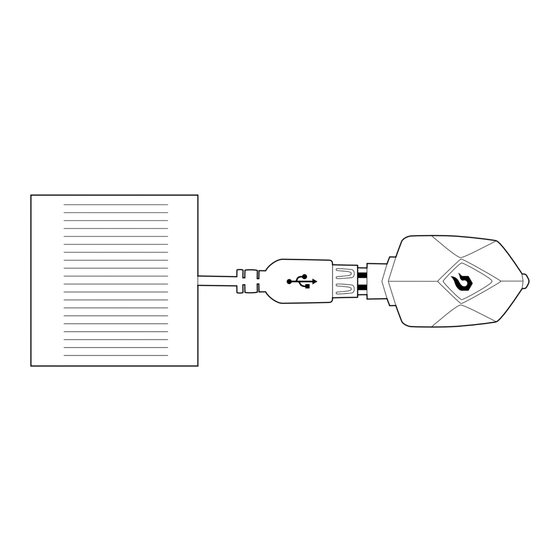
Charging:
USB Charger – (Available separately Part #2016676)
1. Attach charger cradle to the light
1
.
Do not force them into place. Contacts are magnetic and
will self-align.
2. Remove rubber cover from charger
2
.
3. Install charger in standard size USB port
4. When correctly attached to light and charging source, LED
Indicator will ash RED when charging.
5. When charging is complete, LED indicator will ash
GREEN. Remove light and reinstall rubber cover
on charger.
Charging source: All standard size powered USB ports
USB + Solar Charger – (Available separately Part #2016677)
1. See steps 1-2 above.
2. Install charger into USB port on Solar panel
3. Place Solar panel in direct sunlight for fastest
charging.
4. See steps 4-5 above.
Calibration:
1. Turn on Flea light and run continously.
2. At the end of a 15 minute period your Flea light will self-
calibrate by turning off automatically for 2 seconds and will
then turn back on. This is a one time process.
Note: The Fuel gauge will not read accurately until the unit has
completed one full charge and then discharge cycle.
Mounting:
Option 1: Thread included hook and loop closure strap through
metal clip (Flea Rear) or through light body (Flea Front) to attach
Flea to handlebar or seatpost.
Option 2: Clip Flea to accessory strap or belt loop. Make sure
light is rmly attached to mounting surface.
Option 3: Clip Flea to helmet mount, head mount or hat mount.
(Available separately Part #2024357).
Operation:
Front
1. Press button to turn ON
2. Press again for OVERDRIVE mode
3. Press again for FLASH
4. Press again for OFF
Rear
1. Press button to turn ON
2. Press again for FLASH
3. Press again for CHASE
4. Press again for OFF
GREEN = 100% to 75% Battery Capacity (lit for 5 sec
5
after button press)
ORANGE = 75% to 25% Battery Capacity (lit for 5 sec
after button press)
RED = <25% Battery Capacity (lit when light is running)
WARNING: CHOKING HAZARD - Small parts.
Not for children under 3 years.
For more information visit our website at
www.blackburndesign.com
Flea
Instructions
™
Instructions Flea
Flea
Bedienungsanleitung
™
3
.
.
4
3
™
1
2
4
5
Werbung

Verwandte Anleitungen für Blackburn Flea

Inhaltszusammenfassung für Blackburn Flea
- Seite 1 Calibration: 1. Turn on Flea light and run continously. 2. At the end of a 15 minute period your Flea light will self- calibrate by turning off automatically for 2 seconds and will then turn back on. This is a one time process.
- Seite 2 Gesehen werden! Merci de votre achat d’un Flea 2.0 USB de Blackburn, chef de Wir danken Ihnen für den Kauf von Flea 2.0 USB von Blackburn, dem le des systèmes d’éclairage pour bicyclettes. Le Flea 2.0 USB führenden Unternehmen im Bereich von Beleuchtungssystemen. Flea associe quatre DEL extra brillantes et une pile Li-Ion rechargeable 2.0 USB vereinigt in sich vier superhelle LED und eine wiederauadbare...