Herunterladen Inhalt Inhalt Diese Seite drucken
Inhaltsverzeichnis

Werbung

Verfügbare Sprachen
  • DE

Verfügbare Sprachen

  • DEUTSCH, seite 1
Thermostar MiXX & Cook
Multifunktionsgerät
Multi-function appliance
Appareil multifonction
Electrodoméstico multifunción
Apparecchio multi-funzione
Multifunctioneel apparaat
Многофункциональный прибор
Bedienungsanleitung DE
Instruction manual EN
Mode d'emploi FR
Manual de instrucciones ES
Istruzioni d'uso IT
Gebruiksaanwijzing NL
Руководство пользователя RU
1
21
41
61
81
101
121

Werbung

Inhaltsverzeichnis
loading

Inhaltszusammenfassung für Beem Thermostar MiXX & Cook

  • Seite 1 Thermostar MiXX & Cook Bedienungsanleitung DE Multifunktionsgerät Instruction manual EN Multi-function appliance Mode d’emploi FR Appareil multifonction Manual de instrucciones ES Electrodoméstico multifunción Istruzioni d’uso IT Apparecchio multi-funzione Gebruiksaanwijzing NL Multifunctioneel apparaat Руководство пользователя RU Многофункциональный прибор...
  • Seite 2: Sicherheitshinweise

    Sicherheitshinweise Zu Ihrer eigenen Sicherheit lesen niemals in Wasser oder andere Sie vor dem ersten Einsatz die- Flüssigkeiten. se Sicherheitshinweise sorgfältig Kontrollieren Sie das Gerät, die • durch. Netzleitung und den Netzstecker Das Gerät ist zum Hacken, vor der Verwendung auf äußere •...
  • Seite 3 terdeckel nur, wenn die Drehzahl Flüssigkeit in Berührung kommen. Null ist. Beachten Sie, dass beim Abneh- • Achten Sie auf die aus der Mix- men des Dämpfaufsatz weiterhin • behälterdeckelöffnung vereinzelt heißer Dampf aus der Deckelöff- austretenden Spritzer des heißen nung des Mixbehälters aufsteigt.
  • Seite 4 Sicherheitshinweise Nutzen Sie zum Verschließen der das Mixmesser mit dem Mixbe- • Öffnung im Mixbehälterdeckel hälterfuß am Topf fixiert ist. ausschließlich den Messbecher. Sorgen Sie dafür, dass die Lüf- • Decken Sie den Mixbehälterde- tungsschlitze des Geräts hinten ckel nicht mit Handtüchern oder und unten stets frei von Fett, ähnlichen Gegenständen ab.
  • Seite 5: Inhaltsverzeichnis

    Übersicht Sehr geehrter Kunde, Inhaltsverzeichnis Glückwunsch zum Kauf Ihres BEEM Sicherheitshinweise Thermostar MiXX & Cook. Lesen Sie alle Verwendete Symbole Anweisungen vor der Verwendung des Übersicht Geräts sorgfältig durch und bewahren Sie Lieferumfang die Bedienungsanleitung für eine spätere Funktion Verwendung auf. Geben Sie das Gerät nur...
  • Seite 6: Übersicht

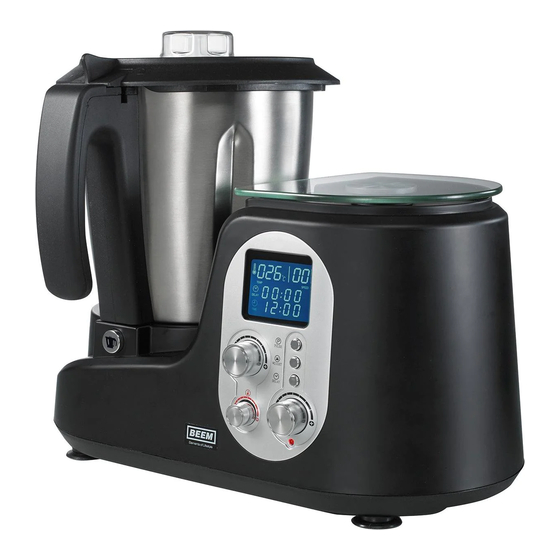
    Übersicht Lieferumfang Prüfen Sie den Lieferumfang auf Vollständigkeit und sichtbare Schäden. 1 Deckel mit Nachfüllöffnung 6 Deckel für den Dämpfaufsatz 2 Mixbehälter 7 Deckel für Nachfüllöffnung/Messbecher 3 Basisgerät mit integrierter Waage 8 Spatel 4 Dämpfaufsatz 9 Rühreinsatz 5 Einlegeboden für den Dämpfaufsatz 10 Dämpfeinsatz 5 | DE...
  • Seite 7: Funktion

    Funktion A Temperaturanzeige B Anzeige Timer (h:min) C Zeitanzeige (min:sek) D Geschwindigkeitsanzeige 1 Geschwindigkeitsregler (Stufen 1-10) 2 Temperaturregler (30°C-120°C in 10°C-Schritten) 3 Pulse-Funktion 4 Aktivierung/Deaktivierung der Waage 5 Delay (Verzögerter Start) 6 Zeiteinstellung 7 Kontrollanzeige Achtung: Im Standby-Modus (5 Minuten nach Zubereitungsende) erlischt die Displayanzeige. Dre- hen Sie den Geschwindigkeitsregler auf 0.
  • Seite 8: Verwendung Des Gerätes

    Verwendung des Gerätes Behälter einsetzen und entnehmen Hinweis: • Beachten Sie die MAX- Menge von 2 l. Heiße Lebensmittel maximal 1,5 l. • Minimale Menge ca. 300 ml, damit das Messer die Lebensmittel greifen kann. Setzen Sie den Behälter Um den Behälter zu von oben in das Gerät ein.
  • Seite 9: Waage Verwenden

    Verwendung des Gerätes Waage verwenden Drücken Sie die Taste 4, Legen Sie das Lebensmittel Drücken Sie erneut die um die Waage zu aktivie- oder den Behälter MITTIG Taste 4, um die Waage zu ren. Warten Sie bis die un- auf die Waage. Das Ge- deaktivieren, bzw.
  • Seite 10: Hacken, Zerkleinern, Kneten, Mixen, Crushen

    Verwendung des Gerätes Hacken, zerkleinern, kneten, mixen, crushen Geben Sie die Lebensmittel Setzen Sie den Deckel auf Setzen Sie den Deckel der in den Behälter und setzen den Behälter und verrie- Nachfüllöffnung auf und Sie ihn in das Gerät ein. geln Sie ihn.
  • Seite 11: Pulse-Funktion

    Verwendung des Gerätes Pulse-Funktion Die Funktion eignet sich besonders zum Crushen von Eis und zum Mixen von Getränken. Hinweis: • Die Pulse-Taste lässt sich während Kochfunktion nicht betätigen. • Wenn der Inhalt im Behälter über 60°C ist, ist die Pulse-Taste deak- tiviert.
  • Seite 12: Rühren Mit Dem Rühreinsatz

    Verwendung des Gerätes Rühren mit dem Rühreinsatz Der Rühreinsatz eignet sich zur Zubereitung von Cremes, Mayonnaise, steifem Eiweiß und Sahne. Setzen Sie den Rühreinsatz Geben Sie die Lebensmittel Setzen Sie den Deckel auf auf den Stift der Messer- in den Behälter und setzen den Behälter und verrie- einheit auf.
  • Seite 13 Verwendung des Gerätes Während der Zubereitung Zum Abnehmen des läuft die Uhr rückwärts ab. Rühreinsatzes ziehen Sie ihn nach oben hin ab, dre- hen Sie ihn dabei leicht hin und her. Hinweis: • Für sehr langsames Einfüllen schließen Sie den Deckel der Nachfüllöffnung. Es ent- steht ein kleiner Spalt.
  • Seite 14: Erhitzen, Kochen

    Verwendung des Gerätes Erhitzen, Kochen Geben Sie die Lebensmittel Setzen Sie den Deckel auf Setzen Sie den Deckel der in den Behälter und setzen den Behälter und verrie- Nachfüllöffnung auf und Sie ihn in das Gerät ein. geln Sie ihn. verriegeln Sie ihn.
  • Seite 15: Dämpfeinsatz Verwenden

    Verwendung des Gerätes Hinweis: Das Gerät eignet sich besonders zur Zubereitung von Babynahrung, Marmelade, Sup- pen und Soßen. Dämpfeinsatz verwenden Verwenden Sie den Dämpfeinsatz zum Garen von Reis, Kartoffeln und Gemüse. Geben Sie mindestens Setzen Sie den Dämpfein- Schließen Sie den Behälter 500 ml Wasser in den Be- satz mit dem Lebensmittel und schalten Sie das Gerät...
  • Seite 16: Dämpfaufsatz Verwenden

    Verwendung des Gerätes Dämpfaufsatz verwenden Ist besonders geeignet für Fisch, Gemüse wie Spargel und Brokkoliröschen sowie Knödel. Geben Sie mindestens Setzen Sie den Dämpfauf- Füllen Sie die Lebensmittel 500 ml Wasser in den Be- satz auf den Behälter und in den Einlegeboden und hälter.
  • Seite 17: Timer Einstellen

    Verwendung des Gerätes Timer einstellen Timer Intervall bis 1 h 5 min Mit dem Timer können Sie die Zubereitung zeitverzögert starten, maximal 24 Stunden. bis 24 h 10 min Befüllen Sie den Behälter Drücken Sie die Taste „De- Stellen Sie die gewünschte (bzw.
  • Seite 18: Reinigung Und Wartung

    Reinigung und Wartung Reinigung Dichtungsringe reinigen Warnung: Schalten Sie das Gerät vor der Reinigung ab, ziehen Sie den Stecker und lassen Sie es abkühlen. 1. Entleeren Sie den Behälter nach jeder Benutzung. 2. Behälter innen und außen mit Spülwas- ser reinigen. Dabei Behälter nicht in Entnehmen Sie die Dichtungsringe.
  • Seite 19: Messereineit Entnehmen Und Wieder Einsetzen

    Reinigung und Wartung Messereinheit entnehmen und wieder einsetzen Halten Sie die Messerein- Zum Entfernen der Mes- Nach der Reinigung setzen heit am Gewinde fest, sereinheit drehen Sie den Sie den Silikonring wieder damit sie nicht aus dem Spanner gegen den Uhrzei- auf die Messereinheit und Behälter fällt.
  • Seite 20: Fehlerbehebung

    Reinigung und Wartung Fehlerbehebung Fehlercode Ursache Ursache Behälter nicht korrekt in das Ge- Prüfen Sie den Sitz des Behälters. rät eingesetzt. Behälterdeckel nicht korrekt Prüfen Sie den Sitz des Behälter- aufgesetzt. deckels. Kundenservice kontaktieren. Technische Daten Modell: Thermostar MiXX & Cook Multifunktionsgerät Typnummer: MC63.001...
  • Seite 21: Gewährleistung/Garantie

    Fragen zur Serviceabwicklung außer- oder die örtlichen Behörden. halb Deutschlands kontaktieren Sie Ihren Händler. Konformitätserklärung Hiermit erklärt die Firma BEEM, dass sich dieses Gerät in Übereinstimmung mit den grundlegenden Anforderungen und den übrigen einschlägigen Bestimmungen der Richtlinien 2004/108/EG, 2006/95/EG, 2009/125/EG und 2011/65/EU befindet.
  • Seite 22: Safety Instructions

    Safety instructions For your own safety, please read the power cord, and the power these safety notes carefully before plug for visible external damage. first use. Do not use the appliance in case The appliance is intended for of damage. •...
  • Seite 23 Pay attention to splashes of hot When working with the steaming • • mixture sometimes coming out top, keep children away from the of the mixing bowl lid opening. appliance and warn them about Place the measuring cup cor- the steam generation and the hot rectly under the mixing bowl lid condensate.
  • Seite 24 Safety instructions Use only the measuring cup to Operate the appliance only on • • close the opening in the mixing AC and on an outlet installed bowl lid. Do not cover the mixing correctly by a specialist. The bowl lid with towels or similar voltage of the outlet and the items.
  • Seite 25: Symbols Used

    Overview Dear customer! Contents Congratulation on the purchase of your Safety instructions BEEM Thermostar MiXX & Cook. Read all Symbols used instructions carefully before using the ap- Overview pliance, and keep the operating instructions Scope of delivery for later use. Always include the operating...
  • Seite 26: Overview

    Overview Scope of delivery Check the scope of delivery for completeness and visible damage. 1 Lid with replenishing opening 6 Lid for the steaming top 2 Mixing bowl 7 Lid of the replenishing opening/ 3 Base unit with integrated scales measuring cup 4 Steaming top 8 Spatula...
  • Seite 27: Function

    Function A Temperature display B Timer display (h:min) C Time display (min:sec) D Speed display 1 Speed control (steps 1 to 10) 2 Temperature regulator (30 °C to 120 °C in steps of 10 °C) 3 Pulse Function 4 Activation/Deactivation of the scales 5 Delay (delayed start) 6 Time setting 7 Signal lamp...
  • Seite 28: Using The Appliance

    Using the Appliance Bowl Setting and Removal Note: • Observe the MAX quantity of 2 L. Hot food max. 1.5 L • Min. quantity ca. 300 ml, so that the knife can catch the food. Set the bowl into the For removal of the bowl, appliance from above.
  • Seite 29: Using The Scales

    Using the Appliance Using the Scales Press the button 4 to acti- Place the food or the con- Press the button 4 again vate the scales. Wait until tainer CENTERED onto to deactivate the scales or the bottom display line the scales.
  • Seite 30: Chopping, Mincing, Kneading, Mixing, Crushing

    Using the Appliance Chopping, Mincing, Kneading, Mixing, Crushing Fill the food into the bowl Set the lid onto the bowl Set the lid of the replenish- and set the bowl onto the and lock it. ing opening and lock it. appliance.
  • Seite 31: Pulse Function

    Using the Appliance Pulse Function This function is suited especially for crushing ice and for mixing beverages. Note: • The pulse button cannot be operated during the cooking function. • The pulse button is deactivated when the contents of the bowl are above 60 °C.
  • Seite 32: Stirring With The Stirring Attachment

    Using the Appliance Stirring with the Stirring Attachment The stirring attachment is suited for the preparation of creams, mayonnaise, stiff egg- white, and cream. Set the stirring attachment Fill the food into the bowl Set the lid onto the bowl onto the pin of the knife and set the bowl onto the and lock it.
  • Seite 33 Using the Appliance The clock runs backward To remove the stirring during the preparation. attachment, pull it off in upward direction while turning it slightly to and fro. Note: • Close the lid of the replenishing opening for very slow filling. A small slit is created. Add the liquid slowly onto the lid of the bowl.
  • Seite 34: Heating, Cooking

    Using the Appliance Heating, Cooking Fill the food into the bowl. Set the lid onto the bowl Set the lid of the replenish- Set the bowl onto the and lock it. ing opening and lock it. appliance. Set the time (under 1 hour) Set the temperature Set the speed (1 to 4), the with the rotary knob 6.
  • Seite 35: Using The Steamer Basket

    Using the Appliance Note: The appliance is suited especially for the preparation of baby foods, marmalade, soups, and sauces. Using the Steamer Basket Use the steamer basket for cooking of rice, potatoes, and vegetables. Fill at least 500 ml of Set the steamer basket Close the bowl and set the water into the bowl.
  • Seite 36: Using The Steaming Top

    Using the Appliance Using the Steaming Top Suited especially for fish, vegetables like asparagus and broccoli florets, and dumplings. Fill at least 500 ml of Set the steaming top onto Fill the food onto the tray water into the bowl. This the bowl and lock it.
  • Seite 37: Setting The Timer

    Using the Appliance Setting the Timer Timer Interval Up to 1 h 5 min You can use the timer to start the prepara- tion with a delay of up to 24 hours. Up to 24 h 10 min Fill the bowl (or the steam- Pres the button “Delay”, Set the desired delay time ing top respectively) with...
  • Seite 38: Cleaning And Maintenance

    Cleaning and Maintenance Cleaning Cleaning the Seal Rings Warning: Switch off the appliance before cleaning, pull the power plug, and let the appliance cool down. 1. Empty the bowl after each use. 2. Clean the inside and the outside of the bowl with dishwater.
  • Seite 39: Removal And Insertion Of The Knife Unit

    Cleaning and Maintenance Removal and Insertion of the Knife Unit Hold the knife unit at the For removal of the knife After cleaning, set the threaded part, so that it unit, turn the tightening silicone ring again to the will not drop out of the knob counterclockwise to knife unit and push it all the bowl.
  • Seite 40: Troubleshooting

    Cleaning and Maintenance Troubleshooting Fault code Cause Cause Bowl not set correctly to the Check the fit of the bowl. appliance. Lid of the bowl not set correctly. Check the fit of the lid of the bowl. Contact customer service. Technical data Model: Thermostar MiXX &...
  • Seite 41: Warranty/Guarantee

    Do not dispose tising material, or on the BEEM website for of this appliance as unsorted municipal the respective product. You can find the waste. Return appliance and packaging to a...
  • Seite 42: Consignes De Sécurité

    Consignes de sécurité Pour votre sécurité, lisez ces consi- tion dans l’eau ou dans un autre gnes de sécurité avant la première liquide. utilisation. Avant utilisation, vérifiez que • Cet appareil est prévu pour l’appareil, son cordon d’alimenta- • hacher, émincer, mélanger, cuire, tion et sa fiche d’alimentation ne chauffer et cuire à...
  • Seite 43 mélangeur. Ouvrez le couvercle Ouvrez le couvercle en le te- • du bol mélangeur uniquement nant de sorte à ne pas entrer en lorsque la vitesse est nulle. contact avec la vapeur qui monte Faites attention aux éclabous- ni avec le liquide brûlant qui •...
  • Seite 44 Consignes de sécurité recommandées par le fabricant. N’utilisez jamais l’appareil dans • Sinon, la garantie serait caduque. un environnement très humide, Utilisez uniquement le couvercle mouillé ou chaud. Ne posez • fourni pour fermer le bol mélan- jamais l’appareil ni son cordon geur.
  • Seite 45: Symboles Utilisés

    Présentation Cher client, Table des matières Nous vous félicitons d’avoir acheté votre Consignes de sécurité BEEM Thermostar MiXX & Cook. Veuillez Symboles utilisés lire attentivement toutes les instructions Présentation avant d’utiliser l’appareil. Conservez le Contenu du produit mode d’emploi pour une utilisation ul- Fonction térieure.
  • Seite 46: Présentation

    Présentation Contenu du produit Vérifiez que le contenu du produit est complet et ne comporte aucun dégât. 1 Couvercle avec orifice de remplissage 6 Couvercle pour la cuve de vapeur 2 Bol mélangeur 7 Couvercle de l’orifice de remplissage/ 3 Corps principal avec balance intégrée doseur 4 Cuve de vapeur 8 Spatule...
  • Seite 47: Fonction

    Fonction A Affichage de la température B Affichage du minuteur (h:min) C Affichage de la durée (min:s) D Affichage de la vitesse 1 Réglage de la vitesse (1 à 10) 2 Réglage de la température (30 à 120 °C par paliers de 10 °C) 3 Fonction d’impulsion 4 Activation/Désactivation de la balance 5 Délai (Mise en marche différée)
  • Seite 48: Utiliser L'appareil

    Utiliser l’appareil Placer et enlever le bol Remarque : • Observez le volume MAX de 2 L et de 1,5 L pour les aliments chauds. • Observez le volume MIN d’environ 300 mL, afin que les aliments attei- gnent la hauteur de la lame.
  • Seite 49: Utiliser La Balance

    Utiliser l’appareil Utiliser la balance Appuyez sur le bouton 4 Placez les aliments ou le Rappuyez sur le bouton 4 pour activer la balance. récipient CENTRÉ sur la pour désactiver la balance Attendez que la ligne infé- balance. Le poids s’affiche. ou appuyez deux fois pour rieure sur l’écran cesse de réinitialiser la balance à...
  • Seite 50: Hacher, Émincer, Pétrir, Mélanger Et Broyer

    Utiliser l’appareil Hacher, émincer, pétrir, mélanger et broyer Ajoutez des aliments dans Placez le couvercle sur le Placez le couvercle sur le bol et placez le bol sur bol et verrouillez-le. l’orifice de remplissage et l’appareil. verrouillez-le. Remarque : • La limite max. pour le poids le la pâte est de 800 g.
  • Seite 51: Fonction D'impulsion

    Utiliser l’appareil Fonction d’impulsion Cette fonction sert particulièrement à broyer de la glace et à mélanger des boissons. Remarque : • Le bouton d’impulsion ne fonctionne pas pendant la fonction de cuisson. • Le bouton d’impulsion est désactivé lorsque le contenu du bol dépasse 60 °C.
  • Seite 52: Agiter Avec L'accessoire Mélangeur

    Utiliser l’appareil Agiter avec l’accessoire mélangeur L’accessoire mélangeur sert à préparer des crèmes et des mayonnaises et à battre des œufs en neige. Placez l’accessoire mé- Ajoutez des aliments dans Placez le couvercle sur le langeur sur la broche de le bol et placez le bol sur bol et verrouillez-le.
  • Seite 53 Utiliser l’appareil Le temps s’écoule à re- Pour enlever l’accessoire, bours pendant la prépara- soulevez-le tout en le tour- tion. nant légèrement d’avant en arrière. Remarque : • Fermez le couvercle de l’ouverture de remplissage pour un remplissage très lent. Une petite ouverture se forme.
  • Seite 54: Chauffer Et Cuire

    Utiliser l’appareil Chauffer et cuire Ajoutez les aliments dans Placez le couvercle sur le Placez le couvercle sur le bol. Placez le couvercle bol et verrouillez-le. l’orifice de remplissage et sur l’appareil. verrouillez-le. Réglez la durée (mois d‘1 Réglez la température Réglez la vitesse (de 1 à...
  • Seite 55: Utiliser Le Panier-Vapeur

    Utiliser l’appareil Remarque : L’appareil est particulièrement adapté à la préparation d’aliments pour bébé, de confi- tures, de soupes et de sauces. Utiliser le panier-vapeur Utilisez le panier-vapeur pour cuire du riz, des pommes de terre et des légumes. Ajoutez au moins 500 mL Placez le panier-vapeur Fermez le bol et réglez d’eau dans le bol.
  • Seite 56: Utiliser La Cuve De Vapeur

    Utiliser l’appareil Utiliser la cuve de vapeur Convient particulièrement au poisson, aux légumes tels que les asperges et aux fleurons de brocoli ainsi qu’aux raviolis. Ajoutez au moins 500 mL Placez la cuve de vapeur Ajoutez des aliments dans d’eau dans le bol. Cette sur le bol et verrouillez-la.
  • Seite 57: Régler Le Minuteur

    Utiliser l’appareil Régler le minuteur Minuteur Intervalle Jusqu’à 1 h 5 min Vous pouvez utiliser le minuteur pour dé- marrer la préparation avec un délai allant Jusqu’à 24 h 10 min jusqu’à 24 heures. Ajoutez des aliments dans Appuyez sur le bouton « Réglez la durée de différé...
  • Seite 58: Nettoyage Et Entretien

    Nettoyage et entretien Nettoyage Nettoyage des joints Mise en garde : Avant le nettoyage, éteignez l’appareil en débranchant la fiche et laissez refroidir l’appareil. 1. Videz le bol après chaque utilisation. 2. Nettoyez l’intérieur et l’extérieur du bol à l’eau savonneuse. N’immergez pas le bol dans l’eau car cela endommagerait Enlevez les joints.
  • Seite 59: Enlever Et Installer L'ensemble De Lame

    Nettoyage et entretien Enlever et installer l’ensemble de lame Tenez l’ensemble de lame Pour enlever l’ensemble de Après le nettoyage, re- au niveau de la partie lame, tournez le bouton mettez en place le joint en filetée, afin qu’il ne tombe de serrage dans le sens silicone sur l’ensemble de pas hors du bol.
  • Seite 60: Dépannage

    Nettoyage et entretien Dépannage Code d’erreur Cause Solution Bol mal placé sur l’appareil. Vérifiez la fixation du bol. Couvercle du bol mal fermé. Vérifiez la fermeture du couvercle. Contactez le service après-vente. Caractéristiques techniques Modèle : Thermostar MiXX & Cook Appareil multifonction Numéro de série : MC63.001...
  • Seite 61: Garantie

    électriques et électroniques l’emballage spécifique au produit, les objets peuvent contenir des substances dange- publicitaires ou sur le site web de BEEM reuses. Ne jetez pas cet appareil avec les pour le produit respectif. Vous trouverez déchets ménagers. Apportez l’appareil et la garantie détaillée et les conditions de...
  • Seite 62: Instrucciones De Seguridad

    Instrucciones de seguridad Por su propia seguridad, lea estas Si el aparato o el cable de alimen- • indicaciones de seguridad cuidado- tación están dañados, deben ser samente antes del primer uso. reparados o reemplazados por el El aparato ha sido diseñado fabricante, su agente de servicio •...
  • Seite 63 bajo la apertura de la tapa del re- Cuando trabajo con el accesorio • cipiente y de mezcla y déjela allí, de cocción al vapor, mantenga especialmente cuando procese a los niños alejados del aparato alimentos calientes (por ejemplo, y adviértales sobre la genera- mermelada, sopa).
  • Seite 64 Instrucciones de seguridad Use exclusivamente la taza medi- Asegúrese de que las ranuras • • dora para cerrar la apertura de de ventilación del aparato en la la tapa del recipiente de mezcla. parte posterior e inferior estén No cubra la tapa del recipiente libres de grasa, restos de alimen- de mezcla con trapos ni objetos tos o similares.
  • Seite 65: Símbolos Utilizados

    Resumen Estimado cliente, Índice Felicidades por su adquisición del BEEM Instrucciones de seguridad Thermostar MiXX & Cook. Lea cuidado- Símbolos utilizados samente todas las instrucciones antes de Resumen usar el aparato y consérvelas para uso en el Contenido de la entrega futuro.
  • Seite 66: Resumen

    Resumen Contenido de la entrega Compruebe que el contenido de la entrega esté completo y no muestre daños visibles. 1 Tapa con apertura de llenado 6 Bandeja para el accesorio de cocción al 2 Recipiente de mezcla vapor 3 Unidad base con báscula integrada 7 Tapa de apertura de llenado/taza medi- 4 Accesorio de cocción al vapor dora...
  • Seite 67: Funciones

    Funciones A Indicación de temperatura B Indicación de temporizador (h:min) C Indicación de tiempo (min:seg) D Indicación de velocidad 1 Control de velocidad (pasos 1 a 10) 2 Regulador de temperatura (30ºC a 120ºC en pasos de 10ºC) 3 Función de pulso 4 Activación/desactivación de la báscula 5 Retraso (inicio con retraso) 6 Configuración de tiempo...
  • Seite 68: Uso Del Aparato

    Uso del aparato Instalación y extracción del recipiente Nota: • Tenga en cuenta la cantidad máxima de 2 L. Máximo de alimentos calientes 1,5 L. • Cantidad mínima aproxi- mada 300 ml, de forma que la cuchilla pueda procesar los alimentos. Ponga el recipiente sobre Para extraer el recipien- el aparato.
  • Seite 69: Uso De La Báscula

    Uso del aparato Uso de la báscula Pulse el botón 4 para Ponga los alimentos en el Pulse de nuevo el botón 4 activar la báscula. Espere recipiente CENTRADO para desactivar la báscula a que la línea inferior de la sobre la báscula.
  • Seite 70: Cortar, Picar, Amasar, Mezclar, Triturar

    Uso del aparato Cortar, picar, amasar, mezclar, triturar Ponga los alimentos en el Ponga la tapa sobre el Ponga la tapa de la apertu- recipiente y ponga el reci- recipiente y encájela en ra de llenado y encájela en piente sobre el aparato. posición.
  • Seite 71: Función De Pulso

    Uso del aparato Función de pulso Esta función es especialmente adecuada para triturar hielo y mezclar bebidas. Nota: • El botón de pulso no funciona durante la fun- ción de cocción. • El botón de pulso se desactiva cuando el contenido del recipiente supera los 60ºC.
  • Seite 72: Remover Con El Accesorio De Removido

    Uso del aparato Remover con el accesorio de removido El accesorio de removido es adecuado para preparar cremas, mayonesa, clara de huevo montada y nata. Ponga el accesorio de Ponga los alimentos en el Ponga la tapa sobre el removido sobre la punta recipiente y ponga el reci- recipiente y encájela en de la unidad de cuchilla.
  • Seite 73 Uso del aparato El temporizador realizará Para extraer el accesorio una cuenta atrás durante la de removido, sáquelo ti- preparación. rando hacia arriba mientras lo gira ligeramente adelan- te y atrás. Nota: • Cierre la tapa de la apertura de llenado para llenar muy lentamente. Se producirá una pequeña ranura.
  • Seite 74: Calentamiento, Cocción

    Uso del aparato Calentamiento, cocción Ponga los alimentos en el Ponga la tapa sobre el Ponga la tapa de la apertu- recipiente. Ponga el reci- recipiente y encájela en ra de llenado y encájela en piente sobre el aparato. posición. posición.
  • Seite 75: Uso Del Cesto De Cocción Al Vapor

    Uso del aparato Nota: El aparato es especialmente adecuado para preparar alimentos infantiles, mermelada, sopas y salsas. Uso del cesto de cocción al vapor Use el cesto de cocción al vapor para cocer arroz, patatas y verduras. Llene con al menos 500 Ponga el cesto de cocción Cierre el recipiente y pon- ml de agua el recipiente.
  • Seite 76: Uso Del Accesorio De Cocción Al Vapor

    Uso del aparato Uso del accesorio de cocción al vapor Especialmente adecuado para pescado, verduras como espárragos y cogollos de brécol, y bollos. Llene con al menos 500 Ponga la tapa sobre el Ponga los alimentos sobre ml de agua el recipiente. recipiente y encájela en la bandeja y ponga la ban- Esta cantidad es suficiente...
  • Seite 77: Configuración Del Temporizador

    Uso del aparato Configuración del temporizador Temporizador Intervalo Hasta 1 h 5 min Puede usar el temporizador para iniciar la preparación con un retraso de hasta 24 Hasta 24 h 10 min horas. Llene el recipiente (o el Pulse el botón “Retraso”, Ponga el tiempo de retraso accesorio de cocción al parpadeará...
  • Seite 78: Limpieza Y Mantenimiento

    Limpieza y mantenimiento Limpieza Limpieza de las arandelas de estanqueidad Advertencia: Apague el aparato antes de limpiarlo, desconecte el enchufe y déjelo enfriar. 1. Vacíe el recipiente después de cada uso. 2. Limpie el interior y exterior del reci- piente con agua lavavajillas. No intro- duzca el recipiente en el agua para evitar Saque las arandelas de estanqueidad.
  • Seite 79: Extracción E Inserción De La Unidad De Cuchilla

    Limpieza y mantenimiento Extracción e inserción de la unidad de cuchilla Aguante la unidad de cuchi- Para sacar la unidad de Después de limpiarla, pon- lla por la zona estriada, de cuchilla gire el mando de ga la arandela de silicona forma que no caiga fuera fijación hacia la izquierda de nuevo en la unidad de...
  • Seite 80: Solución De Problemas

    Limpieza y mantenimiento Solución de problemas Código de avería Causa Causa Recipiente colocado incorrecta- Compruebe que el recipiente mente en el aparato. encaje. Tapa del recipiente colocada Compruebe que la tapa encaje en incorrectamente. el recipiente. Contacte con el servicio al cliente. Datos técnicos Modelo: Thermostar MiXX &...
  • Seite 81: Garantía

    (WEEE). Los equipos producto, el material publicitario o el sitio eléctricos y electrónicos pueden contener web de BEEM para el producto correspon- sustancias peligrosas. No deseche este diente. Puede encontrar las condiciones aparato o el embalaje en la basura domésti- detalladas de garantía, accesorios disponi-...
  • Seite 82: Istruzioni Di Sicurezza

    Istruzioni di sicurezza Per la vostra sicurezza, leggere Le riparazioni possono essere ef- • attentamente queste note sulla fettuate esclusivamente da riven- sicurezza prima del primo utilizzo. ditori specializzati autorizzati o L’apparecchio è destinato all’uso dall’assistenza di fabbrica. Questo • per tritare, sminuzzare, frullare, vale, in particolare, per la sostitu- cuocere, riscaldare, e cuocere a...
  • Seite 83 caldi (ad esempio: marmellate, Assicurarsi sempre che un nu- • zuppe). mero sufficiente di aperture per Non riscaldare o far bollire fare uscire il vapore non siano • quantità maggiori di preparato ostruite nella parte superiore, nel alla temperatura 110 - 120 °C per vassoio e nel coperchio della par- evitare bruciature.
  • Seite 84 Istruzioni di sicurezza Usare esclusivamente il misurino Assicurarsi che le fessure di aera- • • per chiudere l’apertura del co- zione dell’apparecchio sulla parte perchio della ciotola. Non copri- posteriore e sulla base siano re il coperchio della ciotola con sempre libere da grasso, residui strofinacci o oggetti simili.
  • Seite 85: Simboli Utilizzati

    Descrizione generale Gentile cliente, Sommario Complimenti per aver acquistato il BEEM Istruzioni di sicurezza Thermostar MiXX & Cook. Leggere atten- Simboli utilizzati tamente tutte le istruzioni prima di usare Descrizione generale l‘apparecchio e conservare le istruzioni Contenuto della confezione d‘uso per un utilizzo successivo. Includere Funzioni sempre le istruzioni per l’uso quando si...
  • Seite 86: Contenuto Della Confezione

    Panoramica Contenuto della confezione Verificare che il contenuto della confezione sia completo e che non vi siano danni visibili. 1 Coperchio con apertura di riempimento 6 Coperchio della parte superiore per 2 Ciotola cottura a vapore 3 Unità base con bilancia integrata 7 Coperchio con apertura di riempimen- 4 Parte superiore per cottura a vapore to/misurino...
  • Seite 87: Funzioni

    Funzioni A Indicatore di temperatura B Indicatore timer (h:min) C Indicatore ora (min:sec) D Indicatore velocità 1 Controllo velocità (passi da 1 a 10) 2 Regolatore di temperatura (da 30 °C a 120 °C in incrementi di 10 °C) 3 Funzione impulsi 4 Attivazione/disattivazione della bilancia 5 Ritardo (avvio ritardato) 6 Impostazione ora...
  • Seite 88: Uso Dell'apparecchio

    Uso dell’apparecchio Posizionamento e rimozione della ciotola Nota: • Osservare la quantità MAX di 2 L. Cibi caldi max. 1,5 L. • Quantità min. ca. 300 ml, in modo che la lama possa catturare il cibo. Inserire la ciotola nell’appa- Per la rimozione della recchio dalla parte supe- ciotola, premere il pulsante...
  • Seite 89: Uso Della Bilancia

    Uso dell’apparecchio Uso della bilancia Premere il pulsante 4 per Posizionare il cibo o il con- Premere di nuovo il pul- attivare la bilancia. Atten- tenitore al CENTRO della sante 4 per disattivare la dere che la linea del display bilancia.
  • Seite 90: Tritare, Sminuzzare, Impastare, Frullare, Triturare

    Uso dell’apparecchio Tritare, sminuzzare, impastare, frullare, triturare Versare il cibo nella ciotola Posizionare il coperchio Posizionare il coperchio e posizionare la ciotola sulla ciotola e bloccarlo. dell’apertura di riempimen- sull’apparecchio. to e bloccarlo. Nota: • Il limite max. del peso dell’impasto è...
  • Seite 91: Funzione Impulsi

    Uso dell’apparecchio Funzione impulsi Questa funzione è particolarmente adatta per tritare il ghiaccio e per mescolare bevan- Nota: • Il pulsante impulsi non può essere utilizzato durante la funzione cottura. • Il pulsante impulsi è disattivato quando il contenuto della ciotola è al di sopra dei 60 °C.
  • Seite 92: Mescolare Con L'accessorio Per Incorporare

    Uso dell’apparecchio Mescolare con l’accessorio per incorporare L’accessorio per incorporare è adatto per la preparazione di creme, maionese, albumi montati a neve e crema. Inserire l’accessorio per Versare il cibo nella ciotola Posizionare il coperchio incorporare sul perno del e posizionare la ciotola sulla ciotola e bloccarlo.
  • Seite 93 Uso dell’apparecchio L’orologio scorre all’indie- Per rimuovere l’accessorio tro durante la preparazio- per incorporare, tirarlo verso l’alto ruotandolo leg- germente avanti e indietro. Nota: • Chiudere il coperchio dell’apertura di riempimento per versare molto lentamente. Si crea una piccola fessura. Aggiungere il liquido lentamente sul coperchio della cioto- la.
  • Seite 94: Riscaldare, Cuocere

    Uso dell’apparecchio Riscaldare, cuocere Inserire gli ingredienti nella Posizionare il coperchio Posizionare il coperchio ciotola. Posizionare la cio- sulla ciotola e bloccarlo. dell’apertura di riempimen- tola sull’apparecchio. to e bloccarlo. Impostare il tempo (meno Impostare la temperatura Impostare la velocità (da 1 di 1 ora) utilizzando la (da 30 °C a 120 °C).
  • Seite 95: Utilizzare Il Cestello Per La Cottura A Vapore

    Uso dell’apparecchio Nota: L’apparecchio è particolarmente adatto alla preparazione di alimenti per bambini, marmellate, zuppe e salse. Utilizzare il cestello per la cottura a vapore Utilizzare il cestello per la cottura a vapore per cuocere riso, patate e verdure. Versarne almeno 500 ml Posizionare il cestello per Chiudere la ciotola ed im- nella ciotola.
  • Seite 96: Utilizzare La Parte Superiore Per La Cottura A Vapore

    Uso dell’apparecchio Utilizzare la parte superiore per la cottura a vapore Particolarmente adatto per pesce, verdure come asparagi e broccoletti e gnocchi. Versarne almeno 500 ml Posizionare la parte Versare il cibo sul vassoio nella ciotola. Questa quan- superiore per la cottura e posizionare il vassoio nel tità...
  • Seite 97: Impostare Il Timer

    Uso dell’apparecchio Impostare il Timer Timer Intervallo Fino a 1 h 5 min E’ possibile utilizzare il timer per iniziare la preparazione con un ritardo fino a 24 ore. Fino a 24 h 10 min Riempire la ciotola (o la Premere il pulsante “Ritar- Impostare il tempo di parte superiore per la...
  • Seite 98: Pulizia E Manutenzione

    Pulizia e manutenzione Pulizia Pulire le guarnizioni Avvertenza: Spegnere l‘apparecchio prima della puli- zia, estrarre la spina di alimentazione e lasciar raffreddare l‘apparecchio. 1. Svuotare la ciotola dopo ogni utilizzo. 2. Pulire l’interno e l’esterno della ciotola con acqua saponata. Non inserire la cio- tola in acqua, al fine di evitare danni ai Rimuovere le guarnizioni.
  • Seite 99: Rimozione E Inserimento Del Corpo Lama

    Pulizia e manutenzione Rimozione e inserimento del corpo lama Tenere il corpo lama dalla Per rimuovere il corpo Dopo la pulizia, posiziona- parte filettata, in modo che lama, ruotare la manopola re di nuovo la guarnizione non cada fuori dalla ciotola. di tenuta in senso anti-ora- in silicone sul corpo lama e rio per sbloccare il corpo...
  • Seite 100: Risoluzione Dei Problemi

    Pulizia e manutenzione Risoluzione dei problemi Codice errore Causa Causa La ciotola non è posizionata cor- Verificare il posizionamento della rettamente sull’apparecchio. ciotola. Il coperchio della ciotola non è Verificare il posizionamento del posizionato correttamente. coperchio della ciotola. Contattare il servizio clienti. Dati tecnici Modello: Thermostar MiXX &...
  • Seite 101: Garanzia

    Garanzia Smaltimento Per alcuni prodotti, oltre all’obbligo di ga- Il simbolo del cestino dei rifiuti ranzia legale BEEM also BEEM offre un’ulte- barrato indica lo smaltimento riore estensione di garanzia del produttore. separato dei rifiuti di apparecchiature Una volta concessa, potrete trovare i dati elettriche ed elettroniche (RAEE).
  • Seite 102: Veiligheidsinstructies

    Veiligheidsinstructies Voor uw eigen veiligheid, lees deze Controleer het netsnoer, het • veiligheidsinstructies zorgvuldig apparaat en het verlengsnoer vóór het eerste gebruik. op schade voor u het gebruikt. Het toestel is bestemd voor Gebruik het apparaat niet in geval • het hakken, fijnhakken, mengen, van schade.
  • Seite 103 Besteed aandacht aan spatten van Merk op dat hete stoom uit de • • het hete mengsel die soms uit opening van het deksel van de de opening in het deksel van de mengkom blijft ontsnappen wan- mengkom komen. Plaats de maat- neer het stoomopzetstuk wordt beker correct onder de opening verwijderd.
  • Seite 104 Veiligheidsinstructies Gebruik alleen de maatbeker Zorg ervoor dat de ventilatie- • • om de opening in het deksel van sleuven aan de achterkant en de de mengkom te sluiten. Bedekt onderkant van het apparaat altijd het deksel van de mengkom niet vrij worden gehouden van vet, met handdoeken of vergelijkbare voedselresten enz.
  • Seite 105: Gebruikte Symbolen

    Overzicht Geachte klant, Inhoud Gefeliciteerd met de aankoop van uw Ther- Veiligheidsinstructies mostar MiXX & Cook. Lees alle instructies Gebruikte symbolen zorgvuldig door voordat u het apparaat in Overzicht gebruik neemt en bewaar de gebruiksaan- Geleverde onderdelen wijzing om deze later te kunnen raadplegen. Functie Als het apparaat aan een derde partij wordt Voor het eerste gebruik...
  • Seite 106: Overzicht

    Overzicht Geleverde onderdelen Controleer of alle onderdelen aanwezig zijn en of er zichtbare beschadigingen zijn. 1 Deksel met bijvulopening 6 Deksel voor het stoomopzetstuk 2 Mengkom 7 Deksel van de bijvulopening/maatbeker 3 Basiseenheid met geïntegreerde weeg- 8 Spatel schaal 9 Roerhulpstuk 4 Stoomopzetstuk 10 Stoommand 5 Blad voor het stoomopzetstuk...
  • Seite 107: Functie

    Functie A Temperatuurweergave B Timerweergave (uur:min) C Tijdweergave (min:sec) D Snelheidweergave 1 Snelheidknop (stappen 1 tot 10) 2 Temperatuurregelaar (30 °C tot en met 120 °C in stappen van 10 °C) 3 Pulsfunctie 4 Activering/deactivering van de weegschaal 5 Vertraging (uitgestelde start) 6 Tijdinstelling 7 Signaal-LED OPGELET:...
  • Seite 108: Het Apparaat Gebruiken

    Het apparaat gebruiken De kom plaatsen en verwijderen Opmerking: • Let op de MAX hoeveel- heid 2 l. Warm voedsel max.1,5 l. • Min. hoeveelheid ca. 300 ml, zodat het mes het voedsel kan grijpen. Plaats de kom vanaf boven Voor het verwijderen van in het apparaat.
  • Seite 109: De Weegschaal Gebruiken

    Het apparaat gebruiken De weegschaal gebruiken Druk op knop 4 om de Plaats het voedsel of de Druk opnieuw op knop 4 weegschaal te activeren. container op het midden om de weegschaal uit te Wacht totdat de onderste van de weegschaal. Het schakelen of druk twee- regel van de display met gewicht kan op de display...
  • Seite 110: Hakken, Fijnhakken, Kneden, Mixen, Breken

    Het apparaat gebruiken Hakken, fijnhakken, kneden, mixen, breken Vul het voedsel in de kom Plaats het deksel op de Plaats het deksel van de en plaats de kom op het kom en vergrendel het. bijvulopening en vergrendel apparaat. het. Opmerking: • De max.
  • Seite 111: Pulsfunctie

    Het apparaat gebruiken Pulsfunctie Deze functie is geschikt vooral voor het breken van ijs en mixen van dranken. Opmerking: • De pulsknop kan niet worden bediend tijdens de kookfunctie. • De pulsknop wordt gedeactiveerd wanneer de inhoud van de kom boven 60 °C is.
  • Seite 112: Roeren Met Het Roerhulpstuk

    Het apparaat gebruiken Roeren met het roerhulpstuk Het roerhulpstuk is geschikt voor de bereiding van crèmes, mayonaise, stijf eiwit en room. Plaats het roerhulpstuk op Vul het voedsel in de kom Plaats het deksel op de de pen van de meseenheid. en plaats de kom op het kom en vergrendel het.
  • Seite 113 Het apparaat gebruiken De klok loopt achteruit Als u het roerhulpstuk wilt tijdens de bereiding. verwijderen, trek het eraf in opwaartse richting met lichte draaibewegingen heen en weer. Opmerking: • Sluit het deksel van de bijvulopening voor zeer langzaam vullen. Een kleine spleet wordt gemaakt.
  • Seite 114: Verwarmen, Koken

    Het apparaat gebruiken Verwarmen, koken Vul het voedsel in de kom. Plaats het deksel op de Plaats het deksel van de Plaats de kom op het kom en vergrendel het. bijvulopening en vergrendel apparaat. het. Stel de tijd (minder dan 1 Stel de temperatuur Stel de snelheid (1 tot 4) uur) in met draaiknop 6.
  • Seite 115: De Stoommand Gebruiken

    Het apparaat gebruiken Opmerking: Het apparaat is vooral geschikt voor de bereiding van babyvoeding, marmelade, soe- pen en sauzen. De stoommand gebruiken Gebruik de stoommand voor het koken van rijst, aardappelen en groenten. Vul ten minste 500 ml Plaats de stoommand met Sluit de kom en stel het water in de kom.
  • Seite 116: Het Stoomopzetstuk Gebruiken

    Het apparaat gebruiken Het stoomopzetstuk gebruiken Vooral geschikt voor vis, groenten zoals asperges en broccoliroosjes, en knoedels. Vul ten minste 500 ml Plaats het stoomopzetstuk Vul het voedsel op het blad water in de kom. Deze op de kom en vergrendel en plaats het blad in de hoeveelheid is voldoende het.
  • Seite 117: De Timer Instellen

    Het apparaat gebruiken De timer instellen Timer Interval Maximaal 1 uur 5 min U kunt de timer gebruiken om de bereiding met een vertraging van maximaal 24 uur te Maximaal 24 uur 10 min starten. Vul de kom (of respectie- Druk op de knop “Vertra- Stel de gewenste vertra- velijk het stoomopzetstuk)
  • Seite 118: Reiniging En Onderhoud

    Reiniging en onderhoud Reiniging De afdichtringen reinigen Waarschuwing: Schakel het apparaat uit vóór u het schoonmaakt, trek de stekker uit het stopcontact en laat het apparaat afkoelen. 1. Maak de kom leeg na elk gebruik. 2. Reinig de binnenkant en buitenkant van de kom met afwaswater.
  • Seite 119: De Meseenheid Verwijderen En Plaatsen

    Reiniging en onderhoud De meseenheid verwijderen en plaatsen Houd de meseenheid bij Voor verwijdering van de Na het reinigen, breng de het schroefdraadgedeelte meseenheid, draai de be- siliconenring weer op de vast, zodat het niet uit de vestigingsknop linksom om meseenheid aan en duw kom zal vallen.
  • Seite 120: Problemen Oplossen

    Reiniging en onderhoud Problemen oplossen Foutcode Oorzaak Oorzaak De kom is niet correct op het Controleer de plaatsing van de apparaat geplaatst. kom. Het deksel van de kom is niet Controleer de plaatsing van het correct op het apparaat geplaatst. deksel van de kom.
  • Seite 121: Garantiedekking / Garantie

    (AEEA). Elektrische en elektroni- productverpakking, op de reclame-materia- sche apparatuur kunnen gevaarlijke en len of op de BEEM website. U kunt de gede- schadelijke stoffen bevatten. Gooi dit tailleerde garantie en garantievoorwaarden, apparaat niet als ongesorteerd gemeentelijk beschikbare accessoires en onderdelen, afval weg.
  • Seite 122: Инструкции По Безопасности

    Инструкции по безопасности Для обеспечения личной без- Не погружайте прибор, смеси- • опасности перед первым исполь- тельную чашу или вилку пита- зованием внимательно прочи- ния в воду или другие жидко- тайте эти указания по технике сти. безопасности. Перед использованием про- •...
  • Seite 123 были грязными. Регулярно про- Держите паровую чашу только • веряйте уплотнение крышки на за две ручки с обеих сторон. предмет возможных поврежде- Никогда не используйте паро- • ний. вую чашу без крышки. Никогда не пытайтесь откры- Открывая крышку, всегда дер- •...
  • Seite 124 Инструкции по безопасности работы прибора и при исполь- Во время работы не оставляйте • зовании приспособления для прибор без присмотра. перемешивания. Выходящий пар не должен на- • Используйте только подлинные правляться непосредственно • запасные части и принадлежно- на предметы, подверженные сти...
  • Seite 125: Использованные Символы

    Обзор Уважаемый покупатель, Оглавление Поздравляем вас с приобретением Инструкции по безопасности многофункционального прибора BEEM Использованные символы Thermostar MiXX & Cook. Внимательно Обзор прочтите все инструкции перед его при- Комплект поставки менением и сохраните эти инструкции Функции для справки в будущем. При передаче...
  • Seite 126: Обзор

    Обзор Комплект поставки Проверьте комплект поставки по списку и на видимые повреждения. 1 Крышка с отверстием для заполнения 6 Крышка для паровой чаши 2 Смесительная чаша 7 Крышка для отверстием для заполне- 3 Базовый блок со встроенными весами ния/мерный стаканчик 4 Паровая...
  • Seite 127: Функции

    Функции A Отображение температуры B Отображение таймера (ч:мин) C Отображение времени (мин:с) D Отображение скорости 1 Регулятор скорости (уровень 1 – 10) 2 Регулятор температуры (от 30 °C до 120 °C с шагом 10 °C) 3 Импульсная функция 4 Активация/деактивация весов 5 Задержка...
  • Seite 128: Использование Прибора

    Использование прибора Установка и снятие чаши Примечание: • Следите за максималь- ным объемом, равным 2 л. Максимальный объ- ем горячих продуктов составляет 1,5 л. • Минимальный объем – около 300 мл, чтобы нож мог захватить Установите чашу сверху в Для удаления чаши пищу.
  • Seite 129: Использование Весов

    Использование прибора Использование весов Чтобы включить весы, Положите в ЦЕНТР весов Снова нажмите на кнопку нажмите на кнопку 4. По- пищу или поставьте 4, чтобы отключить весы, дождите, чтобы нижняя емкость. Вес отобразится или нажмите на нее строка дисплея перестала на...
  • Seite 130: Измельчение, Рубка, Замешивание, Перемешивание, Дробление

    Использование прибора Измельчение, рубка, замешивание, перемешивание, дробление Введите продукты в чашу Установите крышку на Установите крышку от- и установите ее на при- чашу и зафиксируйте ее. верстия для заполнения и бор. зафиксируйте ее. Примечание: • Максимальное ограни- чение для веса теста составляет...
  • Seite 131: Импульсная Функция

    Использование прибора Импульсная функция Данная функция особенно хорошо подходит для дробления льда и смешивания напитков. Примечание: • Во время выполнения функции варки исполь- зовать кнопку импульса нельзя. • Кнопка импульса деактивируется, если содержимое чаши име- ет температуру свыше Нажмите на кнопку им- 60 °C.
  • Seite 132: Перемешивание С Помощью Приспособления Для Перемешивания

    Использование прибора Перемешивание с помощью приспособления для перемешива- ния Приспособление для перемешивания подходит для приготовления кремов, майоне- за, взбитых белков и сливок. Установите приспосо- Введите продукты в чашу Установите крышку на бление для перемешива- и установите ее на при- чашу и зафиксируйте ее. ния...
  • Seite 133 Использование прибора Во время приготовления Для удаления приспо- часы идут в обратном на- собления для переме- правлении. шивания вытяните его в направлении вверх, одновременно слегка по- ворачивая из стороны в сторону. Примечание: • Для очень медленного заполнения закройте крышку отверстия для заполнения. Образуется...
  • Seite 134: Разогрев, Варка

    Использование прибора Разогрев, варка Введите продукты в чашу. Установите крышку на Установите крышку от- Установите чашу на при- чашу и зафиксируйте ее. верстия для заполнения и бор. зафиксируйте ее. Задайте время (до 1 часа) Задайте температуру (от Настройте скорость с помощью ручки 6. 30 °C до...
  • Seite 135: Использование Паровой Корзины

    Использование прибора Примечание: Прибор особенно хорошо подходит для приготовления детского питания, мар- мелада, супов и соусов. Использование паровой корзины Используйте паровую корзину для варки риса, картофеля и овощей. Заполните чашу водой Установите паровую кор- Закройте чашу и настрой- не менее чем на 500 зину...
  • Seite 136: Использование Паровой Чаши

    Использование прибора Использование паровой чаши Особенно хорошо подходит для приготовления рыбы, таких овощей, как спаржа и соцветия брокколи, а также клецок. Заполните чашу водой Поставьте паровую чашу Засыпьте пищу на поддон не менее чем на 500 на смесительную чашу и и...
  • Seite 137: Настройка Таймера

    Использование прибора Настройка таймера Таймер Интервал До 1 ч 5 мин Можно использовать таймер для начала приготовления с задержкой до 24 часов. До 24 ч 10 мин Заполните смесительную Нажмите на кнопку Задайте нужное время чашу (или, соответствен- “Delay” (Задержка), по- задержки...
  • Seite 138: Очистка И Обслуживание

    Очистка и обслуживание Очистка Очистка уплотнительных колец Внимание: Выключите прибор перед очисткой, извлеките вилку шнура питания из розетки сети электропитания и дайте прибору остыть. 1. После каждого использования опо- рожняйте чашу. 2. Промойте внутреннюю и наружную Удалите уплотнительные кольца. По- поверхности...
  • Seite 139: Удаление И Вставка Ножевого Устройства

    Очистка и обслуживание Удаление и вставка ножевого устройства Удерживайте ножевое Для снятия ножевого После очистки снова устройство за резьбовую устройства, чтобы его установите силиконо- часть так, чтобы оно не разблокировать, повер- вое кольцо на ножевое выпало из чаши. ните затягивающую ручку устройство...
  • Seite 140: Устранение Неисправностей

    Очистка и обслуживание Устранение неисправностей Код неисправ- Причина Способ устранения ности Чаша не установлена правильно Проверьте установку чаши. на приборе. Крышка чаши не установлена Проверьте установку крышки правильно. чаши. Обратитесь в службу работы с покупателями. Технические характеристики Thermostar MiXX & Cook Модель: Многофункциональный...
  • Seite 141: Гарантийные Обязательства

    розничному продавцу или в местные Германии, обратитесь в местное торго- органы власти. вое представительство. Декларация о соответствии Настоящим компания BEEM заявляет, что данный прибор соответствует основным требованиям и другим необходимым положениям директив 2004/108/EG, 2006/95/EG, 2009/125/EG и 2011/65/EU. Отказ от ответственности...
  • Seite 142 Deutschland Email kundenservice@beem.de www.beem.de Tel. +49 (0)60 03-91 13 88 88 +49 (0)60 03-91 13 99 99 © BEEM GmbH Alle Rechte vorbehalten. Nachdruck nur mit Genehmigung des Her- ausgebers. Technische Änderungen und Druckfehler vorbehalten! Thermostar MiXX & Cook _V1.0_K7a_15-08-10...

Inhaltsverzeichnis