
Verwandte Anleitungen für Hobot 268

Inhaltszusammenfassung für Hobot 268
- Seite 1 HOBOT-268/288 Download Version Bedienungsanleitung Mode d’emploi Modalità d’uso User's Manual...
-
Seite 3: Technischer Support
Copyright Copyright © 2017 by HOBOT® Technology Inc. Alle Rechte vorbehalten. Kein Teil dieser Publikation darf in irgendeiner Form oder auf irgendeine Weise elektronisch, mechanisch, magnetisch, optisch, chemisch, manuell oder in irgendeiner Form reproduziert, übertragen, in einer Datenbank gespeichert oder in irgendeine Sprache oder Computerdaten übersetzt werden oder ähnliches, ohne vorherige schriftliche Zustimmung des Rechteinhabers. -
Seite 4: Sicherheitshinweise
Vor Inbetriebnahme muss der Notfall-Akku vollständig geladen sein (grüne LED leuchtet). Keine Aussenfensterreinigung an regnerischen oder feuchten Tagen. Schalten Sie den HOBOT zuerst ein, bevor Sie das Gerät auf das Glas positionieren. Positionieren Sie das Gerät mit beiden Händen auf das Glas. Vergewissern Sie sich, dass es an der Oberfläche haftet, bevor Sie los lassen. -
Seite 5: Produktbeschreibung
HOBOT-268/288 ist ein quadratisch geformter Fensterreinigungsroboter, der mit Unterdruck an einer Glasoberfläche haftet. Das Gerät verfügt ausserdem über zwei Raupen, welche dem HOBOT erlaubt sich an Fensterflächen und sogar an Wänden zu bewegen. Das leicht austauschbare fusselfreie Reinigungs-Pad wird auf der Unterseite angebracht. Das Microfaser-Pad wird verwendet, um eine streifenfreie Glasreinigung zu erreichen. -
Seite 6: Produkt Und Zubehör
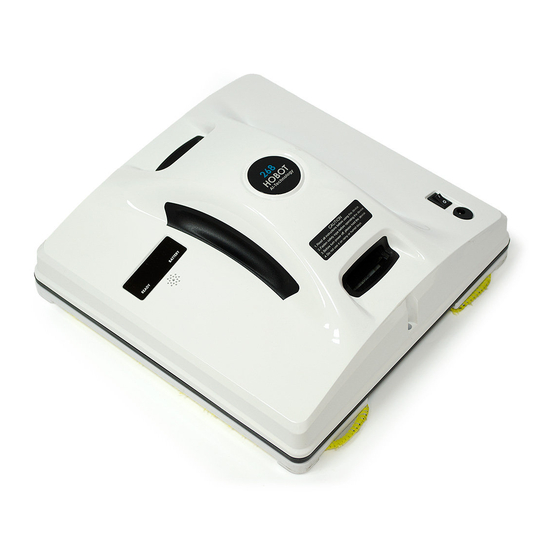
Produkt und Zubehör 1x HOBOT 1x Fernbedienung 1x Netzteil 100~240V, 50~60Hz 1x Anschlusskabel 1x Netzteilkabel 4m 3x Microfaser Reinigungs-Pads 3x Microfaser Trocken-Pads 1x Sicherungsseil (150 kg Zugkraft) Leistungsmerkmale Für jede Glasdicke geeignet ... - Seite 7 Ansicht Orange LED: wird geladen Grüne LED: vollgeladen Ventilator-Öffnung Rote LED: Warnung Griff Blaue LED: Normal IR-Empfänger Summer Hinweisschild Ein-/Aus-Kippschalter Ventilator-Öffnung Stromanschluss Befestigungs-Öse für Sicherungsseil Raupen Reinigungs-Pad Ansaugbereich Blaue LED, Rote LED IR-Empfänger Laser-Sensor Sicherungsseil mit Karabienerhaken...
-
Seite 8: Betrieb
2) Lassen Sie das Netzteil am HOBOT angeschlossen. Der Akku wird geladen und die orange LED leuchtet. 3) Sobald die LED grün leuchtet, ist der Akku vollständig aufgeladen. HOBOT kann nun mit der Reinigung beginnen. Schritt 4. Stellen Sie sicher, dass das Pad korrekt an das Gerät angebracht ist. -
Seite 9: Sauberes Reinigungs-Pad Am Gerät Anbringen
Drehen Sie den HOBOT um. Schalten Sie den HOBOT ein. Die Raupen drehen nun während ca. 3 Minuten Nehmen Sie ein sauberes Tuch und halten Sie dieses an die Mitte der Raupe, so dass ein kleiner Druck zwischen Raupe und Tuch besteht. -
Seite 10: Notfallstromversorgung
1. Die Notfallstromversorgung schaltet sich unterbrechungsfrei ein, wenn das Netzkabel ausgezogen wird oder das Hausstromnetz plötzlich ausfällt. 2. Im Notfallbetrieb bleibt der HOBOT bis zu 20 Minuten an der letzten Position stehen. Sie sollten das Gerät so schnell wie möglich entfernen. - Seite 11 Fernbedienung Das Gerät kann nach oben und unten ferngesteuert werden. Um die Batterie zu ersetzen, ziehen Sie die Batteriefachabdeckung nach unten. Steuerung Horizontal Vertical Startposition Startposition Fährt automatisch hoch und Fährt autom. nach rechts und reinigt das ganze Fenster. reinigt das ganze Fenster.
-
Seite 12: Led-Anzeige
Blaue LED leuchtet Rote LED blinkt einmal Warnton 6. Unterdruck Fehler Blaue LED leuchtet Rote LED blinkt einmal Warnton Netzteil und Verlängerungskabel Netzteil Anschlusstecker Schritt 1 L-Profil-Stecker Schritt 3 : Schritt 2 : Geräteanschluss- an HOBOT Strombuchse Kabel 1m 4m Verlängerungskabel... -
Seite 13: Häufig Gestellte Fragen (Faq)
Fensterrand nicht. 1) Stoppen Sie den HOBOT mit der Taste . Drücken Sie die Taste und warten Sie bis der HOBOT sich um etwa eine halbe Gerätelänge nach unten bewegt hat. Starten Sie den HOBOT erneut mit einer der Tasten oder... - Seite 14 Was ist zu tun bei Stromausfall und der HOBOT sich im Notfallbetrieb befindet. 1) Ziehen Sie den HOBOT mit Hilfe des Sicherungsseils zu sich. 2) Halten Sie mit der einen Hand das Sicherungsseil nahe dem HOBOT. Mit der anderen Hand halten Sie den HOBOT fest.
-
Seite 15: Sicherheitshinweise Netzteil/Akku
Sicherheitshinweise Netzteil/Akku Verwenden Sie nur das mit diesem Gerät mitgelieferte Netzteil und Akku. Die Verwendung eines fremden Netzteils kann zu Fehlfunktionen führen. Eine Beschädigung des HOBOT ist möglich. Verwenden Sie eine geeignete Steckdose und achten Sie darauf, dass keine schweren Gegenstände auf das Netzteil oder das Netzkabel gesetzt werden. -
Seite 16: Waschen Der Reinigungs-Pads
Schäden durch nichtsachgemässe Behandlung oder falsche Inbetriebnahme des HOBOT. Schäden, die durch zweckentfremdendes Verwenden des HOBOT Fensterputz Roboters verursacht wurden. Schäden durch Verwendung von Teilen und Zubehör, die nicht von HOBOT freigegeben wurden. Schäden durch Fremdeinwirkung, Missbrauch oder falsche Verwendung des HOBOT. -
Seite 18: Marques Déposées
En outre, HOBOT Technology Inc. se réserve le droit de procéder à la révision de cette publication et d’apporter, de temps en temps, des modifications à son contenu sans que cette société ne soit tenue de d’avertir l’utilisateur d’une telle révision ou de ces changements. -
Seite 19: Précautions Importantes De Sécurité
Vérifiez que la corde de sécurité n’est pas endommagée et que le nœud n’est pas desserré avant d’utiliser l’appareil. Un câble d’alimentation doit être utilisé pour le HOBOT pour assurer son bon fonctionnement. Pour les fenêtres sans balcon, un périmètre de sécurité doit être établi au sol situé... -
Seite 20: Description Du Produit
Description du produit L’appareil HOBOT est un robot de nettoyage de vitres de forme carrée et doté d’un moteur à vide intégré qui utilise l’aspiration pour assurer l’adhésion sur la surface vitrée. L’appareil dispose également de deux roues Caterpillar permettant à l’appareil de parcourir librement la surface de la vitre, et même de murs. -
Seite 21: Produit Et Accessoires
Produit et accessoires 1x Appareil 1x Commande à distance 1x Adaptateur (100~240VAC, 50~60Hz) 1x Câble d’alimentation AC 1x Rallonge d’alimentation DC (4 mètres) 3x Tissus de nettoyage à sec en microfibre 3x Tissus de polissage en microfibre ... - Seite 22 Apprendre à connaître l’appareil Voyant orange: en cours de chargement Voyant vert: entièrement chargé Ventilation Voyant rouge: indique une anomalie Poignée Voyant bleu: indique l’état normal Fenêtre de reception à distance Buzzer Autocollant d’avertisseme Interrupteur Ventilation Jack d’alimentation DC Trou de suspension 2 roues Caterpillar Tissu de nettoyage Zone d’aspiration...
- Seite 23 Installer le tissu de nettoyage correctement sur l’appareil (1) HOBOT dispose de 2 capteurs laser pour détecter les bords de la vitre. Ces capteurs laser ne doivent pas être recouverts par le tissu de nettoyage comme indiqué sur l’illustration.
- Seite 24 Roue Caterpillar 2 capteurs laser Comment nettoyer la courroie Caterpillar Lorsque l’appareil glisse facilement sur la surface de la vitre, les courroies sont souillées par l’accumulation de poussière et d’eau après chaque utilisation. Il est vivement recommandé de nettoyer les courroies Caterpillar avant de mettre l’appareil de côté. Veuillez suivre les 3 étapes ci-dessous.
- Seite 25 élevée et sa meilleure capacité d’absorption d’eau. La pulvérisation d’un détergent sur la vitre, permet au HOBOT de polir la vitre de façon efficace et de faire briller les vitres. Lorsque l’appareil glisse et ne parvient pas à se déplacer, veuillez changer le tissu et installer un tissu en microfibre de nettoyage à...
- Seite 26 Télécommande L’appareil peut être commandé à distance, en se plaçant du côté face ou du côté arrière. Pour remplacer la batterie, tirez le couvercle du compartiment de batterie vers le bas. Configura Configuration Configuration tion de la horizontale verticale direction Zigzag, puis parcours en N Parcours en N pour pour nettoyage auto de...
- Seite 27 Indication LED Situation Indication LED / son 1. Chargement de la batterie LED orange sur ON 2. Batterie entièrement chargée LED verte sur ON 3. Pas d’alimentation électrique LED bleue sur ON LED rouge clignote Son: bip répété 4. Erreur matérielle LED rouge clignote LED bleue clignote avec «...
-
Seite 28: Foire Aux Questions (Faq)
Q4: Le HOBOT glisse et ne parvient pas à détecter le cadre supérieur de la vitre en « mode déplacement automatique vers le haut, puis vers le bas » ( R: (1) Appuyez sur to arrêter le processus, passez en mode... - Seite 29 Q5: Le HOBOT ne parvient pas à terminer le nettoyage de l’intégralité de la vitre et s’arrêt en plein milieu. Pour continuer le nettoyage, activez les modes automatiques en appuyant sur Q6: Le HOBOT glisse et ne parvient pas à remonter la vitre jusqu’au cadre.
-
Seite 30: Informations Générales De Sécurité
Ne pas essayer de réparer l’adaptateur. Celui-ci ne contient aucune pièce réparable. Remplacez l’ensemble du bloc s’il est endommagé ou exposé à une humidité élevée. Consultez votre revendeur HOBOT pour obtenir de l’aide et la maintenance de votre appareil. -
Seite 31: Garantie Limitée
Ne pas nettoyer à sec. Garantie limitée Si vous constatez des défauts sur votre robot de nettoyage de vitre HOBOT dus à des défauts matériels, des défauts de fabrication, ou un dysfonctionnement pendant la période de garantie à compter de la date d’achat ou de livraison, merci de bien vouloir contacter votre revendeur ou distributeur agréé... -
Seite 32: Assistenza Tecnica
Copyright Copyright © 2017 by HOBOT® Technology Inc. Tutti i diritti riservati. È vietata qualsiasi riproduzione, divulgazione, trascrizione, memorizzazione su sistemi elettronici d’estrazione e traduzione verso qualsiasi lingua o in linguaggio informatico della presente pubblicazione, in qualsivoglia formato o con qualsiasi sistema, in modalità elettronica, meccanica, magnetica, ottica, chimica, manualmente o in qualsiasi altro modo, senza previa autorizzazione scritta dell’azienda. -
Seite 33: Precauzioni Per La Sicurezza
Precauzioni per la sicurezza Avvertenze Prima di utilizzare l’HOBOT, collegare il cavo di sicurezza un oggetto fisso ubicato all’interno. Prima di utilizzare l’apparecchio, verificare che il cavo di sicurezza non sia danneggiato, fessurato, tagliato, ecc. A garanzia di un funzionamento appropriato, è necessario utilizzare un cavo d’alimentazione per l’HOBOT. -
Seite 34: Descrizione Del Prodotto
Descrizione del prodotto L'HOBOT è un robot per la pulizia di vetri di forma quadrata, dotato di motore a vuoto integrato che, grazie al sistema d’aspirazione, garantisce l’adesione alla superficie vetrata. L’apparecchio è inoltre provvisto di due cinghie Caterpillar, che consentono all’HOBOT di percorrere liberamente la superficie del vetro e anche delle pareti. -
Seite 35: Funzioni Del Prodotto
Prodotto e accessori 1x HOBOT 1x Telecomando 1x Alimentatore 100~240V, 50~60Hz 1x Cavo d’alimentazione CA 1x Cavo d’alimentazione CC, 4 m 3x Cuscinetti detergenti in microfibra 3x Cuscinetti lucidanti in microfibra 1x Cavo di sicurezza (trazione 150 kg) Funzioni del prodotto ... - Seite 36 Panoramica LED arancione: in carica LED verde: totalmente caricata Ventilatore-Apertura LED rosso: avvertenza Impugnatura LED blu: normale Ricevitore RI Cicalino Autoadesivo Interruttore On-Off Ventilatore-Apertura Connettore di Occhiello di fissaggio alimentazione per il cavo di sicurezza Ruote Caterpillar Cuscinetto detergente Area d’aspirazione LED blu, LED rosso Ricevitore RI Sensore laser...
-
Seite 37: Funzionamento
1) Spostare l’interruttore dell’HOBOT su ON (ACCESO). 2) Verificare il funzionamento del ventilatore d’estrazione. 3) Posizionare l’HOBOT sulla superficie da pulire, mantenendo una distanza di 10 cm dal telaio della finestra. 4) Prima di rilasciarlo, verificare che l’HOBOT aderisca correttamente al vetro. - Seite 38 Installazione corretta del cuscinetto detergente sull’apparecchio L'HOBOT è dotato di 2 sensori laser per il rilevamento dei bordi del vetro. Questi sensori laser non devono essere coperti dal cuscinetto detergente. Cinghie Caterpillar Corretto Errato Sensore laser Cinghie Caterpillar Sensore laser Modalità...
- Seite 39 2. La durata di funzionamento di questo sistema d’alimentazione elettrica d’emergenza dell’HOBOT è pari a 20 minuti. Rimuovere l’apparecchio dal vetro quanto prima possibile. 3. A tale proposito, è possibile utilizzare il cavo di sicurezza. Tirare delicatamente il cavo di sicurezza quanto più...
- Seite 40 Telecomando L’apparecchio può essere azionato a distanza, verso l’alto e verso il basso. Per sostituire la batteria, tirare il coperchio del vano batterie verso il basso. Azionamento Posizione Posizione iniziale iniziale orizzontale verticale Spostamento automatico verso Spostamento automatico verso l’alto per la pulizia di tutta la sinistra e destra per la pulizia di finestra.
- Seite 41 6. Fuga d’aria durante il funzionamento LED blu acceso Il LED rosso lampeggia una volta Segnale acustico Alimentatore e cavo di prolunga Alimentatore Presa di collegamento Fase 1 Presa profile L Fase 3: Fase 2: cavo di un connettore HOBOT collegamento apparecchio 1 m Prolunga 4 m...
-
Seite 42: Domande Frequenti (Faq)
Q4. In modalità automatica della finestra. 1) Interrompere il funzionamento dell’HOBOT premendo il tasto . Premere il tasto attendere che l’HOBOT si sia spostato di mezza unità di lunghezza verso il basso. Riavviare l’HOBOT premendo uno dei tasti... - Seite 43 Q5. L’HOBOT non termina il programma di pulizia automatica e si ferma al centro della finestra. 1) Per proseguire con la pulizia, premere il tasto Q6. L’HOBOT slitta e non riesce a spostarsi verso l’alto. 1) Il cuscinetto detergente è eccessivamente sporco o umido. Sostituire il cuscinetto detergente.
-
Seite 44: Norme Di Sicurezza Generali
Utilizzare esclusivamente l’adattatore elettrico e la batteria forniti in dotazione al presente apparecchio. L’utilizzo di altri tipi d’adattatori elettrici può implicare il rischio di malfunzionamenti. L’HOBOT potrebbe essere danneggiato. Si raccomanda di utilizzare una presa elettrica in buono stato e di accertarsi che sull’adattatore elettrico o sul cavo d’alimentazione non vi siano oggetti pesanti. -
Seite 45: Garanzia
Non lavare a secco. Garanzia In presenza di guasti del robot per lavaggio vetri HOBOT dovuti a guasti materiali, difetti di produzione o malfunzionamento durante il periodo di garanzia dalla data d’acquisto o di consegna, contattare il rivenditore o distributore autorizzato locale. -
Seite 46: Technical Support
Copyright Copyright © 2017 by HOBOT® Technology Inc. All rights reserved. No part of this publication may be reproduced, transmitted, transcribed, stored in a retrieval system or translated into any language or computer language, in any form or by any means, electronic, mechanical, magnetic, optical, chemical, manual or otherwise, without the prior written permission of this company. -
Seite 47: Important Safety Precautions
Check if the safety rope is broken or the knot is loose before operating the device. A power cord must be used for the HOBOT to function properly. For windows with no balcony, a warning area must be established on the ground below to prevent people from coming near it. -
Seite 48: Product Description
Product Description HOBOT is a square-shaped window-cleaning robot with a vacuum motor inside that uses suction to stick to glass surfaces. The device also has two caterpillar wheels that can freely traverse window surfaces, and even walls. The easily-replaceable lint-free cloth is used on the pad. Micro-fiber cloth is used to attain superior glass cleaning. -
Seite 49: Product And Accessories
Product and accessories Device x 1 Remote controller x 1 Adapter (100~240VAC, 50~60Hz) x 1 AC power cord x 1 DC power extension cord (4 meters) x 1 Microfiber dry-cleaning cloth x 3 Microfiber polishing cloth x 3 ... -
Seite 50: Getting To Know The Device
Getting to know the device Orange light: charging Green light: full-charged Vent Red light: Indicates abnormal status Handle Blue light: Indicates normal status Remote receiving window Buzzer Caution sticker Power-switch Vent DC power jack Hanging hole 2-Caterpillar wheel Cleaning cloth Suction area Blue LED, Red LED Remote receiving window... - Seite 51 Put cleaning cloth onto device correctly (1) HOBOT has 2-laser sensors for detecting glass edge. These laser sensors can not be covered by cleaning cloth like as shown. (2) Put cleaning cloth onto device flatly and do not let cloth cover the caterpillar wheel and laser sensors.
- Seite 52 Spraying detergent on the glass makes HOBOT effectively polish window and leave window shining. If the device slips and cannot move, please change cloth to microfiber dry-cleaning cloth.
-
Seite 53: Remote Controller
Using HOBOT on sunny days or days with low humidity for best results. The surface of window with water molecules becomes slippery and has white streaks left on the glass so it is not suggested using the device to clean exterior windows on rainy or high humidity days. -
Seite 54: Led Indication
Step2. Turn on Bluetooth and click HOBOT App. Step3. Turn on the device and wait for “Connected” shown on HOBOT App. Make sure both HOBOT App and the device are on, so you can use your iOS or Android smart device to operate the device. LED indication... -
Seite 55: Frequently Asked Questions (Faq)
Q2: When the power switch is turned on, the FAN is rotating, Blue-LED is lighting, Red-LED is flashing, with repeat beep sounds. Ans: No electrical power supplied. Please connect and check power cord, adapter, and the device. Q3: When the power switch is turned on, HOBOT can’t start up by remote controller. Case LED signal/Sound Situation and Solution 1. - Seite 56 Q8: What to do if HOBOT stops due to a power outage? Ans: (1) User can pull HOBOT back with safety rope. Gently pull the safety rope at an angle close to the glass to prevent it from falling off the glass.
-
Seite 57: General Safety Information
Do not use a broken adapter, power cord, or plug. Do not attempt to service the adapter. There are no service parts included. Replace the whole unit if it is damaged or exposed to high moisture. Consult your HOBOT dealer for help and maintenance. ... -
Seite 58: Limited Warranty
Do not dry clean. Limited warranty If there are defects in your HOBOT glass-cleaning robot due to faulty materials, poor workmanship, or malfunction within the warranty period from the date of purchase or delivery, please contact a local retailer or local authorized dealer for repairs or replacement.