Herunterladen Inhalt Inhalt Diese Seite drucken
Num'axes canicom 1500 Gebrauchsanleitung
Vorschau ausblenden Andere Handbücher für canicom 1500:
Inhaltsverzeichnis

Werbung

Verfügbare Sprachen
  • DE

Verfügbare Sprachen

  • DEUTSCH, seite 51
Guide d'utilisation
User's guide
Manual de instrucciones
Gebrauchsanleitung
Manuale d'uso
Fr - 3
Gb - 19
Es - 35
D - 51
It - 69

Werbung

Inhaltsverzeichnis
loading

Inhaltszusammenfassung für Num'axes canicom 1500

  • Seite 1 Guide d’utilisation Fr - 3 User’s guide Gb - 19 Manual de instrucciones Es - 35 Gebrauchsanleitung D - 51 Manuale d’uso It - 69...
  • Seite 2 CANICOM 800 – CANICOM 1500 satisfont à toutes les dispositions de la Directive N° 1999/5/CE du 07/04/99 du Conseil Européen comply to all dispositions of the European Council Directives below N° 1999/5/CE...
  • Seite 3 Ces appareils répondent à la norme européenne ETSI EN 300 220. Nous vous remercions d’avoir choisi un appareil de la gamme NUM’AXES. Avant d’utiliser le CANICOM 800 ou le CANICOM 1500, lire attentivement les explications de ce guide que vous conserverez pour toute référence ultérieure.
  • Seite 4: Inhaltsverzeichnis

    Usure/remplacement de la ou des pile(s) de la télécommande ........11 Usure/remplacement de la pile du ou des collier(s) récepteur(s) ........12 Changement des électrodes ....................13 Vérification de votre CANICOM 800/CANICOM 1500 ............13 Pour obtenir les meilleures performances ............... 13 Ajustement du collier ......................14 L’initiation au collier d’éducation ..................
  • Seite 5: Composition Du Canicom 1500

    - 1, 2, 3 ou 4 collier(s) CANICOM équipé(s) d’électrodes courtes - 1, 2, 3 ou 4 ou pile(s) lithium 3 Volts CR2 pour le(s) collier(s) - 1 télécommande CANICOM 1500 équipée de deux piles alkalines LR06 - 1 lampe néon test - 1, 2, 3 ou 4 jeu(x) d’électrodes longues...
  • Seite 6 : de 1 à 15 Indicateur de sélection du Indicateur de sélection du collier 1, 2, 3 ou 4 collier A ou B Ecran LCD télécommande CANICOM 800 - Fig. 4 Ecran LCD télécommande CANICOM 1500 - Fig. 5...
  • Seite 7: Première Mise En Service

    Fr - 7 Première mise en service N Mise en place de la pile dans le collier CANICOM - Dévissez les 4 vis du couvercle du collier CANICOM à l’aide d’un tournevis. - Insérez la pile 3V Lithium CR2 en respectant la polarité indiquée près du logement de la pile (cf.
  • Seite 8 Pour le CANICOM 800 : Collier A = collier à sangle noire – Collier B = collier à sangle jaune Pour le CANICOM 1500 : Collier 1 = collier à sangle noire – Collier 2 = collier à sangle jaune...
  • Seite 9 Fr - 9 Procédure de codage lors de la 1ère mise en service : Attention, si vous possédez plusieurs colliers, vous devez les coder l’un après l’autre. Pour coder le collier « A » ou « 1 » à sangle noire : 1.
  • Seite 10: Utilisation De La Télécommande

    Pour le CANICOM 800 : appui bref sur la touche A ou B de la télécommande (la lettre A ou B apparaît en bas de l’écran LCD). Pour le CANICOM 1500 : appui bref sur la touche 1, 2, 3 ou 4 de la télécommande (le chiffre 1, 2, 3 ou 4 apparaît en bas de l’écran LCD).
  • Seite 11: Usure/Remplacement De La Ou Des Pile(S) De La Télécommande

    En cas d’usure de la ou des pile(s), les performances (portée radio) de la télécommande se trouvent diminuées. Ne tardez pas à les remplacer ! Pour pouvoir contrôler les piles, mettez en service votre télécommande CANICOM 800/CANICOM 1500 et observez le témoin d’usure des piles affiché sur l’écran LCD. Les divers symboles de cet indicateur ont les significations suivantes : La pile est en bon état.
  • Seite 12: Usure/Remplacement De La Pile Du Ou Des Collier(S) Récepteur(S)

    Remplacez la ou les pile(s) usagée(s) par de nouvelles piles de même type : - une pile lithium 3V CR2 pour la télécommande CANICOM 800 - deux piles alkalines LR06 pour la télécommande CANICOM 1500 NUM’AXES vous recommande d’utiliser des piles du même modèle et de la même marque que celles qui vous ont été...
  • Seite 13: Vérification De Votre Canicom 800/Canicom 1500

    Ces ondes radio sont sensibles et « portent » à une distance pouvant atteindre 800 mètres environ pour le CANICOM 800 et 1500 mètres environ pour le CANICOM 1500 (distances variables selon l’environnement et le relief dans lequel vous évoluez).
  • Seite 14: La Différence Entre La Stimulation « Continue » Et La Stimulation « Flash

    Fr - 14 Ajustement du collier La sangle doit être ajustée de façon à ce que les électrodes soient bien en contact avec la peau du chien. - Si la sangle est trop lâche, le collier ne fonctionnera pas correctement. De plus, il risque de bouger et les frottements répétés peuvent irriter la peau de votre chien.
  • Seite 15: En Cas De Dysfonctionnement

    - Ne laissez jamais de piles usagées dans l’appareil (télécommande et collier récepteur) : elles peuvent Entretien fuir et endommager votre CANICOM 800 / CANICOM 1500. - Ne laissez pas votre ensemble CANICOM à la portée des enfants. Ne le considérez pas comme un jouet pour vos enfants ou vous-même.
  • Seite 16: Caractéristiques Techniques

    - de la preuve d’achat (facture ou ticket de caisse) Si vous omettez l’un de ces éléments, le Service Après-Vente NUM’AXES vous facturera la réparation. Télécommande CANICOM 800 Télécommande CANICOM 1500 Collier récepteur CANICOM Alimentation 1 pile lithium 3 V type CR2...
  • Seite 17: Autonomie Du Collier Canicom

    Fr - 17 Autonomie du collier CANICOM Télécommande CANICOM 800 Télécommande CANICOM 1500 Collier récepteur CANICOM Niveaux de stimulation Température d’utilisation Entre – 20°C et +40°C Entre – 20°C et +40°C Entre – 20°C et +40°C Dimensions : h x l x ép.
  • Seite 18: Accessoires

    Fr - 18 Accessoires Collecte et recyclage de votre appareil en fin de vie Vous pouvez vous procurer les accessoires (pile, sangle, collier supplémentaire…) à tout moment auprès de NUM’AXES ou de votre distributeur. Le pictogramme apposé sur votre produit signifie que l’équipement ne peut être mêlé aux ordures ménagères.
  • Seite 19 These devices emit some static magnetic fields (a magnet is located in the remote control) (Frequency = 869 Mhz, at = 250 Mw for CANICOM 800 and 500 Mw for CANICOM 1500). The devices comply with the European Standard ETSI EN 300 220.
  • Seite 20 Checking/replacing battery(ies) of remote control ............27 Checking/replacing battery of receiver collar(s) .............. 28 Changing the contact points ....................28 How to check that your CANICOM 800/CANICOM 1500 is functioning properly ..... 29 Getting the best results ...................... 29 Fitting the collar ......................... 29 Starting out with the training collar ..................
  • Seite 21: Contents Of The Product Canicom 1500

    - this user’s guide - 1, 2, 3 or 4 CANICOM collar(s) fitted with short contact points - 1 remote control CANICOM 1500 fitted with 2 LR06 alkaline batteries - 1, 2, 3 or 4 lithium 3 Volts CR2 battery(ies) for the collar(s)
  • Seite 22 Dog A Selection key dog 2 located black collar Dog 1 yellow collar black collar CANICOM 800 remote control - Diagram 2 CANICOM 1500 remote control - Diagram 3 Indicator of Battery level Indicator of Battery level radio indicator radio indicator...
  • Seite 23: First Use From New

    Gb - 23 First use from new N Fitting the battery in the receiver collar - Unscrew the 4 screws of the top of CANICOM using a screwdriver. - Insert the battery (3V Lithium CR2) paying attention to follow polarity indicated on the battery housing (ref.
  • Seite 24 IMPORTANT : before beginning the coding (first use of the receiver or re-coding), make sure no other person is using his CANICOM 800/CANICOM 1500 or other products from the NUM'AXES range close by. Your receiver could accidentally record the code of his remote control. If that occurs, re-code the remote control with the receiver collar.
  • Seite 25: How To Use The Remote Control

    The CANICOM 800 remote control is designed to operate with 1 or 2 receiver collar(s). The CANICOM 1500 remote control is designed to operate with 1, 2, 3 or 4 receiver collar(s). Before sending any training instruction (beep sound or stimulations), you have to select the dog...
  • Seite 26 For CANICOM 800: Press the A or B key in order to select the collar (the letter A or B will appear on the LCD screen). For CANICOM 1500: Press the 1, 2, 3 or 4 key in order to select the collar (the number 1, 2, 3 or 4 will appear on the LCD screen).
  • Seite 27: Checking/Replacing Battery(Ies) Of Remote Control

    Performance (radio range) of the remote control may deteriorate as battery(ies) become(s) weak. Be prepared to replace the battery(ies). To check the condition of the battery(ies), turn “on” the remote control CANICOM 800/CANICOM 1500 and look at the battery level indicator on the LCD screen. The symbols which appear indicate the following: Battery fully charged.
  • Seite 28: Checking/Replacing Battery Of Receiver Collar(S)

    - Put the battery cover back in place. - Retighten the screw. - Check the remote control operates correctly. Replacing battery Replacing batteries of CANICOM 800 of CANICOM 1500 remote control remote control Diagram 9 Diagram 10 Checking/replacing battery of receiver collar(s)
  • Seite 29: How To Check That Your Canicom 800/Canicom 1500 Is Functioning Properly

    For CANICOM 800 : Press the A or B key in order to select the collar (the letter A or B will appear on the LCD screen). For CANICOM 1500 : Press the 1, 2, 3 or 4 key in order to select the collar (the number 1, 2, 3 or 4 will appear on the LCD screen).
  • Seite 30: The Difference Between « Continuous » And « Flash » Stimulation

    Gb - 30 Starting out with the training collar • You can start using the collar with 6 month-old puppies that have already received some basic training: « stay », « sit », or at least « no ». • Do not use the collar with dogs that are not in good physical shape (i.e. cardiac problems, epilepsy) or have behavioural problems.
  • Seite 31: Troubleshooting

    - In order to maintain water tightness, we recommend the replacement of the seal located in the receiver collar every year. Should your CANICOM 800 / CANICOM 1500 stop working or develop a fault, first read this user’s guide over, then check the batteries (see § Checking/replacing battery of remote control and § Checking replacing battery of receiver collar) and replace them if necessary and retry.
  • Seite 32: Technical Specifications

    Gb - 32 Technical specifications CANICOM 800 remote control CANICOM 1500 remote control CANICOM receiver collar Power 1 3-V lithium battery CR2 2 LR06 alkaline batteries 1 3-V lithium battery CR2 Battery life Continuous use: Continuous use: In stand by: approximately...
  • Seite 33: Guarantee Conditions

    Gb - 33 Guarantee conditions 1. The guarantee will be valid only if the proof of purchase (invoice or sales receipt), without cancellation, is submitted to the distributor or to NUM’AXES. The guarantee is limited to the original purchaser. 2. This guarantee does not cover the following: - Changing the battery - Changing the strap - Direct or indirect transport risks incurred when sending the article back to the distributor or...
  • Seite 34 Gb - 34 www.numaxes.com internationalsales@numaxes.com...
  • Seite 35: Manual De Instrucciones Es

    Estos aparatos emiten campos magnéticos estáticos (imán situado en el mando a distancia) así como ondas electromagnéticas de alta frecuencia (frecuencia = 869Mhz, una potencia de emisión máxima=250 mW para CANICOM 800 y 500 mW para CANICOM 1500). Estos aparatos se ajustan a la normativa europea ETSI EN 300 220.
  • Seite 36 Desgaste/sustitución de la(s) pila(s) del mando a distancia..........43 Desgaste/sustitución de la pila del (de los) collar(es)receptor(es) ........44 Cambio de los electrodos..................... 45 Verificación de su CANICOM 800/CANICOM 1500 .............. 45 Para obtener los mejores resultados.................. 45 Ajuste del collar........................46 Iniciación al collar de adiestramiento .................
  • Seite 37: Composición Del Canicom 1500

    - 1, 2, 3 o 4 collar(es) receptor(es) CANICOM equipado(s) con electrodos cortos - 1, 2, 3 o 4 pila(s) de litio 3 Volts CR2 para el(los) collar(es) - 1 mando CANICOM 1500 equipado con 2 pilas LR06 - 1 lámpara de prueba - 1, 2, 3 o 4 juego(s) de electrodos largos Presentación del producto...
  • Seite 38 1 receptor con radio negra correa negra Mando a distancia canicom 800 - Fig. 2 Mando a distancia canicom 1500 - Fig. 3 Indicador Indicador de de emisión radio carga Indicador Indicador de de las pilas de emisión radio...
  • Seite 39: Primera Puesta En Servicio

    Encendido/Apagado . Se apagan las indicaciones sobre la pantalla LCD. Para preservar la duración de la pila, es conveniente cuando no use el CANICOM 800/CANICOM 1500 ponerlo fuera de servicio. N Puesta en/fuera de servicio del o de los collar(es) receptor(es) Un imán situado en el mando permite poner en servicio o fuera de servicio el collar receptor CANICOM.
  • Seite 40 IMPORTANTE : Antes de empezar con la codificación (primera o posteriores) se debe tener en cuenta que ninguna otra persona cercana está utilizando un CANICOM 800/CANICOM 1500 o cualquier otro producto de la gama NUM’AXES. Su collar receptor podría registrar el código de ése mando vecino.
  • Seite 41 Para el CANICOM 800 : Apoyo breve sobre el botón A o B elegido (la letra A o B aparece abajo de la pantalla LCD). Para el CANICOM 1500 : Apoyo breve sobre el botón 1, 2, 3 o 4 elegido (la cifra 1,2,3 o 4 aparece abajo de la pantalla LCD).
  • Seite 42: Utilización Del Mando A Distancia

    - Para el CANICOM 800 : apoyo breve sobre el botón A o B (la letra A o B aparece abajo de la pantalla LCD) - Para el CANICOM 1500 : apoyo breve sobre el botón 1, 2, 3 o 4 (la cifra 1, 2, 3 o 4 aparece abajo de la pantalla LCD)
  • Seite 43: Desgaste/Sustitución De La(S) Pila(S) Del Mando A Distancia

    En caso de desgaste de la(s) pila(s), las prestaciones (alcance radio) del mando disminuirán. Sustituir la(s) pila(s)! Para comprobar las pilas, poner en servicio su mando CANICOM 800/CANICOM 1500 y controlar el indicador de nivel de carga de la pila sobre la pantalla LCD. Los diferentes símbolos en dicho indicador tienen los siguientes significados : Pila en buen estado.
  • Seite 44: Desgaste/Sustitución De La Pila Del (De Los) Collar(Es)Receptor(Es)

    Sustituir la(s) pila(s) gastada(s) por una(s) pila(s) nueva(s) de mismo tipo : - una pila de litio 3V CR2 para el mando CANICOM 800 - dos pilas LR06 para el mando CANICOM 1500 NUM’AXES recomienda la utilización de pilas de modelo y marca idénticos que las que están proporcionadas con su equipo de educación canina.
  • Seite 45: Verificación De Su Canicom 800/Canicom 1500

    Estas ondas radio son sensibles y “alcanzan” una distancia de 800 metros para el CANICOM 800 y 1500 metros para el CANICOM 1500 (estas distancias pueden variar según el entorno y la configuración del terreno donde se encuentre).
  • Seite 46: La Diferencia Entre Estímulo « Continuo » Y « Flash

    Es - 46 Ajuste del collar Debe asegurarse que los electrodos estén en contacto con la piel del perro. - Si la correa está demasiada suelta, el collar va a moverse y los frotamientos repetidos de los electrodos sobre la piel del perro podrán provocar irritaciones y no funcionará bien. - Si la correa está...
  • Seite 47: En Caso De Malfuncionamiento

    CANICOM 800 / CANICOM 1500. - Si se prevé no usar el CANICOM 800 / CANICOM 1500 durante un período prolongado del orden de 3 meses (fin de temporada de caza), se recomienda retirar la pila del mando a distancia y del collar receptor.
  • Seite 48: Características Técnicas

    - la fecha de compra (factura o ticket de compra) Si olvida usted uno de estos elementos, el Servicio Post Venta le facturará el arreglo. Mando a distancia CANICOM 800 Mando a distancia CANICOM 1500 Collar receptor CANICOM Alimentación 1 pila de Litio 3 V tipo CR2...
  • Seite 49: Autonomía Del Collar Receptor Canicom

    Es - 49 Autonomía del collar receptor CANICOM - 7 meses en stand by : para una puesta in marcha de 4 horas por día. Garantía - 2 meses en funcionamiento intensivo : o sea unas 5 000 impulsiones de 2 segundos al nivel máximo. Para preservar la duracíon de la pila, es conveniente cuando no use el CANICOM ponerlo fuera de servicio.
  • Seite 50: Reciclaje De Aparatos Electrónicos Al Final De Su Vida

    Es - 50 Reciclaje de aparatos electrónicos al final de su vida El pictograma que aparece en su producto, significa que el equipo no puede mezclarse con basuras domésticas. Debe ser entregado en un punto de recogida adecuado para el tratamiento, la valorización y el reciclaje de las basuras electrónica o bien devolverlo a su distribuidor.
  • Seite 51 Wir danken Ihnen, dass Sie sich für ein Gerät aus der NUM’AXES Produktreihe entschieden haben. Sie sollten vor dem Gebrauch von CANICOM 800 oder CANICOM 1500 die Anweisungen dieser Anleitung sorgfältig durchlesen und diese zur Konsultation bei später auftretenden Fragen aufbewahren.
  • Seite 52 D - 52 Innhaltsverzeichnis: Lieferumfang des CANICOM 800 ..................53 Lieferumfang des CANICOM 1500 ..................53 Vorstellung des Gerätes....................... 53 Erste Inbetriebnahme ......................55 Bedienung des Handsenders....................57 Zustand/Auswechseln der Batterie(n) des Handsenders ..........60 Zustand/Auswechseln der Batterie des/der Empfänger-Halsbandes(¨er) ...... 61 Auswechseln der Kontakte ....................
  • Seite 53: Lieferumfang Des Canicom 1500

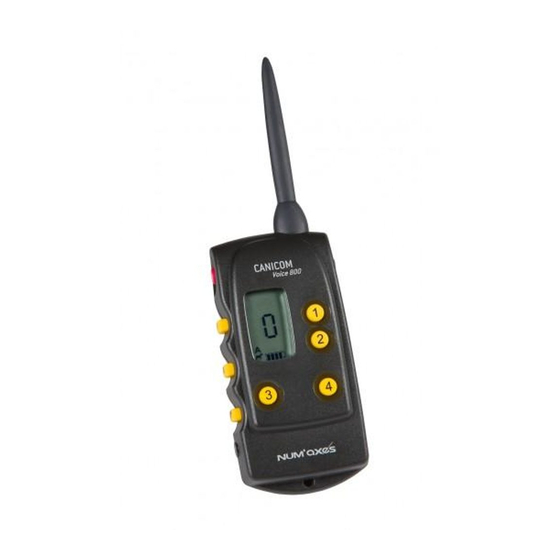
    - Ein, zwei, drei oder vier CANICOM- Halsband / Halsbänder, mit Kurzen Kontakten - Ein , zwei, drei oder vier 3V Lithium-Batterie(n) CR2 für das/die CANICOM-Halsband/Halsbänder - Einen Handsender CANICOM 1500, mit 2 Batterien LR06 - 1 Testlampe - 1, 2, 3 oder 4 Paar langer Kontakte Vorstellung des Gerätes...
  • Seite 54 + (neue) Kodierung Wahltaste Halsbandes Gelbes Halsband Schwarzes Halsband Hunde 1 + (neue) Kodierung Schwarzes Halsband CANICOM 800 - Handsender - Abb. 2 CANICOM 1500 - Handsender - Abb. 3 Funksendeanzeige Batteriestands- anzeige Batteriestands- Funksendeanzeige anzeige Anzeige der Impulsstufe: Anzeige der...
  • Seite 55: Erste Inbetriebnahme

    D - 55 Erste Inbetriebnahme N Legen Sie die Batterie in das CANICOM Empfänger-Halsband ein. So gehen Sie vor: - Lösen Sie die vier Schrauben des CANICOM-Deckels mittels eines Schraubenziehers. - Legen Sie die Batterie (Typ 3V-Lithium CR2) gemäß der neben dem Batteriefach aufgezeigten Polarität ein.
  • Seite 56 Zusätzliche Empfänger-Halsbänder erhalten Sie später auf Wunsch. WICHTIG: Bitte vergewissern Sie sich vor der Frequenzabstimmung (erste Inbetriebnahme des Empfänger-Halsbandes oder neue Abstimmung), dass sich kein CANICOM 800 / CANICOM 1500 oder kein anderes NUM’AXES Gerät in Ihrer Umgebung in Betrieb befindet. Es könnte ansonsten zur Kodierung Ihres Empfänger-Halsbandes mit der fremden Komponente kommen.
  • Seite 57: Bedienung Des Handsenders

    (siehe Verfahren zur Frequenzabstimmung) Der Handsender CANICOM 800 arbeitet mit 1 oder 2 Empfänger-Halsband/Halsbändern. Der Handsender CANICOM 1500 arbeitet mit 1, 2, 3 oder 4 Empfänger-Halsband/Halsbändern Bevor Sie ein Piep-Ton oder einen Impuls auslösen, wählen Sie die Taste, die dem Hund entspricht, auf welchem Sie einwirken wollen, und zwar: - Hund A (schwarzes Halsband) oder B (gelbes Halsband) für das CANICOM 800...
  • Seite 58 D - 58 Für das CANICOM 1500: 1, 2, 3 oder 4-Taste kurz drücken (die Ziffer 1, 2, 3 oder 4 erscheint unter dem Bildschirm). - Taste: Ton-Signal Drücken Sie auf die «Ton-Taste» , um ein Ton-Signal am Hundehalsband auszulösen. Bei dieser Funktion gibt es keine Zeitbeschränkung: Pieptöne werden solange abgegeben, wie Sie auf die Ton-Taste drücken.
  • Seite 59 - Drücken Sie auf die A-Taste zur Bestätigung der Impulsstärke Das gleiche Verfahren gilt für die Programmierung des Hundes B. - Für das CANICOM 1500: Programmierung der Booster-Taste für den Hund 1: - Drücken Sie 5 Sek. lang auf die 1-Taste (die Anzeige der Impulsstufe blinkt auf dem LCD-Bildschirm) - Drücken Sie auf die +/- Taste, um die Impulsstärke einzustellen...
  • Seite 60: Zustand/Auswechseln Der Batterie(N) Des Handsenders

    Mit einer schwachen Batterie vermindert sich die Leistung (die Funkreichweite) des Handsenders. Ersetzen Sie die Batterie daher frühzeitig. Sie können den Batteriezustand kontrollieren indem Sie Ihren CANICOM 800 / CANICOM 1500 – Handsender einschalten. Das Ladezustand-Symbol der Batterie erscheint auf dem LCD-Bildschirm. Die verschiedenen Symbole dieses Zeichens bedeuten wie folgt: Die Batterie ist im guten Zustand.
  • Seite 61: Zustand/Auswechseln Der Batterie Des/Der Empfänger-Halsbandes(¨Er)

    D - 61 Einlegen oder Auswechseln Einlegen oder Auswechseln der Batterie in das der Batterien in das CANICOM 800 CANICOM 1500 Abb. 9 Abb. 10 Zustand / Auswechseln der Batterie des / der Empfänger-Halsbandes(¨er) VORSICHT Achten Sie bitte auf die Polarität Den Ladezustand der im Halsband befindlichen Batterie zeigt die auf der Vorderseite des Gehäuses des...
  • Seite 62: So Erzielen Sie Die Besten Ergebnisse

    Für das CANICOM 800: Taste A = Halsband mit schwarzem Halsgurt – Taste B = Halsband mit gelbem Halsgurt Für das CANICOM 1500: Taste 1 = Halsband mit schwarzem Halsgurt – Taste 2 = Halsband mit gelbem Halsgurt – Taste 3 = Halsband mit orangenem Halsgurt – Taste 4 = Halsband mit blauem Halsgurt - Drücken Sie auf die «...
  • Seite 63: Die Gewöhnung An Das Halsband Zur Hundeerziehung

    D - 63 Reizungen verursachen. Falls der Hund das Halsband während mehrere Stunden trägt, wird es Die Gewöhnung an das Halsband zur Hundeerziehung empfohlen an verschiedenen Stellen zu lassen. Lassen Sie das Halsband nicht mehr als 8 Stunden lang pro Tag am Hals Ihres Hundes und prüfen Sie regelmäßig dass, es keine Irritation gibt.
  • Seite 64: Beim Nicht-Funktionieren Ihres Gerätes

    - Lassen Sie niemals die verbrauchte Batterie im Handsender oder im Halsband; sie könnte auslaufen Pflege und Ihr CANICOM 800 / CANICOM 1500 beschädigen. - Sie sollten das Gerät von Kindern fernhalten. Verwenden Sie es nicht als Spielzeug für Ihre Kinder oder Sie selbst.
  • Seite 65 D - 65 Es besteht auch die Möglichkeit, das Empfänger-Halsband auf Werkseinstellung zurückzusetzen. Öffnen Sie dazu das Empfänger-Halsband und entnehmen Sie die Batterie. Verursachen Sie mit einem metallischen Gegenstand einen Kurzschluss zwischen den beiden Batteriepolen (mindestens 2 Sekunden). Wenn Sie anschließend wieder die Batterie einlegen, sollte der oben beschriebene Batterie-Piepton zu hören sein.
  • Seite 66: Technische Merkmale

    D - 66 Technische Merkmale Sender CANICOM 800 Sender CANICOM 1500 Empfänger CANICOM Spannungsversorgung 1 Batterie Lithium 3 V CR2 2 Alkalische Batterien LR06 1 Batterie 3V CR2 Durchschnittliche Bei intensiver Nutzung: Bei intensiver Nutzung: Im Standbyzustand: Batterieleistung Ca. 30 000 Sende-Signale Ca.
  • Seite 67: Garantiebedingungen

    D - 67 Garantiebedingungen 1. Die Garantie kann nur dann gewährt werden, wenn der Kaufbeweis (Rechnung oder Kassenbeleg) dem Händler oder der Firma NUM’AXES vorliegt. 2. Die Garantie erstreckt sich nicht auf folgende Bereiche: - Erneuerung der Batterie oder des Gurts. - Transportrisiken direkter oder indirekter Art, die durch Rücksendung des Produkts an NUM’AXES entstehen.
  • Seite 68 D - 68 www.numaxes.com internationalsales@numaxes.com...
  • Seite 69 (frequenza = 869 Mhz, potenza d’emissione Max = 250 mW per CANICOM 800 e 500 mW per CANICOM 1500). CANICOM 800 e CANICOM 1500 sono conformi alle normative Europee ETSI EN 300 220.
  • Seite 70 Sostituzione pila telecomando..................... 78 Pila collare ..........................78 Sostituzione pila collare ....................... 78 Sostituzione elettrodi......................78 Verifica del correto funzionamento CANICOM 800/CANICOM 1500 ........78 Per ottenere migliori prestazioni..................78 Posizionamento del collare....................79 Regole di base per utilizzare il collare d’addestramento........... 79 Precauzioni per l’uso......................
  • Seite 71: Presentazione Del Prodotto

    - Autorizzazione Ministeriale Italia - 1, 2, 3 o 4 collari CANICOM - 1 pila lithium CR2 da 3V per ogni collare - Telecomando CANICOM 1500 completo di pile - Lampadina test - 1 coppia di elettrodi lunghi per ogni collare...
  • Seite 72 Selezione collare Selezione collare spegnimento collare A Nero 2 Giallo Selezione collare 1 Nero Telecomando CANICOM 800 - Fig. 2 Telecomando CANICOM 1500 - Fig. 3 Indicatore Indicatore emissione radio carica Indicatore Indicatore della pila emissione radio carica...
  • Seite 73: Primo Utilizzo

    It - 73 Primo utilizzo N Preparazione del collare CANICOM - Con un cacciavite a croce svitare le 4 viti del coperchio collare CANICOM. - Inserire la pila al litio da 3V tipo CR2 rispettando la polarità indicata en vano pila (Fig. 6). - Un bip sonoro di tonalità...
  • Seite 74: Codifica Telecomando/Collare

    Ciascun telecomando ha un proprio codice radio. La codifica telecomando/collare può essere effettuata sia alla prima attivazione del CANICOM 800/CANICOM 1500, sia in occasione dell'aggiunta di collari supplementari, sia nel caso in cui dobbiate sostituire il telecomando o un collare.
  • Seite 75: Utilizzo Del Telecomando

    Per scegliere il cane sul quale volete agire, procedete nel modo seguente: CANICOM 800: premere A o B (sul display del telecomando appare la selezione desiderata) CANICOM 1500: premere 1, 2, 3 o 4 (sul display del telecomando appare la selezione desiderata) O Tasto : avvertimento sonoro Premendo il tasto «Bip sonoro»...
  • Seite 76 O Tasti di regolazione del livello di stimolazione «+» e «- »: I tasti +/- permettono di regolare rapidamente il livello di stimolazione del collare, secondo necessità. Sul telecomando CANICOM 800 sono disponibili 15 livelli. Sul telecomando CANICOM 1500 sono disponibili 18 livelli.
  • Seite 77: Pila Telecomando

    Il telecomando CANICOM 800 ha 1 pila litio tipo CR2 da 3V Il telecomando CANICOM 1500 ha 2 pile stilo alcaline tipo AA da 1,5V LR06 NUM’AXES raccomanda di utilizzare pile dello stesso modello e della stessa marca, come quelle che trovate già...
  • Seite 78: Verifica Del Correto Funzionamento Canicom 800/Canicom 1500

    Per ottenere le migliori prestazioni 4. Selezionate sul telecomando il collare da provare ( A o B per CANICOM 800/1, 2, 3 o 4 per CANICOM 1500). 5. Premete il tasto stimolazioni C o F del telecomando. La lampadina test si deve illuminare, indicando che il collare emette stimolazioni e quindi funziona correttamente.
  • Seite 79: Regole Di Base Per Utilizzare Il Collare D'addestramento

    It - 79 Di seguito elenchiamo alcuni consigli per ottenere le migliori prestazioni: - Non coprite con la mano l’antenna del telecomando quando premete un pulsante, perché riduce la portata. - La portata aumenta tenendo il telecomando in posizione alta. Posizionamento del collare - La lunga esposizione a temperature molto rigide, inferiori a 0°...
  • Seite 80: In Caso Di Malfunzionamento

    It - 80 pioggia senza tuttavia sottoporlo ad eccessiva esposizione. Attenzione: se il telecomando cade in acqua, l’immersione totale potrebbe causare danni irreversibili non coperti in garanzia, - Evitate di avvicinare troppo il telecomando a oggetti sensibili ai campi magnetici, rischiereste di danneggiarli in modo irreversibile.
  • Seite 81: Caratteristiche Tecniche

    It - 81 Caratteristiche tecniche Telecomando CANICOM 800 Telecomando CANICOM 1500 Collare ricevitore CANICOM Alimentazione 1 pila litio 3V tipo CR2 2 pile stilo 1,5V LR06 1 pila litio 3V tipo CR2 Autonomia Utilizzo intensivo: Utilizzo intensivo: Utilizzo intensivo: circa 2 mesi circa 30.000 comandi...
  • Seite 82: Accessori

    It - 82 3. Se il prodotto è riconosciuto difettoso, CANICOM srl lo riparerà o lo sostituirà a sua insindacabile guidizio. 4. Contro NUM’AXES e CANICOM srl non è ammesso alcun ricorso, in particolare, in caso di cattivo uso, manomissione o uso non conforme del prodotto. 5.
  • Seite 83 print : www.easyflyer.fr...
  • Seite 84 www.numaxes.com...

Diese Anleitung auch für:

Canicom 800

Inhaltsverzeichnis