Rollotron Pro Star 9905 Einbau- Und Bedienungsanleitung

Inhaltszusammenfassung für Rollotron Pro Star 9905
- Seite 1 Einbau- und Bedienungsanleitung RolloTron ® Pro Star Installation and operation manual RolloTron ® Pro Star Artikel Nr.; Article no 9900/9905/9940 VBD 462-6-D-GB (09.09)
-
Seite 2: Diese Anleitung
Sehr geehrte Kunden ... Dear Customers..mit dem Kauf des Rollladenantriebs RolloTron ® ...in purchasing this RolloTron ® Pro Star roller shutter Star haben Sie sich für ein Qualitätsprodukt aus dem drive, you have decided on a quality product manufactured Hause RADEMACHER entschieden. -
Seite 3: Inhaltsverzeichnis
Electrical connection ..........15 Gurtband einziehen und befestigen ......16 Feeding the belt through and fixing in place ... 16 Den RolloTron Pro Star einbauen ......18 Mounting the RolloTron Pro Star ......18 ® ® Grundprinzip der Menüführung ......19 Basic principles of navigation through the menu .. - Seite 4 Manuelle Bedienung ..........50 Manual operation ..........50 Den RolloTron ® Pro Star ausbauen ......51 Removal of the RolloTron ® Pro Star ....... 51 Gurtband entfernen bei Geräteausfall ..... 52 Removing the belt in the event of unit failure ..52 Pflege/Wartung ..........
-
Seite 5: Gesamtansicht
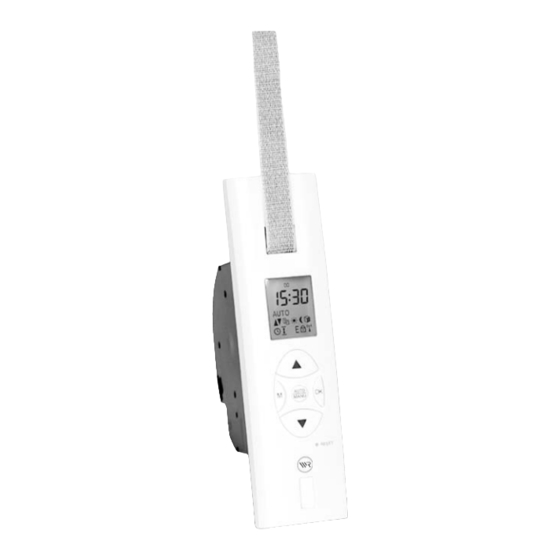
i i i i i Gesamtansicht General View Artikel Nr. 9900/9905/9940 Art. no. 9900/9905/9940 Stellschraube zum Einstellen des DCF-Funk- Adjusting screw for optimizing the DCF radio empfangs reception Befestigungslöcher Fixing holes Umlenkrolle Deflection roller Gurteinlass Belt entry Display Display AUTO MANU Auf-Taste Up button... -
Seite 6: Zeichenerklärung
i i i i i Key to Symbols Zeichenerklärung Lebensgefahr durch Stromschlag Danger of fatal electric shock Dieses Zeichen weist Sie auf Gefahren bei Arbeiten an elek- This symbol advises of the danger involved when wor- trischen Anschlüssen, Bauteilen etc. hin. Es fordert Sicher- king on electrical connections, components etc. -
Seite 7: Allgemeine Sicherheitshinweise
i i i i i Allgemeine Sicherheitshinweise General safety instructions Bei allen Arbeiten an elektrischen Anlagen be- All works to electrical systems present a life steht Lebensgefahr durch Stromschlag. threatening danger of electric shock. Der elektrische Anschluss und alle Arbeiten an elektri- The electrical connections and all works to electrical schen Anlagen müssen durch eine zugelassene Elek- systems must be carried out by a qualified electrician... -
Seite 8: Richtige Verwendung
Pro Star nur... Only use the RolloTron ® Pro Star for..zum Heben und Senken von Rollläden mit zulässigem ...raising and lowering the roller shutters with RolloTron ® Gurtband. Pro authorized belts. Verwenden Sie nur Originalteile des Only use original parts made by the manufac-... -
Seite 9: Zulässige Gurtbandbreiten Und -Längen
Verwenden Sie nur Gurtbänder in den zulässigen Län- Only use belts of the lengths permitted. If longer belts ** Minigurtband /Mini belt gen. Werden längere Gurtbänder eingezogen, kann das are pulled through, damage to the RolloTron ® Pro Star zur Beschädigung des RolloTron ®... -
Seite 10: Funktionsübersicht
i i i i i Funktionsübersicht Overview of functions Manuelle Bedienung Manual operation AUTO/MANU-Umschaltung AUTO/MANU switch Standardschaltzeit für AUF ( ) und AB ( ) Standard switching time for UP ( ) and DOWN ( ) Wochenprogramm inkl.: Weekly timer including: - Werktags- und Wochenendprogramm - Weekday and weekend programme - Einzeltagesprogramm... -
Seite 11: Vor Dem Einbau
® Pro Star. RolloTron Pro Star bietet. ® RES ET Maßzeichnung für RolloTron ® Pro Star Dimensioned drawing for RolloTron ® Pro Star (Artikel-Nr. 9900/9940) (Article no. 9900/9940) AUTO RES ET Maßzeichnung für RolloTron ® Pro Star Dimensioned drawing for RolloTron ®... - Seite 12 i i i i i Vor dem Einbau Before installation Sie brauchen folgende Werkzeuge: You will need the following tools: Schraubendreher Slotted Screwdriver Kreuzschlitz-Schraubendreher Phillips screwdriver Schere Scissors Zollstock oder Maßband Folding rule or tape measure Stift Den alten Gurtwickler ausbauen. Dismantle the old belt winder.
-
Seite 13: Empfehlung
i i i i i Vor dem Einbau Before installation Gurtband vorbereiten. Prepare the belt. Schneiden Sie das Gurtband ca. 20 cm unterhalb des Cut off the belt approx. 20 cm below the belt case. Fold Gurtkastens ab. Schlagen Sie das Ende des Gurtbandes over the end of the belt by approx. -
Seite 14: Sicherheitshinweise Zum Elektrischen Anschluss
i i i i i Sicherheitshinweise zum elektrischen Safety instructions for the electrical Anschluss connection Bei allen Arbeiten an elektrischen Anlagen be- All works to electrical systems present a life steht Lebensgefahr durch Stromschlag. threatening danger of electric shock. Der elektrische Anschluss und alle Arbeiten an elektri- The electrical connections and all works to electrical schen Anlagen müssen durch eine zugelassene Elek- systems must be carried out be a qualified electrician... -
Seite 15: Elektrischer Anschluss
Elektrischer Anschluss Electrical connection HINWEIS NOTE Der elektrische Anschluss des RolloTron ® Pro Star kann The RolloTron ® Pro Star can be connected to the mains sowohl über ein Kabel mit Netzstecker als auch über eine using a cable with a mains plug or by means of perma- fest verlegte Zuleitung erfolgen. -
Seite 16: Gurtband Einziehen Und Befestigen
Always place the belt onto the winding wheel from above. Führen Sie erst dann das Gurtband von oben in Only then can you feed the belt into the den RolloTron ® Pro Star ein. Befestigen Sie an- RolloTron ® Pro Star from above. Then fix the schließend das Gurtband auf dem Haken... - Seite 17 i i i i i Gurtband einziehen und befestigen Feeding the belt through and fixing in place Drücken Sie die Auf-Taste solange, bis sich das Press the UP button until the belt has wound Gurtband einmal ganz um das Wickelrad itself completely around the winding wheel gewickelt hat.
-
Seite 18: Den Rollotron ® Pro Star Einbauen
Pro Star einbauen Mounting the RolloTron ® Pro Star HINWEIS NOTE Bauen Sie den RolloTron ® Pro Star gerade ein, damit sich Ensure that the RolloTron ® Pro Star is straight when das Gurtband korrekt aufwickeln kann. Achten Sie darauf, mounted so that the belt can wind up correctly. -
Seite 19: Grundprinzip Der Menüführung
„Menü“ aufrufen, um die einzelnen Funktionen Ihres call up the „menu“ and set the individual functions of RolloTron ® Pro Star auszuwählen und nach Ihren Wünschen your RolloTron ® Pro Star according to your requirements. einzustellen. So können Sie Funktionen aufrufen und... -
Seite 20: Grundeinstellungen/Erstinbetriebnahme
i i i i i Grundeinstellungen / Erstinbetriebnahme Basic settings / Initial operation Strom einschalten. Switch on the power. Das Funkuhr-Symbol (DCF) blinkt solange, bis ein Funk- The radio clock symbol (DCF) flashes until a radio signal signal empfangen wird (Das kann bis zu 5 Minuten dau- is received. - Seite 21 i i i i i Grundeinstellungen / Erstinbetriebnahme Basic settings / Initial operation Guter DCF-Empfang. Good DCF reception. Bestätigen und automatisch weiter mit: Confirm and continue automatically with: Oberen Endpunkt einstellen, s. 3.a. Set the upper end position, see 3.a. Das Symbol für die Endpunkteinstellung „EndP“...
- Seite 22 i i i i i Grundeinstellungen / Erstinbetriebnahme Basic settings / Initial operation Unteren Endpunkt einstellen. Set the lower end position. Hold the button pressed, the roller shutter moves Taste gedrückt halten, der Rollladen fährt runter. downwards. Release the button, as soon as the desired end position has Taste loslassen, sobald der gewünschte untere Endpunkt been reached.
- Seite 23 The basic settings are now fixed. Die Grundeinstellungen sind abgeschlossen. The normal display appears with the current time of day. Die Normalanzeige erscheint. NOTE HINWEIS Der RolloTron Pro Star ist jetzt bereits betriebsbereit. The RolloTron ® Pro Star is now ready for operation. The ®...
-
Seite 24: Automatikbetrieb Ein-/Ausschalten
i i i i i Automatikbetrieb Automatic operation AUTO MANU Alle Automatikfunktionen sind eingeschaltet z.B. All automatic functions are switched on, e.g.: AUTO Schaltzeiten Switching times Sonnenautomatik Automatic sunlight protection Dämmerungsautomatik etc. Automatic twilightoperation, etc. HINWEIS NOTE Auch im Automatikbetrieb ist eine manuelle Bedienung Manual operation is still possible in automatic mode. -
Seite 25: Standardschaltzeiten Auf/Ab Ändern
i i i i i Standardschaltzeiten AUF/AB Standard switching times, UP/DOWN Gleiche Schaltzeiten für alle Wochentage The same switching times for every day of einstellen. the week. Die eingestellten Öffnungs- und Schließzeiten gelten an The settings for the opening and closing times apply to allen Wochentagen. -
Seite 26: Wochenprogramm
i i i i i Wochenprogramm Weekly timer Im Wochenprogramm können Sie für alle Wochentage Individual opening and closing times for each weekday individuelle Öffnungs- und Schließzeiten einstellen. or weekend can be set using the weekly timer. Werktags-/Wochenendprogramm Programme weekdays/weekend Hier können Sie vier Schaltzeiten einstellen: Here you can set four switching times: 1 x Öffnungszeit gültig von Mo. -
Seite 27: Wochenprogramm Einstellen
i i i i i Wochenprogramm einstellen Setting the weekly timer Das Menü öffnen. Open the menu. Wochenprogramm ( ) wählen und öffnen. Select and open the weekly timer ( Betriebsart wählen. Select mode of operation. = Wochenprogramm ausschalten. = Switch off weekly timer oder = Werktags-/Wochenendprogramm = Select weekdays/weekend programme... -
Seite 28: Werktags-/Wochenendprogramm Einstellen
i i i i i Wochenprogramm einstellen Setting the weekly timer Werktags-/Wochenendprogramm einstellen: Set the weekdays/weekend programme: 1. Öffnungszeit für Mo. bis Fr. 1. Opening time for Mo. to Fr. 2. Schließzeit für Mo. bis Fr. 2. Closing time for Mo. to Fr. 3. -
Seite 29: Sonnenautomatik
The light sensor is fixed to the window pane (s. illus- sensor mit einem Saugnapf an der Fensterscheibe befes- tration) with a suction pad and is plugged into to the tigt (s. Abbildung) und über einen Stecker mit dem RolloTron ® Pro Star. RolloTron ®... - Seite 30 i i i i i Sonnenautomatik Automatic sunlight protection Automatisches Freiziehen. Automatic exposure of the sensor. Nach ca. 20 Minuten fährt der Rollladen automatisch ein After approx. 20 minutes, the roller shutter moves upwards Stück hoch, um den Sensor freizugeben. Bei weiterer a little to expose the light sensor.
-
Seite 31: Sonnenautomatik Einstellen
i i i i i Sonnenautomatik einstellen Setting the automatic sunlight protection Das Menü öffnen. Open the menu. Select and open automatic sunlight protection Sonnenautomatik ( ) wählen und öffnen. Sonnenautomatik einschalten. Switch on the automatic sunlight protection. = Ein = switched on = Aus (Werkseinstellung) = switched off (factory default setting) -
Seite 32: Dämmerungsautomatik
Dämmerungsautomatik Automatic twilight operation Die Dämmerungsautomatik bewirkt ein automatisches The automatic twilight operation causes the roller shutter Schließen des Rollladens. to close automatically. Der RolloTron ® Pro Star verfügt über zwei The RolloTron ® Pro Star has two twilight Dämmerungsfunktionen: functions: über Lichtsensor (Art.-Nr. -
Seite 33: Über Lichtsensor
i i i i i Dämmerungsautomatik über Lichtsensor Automatic twilight operation via light sensor HINWEIS NOTE Soll der Tieflauf Ihres Rollladens durch die Dämmerungs- If you would like your roller shutter to close at dusk using automatik erfolgen, müssen Sie die automatische Schließ- the automatic twilight facility, then you must switch off zeit entweder ausschalten oder auf eine Zeit nach Eintritt the automatic closing time or set the closing time to a... -
Seite 34: Über Lichtsensor Einstellen
i i i i i Dämmerungsautomatik über Lichtsensor Set the „Automatic twilight operation via einstellen light sensor“ Das Menü öffnen (Die Astrofunktion muss Open the menu (the astro function must be ausgeschaltet sein, s. nächste Seite). switched off, see next page). Select and open the automatic twilight Dämmerungsautomatik ( ) wählen und operation ( ). -
Seite 35: Über Astrofunktion
i i i i i Dämmerungsautomatik über Automatic twilight operation via Astrofunktion astro function Auch die Astrofunktion bewirkt ein automatisches Schlie- The astro function also causes the roller shutter ßen des Rollladens. to close automatically. Der Zeitpunkt für den AB-Befehl ist von der Jahreszeit The closing time is dependent on the time of year and und von der geographischen Lage abhängig. -
Seite 36: Verzögerungszeit Einstellen
i i i i i Astrofunktion ein-/ausschalten Switch the astro function on or off Verzögerungszeit einstellen. Set the delay time. Mit Hilfe der Verzögerungszeit können Sie die Schließ- By setting the delay time, you can alter the closing time zeit der Dämmerungsautomatik um +/- 60 Minuten ver- of the automatic twilight operation by +/- 60 minutes ändern (Schrittweite = 10 Minuten). -
Seite 37: Zufallsautomatik Ein-/Ausschalten
i i i i i Zufallsautomatik Automatic random operation Diese Einstellung bewirkt eine Verzögerung der einge- This setting delays the programmed switching times by 0 stellten Schaltzeiten um 0 bis 30 Minuten. to 30 minutes. HINWEIS NOTE Die Zufallsautomatik gilt nicht für die Dämmerungs- The automatic random operation does not apply to the zeiten. -
Seite 38: Uhrzeit Einstellen/Datum Eingeben
i i i i i Uhrzeit einstellen / Datum eingeben Setting the time / Entering the date Wurde bei der Inbetriebnahme kein Zeitsignal empfan- If no time signal was received during initial operation, gen, haben Sie die aktuelle Uhrzeit und das Datum bereits then you have already set the time and the date during während der Grundeinstellungen eingestellt. -
Seite 39: Endpunkte Einstellen Und Korrigieren
Endpunkte einstellen oder korrigieren Setting or adjusting the end positions Bei der Inbetriebnahme des RolloTron ® Pro Star haben You’ve already set the end positions during the initial Sie die Endpunkte bereits eingestellt (s. Seite 21/22). -
Seite 40: Tastensperre Ein-/Ausschalten
i i i i i Tastensperre ein- oder ausschalten Switching the keypad lock on or off Die Tastensperre bietet Schutz vor unbeabsichtigten Ein- The keypad lock prevents the settings from being altered stellungen. unintentionally. Tastensperre ( ) einschalten. Switch on the keypad lock ( Normalanzeige mit aktiver Tastensperre. -
Seite 41: Expertenmodus
Expert mode Im Expertenmodus stehen Ihnen verschiedene Funktio- In expert mode, various functions are available to enable nen zur Verfügung, um den Programmablauf des you to adapt the programme operations of the RolloTron ® RolloTron ® Pro Star an Ihre Wünsche anzupassen. -
Seite 42: Menüpunkte Wählen Und Einstellen
i i i i i Beispiel: Expertenmodus aufrufen / Call up expert mode/ Menüpunkte wählen und einstellen Select and set menu items Das Menü öffnen. Open the menu. Expertenmodus ( ) wählen. Select expert mode ( ). Expertenmodus öffnen. Open expert mode. Der Menüpunkt blinkt. -
Seite 43: Kontrasteinstellung
i i i i i Übersicht aller Menüpunkte und Parameter Overview of all menu items and parameters im Expertenmodus in expert mode Menüpunkt / Funktion / Display Parameter Parameter Menu item / Function / Display Maximale Motorgeschwindigkeit 1 bis 3 1 to 3 Maximum motor speed 1 = langsame Geschwindigkeit... - Seite 44 i i i i i Übersicht aller Menüpunkte und Parameter Overview of all menu items and parameters im Expertenmodus in expert mode Menüpunkt / Funktion / Display Parameter Parameter Menu item / Function / Display Maximale Helligkeit der Kurzbeschreibung Brief description Hintergrundbeleuchtung.
- Seite 45 i i i i i Übersicht aller Menüpunkte und Parameter Overview of all menu items and parameters im Expertenmodus in expert mode Menüpunkt / Funktion / Display Parameter Parameter Menu item / Function / Display Anzeige der DCF-Empfangsqualität. 0 bis 5 (keine Einstellmöglichkeit) Parameter 0 to 5 (no setting options) Display DCF reception quality.
- Seite 46 Parameter 0 and 1 Automatic keypad lock. 0 = Aus (Werkseinstellung) 0 = OFF (factory default setting) 1 = On 1 = Ein To prevent the RolloTron ® Pro Star settings from being Um den RolloTron ® Pro Star gegen unbeabsichtigte Ein- gaben zu schützen, können Sie eine automatische Tasten-...
- Seite 47 i i i i i Übersicht aller Menüpunkte und Parameter Overview of all menu items and im Expertenmodus parameters in expert mode Menüpunkt / Funktion / Display Parameter Parameter Menu item / Function / Display Lüftungsposition 0 und 1 Parameter 0 and 1 Ventilating position 0 = Aus (Werkseinstellung) 0 = OFF (factory deafult setting)
-
Seite 48: Rückstellung Auf Die Werkseinstellungen
i i i i i Rückstellung auf die Werkseinstellungen Resetting to factory settings Softwarereset Reset the software Alle vier Tasten 8 Sekunden lang gleichzeitig drücken. Hold all four buttons pressed simultaneously for 8 seconds. Es erscheinen kurz nacheinander folgende An- The following displays appear in quick succes- zeigen: 8 Sekunden... -
Seite 49: Hardwarereset
Hardwarereset Hardwarereset Resettaste (s. Seite 5) vorsichtig mit Hardwarereset Reset the hardware einem dünnen (nicht zu spitzen) Falls der RolloTron ® Pro Star nicht mehr auf Tastendruck Should the RolloTron ® Pro Star no longer react to a key Gegenstand drücken. -
Seite 50: Manuelle Bedienung
i i i i i Manuelle Bedienung Manual operation Die manuelle Bedienung ist in jeder Betriebsart möglich Manual operation is possible in every mode and has priority und hat Vorrang vor den Automatikfunktionen. over the automatic functions. Rollladen öffnen. Open the roller shutter. Der Rollladen fährt bis zum oberen Endpunkt. -
Seite 51: Den Rollotron ® Pro Star Ausbauen
Press and hold (several times if necessary). Das Gurtband mit der Hand soweit wie Pull the belt out over the deflection roller at möglich über die Umlenkrolle vorne aus dem the front of the RolloTron ® Pro Star by hand, RolloTron ®... -
Seite 52: Gurtband Entfernen Bei Geräteausfall
Das Gurtband vom Befestigungshaken lösen Lift the fixing hook off the belt and pull the und vorne aus dem RolloTron ® Pro Star voll- belt completely out of the RolloTron ® Pro Star ständig herausziehen. at the front. i i i i i... - Seite 53 Gurtband entfernen bei Geräteausfall Gurtband entfernen bei Geräteausfall RolloTron ® Pro Star ausbauen, s. Seite 51. Remove the RolloTron ® Pro Star , s. page 51. Strom abschalten und die Netzverbindung Switch off the electricity and disconnect from lösen.
-
Seite 54: Pflege/Wartung
Pflege / Wartung Sie können den RolloTron ® Pro Star mit einem angefeuch- You can clean the RolloTron ® Pro Star using a damp cloth. teten Tuch reinigen. Verwenden Sie bitte keine aggressiven Please do not use aggressive or abrasive cleaning oder scheuernden Reinigungsmittel. - Seite 55 i i i i i Was tun, wenn... ? What to do if... ? ...der Rollladen nach der Montage nicht ganz ... the roller does not open completely after hochfährt. installation? Mögliche Ursache: Possible cause: Die Einstellung des oberen Endpunkte stimmt nicht. The setting of the upper end stop position is not correct.
- Seite 56 Pro Star still not respond after reset immer noch nicht reagieren, führen Sie bitte ei- resetting the hardware, then please reset the software nen Softwarereset (s. Seite 48) durch und testen Sie (see page 48) and test the RolloTron ® Pro Star with den RolloTron ®...
- Seite 57 i i i i i Was tun, wenn... ? What to do if... ? ...der Rollladen morgens zur eingestellten ...the roller shutter does not open at the Zeit nicht hochfährt? programmed time on a morning? Mögliche Ursache: Possible cause: Die Elektronik hat den Antrieb nach dem Schließen des The electronics have switched off the drive after closing Rollladens abgeschaltet, da sich die Umlenkrolle nicht the roller shutter because the deflection roller was not...
- Seite 58 Was tun, wenn... ? What to do if... ? ...der RolloTron ® Pro Star nicht mehr reagiert ...the RolloTron ® Pro Star no longer reacts and an error message appears? und eine Fehlermeldung erscheint? Possible cause: Mögliche Ursache:...
-
Seite 59: Technische Daten
i i i i i Technische Daten Technical data Versorgungsspannung: 230 V/50 Hz Supply voltage: 230 V/50 Hz Nennleistung: ca. 70 W Power rating: approx. 70 W Stand-by-Verbrauch: ca. 0,5 W Standby power: approx. 0.5 W Nenndrehmoment: ca. 10 Nm * Rated torque: approx. -
Seite 60: Werkseinstellungen
i i i i i Technische Daten / Werkseinstellungen Technical data / Factory default settings Uhr: 12:00 Uhr Time: 12:00 hours Datum: 10.02.2009 Date: 10.02.2009 Schaltzeiten Standardprogramm: Switching times, standard programme: - AUF: 07:00 Uhr - UP: 07:00 hours - AB: 20:00 Uhr - DOWN: 20:00 hours... -
Seite 61: Werkseinstellungen Im Expertenmodus
9 Lüftungsposition = 0 (Aus) 9 Ventilating position = 0 (Off) CE-Zeichen und Konformität CE Mark and Conformity Der Rollladenantrieb RolloTron ® Pro Star (Art.-Nr. The RolloTron ® Pro Star, roller shutter drive (art. no. 9900/9905/9940) erfüllt die Anforderungen der gel- 9900/9905/9940) fulfils the requirements of the rele- tenden europäischen und nationalen Richtlinien. -
Seite 62: Zugkraftdiagramm
i i i i i Zugkraftdiagramm Traction force diagram Zuggewicht [Kg] Traction weight [Kg] Gurtbanddicke 1,0 mm Belt thickness 1,0 mm Gurtbanddicke 1,3 mm Belt thickness 1,3 mm Gurtbanddicke 1,5 mm Belt thickness 1,5 mm Gurtbandlänge [m] Belt lenght [m] Gurtbandlängen für Artikel Nr. -
Seite 63: Zeitzonentabelle
i i i i i Zeitzonentabelle Belgien 128 Turku Liechtenstein 182 Salzburg 210 Malmö 242 Fuerteventura 129 Vasa 156 Vaduz 183 Wien 211 Stockholm 101 Antwerpen Süd-Osteuropa 102 Brügge 212 Sundsvall Frankreich Litauen Polen 243 Athen 103 Brüssel 213 Umea 130 Bordeaux 157 Vilnius 184 Breslau... -
Seite 64: Time Zones Table
i i i i i Time zones table Belgium 128 Turku Liechtenstein 181 Nenzing 209 Östersund 241 Gran Canaria 129 Vasa 182 Salzburg 210 Malmoe 242 Fuerteventura 101 Antwerp 156 Vaduz 183 Vienna 211 Stockholm 102 Bruges France South-Eastern Lithuania 212 Sundsvall 103 Brussels Poland... -
Seite 65: Zubehör
i i i i i Zubehör Accessories Umlenkrolle Deflection roller Artikel-Nr. 3590/3595 Article no. 3590/3595 Lichtsensor Light sensor Article no. 3710 Artikel-Nr. 3710 Standard = 0,75 m Standard = 0,75 m optionally available in the following lengths: optional in folgenden Längen erhältlich: 1,5 m/ 3 m/ 5 m/ 10 m 1,5 m / 3 m / 5 m /10 m Electrical cable with European plug... -
Seite 66: Display-Gesamtübersicht
i i i i i Display-Gesamtübersicht View of display paneel Wochentage Days of the week Ziffernanzeige Numeric display Aktueller Lichtwert Current light value Umschaltung Automatik-/Handbetrieb Switching automatic/manual operation von links nach From left to rechts: right: - Auf-/Ab-Schaltzeiten - Up/down switching times - Wochenprogramm - Weekly timer - Sonnenprogramm... -
Seite 67: Kurzanleitung
i i i i i Kurzanleitung Short instructions Funktionen aufrufen und einstellen: Call up and set the functions: Menü aufrufen oder verlassen. Call up or exit menu. Funktion auswählen. Select function. Funktion bestätigen. Confirm function. Werte im Einstellmodus verändern. Alter values in setting mode. Eingabe bestätigen/nächster Wert/zurück zum Menü. -
Seite 68: Garantiebedingungen
i i i i i Garantiebedingungen Guarantee conditions RADEMACHER Geräte-Elektronik GmbH&Co. KG gibt 36 Rademacher Geräte-Elektronik GmbH&Co. KG offers a 36 Monate Garantie für Neugeräte, die entsprechend der Ein- month guarantee for new devices that have been installed in bauanleitung montiert wurden. Von der Garantie abge- accordance with the installation manual. - Seite 69 i i i i i...
- Seite 70 i i i i i...
- Seite 72 RADEMACHER Geräte-Elektronik GmbH & Co. KG Buschkamp 7 46414 Rhede info@rademacher.de www.rademacher.de Service: Hotline 01805 933-171* Telefax +49 2872 933-253 service@rademacher.de * 14 ct/Minute aus dem deutschen Festnetz der DT AG/ Mobilfunktarif abweichend...