ANT B-TWIG 8S Bedienungsanleitung
Kompakt-säulensystem

Verwandte Anleitungen für ANT B-TWIG 8S


Inhaltszusammenfassung für ANT B-TWIG 8S
- Seite 1 P O W E R E D C O L U M N S Y S T E M S I S T E M A A T T I V O A C O L O N N A K O M P A K T - S Ä...
-
Seite 14: Einleitung
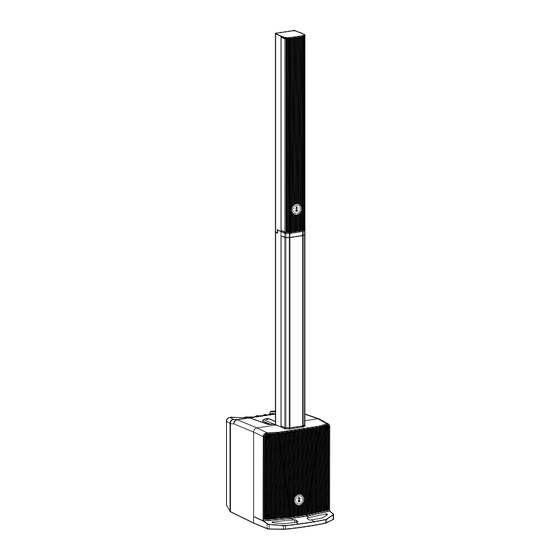
A.N.T.-Produkten finden Sie auf unsere Website: www.ant-intomusic.com. | TECHNISCHE DATEN 2 | AUSSTATTUNG | NOTIZEN Dieses System besteht aus dem aktiven Subwoofer B-TWIG 8S und dem B-TWIG 8CS-Set, ausgestattet mit: A | Griffmulde oben B | Schiebevorrichtung zur schnellen Ver- und Entriegelung der Elemente C | Distanzstück... -
Seite 15: Beschreibung
3 | BESCHREIBUNG EINGANG CHANNEL 2 Symmetrischer Eingang (Kombibuchse XLR-Female + 6,35 mm/1/4” Klinke). Sie können wahlweise auch ein unsymmetrisches Klinkenkabel zum Anschluss verwenden. CHANNEL 2 LINE/MIC Die Eingangsempfindlichkeit von Kanal 1 lässt sich mit diesem Schalter einstellen. Mit LINE wird der Eingang auf Line-Pegel ausgelegt, in der Praxis die häufigste Anwendung. -
Seite 16: Stromversorgung
Lieferumfang befindliche Netzkabel in diese Buchse ein. Bevor Das Distanzstück wird mit dieser Sie das Kabel an das Stromnetz anschließen vergewissern Sie sich, Vorrichtung an den B-TWIG 8S Subwoofer dass das Gerät ausgeschaltet ist. Entfernen Sie niemals die Erdung an- und abgekoppelt. Es sorgt für eine des Netzkabels. -
Seite 17: B-Twig 8Cs-Set
3.3 | B-TWIG 8CS SET AUFBAU • Stellen Sie den Subwoofer auf eine ebene Fläche (Abb. 1). Das in der Tragetasche mitgelieferte Set besteht aus zwei Säulenelementen: einem • Befestigen Sie Element A, indem Sie es in die Arretierung schieben Distanzstück (Element A) und einer Lautsprechersäule (Element B). - Seite 18 ABBAU 5 | FEHLERBEHEBUNG • Schieben Sie Element B nach vorne, um es vom Element A zu lösen (Abb. 4). PROBLEM LÖSUNG • Wiederholen Sie den Vorgang, um Element A aus dem Subwoofer-Gehäuse zu entriegeln (Abb. 5). Vergewissern Sie sich, dass das Kein oder sehr Power-LED aus Gerät ordnungsgemäß...
-
Seite 19: Technische Daten
6 | TECHNISCHE DATEN 7 | NOTIZEN Systemtyp Aktives Säulensystem Subwoofer Bassreflex-Gehäuse (B-TWIG 8S) 1 x 8” Custom-Ferrit-Lautsprecher – 1,5" Schwingspule Säulenlautsprecher 6 x 2,75" Custom-Neodym-Lautsprecher – 0,75" (B-TWIG 8CS) Schwingspule Durchschnittliche Abstrahlung 120° horizontal Frequenzgang 50Hz - 20kHz Max. Schalldruckpegel... - Seite 20 7 | NOTIZEN www.ant-sound.com ENG The information contained in this manual have been carefully drawn up and checked. However no responsibility will be assumed for any incorrectness. This manual cannot cover all the possible contingencies which may arise during the product installation and use. Should further information be desired, please contact us or our local distributor.