Herunterladen Diese Seite drucken

Werbung

Verfügbare Sprachen

Verfügbare Sprachen

Bedienungsanleitung
Instruction
mode d'emploi
City Driver / Flash
deutsch Seite 3
english Page 19
français Page 35

Werbung

loading

Inhaltszusammenfassung für kaps3 City Driver

  • Seite 1 Bedienungsanleitung Instruction mode d‘emploi City Driver / Flash deutsch Seite 3 english Page 19 français Page 35...
  • Seite 3: Sicherheit Und Qualität

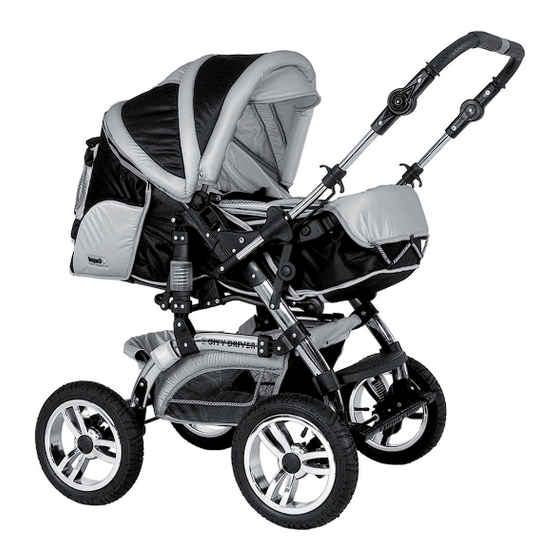
    Sicherheit und Qualität Sicherheit und Qualität - das „A“ und „O“ für uns und unsere Produzenten! Qualitative Verarbeitungen mit hochwertigen Materialien stehen bei unseren Herstellern an 1. Stelle. Dieses gibt Ihnen, liebe Eltern, die not- wendige Sicherheit dass Sie mit unseren Produkten zufrieden sind. Die Verarbeitung von ausschließlich schadstoffgeprüften Textilien ist selbstverständlich.
  • Seite 5 Schieber Roter Schutzbügel Druckknopf für Einstellung Schieberhöhe Schnellverschluss für Rad Feststellbremse Sonneschildchen Bauchbügel Druckknopf für Anbringung Liegeflächenverlängerung und Bauchbügel Verstellbare Fußablage 10.) Druckknopf zum Verstellen der Fußablage 11.) Einkaufskorb 12.) Sicherheitsgurt 13.) einstellbare Federung 14.) Sichtfenster 15.) Adaptereinlässe für Babyschale 16.) Schieberverriegelung...
  • Seite 6 Bild 1 Bild 2 Bild 3 Bild 4 Bild 5 Bild 6...
  • Seite 7 Bild 7 Bild 8 Bild 9 Bild 10 Bild 11 Bild 12...
  • Seite 8 Bild 13 Bild 14 Bild 15 Bild 16 Bild 17 Bild 18...
  • Seite 9 Bild 19...
  • Seite 10 Herzlichen Glückwunsch Damit sich Ihr Kind bis ins 3. Lebensjahr sicher und geborgen fühlt haben Sie sich für ein Produkt der Firma Kaps 3 entschieden und damit eine sehr gute Wahl getroffen. Hochwertige Verarbeitung und hohe Qualitätsansprüche geben Ihnen die Sicherheit das Sie lange sehr viel Freude an Ihrem Kaps 3 Kinderwagen haben.
  • Seite 11: Luftverlust Der Räder

    Pflegehinweise Pflege der Stoffe: Reinigen Sie leicht verschmutzte Teile mit einer weichen Bürste oder klarem Wasser Hartnäckige Verschmutzungen können mit einem milden Waschmittel entfernt werden Alle abnehmbaren Stoffteile können mit einem milden Pflegemittel bei 30 Grad (Pflegewaschgang) gewaschen werden Sollte der Kinderwagen bei starkem Regen gefahren werden trocknen Sie an- schließend diesen mit einem trockenem Tuch ab und lassen den Kinderwagen in einem trockenem und luftigen Raum austrocknen –...
  • Seite 12 Aufbauanleitung Kinderwagen Kinderwagenaufbau: 1.) Nehmen Sie den Kinderwagen vollständig aus der Verpackung 2.) Entnehmen Sie sämtliches Zubehör wie Tragetasche, Softtragetasche usw. 3.) Stellen Sie den Kinderwagen auf die Achse - siehe Bild 1 4.) Stellen Sie sich vor den Kinderwagen - die Haube & Fahrtstange muss sich direkt vor Ihnen befinden 5.) Stellen Sie Ihren Fuß...
  • Seite 13 3.) Befestigen Sie die Haube an der Softtragetasche mittels der Druckknöpfe 4.) legen Sie nun die Softtragetasche in den Kinderwagen 5.) befestigen Sie anschließend die Softtragetasche mit den dafür vorgesehe- nen Karabinern - siehe Bild 9 Positionierung der Fahrtstange: 1.) die Fahrtstange lässt sich in Fahrtrichtung und entgegen der Fahrtrichtung einstellen 2.) es befindet sich an beiden Seiten ein Hebel, diese ziehen Sie zeitgleich an sich heran - Bild 10...
  • Seite 14 Einstellen der Federung: 1.) der City Driver wird mit weicher Federung an Sie geliefert 2.) um die Federung auf hart zu stellen müssen Sie den Umleghebel der sich unter jeder Feder neben dem Rad befindet umlegen - siehe Bild 13 3.) Beim Flash ist die Federung nur an der Hinterachse verstellbar...
  • Seite 15: Beschaffenheitsvereinbarung

    sich vor Ihnen 5.) ziehen Sie nun die Hebel, diese befinden sich an beiden Seiten des Gestel- les, an sich heran - siehe Bild 15 6.) Beim Kinderwagen Flash bitte vorher die Schieberverriegelung lösen – siehe Bild 11 7.) der Kinderwagen klappt zusammen 8.) lösen Sie vor dem endgültigen Zusammenklappen den roten Schutzbügel - siehe Bild 16.
  • Seite 16 Folgefehler, die durch Nichtbeachtung vorhandener Schäden /Fehler entstanden sind Schäden durch ungeeignete oder unsachgemäße Verwendung Schäden durch fehlerhafte Montage und Inbetriebnahme Schäden durch nachlässige Behandlung oder fehlende Wartung Schäden durch Veränderung des Artikels Gewährleistungsfall oder nicht…. Rost: Das Gestell ist rostschutzbehandelt Bei fehlender Wartung kann es jedoch vorkommen , dass Roststellen auftreten Hierfür wird keine Gewährleistung übernommen...
  • Seite 17 Räder: Kinderwagenräder werden nicht ausgewuchtet und können somit einen leichten Höhenschlag oder Seitenschlag („eiern“) aufweisen Abgefahrene Räder sind natürliche Verschleißteile Platen bei Lufträdern kann nur auf eine äußere Einwirkung, spitze Ge- genstände oder Fahren mit zu niedrigem Reifendruck zurückgeführt werden. Die Bremskränze an den Rädern gelten als Verschleißteile Hierfür kann keine Gewährleistung übernommen werden Links und Rechts Ziehen des Gestells:...
  • Seite 18 Es wird eine zügige Bearbeitung der Ansprüche gewährleistet, jedoch ist eine genaue Zeitangabe nicht möglich grundlegendst werden alle in der Garantiezeit auftretenden Schäden repariert, sofern das mangelbehaftete Bauteil zur vorherigen Prüfung beim Fach – oder Großhändler vorliegt...
  • Seite 19 Safety and Quality Safety and Quality – the nuts and bolts for our producers! Qualitative fi nish with high-grade materials are in the fi rst place for our producers. This offers to you the necessary safety to be satisfi ed with our products. The use of only non-harmful substances and tested materials is ensured.
  • Seite 21 Push bar Red safety bar Button for adjusting the push bar height Wheel quick release fastener Parking brake Sun shade Retaining bar Button for fastening the lying surface extension and retaining Adjustable footrest 10.) Button for adjusting the footrest 11.) Shopping basket 12.) Seat belt...
  • Seite 22 Picture 1 Picture 2 Picture 3 Picture 4 Picture 5 Picture 6...
  • Seite 23 Picture 7 Picture 8 Picture 9 Picture 10 Picture 11 Picture 12...
  • Seite 24 Picture 13 Picture 14 Picture 15 Picture 16 Picture 17 Picture 18...
  • Seite 25 Picture 19...
  • Seite 26: Warning Notices

    Congratulations! You have made a good choice indeed buying this product made by Kaps 3 for the safety and comfort of your baby aged three or less. Quality workmanship and high quality requirements will arrange for you to really enjoy this Kaps 3 pushchair for a long time.
  • Seite 27: Care Instructions

    Care instructions Care of fabrics: Use a soft brush or clear water to clean minor stains. Use a mild washing agent to remove more tenacious stains. All detachable fabric parts can be washed in a mild care agent at no more than thirty (30) degrees (gentle wash).
  • Seite 28: Instructions For Assembly

    To complete the pushchair To mount the lying surface extension 1.) There is one large snap fastener each on the front of the City Driver on each end of the frame - see Figure # 6 2.) Use these snap fasteners to attach the lying surface extension and the retaining bar.
  • Seite 29 To mount the carrier bag 1.) Make sure the lying surface is properly aligned. 2.) Remove any accessory items from the soft carrier bag. 3.) Use the snap fasteners to attach the hood to the carrier bag. 4.) Now, put the soft carrier bag into the pushchair. 5.) After that, attach the soft carrier bag using the snap hooks provided for this purpose -see Figure 9.
  • Seite 30 To adjust the suspension 1.) The City Driver comes with its suspension set to hard. 2.) To set the suspension to soft, turn the lever provided beneath each spring adjacent to the wheel - see Figure #13. 3.) pram Flash: adjustable suspension only on the rear axle Mesh lining 1.) To convert the hood to mesh lining, remove the hood by undoing the zip...
  • Seite 31 7.) The pushchair will now collapse. 8.) Before fully folding it up, undo the red safety bar - see Figure # 14. 9.) The pushchair will now fully fold up. To mount the optional shell-type seat on the pushchair 1.) Remove the soft carrier bag, the lying surface extension or retaining bar. 2.) Now, undo the covers of the adapter inlets located on the frame on the right or left hand sides respectively - see Figure # 17.
  • Seite 32 Covered or not covered by warranty…. Rust: The frame comes with antirust protection. However, minor patches of rust may occur where it is not properly ser viced. Such occurrences are not covered by warranty. Scratches: Scratches are deemed occurrences of normal wear and tear. This will not be covered by warranty.
  • Seite 33 Wheels The wheels of your pushchair are not balanced and may thus show a slight out-of-round (wobble). Worn wheels are standard wearing parts. Flat pneumatic tyres may be caused by external impact only, such as pointed objects or use of inadequate tyre pressure The cogwheels on the rear side of the wheels are expendable parts Such instances will not be covered by warranty The pram is turning to the left or right...
  • Seite 34 How to register a complaint... Report any defect to your dealer at your earliest convenience. Defects relevant to safety and not reported to your dealer within one (1) month will not be covered by warranty. Warranty claims will be handled by us as quickly as possible; however, we are sorry not to be able to specify any specific time frame Within the warranty we will repair any damages that may will happen, therefore the damaged part needs to be returned to the retailer or to...
  • Seite 35 La sécurité et la qualité des poussettes-landaus sont essentielles aux yeux de nos fabricants Nos fabricants s‘engagent sur la qualité de fabrication, leurs produits sont conçus avec des matériaux fi ables Vous serez, ainsi,chers parents, satisfaits de nos produits Le traitement des articles textiles, contre leur dégradation, est vraiment pris au sérieux Grâce au grand savoir faire de nos fabricants, nous vous offrons les meilleurs articles disponibles sur le marché...
  • Seite 37 Guidon Arnais rouge 5 points (5 punkt Gurtsystem) bouton permettant de régler en hauteur le guidon Bouton poussoir pour les roues Freinage centralisé (frein parking au pied) Ombrelle Ceinture ventrale Bouton déverrouillage pour ajuster le hamac et la ceinture ventrale Repose jambe 10.) bouton permettant de régler en hauteur le repose jambe...
  • Seite 38 Image 1 Image 2 Image3 Image4 Image 5 Image 6...
  • Seite 39 Image 7 Image 8 Image 9 Image 10 Image 11 Image 12...
  • Seite 40 Image 13 Image 14 Image 15 Image 16 Image 17 Image 18...
  • Seite 41 Image 19...
  • Seite 42 Félicitations Vous avez décidé d‘acheter un produit du fabricant Kaps 3 afin que votre enfant voyage en toute sécurité jusqu‘à ses 3 ans. Vous avez ainsi fait un très bon choix. La grande qualité des matériaux et la finition du travail vous garantissent une utilisation agréable de votre landau Kaps 3.
  • Seite 43: Guide D'entretien

    Guide d‘entretien entretien des textiles Nettoyer les pièces, qui sont légèrement salies avec une brosse douce ou à l‘eau clair Utilisez une lessive douce pour faire partir les tâches les plus tenaces. Ne pas utiliser d‘eau de javel. Toutes les pièces amovibles sont lavables en machine à 30° avec une lessive douce Si le landau est détrempé...
  • Seite 44 Montage de la poussette-landau Le montage de la poussette-landau : doit être effectué par un adulte 1.) Sortez la poussette-landau de son packaging 2.) Mettez de côté tous les accessoires, comme la nacelle, le panier à provisi ons etc.. 3.) Positionnez le landau sur l‘axe - Regardez l‘image 1 4.) Mettez vous devant le landau - la capote et l‘armature doivent se trouver directement devant vous 5.) Posez votre pied sur les freins...
  • Seite 45 Positionnez le couvre-jambes sur le hamac Flash en utilisant le zip Mise en place de la suspension 1.) le City driver vous a été livré avec un niveau mou de suspensions 2.) Pour durcir les suspensions vous devez tournez le loquet, qui se trouve sous chaque suspension sur les côtés intérieurs des roues - Regardez...
  • Seite 46 Filet d‘aération 1.) Ouvrez la femeture éclaire située sur la capote pour mettre en place le filet d‘aération 2.) le zip fait le tour enier de la capote Transformation en poussette 1.) enlevez la nacelle 2.) écarter l‘extension du hamac 3.) attachez la ceinture ventrale de sécurité...
  • Seite 47 Mise en place du baby coque en option 1.) Enlevez le duvet-nacelle, l‘extension du hamac et le harnais 2.) Déverouillez maintenant le kit de fixation, situé à droite et à gauche du châssis- Cf image 17 3.) Sur les côtés du baby coque vous trouverez un adaptateur- Regardez l‘image 18 4.) Positionner le baby coque et fixez le, vous entendrez un clic caractéristique- consultez l‘image 19...
  • Seite 48 Les dommages couverts ou non par la garantie ... La rouille Le véhicule est traité anti-rouille Il peut arriver sans qu‘on y prenne garde, que la rouille s‘installe nous ne garantissons pas le véhicule contre la rouille Les raillures Les raillures sont une cause naturelle d‘usure Elles ne seront pas prises en charge par la garantie Mold croissance: Certains textiles humides doivent être séchés avec soin.
  • Seite 49 gonflage des pneux Les anneaux de freinage sur les roues sont considérés comme des p ièces d‘usure Cela n‘est pas couvert par la garantie Glisser vers la gauche et à droite du cadre: la poussette landau ne possède par de roue directrice qui facilite la direction Lorsque vous souhaitez effectuer un changement de direction, posez les deux mains sur le guidon pour mieux manoeuvrer votre poussette...
  • Seite 50 www.babies-on-wheels.com Copyright by F.K. Company...

Diese Anleitung auch für:

Flash