Shuttle NS02 V2 Serie Kurzanleitung
Quicklinks
53R-NS02V3-2002
The unit can be operated at an ambient temperature of max. 40°C (104°F).
!
Do not expose it to temperatures below 0°C (32°F) or above 40°C (104°F).
本產品最高操作溫度為 40°C (104°F)。請勿在低於 0°C (32°F) 或高於 40°C (104°F) 的環境中使用本產品。
Das Gerät darf bis zu einer maximalen Umgebungstemperatur von 40°C (104°F) betrieben werden.
Setzen Sie das Gerät nicht Temperaturen von unterhalb 0°C (32°F) bzw. oberhalb 40°C (104°F) aus.
L'appareil peut être utilisé à une température ambiante maximum de 40°C (104°F).
Ne pas exposer l'appareil à une température inférieure à 0°C (32°F) ou supérieure à 40°C (104°F).
No utilice la unidad cuando la temperatura ambiente sea superior a 40°C (104°F).
No someta el equipo a temperaturas inferiores a 0°C (32°F) ni superiores a 40°C (104°F).
本機器は周辺温度 40°C (104°F) までの環境で捜査することができます。
0°C (32°F) 未満あるいは 40°C (104°F) を超える環境で使用しないでください。
Устройство может работать при температуре окружающей среды макс. 40°C (104°F).
Не подвергайте воздействию температуры ниже 0°C (32°F) или выше 40°C (104°F).
本机运行时环境温度最高不能超过 40°C (104°F)。请勿在温度低于 0°C (32°F) 或高于 40°C (104°F) 的情况下使用。
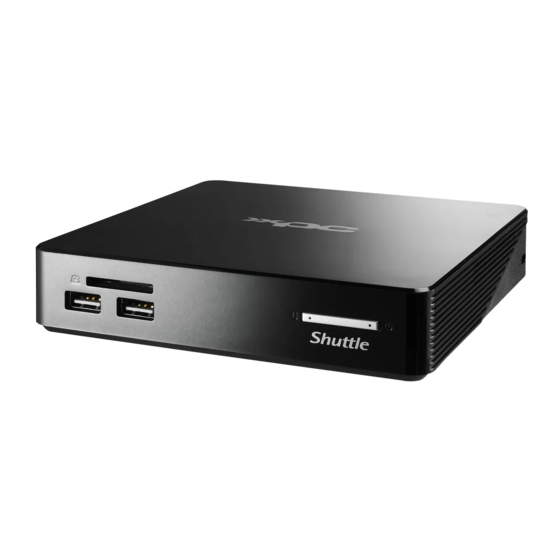
產品外觀 Produktübersicht Aperçu du produit
Product Overview
Relación de productos 製品概要 Обзор продукта 产品概述
5
1
2
3
4
10
4
6
7
8
4
9
1. SD Card Reader
2. HDD LED
SD 讀卡槽
硬碟指示燈
SD-Cardreader
Festplatten-LED
Lecteur de cartes SD
Voyant disque dur
Lector de tarjetas SD
LED de disco duro (HDD)
SD カードリーダー
ハードディスクドライブ LED
SD считыватель карт
LED-индикатор жесткого диска
SD 读卡器
硬盘指示灯
3. Power Button / Status LED \ 電源按鈕 / 電源狀態指示燈
Einschaltknopf / Status-LED
Bouton de mise sous tension / Status LED
Botón de encendido / LED de estado
電源ボタン / ステータス LED \ 电源按钮 / 状态 LED
Кнопка питания / LED-индикатор питания
4. USB 2.0 (x4)
- When the system is shut down in AC mode,
the power rating of the USB 2.0 ports is 500mA.
(Do not connect other storage devices via a USB hub.)
- 當系統關機並插著電源供應器, 四個USB 2.0接口都可提供
每個500毫/安培的電壓。(不要透過USB轉接器連接任何裝置)
- Bei ausgeschaltetem System lassen sich Geräte
über die USB 2.0 Anschlüsse mit bis zu 500mA aufladen.
Verbinden Sie keine USB-Speicher über einen USB-Hub.
- Le système éteint peut charger des appareils via
les ports USB 2.0 jusqu'à 500mA. Ne branchez
aucun autre appareil de stockage via USB-Hub.
- Con el sistema apagado se pueden cargar los
dispositivos con hasta 500 mA mediante las
conexiones USB 2.0. No conecte ninguna
memoria USB a través de un concentrador USB.
- USB 2.0 ポートは、システムの電源がオフの時でも
定格電力500mAで充電することができます。USBハ
ブを介して他の記憶装置に接続しないで下さい。
- Когда система выключена в режиме переменного тока,
номинальная мощность портов USB 2.0 составляет 500 мА.
( Не подключайте другие устройства хранения через USB
концентратор.)
- 当系统关机并插着电源供应器, 四个USB 2.0端口都可提供
每个500毫/安培的电压。(不要透过USB转接器连接任何装置)
Incorrectly replacing the battery may damage this computer. Replace only with the same or equivalent as recommended
!
by Shuttle. Dispose of used batteries in accordance with the laws of your country.
更換電池方式錯誤可能會損壞本電腦以及引發爆炸、火災或
其他危險。僅能依 Shuttle的建議,以相同或同等的電池更換。
請根據您所在國家/地區的法律規定處理廢電池。
Das unkorrekte Austauschen der Batterie kann diesen
Computer beschädigen. Ersetzen Sie die Batterie nur
durch den gleichen Typ oder ein gleichwertiges, von Shuttle
empfohlenes Modell. Entsorgen Sie gebrauchte Batterien
gemäß den gesetzlichen Vorschriften in Ihrem Land.
Ne pas replacer correctement la pile peut endommager
l'ordinateur. Remplacez-la uniquement par un modèle
identique ou un équivalent comme recommandé par
Shuttle. Éliminez les piles usagées conformément à la
législation en vigueur dans votre pays.
La sustitución incorrecta de la batería puede dañar este
NS02A V2 / NS02E V2
Quick Start Guide
快速安裝指南
Kurzanleitung
Guide rapide
Guía de inicio rápido
クリックスタートガイド
Kраткое руководство
快速安装指南
Copyright © 2024, Shuttle Corporation. All Rights Reserved
5. Kensington
Lock Hole
®
Kensington
標準防盜鎖孔
®
Kensington
Lock Öffnung
®
Encoche de sécurité Kensington
Conector de seguridad Kensington
ケンジントンロック用ホール
Отверстие для замка Kensington
Kensington
标准防盗锁孔
®
6. Power Jack (DC IN) \ DC 電源連接埠
DC-Stromanschluss \ Prise alimentation DC
Conexión de la fuente de alimentación (CC)
DC 電源ポート \ 电源插孔 (直流电输入)
Гнездо для подключения питания (DC IN)
7. HDMI Port \ HDMI 連接埠
HDMI-Anschluss \ Prise HDMI
Puerto HDMI \ HDMI ポート
HDMI порт \ HDMI 端口
8. NS02A V2:
8. NS02E V2:
LAN Port
LAN port with PoE
網路連接埠
網路連接埠 PoE 供電
LAN-Anschluss
Netzwerk-Port mit PoE
12
Port Lan
Port réseau avec PoE
Conector LAN
Puerto de red con PoE
11
LAN ポート
PoE LANポート
Сетевые LAN-порт
LAN порт с PoE
网络端口
LAN 端口 PoE 供电
9. Headphones / Line-out Jack
耳機孔 / 音源輸出埠
Kopfhörer / Line-out Anschluss
Prise casque / Sortie audio
Conexión para auriculares / salida de audio
ヘッドフォン / ラインアウト
Наушники / Аудио разъем
耳机孔 / 音源输出埠
10a. Connector for external power button
外部電源按鈕連接器
Anschluss für externen Power Button
Connexion pour bouton d'alimentation externe
Conector para el botón de alimentación externa
外部電源スイッチ用コネクタ
Разъем для внешней кнопки питания
外部电源按钮连接器
10b. Recovery Mode
復原模式
Recovery Modus
Mode de récupération
Modo de recuperación
リカバリーモード
Режим восстановления
恢复模式
11. Perforation for optional WLAN
無線網路卡天線預留孔
Perforation für optionale WLAN-Antenne
Perforations pour Antenne Wi-Fi
Perforación para antena WLAN opcional
WLAN(オプション)用穴
Отверстие для дополнительного WLAN
无线网络卡天线预留孔
12. Thermal Vent \ 散熱孔 \ Belüftungsöffnung
Grilles d'aération \ Aberturas de ventilación
通気孔 \
Вентиляционное отверстие
equipo. Sustituya la batería únicamente por una igual o equivalente
recomendada por Shuttle. Elimine las pilas usadas de acuerdo con
los requisitos legales de su país.
バッテリを間違ってセットすると、このコンピュータが損傷する原
因となります。交換する際は、Shuttle が推奨するバッテリと同じも
のまたは同等のものだけを使用するようにしてください。使用済み
のバッテリーは、お住みの国の法律に従って処分してください。
Неправильная замена батареи может привести к повреждению
компьютера. Батарея должна соответствовать стандарту
производителя Shuttle или быть идентичной предыдущей.
Утилизируйте использованные батареи в соответствии с
законодательством вашей страны.
更换电池方式错误可能会损坏本电脑。仅能依 Shuttle 的建议, 以相同
或同等的电池更换。请根据您所在国家/地区的法律规定处理废电池。
Package Contents
VESA Mount (optional)
Installation of VESA
Mount (optional)
Follow the steps 1-3 to install the VESA mount.
請按照步驟 1-3 安裝 VESA 掛架。
Bitte folgen Sie den Schritten 1-3, um die
VESA-Halterung zu installieren.
Suivez les étapes 1-3 pour installer le support VESA.
®
®
®
Supports 75x75mm and
!
100x100mm VESA standard.
支援 75x75mm 及 100x100mm VESA 標準規格。
Unterstützt die VESA-Standards
75x75mm und 100x100mm.
Compatible avec les formats VESA
75x75mm et 100x100mm.
Soporta los estándares VESA
75x75mm y 100x100mm.
75x75mm および 100x100mm の VESA 規格に対応。
Поддерживает стандарт VESA 75x75 и 100x100мм.
支持 75x75mm 及 100x100mm VESA 标准规格。
Connecting to Power
DC-IN
1
10a
10b
This device complies with Part 15 of the FCC Rules. Operation is subject to the following two conditions:
(1) this device may not cause harmful interference, and (2) this device must accept any interference received,
including interference that may cause undesired operation.
This device meets the requirements for the EU conformity in accordance to the currently valid EU directives.
Dieses Produkt erfüllt die Anforderungen für die EU-Konformität entsprechend der aktuell geltenden EU-Richtlinien.
Ce produit répond aux exigences de la conformité UE suivant les directives européennes actuellement en vigueur.
All bundled parts, power cord
(optional)
included, shall not be used
without this product.
電源ケーブル等、すべての付属品は
本機以外ではご使用になれません。
2000m
\ 通风口
注意: 仅适用于海拔 2000m
以下安全使用,
在海拔 2000m 以上使用时,
可能有安全隐患。
注意: 仅适用于在非热带
气候条件下安全使用,
在热带气候条件下使用时,
可能有安全隐患。
注意: 允许产品使用的最高
环境温度为 40℃。
* The equipment was evaluated
for use in a maximum air ambient
temperature of 40 ºC.
產品宣告最大適用環境溫度為 40 ºC。
包裝內容物 Packungsinhalt Contenu Contenido de la caja
パッケージ内容 Комплект поставки 包装内容
Power adapter only with NS02A V2.
僅適用於 NS02A V2 的電源適配器。
Das Netzteil ist nur bei NS02A V2 enthalten.
Bloc d'alimentation inclus uniquement avec le NS02A V2.
La fuente de alimentación solo se incluye con NS02A V2.
NS02A V2 のみの電源アダプタ。
M4*10 (x4)
Адаптер питания только с NS02A V2.
M2.5*3 (x2)
仅适用于 NS02A V2 的电源适配器 。
VESA 掛架安裝 (選配) Installation der VESA-Halterung (optional)
Installation du support VESA (optionnel) Instalación del soporte VESA (opcional)
VESA マウントの取り付け (オプション) VESA 挂架安装 (可选)
Установка крепления VESA (опционально)
Siga los pasos 1-3 para instalar el soporte VESA.
手順 1-3 に従ってVESAマウントを取り付けます。
Выполните шаги 1-3, чтобы установить
крепление VESA.
请按照步骤 1-3 安装 VESA 挂架。
1
2
M2.5*L3
M4*L10
3
電源連接 Anschließen des Stromkabels Branchement au secteur
Conectar a la alimentación 電源への接続 Подключение к питанию 电源连接
2
THIS PRODUCT CONTAINS A BUTTON BATTERY
WARNING
If swallowed, a lithium button battery can cause severe or fatal
injuries within 2 hours. Keep batteries out of reach of children.
If you think batteries may have been swallowed or placed
inside any part of the body, seek immediate medical attention.
1. The statement "remove and immediately recycle or dispose
of used batteries according to local regulations and keep away
from children. Do NOT dispose of batteries in household trash
or incinerate."
(a) Remove and immediately recycle or dispose of used batteries
according to local regulations and keep away from children.
Do NOT dispose of batteries in household trash or incinerate.
(b) Even used batteries may cause severe injury or death.
(c) Call a local poison control center for treatment information.
(d) Indicating the compatible battery type CR2032.
(e) Indicating the nominal battery voltage.
(f) Non-rechargeable batteries are not to be recharged.
(g) Do not force discharge, recharge, disassemble, heat above (manufacturer's
specified temperature rating) or incinerate. Doing so may result in injury
due to venting, leakage or explosion resulting in chemical burns.
2. This Product contains a button Battery/coin cell batteries
(a) Ensure the batteries are installed correctly according to polarity (+ and -).
(b) Do not mix old and new batteries, different brands or types of batteries,
such as alkaline, carbon-zinc, or rechargeable batteries.
(c) Remove and immediately recycle or dispose of batteries from equipment
not used for an extended period of time according to local regulations.
(d) Always completely secure the battery compartment. If the battery
compartment does not close securely, stop using the product,
remove the batteries, and keep them away from children.
This side
UP!
3
WARNING

Verwandte Anleitungen für Shuttle NS02 V2 Serie


Inhaltszusammenfassung für Shuttle NS02 V2 Serie
- Seite 1 Incorrectly replacing the battery may damage this computer. Replace only with the same or equivalent as recommended (d) Indicating the compatible battery type CR2032. by Shuttle. Dispose of used batteries in accordance with the laws of your country. (e) Indicating the nominal battery voltage.
- Seite 2 A. Begin Installation \ 開始安裝 \ Beginn der Installation \ Commencer l’installation 4. Pull up two latches of “HDD1” first, then plug the HDD/SSD cable to “HDD1” and slide two latches into the lock position. Iniciar la instalación \ 开始安装 \ 取り付けの開始 \ Начало установки 先拉起”HDD1”插槽兩側卡榫, 安裝硬碟排線於”HDD1”插槽, 並往下壓至兩側卡榫完全定位。...