TiSUN PFM-S Montageanleitung
1-reihig

Verwandte Anleitungen für TiSUN PFM-S


Inhaltszusammenfassung für TiSUN PFM-S
- Seite 1 Montageanleitung für PFM-S Indach (1-reihig) Installation instructions for PFM-S in-roof (1-row) Istruzioni di montaggio per PFM-S nel tetto (a 1 fila) Instruções de montagem para PFM-S incorporado (1 linha) Montagehandleiding voor PFM-S Indach (1-rij) Art.Nr. 1015840...
- Seite 2 We should like to take this opportunity to thank you sincerely for buying a TiSUN® product. Our name is our guarantee for the high quality and durability of our products. Only authorised specialist companies familiar with our products may handle and install them. Errors and omissions excepted. The General Terms and Conditions published by TiSUN GmbH in their latest version shall apply.
- Seite 3 Der Hersteller verpflichtet sich hiermit, die mit dem Umweltzeichen gekennzeichneten Pro- Bei Dachmontagen vorschriftsmäßige personenunabhängige Absturzsicherungen oder dukteund die darin eingesetzten Materialien zurückzunehmen und einer Wiederverwertung Auffangeinrichtungen nach DIN 18338 Dachdeckungs- und Dachdichtungsarbeiten und nach DIN 18451 Gerüstarbeiten mit Sicherheitsnetz unbedingt vor Arbeitsbeginn! Bauarbei- zuzuführen.
- Seite 4 Prefácio Gostaríamos de o felicitar pela compra de um produto da marca TiSUN®. Com o nosso nome garantimos uma elevada qualidade e uma longa vida útil dos nossos produtos. Apenas empresas concessionadas especializadas, que conhecem os nossos produtos, podem processar e montá-los! Não assumimos qualquer tipo de responsabilidade pela veracidade e integridade do conteúdo. São válidas as condições gerais de negócio da TiSUN GmbH na versão actual.
- Seite 5 O fabricante compromete-se pela presente, em aceitar de volta os produtos e os materiais No caso de montagens em telhados, antes de iniciar os trabalhos instalar rigorosamente equi- neles aplicados, identificados com o símbolo do ambiente, e de os enviar para reciclagem. pamentos de protecção contra quedas em altura ou dispositivos anti-queda regulamentares Apenas deverá...
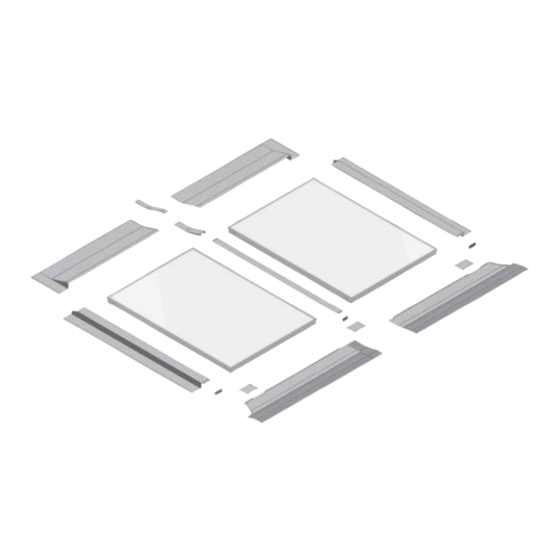
- Seite 6 Einfassung Einzelkollektor // Surround, single collector Dotazione del collettore singolo // Guarnição, colector individual // Omlijsting enkele collector Pos. 2.01 2.55 3.30 75014 75014 75014 75150 75150 75150 75111 75121 75131 75113 75123 75133 75155 75155 75155 75064 75064 75064 75094 75094 75094...
- Seite 7 Einfassung Grundset // Surround, basic kit Dotazione del kit di base // Guarnição, kit básico // Omlijsting basisset Pos. 2.01 2.55 3.30 75011 75011 75011 75013 75013 75013 75150 75150 75150 75111 75121 75131 75113 75123 75133 75125 75135 75145 75155 75155 75155...
- Seite 8 Einfassung Erweiterungsset // Surround, add-on kit Dotazione del kit di ampliamento // Guarnição, kit de alargamento // Omlijsting uitbreidingsset Pos. 2.01 2.55 3.30 75012 75012 75012 75150 75150 75150 75125 75125 75125 75152 75152 75152 Pos. 2.01 2.55 3.30 75080 75080 75080 75082...
- Seite 9 Teilliste // Parts list Elenco delle parti // Lista de peças // Onderdelenlijst Traufblech links Seitenteil links Eaves flashing, left Sidepiece, left Scossalina sinistra Parte laterale sinistra Chapa de beiral esquerda Peça lateral esquerda Dakgoot links Zijgedeelte links 75011 2.01 (75111) | 2.55 (75121) | 3.30 (75131) Traufblech Einzelkollektor Seitenteil rechts Eaves flashing, single collector...
- Seite 10 Teilliste // Parts list Elenco delle parti // Lista de peças // Onderdelenlijst 23°-70° 15°-23° Stützblech 23° Stützblech 15° Support plate 23° Support plate 15° Lamiera di sostegno 23° Lamiera di sostegno 15° Chapa de apoio 23° Chapa de apoio 15° Steunplaat 23°...
-
Seite 11: Werkzeuge // Tools
Befestigungsmaterial // Fixing materials Materiale di fissaggio // Material de fixação // Bevestigingsmateriaal Spenglerschraube 4,5 x 25 mm Senkkopfschraube M5x25 mit Dichtung Spengler screw 4.5 x 25 mm Countersunk screw M5x25 with seal Vite da lattoniere 4,5 x 25 mm Vite a testa svasata M5x25 con guarnizione Parafuso para fachadas 4,5 x 25 mm Parafuso de cabeça escareada M5x25 com disco vedante... - Seite 12 Montage // Installation 15° - 23° 23° - 70° Montaggio // Montagem // Montage ∢ ∢ 23°-70°: 360 mm 15°-23°: 470 mm 230 mm 280 mm...
- Seite 13 Montage // Installation 15° - 23° 23° - 70° Montaggio // Montagem // Montage Alle Dachlatten sind im Bereich des Kollektorfeldes mit Holz- schrauben (mind. 5 x 80 mm) zu verschrauben. Die Schrauben sind nicht Bestandteil der Einfassung! All roof battens in the area of the collector array are to be screwed using woodscrews (at least 5 x 80 mm).
- Seite 14 Montage // Installation 15° - 23° 23° - 70° Montaggio // Montagem // Montage Zur Montage der Traufbleche sind zwei zusätzliche Dachlatten (gleiche Dimension wie bestehende Dachlattung) über die Hilfslatte gesamte Anlagenbreite zu montieren. Die Dachlatten sind Auxiliary batten nicht Bestandteil der Einfassung! Listelli ausiliari Ripas auxiliares Two additional roof battens (same dimension as the existing...
- Seite 15 Montage // Installation 15° - 23° 23° - 70° Montaggio // Montagem // Montage Die Traufbleche werden von links nach rechts montiert. An dem linken Traufblech befindet sich eine Markierung, die die Ziegelkante anzeigt. Richten Sie das Traufblech so aus, um links keine Ziegel schneiden zu müssen.
- Seite 16 Montage // Installation 15° - 23° 23° - 70° Montaggio // Montagem // Montage Markierung Mark Marcatura Marca Markering...
- Seite 17 Montage // Installation 15° - 23° 23° - 70° Montaggio // Montagem // Montage PFM-S 2.01: 2 x PFM-S 2.55: 2 x PFM-S 3.30: 3 x PFM-S 2.01: 2 x PFM-S 2.55: 2 x PFM-S 3.30: 3 x Markierung Kollektorkante...
- Seite 18 Montage // Installation 15° - 23° 23° - 70° Montaggio // Montagem // Montage PFM-S 2.01: 2 x PFM-S 2.55: 2 x PFM-S 3.30: 3 x PFM-S 2.01: 2 x PFM-S 2.55: 2 x PFM-S 3.30: 3 x 08b, 08c...
- Seite 19 Montage // Installation 15° - 23° 23° - 70° Montaggio // Montagem // Montage Bei Großflächenanlagen sind die hydraulischen Verbinder bereits vormontiert. 1 Stk. Hydraulisches Erweiterungsset Bei der Modulausführung müssen die Verbinder separat bestellt werden. 2 Stk. PFM Verbinder mit O-Ringen HE-PFM HE-PFM (1040715) In large arrays the hydraulic connectors are already pre-installed.
- Seite 20 Montage // Installation 15° - 23° 23° - 70° Montaggio // Montagem // Montage Hydraulische Anbindung mit Fühlertauchhülse // Hydraulic connection with sensor pocket // Collegamento idraulico con boccola d’immersione del sensore // Conexão hidráulica com bucha de imersão por sensor // Hydraulische aansluiting op de sensordompelhuls PFM-Fitting –...
- Seite 21 Montage // Installation 15° - 23° 23° - 70° Montaggio // Montagem // Montage Anschlussmöglichkeiten Possibilidades de conexão Die Auswahl der Schemen muss unter Berücksichtigung der Gesamtanlage erfolgen (Art, Dimension und Os esquemas devem ser seleccionados tendo em conta a instalação global (tipo, dimensão e comprimento Länge der Anbindungsleitungen, Solarstation, Wärmetauscher, ...).
- Seite 22 Montage // Installation 15° - 23° 23° - 70° Montaggio // Montagem // Montage Lasche am linken und rechten Trauf- blech umbiegen! Bend the link around the left and right eaves flashing! Piegare la linguetta sulla scossalina sinistra e destra! Dobrar a aba nas chapas de beiral esquerda e direita! Lipje aan de linker- en rechter dakgoot...
- Seite 23 Montage // Installation 15° - 23° 23° - 70° Montaggio // Montagem // Montage 12c, 12d...
- Seite 24 Montage // Installation 15° - 23° 23° - 70° Montaggio // Montagem // Montage...
- Seite 25 Montage // Installation 15° - 23° 23° - 70° Montaggio // Montagem // Montage Hilfslatte Auxiliary batten Listelli ausiliari Ripas auxiliares Steunlatten Hilfslatte Auxiliary batten Listelli ausiliari Ripas auxiliares Steunlatten...
- Seite 26 Montage // Installation 15° - 23° 23° - 70° Montaggio // Montagem // Montage...
- Seite 27 Montage // Installation 15° - 23° 23° - 70° Montaggio // Montagem // Montage...
- Seite 28 Montage // Installation 15° - 23° 23° - 70° Montaggio // Montagem // Montage...
- Seite 29 Montage // Installation 15° - 23° 23° - 70° Montaggio // Montagem // Montage Das linke und rechte Firstblech wird mit je 2 Hafter an den Dachlatten befestigt und mit je einer Dichtniete mit dem Seitenteil vernietet. The left and right-hand ridge plate is fixed onto the roof battens with 2 tacks each and is riveted onto the sidepiece with one sealing rivet each.
- Seite 30 TiSUN GmbH | Stockach 100 | 6306 Söll, Austria Tel.: +43 (0) 53 33 / 201 - 0 | Fax: +43 (0) 53 33 / 201 - 100 | E-Mail: office@tisun.com...