Philips Saeco CA6801/00 Bedienungsanleitung
Cappuccinatore
Quicklinks
3
Inserire il tubo apirazione latte/acqua in un conteni-
IT
tore con circa 1/2 litro di acqua potabile.
Introduzione
4
Posizionare sotto il cappuccinatore un contenitore
Congratulazioni per l'acquisto e benvenuti in Philips!
adeguato ed erogare tutta l'acqua utilizzando la funzione
Per trarre il massimo vantaggio dall'assistenza Philips,
vapore.
registrate il vostro prodotto su www.philips.com/
Alla fi ne riportare la macchina in funzionamento nor-
welcome.
male.
Destinazione d'uso
Utilizzo del cappuccinatore
Il cappuccinatore è previsto esclu si va men te per l'impiego
Nota: per utilizzare il cappuccinatore si deve utilizzare la
do me sti co sulle seguenti macchine: Intelia Focus,
funzione vapore e quindi preparare la macchina in modo
tutti i modelli della famiglia Sintya (tranne la
appropriato seguendo le istruzioni riportate nel manuale
Syntia Cappuccino), tutti i modelli della famiglia
della stessa.
XSmall. È vietato apportare modifi che tec ni che e ogni
impiego illecito, a causa dei rischi che essi com por ta no!
Per l' e rogazione del vapore alcuni modelli possono essere
L'apparecchio non è destinato ad essere utilizzato da per-
dotati di pomello; fare riferimento al manuale della mac-
sone (compresi i bambini) con ridotte capacità fi siche,
china per il corretto utilizzo.
mentali o sensoriali o con esperienza e/o competenze
insuffi cienti, a meno che non siano sotto la supervisione
Per emulsionare il latte
di una persona responsabile della loro sicurezza o non
Pericolo di scottature! All'inizio dell' e rogazione possono
vengano da essa istruite sull'uso dell'apparecchio.
verifi carsi brevi spruzzi di acqua calda. Il tubo di erogazi-
one può raggiungere temperature elevate: evitare di toc-
Uso e Pulizia
carlo direttamente con le mani.
Il cappuccinatore può essere utilizzato esclusivamente
con latte e/o acqua potabile.; è vietato l'utilizzo con altri
Praparare la macchina per l' e rogazione del vapore.
liquidi.
Per una pulizia approfondita, il cappuccinatore può esse-
5 6
Posizionare un contenitore sotto al cappuc-
re disinnestato, smontato nei suoi componenti e messo
cinatore ed erogare vapore per circa 10 secondi; questo
in lavastoviglie (non professionale).
consente di eliminare residui di condensa presenti nel
I lavaggi in lavastoviglie potrebbero dare origine a fe-
circuito.
nomeni di opacizzazione della parte superfi ciale dei
Quando il getto di vapore sarà regolare terminare l' e ro-
componenti del cappuccinatore, specialmente in caso di
gazione.
detergenti aggressivi.
Questo fenomeno è da considerarsi normale e non ha
7
Posizionare il contenitore del latte a fi anco della
alcuna conseguenza sulla corretta funzionalità del cap-
macchina.
puccinatore stesso.
Assicurarsi che il tubo aspirazione latte/acqua sia pulito
Pericolo d'ustioni
anche esternamente.
Evitare di dirigere contro se stessi e/o altri il getto di va-
pore e/o d'acqua calda: pericolo di scottature! Usare
Immergere il tubo nel contenitore.
sempre le apposite maniglie o manopole.
8 9
Avviare l' e rogazione del vapore.
Il latte emulsionato verrà erogato direttamente nella
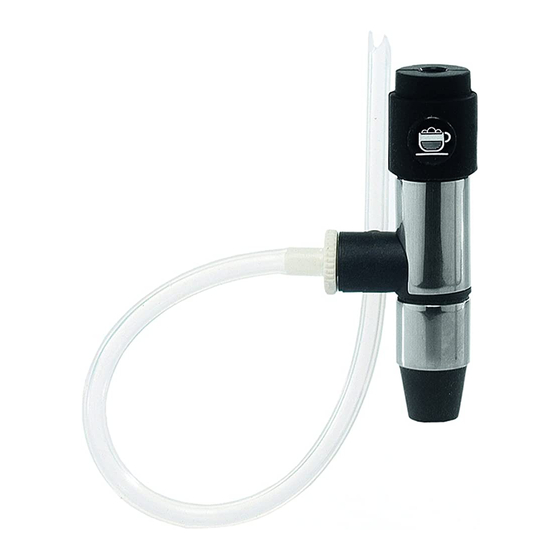
Descrizione generale (fi g.1)
tazza.
1. Foro per installazione nel tubo vapore
2. Raccordo per tubo aspirazione
Raggiunta la quantità desiderata di latte emulsionato,
3. Tubo aspirazione acqua/latte
terminare l' e rogazione.
4. Corpo cappuccinatore
5. Erogatore cappuccinatore
Dopo aver utilizzato il cappuccinatore procedere alla sua
pulizia come descritto nel capitolo "Pulizia e Manutenzi-
one".
Primo utilizzo
Erogazione Acqua calda
Lavaggio
Attenzione: all'inizio possono verifi carsi brevi spruzzi di
acqua calda: pericolo di scottature. Il tubo di erogazione
Prima del primo utilizzo e dopo l'utilizzo quotidiano, il
dell'acqua calda può raggiungere temperature elevate:
cappuccinatore deve essere lavato accuratamente per
evitare di toccarlo direttamente con le mani.
eliminare ogni traccia di impurità o di latte.
Lavare e pulire bene il tubo vapore sul quale deve essere
Praparare la macchina per l' e rogazione dell'acqua calda.
installato il cappuccinatore.
10
Installazione
Rimuovere il perno con il tubo di aspirazione dal
cappuccinatore.
Attenzione! L'installazione del cappuccinatore deve esse-
re fatta a macchina spenta e con il tubo vapore freddo.
11 12
Inserire un contenitore sotto al cappuccinatore.
2
Inserire il cappuccinatore nel tubo vapore fi no a
Erogare la quantità desiderata di acqua calda.
battuta per evitare che possa sfi larsi durante l'utilizzo.
Quando è stata raggiunta la quantità desiderata, fermare
l' e rogazione.
Dopo aver installato il cappuccinatore accendere la mac-
china da caff è.
1
2
3
1
4
2
3
5
12
13
Pulizia e manutenzione
Pulizia Cappuccinatore (Dopo ogni utilizzo)
Introduction
Il cappuccinatore deve essere pulito dopo ogni utilizzo
Congratulations on your purchase and welcome to Philips!
per evitare che tracce di latte rimangano ed alterino il
To fully benefi t from the support that Philips off ers, regis-
gusto nelle successive preparazioni.
ter your product at www.philips.com/welcome.
Per eseguire la pulizia, aspirare dell'acqua come descritto
Intended Use
nel paragrafo "Installazione".
The Cappuccinatore is intended for domestic use only
with the following machines: Intelia Focus, all Syntia
Pulizia mensile cappuccinatore (approfon-
family models (except for the Syntia Cappuccino),
dita)
all XSmall family models. Do not make any technical
Mensilmente procedere con una pulizia accurata di tutti
changes or use the machine for unauthorised purposes
i componenti del cappuccinatore utilizzando il deter-
since this would create serious hazards! The appliance
gente Philips Saeco che può essere acquistato presso il
is not to be used by persons (including children) with
vostro rivenditore locale, nel negozio on-line Philips su
reduced physical, mental or sensory abilities or with
http://shop.philips.com o presso i centri di assistenza
scarce experience and/or expertise, unless they are su-
autorizzati.
pervised by a person responsible for their safety, or they
are instructed by this person on how to properly use the
13
Riempire un contenitore con circa 500 ml di acqua
machine.
tiepida.
Maintenance and Cleaning
Versare una bustina di soluzione nell'acqua appena ver-
The Cappuccinatore should only be used with milk and/
sata ed attendere che si sciolga completamente.
or drinking water. The use of other liquids is prohibited.
For thorough cleaning, the Cappuccinatore can be de-
Preparare la macchina per l' e rogazione del vapore come
tached and disassembled and then put in a dishwasher
descritto nel manuale.
(not professional type).
The washing process in the dishwasher may cause the
Immergere il tubo di aspirazione latte/acqua nel conteni-
surface of the Cappuccinatore parts to tarnish, especially
tore con la soluzione.
if aggressive detergents are used.
This is normal and does not aff ect the correct operation
14
Posizionare un contenitore vuoto sotto al cappuc-
of the Cappuccinatore in any way.
cinatore.
Danger of Burns
Erogare tutta la soluzione attraverso il cappuccinatore.
Never direct the jet of steam and/or hot water towards
yourself or others: Danger of burning! Always use the
È vietato bere la soluzione erogata in questo processo. La
handles or knobs provided.
soluzione deve essere buttata.
15
Terminata l' e rogazione, lavare bene il contenitore
General Description (fi g. 1)
e riempirlo con acqua fresca potabile che sarà utilizzata
per il risciacquo.
1. Hole for installation in the steam wand
2. Suction tube coupling
Immergere il tubo di aspirazione acqua/latte nel conte-
3. Water/milk suction tube
nitore dell'acqua.
4. Cappuccinatore body
5. Cappuccinatore spout
16
Posizionare un contenitore vuoto sotto al cappuc-
cinatore.
First Use
Erogare tutta l'acqua di risciacquo.
Wash
Al termine dell' e rogazione spegnere la macchina.
Upon fi rst use and after daily use, the Cappuccinatore
17
Quando la macchina è fredda, smontare il tubo di
should be washed thoroughly in order to remove any
aspirazione.
impurity or milk residue.
18
Estrarre il cappuccinatore dalla macchina.
The steam wand on which the Cappuccinatore is to be
installed, should be washed and cleaned thoroughly.
19
Smontare tutti i componenti mostrati in fi gura.
Installation
20
Lavare i componenti con acqua tiepida o in lava-
Warning! The Cappuccinatore must be installed with the
stoviglie.
machine off and the steam wand cooled down.
21
Onde evitare malfunzionamenti, la parte di innesto
2
Insert the Cappuccinatore in the steam wand until
nel cappuccinatore deve essere perfettamente pulita.
it locks into place. This is to prevent it from slipping off
Si prega di pulire con un panno umido abrasivo.
during operation.
Dopo averli accuratamente lavati, rimontare i particolari.
After installing the Cappuccinatore, turn on the coff ee
Successivamente montare il cappuccinatore sulla mac-
machine.
china.
4
5
6
7
14
15
16
17
3
Insert the milk/water suction tube in a container
Cleaning and Maintenance
EN
with 1/2 litre of drinking water.
4
Place a suitable container under the Cappuccinatore
The Cappuccinatore should be cleaned after each use in
and use the steam function to dispense all the water.
order to remove any milk residue which may alter the
Then bring the machine back to its normal operation.
taste of the following preparations.
Clean it by sucking water as described in the "Installa-
Using the Cappuccinatore
tion" section.
Note: Using the Cappuccinatore requires using the steam
function. For this reason, the machine should be arranged
properly by following the instructions in the machine
manual.
Every month, perform a thorough cleaning of all the Cap-
Some machine models are equipped with a knob for dis-
puccinatore parts using the Philips Saeco detergent that
pensing steam. For correct use please refer to the machine
can be purchased at your local dealer or at the Philips on-
manual.
line shop at http://shop.philips.com or at the authorised
service centres.
Frothing Milk
13
Danger of burning! Dispensing may be preceded by small
water.
jets of hot water. The wand may reach high tempera-
tures: Never touch it with bare hands.
Pour a solution bag in the water you have just prepared
and let it dissolve completely.
Arrange the machine for steam dispensing.
Arrange the machine for steam dispensing as described
5 6
Place a container under the Cappuccinatore
in the manual.
and dispense steam for about 10 seconds. This operation
allows removing condensation from the circuit.
Immerse the milk/water suction tube in the container
When the steam jet becomes regular, stop dispensing.
where the solution was poured.
7
Place the milk container near the machine, on its
14
side.
tore.
Make sure that also the external part of the milk/water
Dispense all the solution through the Cappuccinatore.
suction tube is clean.
Drinking the solution dispensed during this procedure
Immerse the tube in the container.
is strictly prohibited. The solution must be disposed of.
8 9
Start dispensing steam.
15
Frothed milk will be dispensed directly into the cup.
container thoroughly and fi ll it with fresh drinking water.
This will be used for rinsing.
When the desired quantity of frothed milk has been
reached, stop dispensing.
Immerse the water/milk suction tube in the water con-
tainer.
After use, the Cappuccinatore should be cleaned as de-
scribed in the "Cleaning and Maintenance" section.
16
tore.
Dispensing Hot Water
Dispense all the rinsing water.
Warning: At the beginning, short spurts of hot water may
At the end of the dispensing procedure, turn off the
come out. Risk of burning. The hot water wand may reach
machine.
high temperatures: Do not touch it with bare hands.
17
Arrange the machine for hot water dispensing.
suction tube.
10
Remove the pin with the suction tube from the Cap-
18
puccinatore.
19
11 12
Place a container under the Cappuccinatore.
20
Dispense the desired amount of hot water.
When the desired quantity has been reached, stop dis-
washer.
pensing.
21
clean to avoid malfunctions.
Clean with an abrasive damp cloth.
Clean thoroughly and reassemble the parts. Then, reas-
semble the Cappuccinatore on the machine.
8
9
10
18
19
20
DE
Cleaning the Cappuccinatore (After Each Use)
Einführung
Herzlichen Glückwunsch zu Ihrem Kauf und willkommen
bei Philips!
Um den Support von Philips optimal zu nutzen, regi-
strieren Sie Ihr Produkt bitte unter www.philips.com/
welcome.
Sachgemäßer Gebrauch
Der Cappuccinatore ist ausschließlich zur Verwendung
Cappuccinatore - Monthly Cleaning (Thor-
im Haushalt für die folgenden Maschinen vorgesehen:
ough Cleaning)
Intelia Focus, alle Modelle der Syntia-Linie (außer
Syntia Cappuccino), alle Modelle der Xsmall-Linie.
Technische Änderungen und unsachgemäßer Gebrauch
sind wegen der damit verbundenen Risiken verboten!
Die Maschine ist nicht dazu bestimmt, von Personen
(einschließlich Kindern) mit eingeschränkten körperli-
chen oder geistigen Fähigkeiten oder einer Beeinträch-
Fill a container with about 500 ml of lukewarm
tigung der Sinnesorgane und/oder von Personen ohne
ausreichende Erfahrung oder Kompetenz verwendet zu
werden, es sei denn, sie werden von einer Person über-
wacht, die für ihre Sicherheit verantwortlich ist oder sie
werden im Gebrauch der Maschine geschult.
Gebrauch und Reinigung
Der Cappuccinatore ist ausschließlich mit Milch oder
Trinkwasser zu verwenden; andere Flüssigkeiten dürfen
nicht verwendet werden.
Für eine gründliche Reinigung kann der Cappuccinatore
entfernt, in seine Einzelteile zerlegt und in den Geschirr-
Place an empty container under the Cappuccina-
spüler (keine Gewerbespülmaschine) gelegt werden.
Durch die Reinigung in der Spülmaschine kann es zur
Mattierung der Oberfl ächen der Cappuccinatore-Teile
kommen, insbesondere bei der Verwendung von aggres-
siven Reinigungsmitteln.
Dies ist eine ganz normale Erscheinung und hat keine
negative Auswirkung auf die korrekte Funktionsweise
des Cappuccinatore selbst.
At the end of the dispensing procedure, wash the
Verbrühungsgefahr
Den Heißwasser- und/oder Dampfstrahl keinesfalls auf
sich und/oder andere Personen richten: Verbrühungs-
gefahr! Stets die entsprechenden Griff e oder Drehknöp-
fe benutzen.
Place an empty container under the Cappuccina-
When the machine has cooled down, remove the
Remove the Cappuccinatore from the machine.
Remove all the parts shown in the fi gure.
Wash the parts with lukewarm water or in the dish-
The Cappuccinatore coupling should be perfectly
11
21
Allgemeine Beschreibung (Abb. 1)
1. Öff nung zur Installation in der Dampfdüse
2. Anschluss für Ansaugschlauch
3. Wasser-/ Milchansaugschlauch
4. Hauptteil Cappuccinatore
5. Auslauf Cappuccinatore
Erste Verwendung
Reinigung
Vor der ersten Verwendung und nach dem täglichen
Gebrauch ist der Cappuccinatore gründlich zu spülen,
damit sämtliche Verunreinigungen oder Milchrückstän-
de entfernt werden.
Die Dampfdüse, auf die der Cappuccinatore montiert
wird, ist gründlich zu spülen und zu reinigen.
Installation
Achtung! Bei der Installation des Cappuccinatore muss
die Maschine ausgeschaltet und die Dampfdüse kalt sein.
2
Den Cappuccinatore auf die Dampfdüse setzen und
ihn bis zum Anschlag schieben, um zu vermeiden, dass er
sich beim Gebrauch löst.
Die Kaff eemaschine nach der Installation des Cappucci-
natore einschalten.
3
Den Wasser-/Milchansaugschlauch in einen Behäl-
ter, der mit ca. 1/2 Liter Trinkwasser gefüllt ist, einführen.
4
Ein geeignetes Gefäß unter den Cappuccinatore
stellen und über die Dampff unktion das gesamte Wasser
aus dem Auslauf austreten lassen.
Anschließend die Maschine wieder in den normalen Be-
triebszustand zurücksetzen.
Verwendung des Cappuccinatore
Hinweis: Zur Verwendung des Cappuccinatore ist die
Dampff unktion zu benutzen und die Maschine daher ent-
sprechend unter Befolgung der Anweisungen in der Bedie-
nungsanleitung vorzubereiten.

Inhaltszusammenfassung für Philips Saeco CA6801/00
- Seite 1 Some machine models are equipped with a knob for dis- damit sämtliche Verunreinigungen oder Milchrückstän- gente Philips Saeco che può essere acquistato presso il puccinatore parts using the Philips Saeco detergent that impiego illecito, a causa dei rischi che essi com por ta no! is not to be used by persons (including children) with Technische Änderungen und unsachgemäßer Gebrauch...
- Seite 2 1/2 litre d’ e au potable. un recipiente con aproximadamente 1/2 litro de agua mittels Philips Saeco vorzunehmen. Dieses ist bei Ihrem para ello el detergente Philips Saeco, que puede ser ad- Le Cappuccinatore doit être nettoyé après chaque bienvenue chez Philips ! Para obtener el máximo benefi cio de la asistencia Philips,...