Otto WF307072AAK Montageanleitung
Quicklinks
2
1
3
5
8
x2
Parts List
NO
ITEM
1
Head board
2
Crown
3
Head board legs
4
Siderails
Siderails
5
6
Foot board
Side rails support bar
7
Side rails support legs
8
9
Cross bar
Bed legs
10
11
Slats
ASSEMBLY INSTRUCTION
x2
3
4
7
5
9
8
7
x4
6
4
10
QTY
WF307072AAK
TIPS
1. Please read the instructions fully before
assembly.
important information which could ensure
correct assembly. We have been working on
providing high quality products for you.
However, in the rare instance that your
product is defective, missing parts or there
are some issues, please don't hesitate to
contact our customer service to submit parts
requirements,
warranty claims, and we will give the best
solution as soon as possible. If necessary, we
need you to provide some more clear pictures
of the issue.
2. Insert the screws in holes and tighten the
screws, but not too tight, 70%~80% is ok,
finally tighten all the screws. If some issues
happened that some screws can not target to
the hole or some parts are difficult to install,
please adjust the tightness of the screws.
3. 2 people are recommended to finish
Hardware List
NO
ITEM
A
Allen Key
1
Bolts (M8x40mm)
B
1
Bolts (M8x16mm)
D
2
E
Four hole iron
2
2
"7" Connector
F
1
H
Power adapter
4
I
Color controller
2
J
Nails (
1
K
2
L
Buckle
Bolts (M8x45mm)
12
M
These
instructions
assembly
suggestion,
11
x12
)
M3X16mm
include
or
QTY
1
14
32
1
4
1
1
1
24
12
4

Verwandte Anleitungen für Otto WF307072AAK


Inhaltszusammenfassung für Otto WF307072AAK
- Seite 1 ASSEMBLY INSTRUCTION WF307072AAK TIPS 1. Please read the instructions fully before assembly. These instructions include important information which could ensure correct assembly. We have been working on providing high quality products for you. However, in the rare instance that your...
- Seite 2 Attention: Do not tighten the screws before completing the entire installation If you have any difficulty with the installation process, please feel free to contact us. Step 1 x2 Fix the Head board legs to the headboard with Bolts M by using Allen key A,you can chose the hole a and c,or b and d or c and e.
- Seite 3 Step 4 x2 Fix the side rails support leg to the assembled side rail with Bolts D by using Allen key A. (Befestigen Sie das Stützbein der Seitengitter mit den Schrauben D und dem Inbusschlüssel A am zusammengebauten Seitengitter.) Allen Key D Bolts x 8 M8X16mm Step 5...
- Seite 4 Step 7 Fix the cross bar to the side rails support legs with Bolts B by using Allen key A (Befestigen Sie die Querstange mit den Schrauben B und dem Inbusschlüssel A an den Stützbeinen der Seitenschienen B Bolts x 2 Allen Key M8X40mm Step 8...
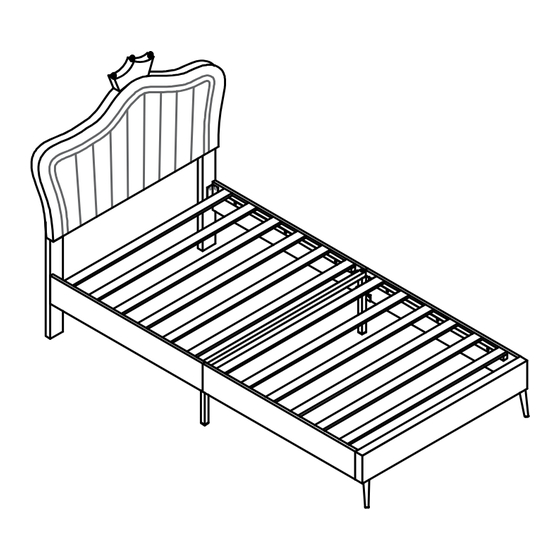
- Seite 5 Step 9 Fix the slats to the side support bar ,the assemble is finished. (Befestigen Sie die Lamellen an der seitlichen Stützstange , der Zusammenbau ist abgeschlossen.) Step 10 At first connect the two led of the headboard and bed frame.Please notice At second,put the color controller I to the light line,please notice that At third,Fix the power adapter H to the Color controller I.Finally connect the power and enjoy the bed.
- Seite 6 Brightness/Speed- Helligkeit/Geschwindigkeit- Brightness/Speed+ Helligkeit/Geschwindigkeit+ static mode button Colorful jump Taste für statischen Modus Bunter Sprung white light gradient weißer Lichtverlau colorful gradient unter Farbverlauf three color jump dreifarbiger Sprung NOTICE: When you use the remote control board to control the color of the light, Please remove the clear plastic card first,then please be sure to point the remote control at the color controller I.