Inhaltsverzeichnis
Werbung
Verfügbare Sprachen
Verfügbare Sprachen
Quicklinks
Werbung
Kapitel
Inhaltsverzeichnis

Inhaltszusammenfassung für Ecleree nuo 4.0
- Seite 1 USER MANUAL MANUAL DE INSTRUCCIONES MANUEL UTILISATEUR BEDIENUNGSANLEITUNG...
-
Seite 3: Inhaltsverzeichnis
LIST OF CONTENTS 1. IMPORTANT REMARK 2. INTRODUCTION 3. INSTALLATION 4. QUICK START 5. OPERATION AND USAGE 6. FURTHER CONSIDERATIONS 7. FUNCTION LIST 8. FUNCTION DIAGRAM 9. TECHNICAL CHARACTERISTICS 10. CONFIGURATION DIAGRAM 11. BLOCK DIAGRAM All numbers subject to variation due to production tolerances. ECLER SA reserves the right to make changes or improvements in manufacturing or design which may affect specifications. -
Seite 4: Important Remark
1. IMPORTANT REMARK Safety Instructions In order to get the optimum operation and efficiency from your mixing unit, it is VERY IMPORTANT - before you plug anything - to read this manual very carefully and take seriously into account all considerations specified within it. -
Seite 5: Introduction
2. INTRODUCTION Congratulations for acquiring a genuine, professional ECLER device! The NUO4.0 is a professional DJ mixer designed and manufactured by ECLER; an enterprise with headquarters in Barcelona, which works on professional audio equipment since 1965. The NUO4.0 is a professional audio mixer thought for any kind of DJ, due to its wide range of functions, which make it a console able to mix any kind of music style: techno, house, minimal, electro, hip hop, …... - Seite 6 Audio input connections INPUT 1 PHONO Turntable INPUT 1 LINE CD Deck INPUT 2 PHONO Turntable INPUT 2 LINE CD Deck INPUT 3 PHONO Turntable INPUT 3 LINE CD Deck INPUT 3 MICRO Microphone INPUT 4 PHONO Turntable INPUT 4 LINE CD Deck INPUT 4...
- Seite 7 Audio outputs connections MASTER Main power amplifier BOOTH Booth/Room2 power amplifier Recording FX Send/Return External effect device (Input and Output) Headphones Headphones MASTER output This stereo output feeds the PA system through balanced XLR3 connectors (38, 39) and an unbalanced RCA connector (40).
-
Seite 8: Quick Start
4. QUICK START Install and connect the NUO4.0 as described in the INSTALLATION paragraph nº1. We will describe a “Quick Start” procedure using the LINE input of channel 1 and headphone monitoring output only. 1. Set the controllers to their initial position Set the rotating controllers GAIN, HI, MID and LOW from channel 1 (3, 4, 5, 6) to their central position. - Seite 9 8. Listen to the signal with your headphones Press the PFL button (7) on channel 1. Adjust the LEVEL controller (29) to obtain a comfortable monitoring volume. Now you should hear music with your headphones. Turn the SELECT controller (28) to the right to crossfade the PFL signal and the MIX signal.
-
Seite 10: Operation And Usage
5. OPERATION AND USAGE Start-up This can be done using the switch (45) located at the mixer’s back panel. Now the LED ON (23) indicator will highlight. Even if the noise produced while enabling the NUO4.0 is as low as possible and gets completely cancelled if all faders are turned down, it is always recommendable to turn on the devices using the following sequence: 1. - Seite 11 Sending to external effects units FX Send/Return The 4 channels from the NUO4.0 are equipped with potentiometers (8) that allow sending the signal to an external effects unit, sampler, etc. These potentiometers allow to precisely adjusting the signal level sent from each channel.
-
Seite 12: Further Considerations
If you wish to install the ETERNAL crossfader, please accomplish the following instructions: 1. Remove the crossfader’s button from the mixer’s surface. 2. Unscrew the mixer’s panel and remove it. ETERNAL 3. Remove the two screws that hold the crossfader. 4. -
Seite 13: Function List
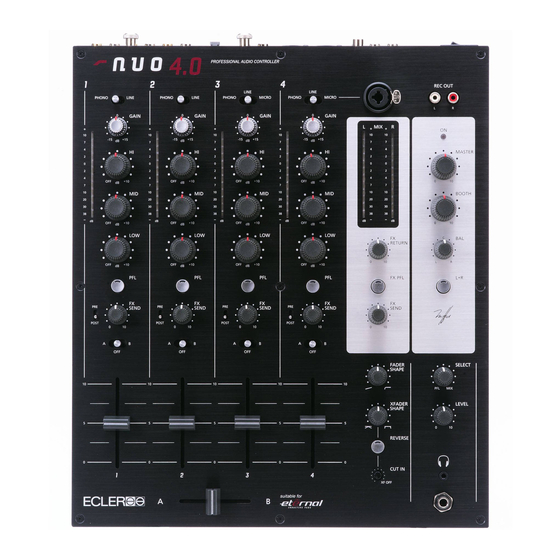
7. FUNCTION LIST . FUNCTION DIAGRAM 1. Input selector 2. LED VU Meter 3. Input sensitivity adjust, GAIN 4. Treble control, HI 5. Midrange control, MID 6. Bass control, LOW 7. Prefader listening control, PFL 8. Fx Send controller, FX SEND 9. - Seite 15 ÍNDICE 1. NOTA IMPORTANTE 2. INTRODUCCIÓN 3. INSTALACIÓN 4. INICIO RÁPIDO 5. OPERACIÓN Y USO 6. OTRAS CONSIDERACIONES 7. LISTA DE FUNCIONES 8. DIAGRAMA DE FUNCIONES 9. CARACTERÍSTICAS TÉCNICAS 10. DIAGRAMA DE CONFIGURACIÓN 11. DIAGRAMA DE BLOQUES Todos los datos están sujetos a variación debida a tolerancias de producción. ECLER S.A. se reserva el derecho de realizar cambios o mejoras en la fabricación o diseño que pudieran afectar las especificaciones.
-
Seite 16: Nota Importante
1. NOTA IMPORTANTE Instrucciones de seguridad Para conseguir la máxima funcionalidad del aparato y su máximo rendimiento, es muy importante antes de su conexión, leer detenidamente y tener muy presentes las consideraciones que en este manual se especifican. Para garantizar el óptimo funcionamiento de este aparato, recomendamos que su mantenimiento y eventuales reparaciones sean llevadas a cabo por nuestros Servicios Técnicos autorizados. -
Seite 17: Introducción
2. INTRODUCCIÓN ¡Felicidades por adquirir un auténtico equipo profesional ECLER! El NUO4.0 es un mezclador profesional para DJ diseñado y fabricado por ECLER, una empresa con sede en Barcelona dedicada al audio profesional desde 1965. El NUO4.0 es un mezclador de audio profesional orientado a cualquier tipo de DJ, gracias a su amplia variedad de funciones que le convierten en una consola apta para mezclar cualquier estilo musical: techno, house, minimal, electro, hip hop... - Seite 18 Conexiones de entrada de audio INPUT 1 PHONO Plato giradiscos INPUT 1 LINE Reproductor de CD INPUT 2 PHONO Plato giradiscos INPUT 2 LINE Reproductor de CD INPUT 3 PHONO Plato giradiscos INPUT 3 LINE Reproductor de CD INPUT 3 MICRO Micrófono INPUT 4...
- Seite 19 Conexiones de salida de audio MASTER Amplificador de potencia principal BOOTH Amplificador de cabina Dispositivo de grabación FX Send/Return Bus de envío auxiliar a efectos Headphones Auriculares Salida MASTER Esta salida estéreo alimenta al sistema de PA a través de una conexión XLR3 balanceada (38, 39) y una RCA (40) no balanceada.
-
Seite 20: Inicio Rápido
4. INICIO RÁPIDO Instale y conecte el NUO4.0 tal y como se describe en el primer párrafo del apartado Instalación. A continuación describimos un procedimiento de inicio rápido usando la entrada LINE de la vía 1 y monitorizando la señal a través de la salida de auriculares. - Seite 21 8. Escuche la señal en sus auriculares. Presione el botón PFL (7) de la vía 1. Ajuste el control LEVEL (29) para obtener un nivel de escucha confortable. Ahora debería escuchar la música en sus auriculares. Mueva el control SELECT (28) hacia la derecha para fundir la señal PFL con la de MIX.
-
Seite 22: Operación Y Uso
5. OPERACIÓN Y USO Puesta en funcionamiento Esta se realizará mediante el interruptor (45) situado en el panel posterior. Al cabo de unos instantes se iluminará el LED ON (23). Aunque el ruido producido por la puesta en funcionamiento del NUO4.0 es mínimo y queda prácticamente anulado al hacerlo con los faders cerrados, siempre resulta muy recomendable poner en marcha todos los aparatos siguiendo la secuencia siguiente: 1. - Seite 23 Envío a unidades de efectos externas FX Send/Return Las 4 vías del NUO4.0 están equipadas con potenciómetros rotativos (8) que permiten enviar la señal a una unidad de efectos externa, sampler, etc. Estos potenciómetros permiten dosificar el nivel de la señal que se envía desde cada una de las vías.
-
Seite 24: Otras Consideraciones
En caso de querer colocar el crossfader ETERNAL, siga los siguientes pasos: 1. Retire el botón del crossfader de la superficie del mezclador. 2. Desatornille los tornillos exteriores que sujetan la tapa del mezclador y extraigala. 3. Retire los dos tornillos por el lado de la carátula que sujetan el crossfader. 4. -
Seite 25: Lista De Funciones
7. LISTA DE FUNCIONES . DIAGRAMA DE FUNCIONES 1. Selector de entrada 2. Vu-metro de vía 3. Ajuste de sensibilidad de entrada, GAIN 4. Control de frecuencias agudas, HI 5. Control de frecuencias medias, MID 6. Control de frecuencias graves, LOW 7. - Seite 27 TABLE DES MATIERES 1. NOTE IMPORTANTE 2. INTRODUCTION 3. INSTALLATION 4. DEMARRAGE RAPIDE 5. MANUEL DE FONCTIONNEMENT ET D'UTILISATION 6. INFORMATIONS COMPLEMENTAIRES 7. LISTE DE FONCTIONS 8. DIAGRAMME DE FONCTIONS 9. CARACTÉRISTIQUES TECHNIQUES 10. DIAGRAMME DE CONFIGURATION 11. SCHÉMA SYNOPTIQUE Toutes les valeurs mentionnées dans ce document sont susceptibles d’être modifiées en raison des tolérances de production.
-
Seite 28: Note Importante
1. NOTE IMPORTANTE Mesures de sécurité Pour un fonctionnement et une efficacité optimisés de votre console de mixage, il est TRÈS IMPORTANT – avant tout raccordement – de lire attentivement ce manuel et de suivre les instructions et recommandations qu'il contient. Nous vous conseillons fortement de confier la maintenance de cet équipement à... -
Seite 29: Introduction
2. INTRODUCTION Félicitations pour votre choix d'un authentique équipement professionnel ECLER ! La NUO4.0 est une console de mixage professionnelle pour DJ conçue et fabriquée par ECLER, une entreprise basée à Barcelone qui se consacre à l'audio professionnel depuis 1965. La NUO4.0 est une console de mixage audio professionnelle adaptée à... - Seite 30 Raccordement des entrées audio INPUT 1 PHONO Platine INPUT 1 LINE Lecteur CD INPUT 2 PHONO Platine INPUT 2 LINE Lecteur CD INPUT 3 PHONO Platine INPUT 3 LINE Lecteur CD INPUT 3 MICRO Microphone INPUT 4 PHONO Platine INPUT 4 LINE Lecteur CD INPUT 4...
- Seite 31 Raccordement des sorties audio MASTER Amplificateur de puissance principal BOOTH Amplificateur de puissance sortie cabine (Booth/Room2) Dispositif d'enregistrement FX Send/Return Processeur d'effet externe (Entrée et Sortie) Headphones Écouteurs Sortie MASTER Cette sortie stéréo alimente la sonorisation via une connexion XLR3 symétrique (38, 39) ou cinch/RCA (40) asymétrique.
-
Seite 32: Demarrage Rapide
4. DEMARRAGE RAPIDE Installer et connecter la NUO4.0 en respectant les instructions du paragraphe n°1 INSTALLATION. Cette section propose une procédure de “Démarrage Rapide” faisant appel à l'entrée LINE de la voie 1 et à la sortie écouteurs uniquement. 1. Réglez les commandes en position initiale Réglez les commandes rotatives GAIN, HI, MID et LOW de la voie 1 (3, 4, 5, 6) en position centrale crantée. - Seite 33 8. Écoutez le signal aux écouteurs Pressez le bouton PFL (7) de la voie 1. Réglez la commande LEVEL (29) pour obtenir un niveau d'écoute confortable. Vous devriez maintenant entendre la musique dans vos écouteurs. Déplacez le sélecteur SELECT (28) vers la droite pour mélanger le signal de PFL avec celui de MIX. Avec cette commande à fond à droite, vous n'écoutez que le signal MIX.
-
Seite 34: Manuel De Fonctionnement Et D'utilisation
5. MANUEL DE FONCTIONNEMENT ET D'UTILISATION Démarrage Celle-ci se fera au moyen de l'interrupteur (45) du panneau arrière. Au bout de quelques instants, la diode ON (23) s'allumera. Bien que le bruit produit par la mise en service de la NUO4.0 soit minimal et pratiquement neutralisé si les faders sont abaissés, il est toujours conseillé... - Seite 35 Envoi à des unités d'effets externes par FX Send/Return Les 4 voies de la NUO4.0 sont équipées de potentiomètres rotatifs (8) qui permettent d'envoyer le signal à une unité d'effets externe, un échantillonneur, etc. Ces potentiomètres permettent de doser le niveau du signal qui est envoyé...
-
Seite 36: Informations Complementaires
Pour installer le crossfader ETERNAL, suivez les étapes ci-dessous : 1. Retirez le bouton du crossfader à la surface de la console de mixage. 2. Dévissez les vis extérieures qui maintiennent le capot de la console de mixage et retirez ce dernier. 3. -
Seite 37: Liste De Fonctions
7. LISTE DE FONCTIONS . DIAGRAMME DE FONCTIONS 1. Sélecteur d’entrée 2. VU-mètre à Leds 3. Réglage de sensibilité d’entrée, GAIN 4. Contrôle des aigus, HI 5. Contrôle des médiums, MID 6. Contrôle des graves, LOW 7. Commutateur de pré-écoute, PFL 8. - Seite 39 INHALTSVERZEICHNIS 1. WICHTIGE VORBEMERKUNG 2. EINFÜHRUNG 3. INSTALLATION 4. SCHNELLSTART 5. BETRIEB UND BEDIENUNG 6. WEITERE HINWEISE 7. FUNKTIONSLISTE 8. FUNKTIONSDIAGRAMM 9. TECHNISCHE DATEN 10. KONFIGURATION 11. BLOCKSCHALTBILD Alle Angaben sind ohne Gewähr. Messwerte können produktionsbedingten Schwankungen unterliegen. ECLER S.A. nimmt sich das Recht heraus Veränderungen am Gerät vorzunehmen, die zur Verbesserung des Produktes beitragen.
-
Seite 40: Wichtige Vorbemerkung
1. WICHTIGE VORBEMERKUNG Sicherheitshinweise Um die optimale Leistung und Effizienz Ihres Mixers sicherzustellen, ist es SEHR WICHTIG, – bevor Sie irgendeinen Anschluss vornehmen – diese Bedienungsanleitung sorgfältig durchzulesen und alle Hinweise gewissenhaft zu befolgen. Wir empfehlen nachdrücklich, eine Reparatur oder Wartung nur von unseren autorisierten technischen Servicestellen durchführen zu lassen. -
Seite 41: Einführung
2. EINFÜHRUNG Herzlichen Glückwunsch zum Erwerb eines echten, professionellen ECLER-Geräts! Der NUO4.0 ist ein professioneller DJ Mixer, entwickelt und hergestellt von ECLER, einer in Barcelona ansässigen Firma, die seit 1965 im professionellen Audiobereich tätig ist. Der NUO4.0 ist ein profesioneller Audiomixer, der für jeden DJ geeignet ist. Dank seiner vielfältigen Funktionen ist dieser Mixer in der Lage, jeden Musikstil abzumischen: Techno, House, Minimal, Electro, Hip Hop, ... - Seite 42 Anschluss der Audio-Eingänge INPUT 1 PHONO Vinyl-Plattenspieler INPUT 1 LINE CD Deck INPUT 2 PHONO Vinyl-Plattenspieler INPUT 2 LINE CD Deck INPUT 3 PHONO Vinyl-Plattenspieler INPUT 3 LINE CD Deck INPUT 3 MICRO Mikrofon INPUT 4 PHONO Vinyl-Plattenspieler INPUT 4 LINE CD Deck INPUT 4...
- Seite 43 Anschluss der Audio-Ausgänge MASTER Haupt-Endverstärker BOOTH Zweiter Endverstärker Aufnahmegerät FX Send/Return Externes Effektgerät (Eingang und Ausgang) Headphones Kopfhörer MASTER Der Stereoausgang speist das PA-System mittels symmetrischer XLR3-Anschlüsse (38, 39) und einem asymmetrischen RCA-Anschluss (40). Der Nominalpegel des MASTER-Ausgangs ist auf 0dBV (1V) eingestellt, kann aber mit Hilfe eines internen Jumpers auf +6dBV festgelegt werden.
-
Seite 44: Schnellstart
4. SCHNELLSTART Installieren und schließen Sie den NUO4.0 an, wie im Abschnitt 1 INSTALLATION beschrieben wurde. Im Folgenden wird eine kurze “Schnellstart” Prozedur beschrieben, die sich ausschließlich auf den LINE Eingang von Kanal 1 und den Kopfhörer-Monitorausgang bezieht. 1. Bringen Sie die Regler in ihre Ausgangspositionen Bringen Sie die Drehregler GAIN, HI, MID und LOW des Kanals 1 (3, 4, 5, 6) in die zentrale Einrastposition. - Seite 45 8. Überprüfen Sie das Signal mit Ihrem Kopfhörer Drücken Sie den PFL-Schalter (7) des Kanals 1. Stellen Sie mit dem LEVEL-Regler (29) eine angenehme Abhörlautstärke ein. Sie sollten die Musik jetzt über den Kopfhörer hören. Drehen Sie den SELECT-Regler (28) nach rechts, um das PFL-Signal mit dem MIX-Signal zu vermischen.
-
Seite 46: Betrieb Und Bedienung
5. BETRIEB UND BEDIENUNG Inbetriebnahme Dies geschieht mit dem Schalter (45), der sich an der Rückseite des Geräts befindet. Kurz nach der Betätigung dieses Schalters wird die Anzeige LED ON (23) aufleuchten. Auch wenn das durch die Inbetriebnahme des NUO4.0 produzierte Rauschen minimal und so gut wie inexistent ist, wenn alle Fader auf Minimum stehen, ist es trotzdem empfehlenswert, das Einschalten der Geräte in folgender Reihenfolge durchzuführen: 1. - Seite 47 Senden von Signalen an externe Effektegeräte FX Send/Return Die 4 Kanäle des NUO4.0 sind mit Drehreglern (8) ausgerüstet, die es ermöglichen, das Signal eines Kanals an ein externes Effektegerät, Sampler, usw. zu senden. Mit den Reglern kann man den Signalpegel des gesendeten Signals für jeden Kanal genau dosieren.
-
Seite 48: Weitere Hinweise
Zur Installation eines ETERNAL-Crossfaders führen Sie bitte die folgenden Anweisungen aus: 1. Entfernen Sie das Bedienelement des Crossfaders von der Oberfläche des Mixers. 2. Lösen Sie die Schrauben, mit denen die Abdeckung des Mixers befestigt ist, und entfernen Sie diese. 3. - Seite 49 7. FUNKTIONSLISTE . FUNKTIONSDIAGRAMM 1. Eingangswahlschalter 2. LED VU Meter 3. Eingangspegelregler, GAIN 4. Höhenregler, HI 5. Mittenregler, MID 6. Tiefenregler, LOW 7. Prefader Vorhörschalter, PFL 8. Sende-Controller an Effekte, FX SEND Send Taste Effekt Bus, PRE/POST 10. Send to XF taste, A/OFF/B 11.
-
Seite 50: Technical Characteristics
9. TECHNICAL CHARACTERISTICS 9. CARACTERÍSTICAS TÉCNICAS 9. CARACTÉRISTIQUES TECHNIQUES 9. TECHNISCHE DATEN Inputs Sensitivity nom/Impedance LINE 0dBV/50kΩ PHONO -40dBV/50kΩ MICRO -50dBV/>1kΩ FX RETURN 0dBV/>6kΩ Outputs Level/Minimum Load MASTER (BAL) 0dBV/600Ω 1V*(+6dB 2V) MASTER (UNBAL) 0dBV/2.2kΩ 1V*(+6dB 2V) BOOTH (BAL) 0dBV/600Ω 1V*(+6dB 2V) BOOTH (UNBAL) 0dBV/2.2kΩ... -
Seite 51: Configuration Diagram
10. CONFIGURATION DIAGRAM 10. DIAGRAMA DE CONFIGURACIÓN 10. DIAGRAMME DE CONFIGURATION 10. KONFIGURATION... -
Seite 52: Block Diagram
11. BLOCK DIAGRAM 11. DIAGRAMA DE BLOQUES 11. SCHÉMA SYNOPTIQUE 11. BLOCKSCHALTBILD ECLER Laboratorio de electro-acústica S.A. Motors 166-168, 08038 Barcelona, Spain INTERNET http://www.ecler.com e-mail: info@ecler.es 50.0141.01.00...